2017 BMW X3 tow
[x] Cancel search: towPage 165 of 265
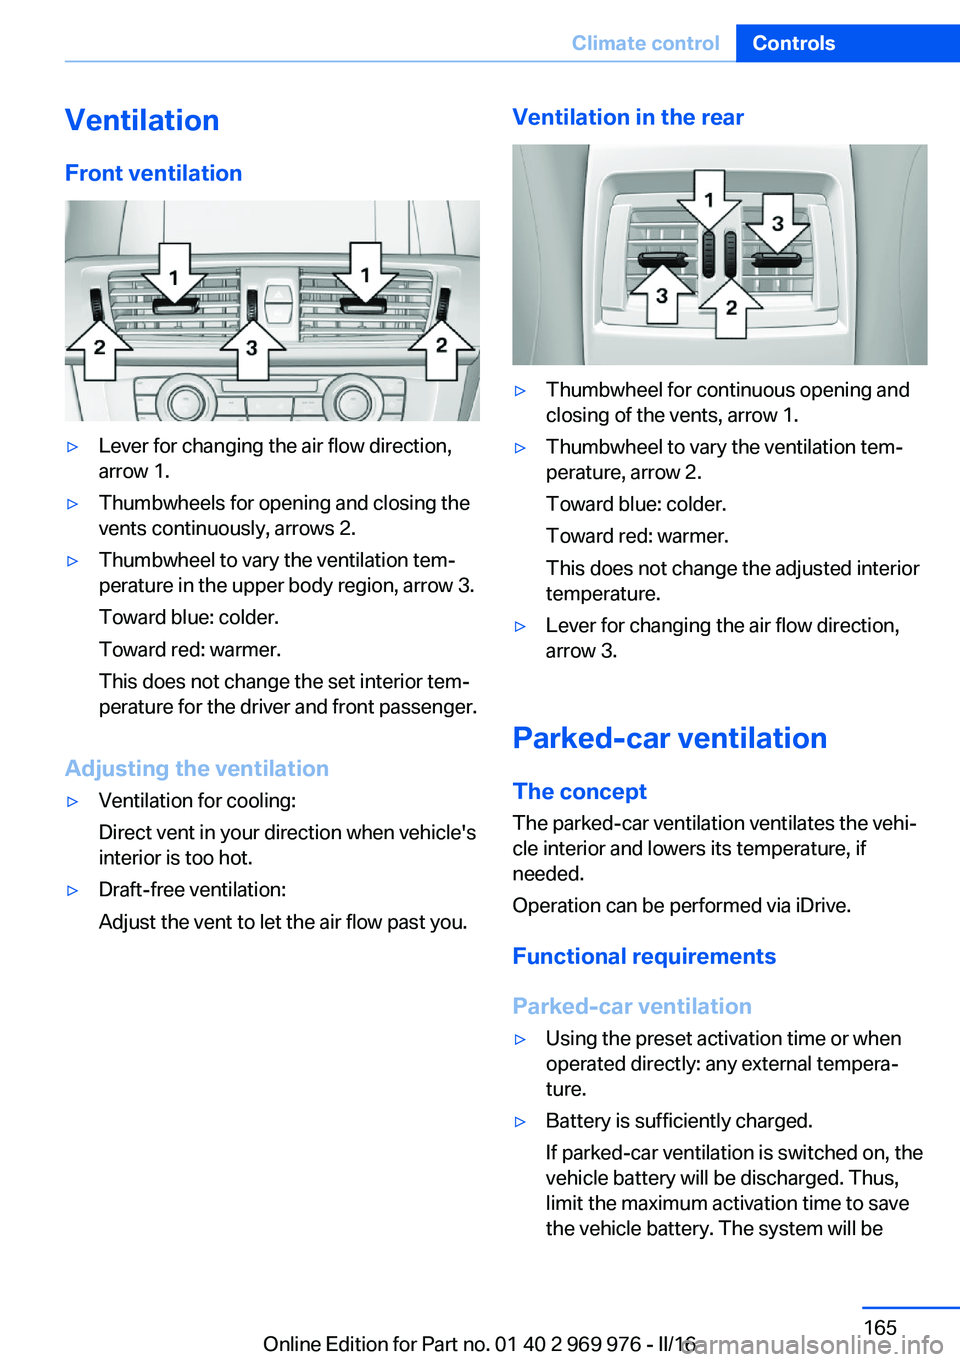
VentilationFront ventilation▷Lever for changing the air flow direction,
arrow 1.▷Thumbwheels for opening and closing the
vents continuously, arrows 2.▷Thumbwheel to vary the ventilation tem‐
perature in the upper body region, arrow 3.
Toward blue: colder.
Toward red: warmer.
This does not change the set interior tem‐
perature for the driver and front passenger.
Adjusting the ventilation
▷Ventilation for cooling:
Direct vent in your direction when vehicle's
interior is too hot.▷Draft-free ventilation:
Adjust the vent to let the air flow past you.Ventilation in the rear▷Thumbwheel for continuous opening and
closing of the vents, arrow 1.▷Thumbwheel to vary the ventilation tem‐
perature, arrow 2.
Toward blue: colder.
Toward red: warmer.
This does not change the adjusted interior
temperature.▷Lever for changing the air flow direction,
arrow 3.
Parked-car ventilation
The concept The parked-car ventilation ventilates the vehi‐
cle interior and lowers its temperature, if
needed.
Operation can be performed via iDrive.
Functional requirements
Parked-car ventilation
▷Using the preset activation time or when
operated directly: any external tempera‐
ture.▷Battery is sufficiently charged.
If parked-car ventilation is switched on, the
vehicle battery will be discharged. Thus,
limit the maximum activation time to save
the vehicle battery. The system will beSeite 165Climate controlControls165
Online Edition for Part no. 01 40 2 969 976 - II/16
Page 174 of 265

If equipped with through-loading system: the
rear seat backrest is divided in the ratio 40–20–
40. The sides and the middle section can be
folded down separately.
Information WARNING
Danger of jamming with folding down the
backrests. There is a risk of injuries or a risk of
property damage. Make sure that the area of
movement of the rear backrest and the of the
head restraint is clear prior to folding down.◀
WARNING
The stability of the child restraint system
is limited or compromised with incorrect seat
adjustment or improper installation of the child
seat. There is a risk of injury or danger to life.
Make sure that the child restraint system fits
securely against the backrest. If possible, ad‐
just the backrest tilt for all affected backrests
and correctly adjust the seats. Make sure that
seats and backrests are securely engaged. If
possible, adjust the height of the head re‐
straints or remove them.◀
WARNING
With an unlocked backrest, an unsecured
load can be thrown into the vehicle's interior,
e.g., in case of an accident, braking or evasive
maneuver. There is a a risk of injury. Make sure
that the backrest engages into the locking af‐
ter folding it back.◀
WARNING
With a rear backrest that is not locked,
the protective function of the middle safety
belt is not guaranteed. There is a risk of inju‐
ries or danger to life. If you are using the mid‐
dle safety belt, lock the wider rear backrest.◀
Folding down the sidesThe right side can be folded down separately.
The left side can be folded down in combina‐
tion with the middle section.
Reach into the recess and pull forward.
Folding down the middle section
Reach into the recess and pull forward.
Cargo area partition net
Information WARNING
If the cargo net snaps back, it can cause
injuries or damage. There is a risk of injuries or
a risk of property damage. Do not let the cargo
area partition net snap back into place.◀
With a normal cargo area
1.Fold open the rear covers on the roofliner.2.Pull the cargo area partition net out of the
case by the strap.3.Insert the bars into the brackets on both
sides in the roofliner toward the front, ar‐Seite 174ControlsInterior equipment174
Online Edition for Part no. 01 40 2 969 976 - II/16
Page 177 of 265

LockingThe glove compartment can be locked with an
integrated key. This prevents access to the
glove compartment.
After the glove compartment is locked, the re‐
mote control can be handed over, such as at a
hotel, without the integrated key.
Compartments in the doors WARNING
Breakable objects, e.g., glass bottles, can
break in the event of an accident. Broken glass
can be scattered in the vehicle's interior. There
is a a risk of injury. Do not stow any breakable
objects in the vehicle's interior.◀
Center armrest
Opening
Press button, arrow 1, and fold the center arm
rest up, arrow 2.
Connection for an external audio
device
An external audio device, for example, an MP3
player, can be connected via the AUX-IN port
in the center armrest.
Cup holders Information WARNING
Unsuitable containers in the cup holder
and hot beverages can damage the cup holder
and increase the a risk of injury in the event of
an accident. There is a risk of injury or risk of
property damage. Use light-weight, unbreaka‐
ble, and sealable containers. Do not transport
hot beverages. Do not force objects into the
cup holder.◀
Front
In the center console.
Slide the cover forward.
Seite 177Storage compartmentsControls177
Online Edition for Part no. 01 40 2 969 976 - II/16
Page 184 of 265
Mobile communication devices in the
vehicle
WARNING
Vehicle electronics and mobile phones
can influence one another. There is radiation
due to the transmission operations of mobile
phones. There is a risk of injury or risk of prop‐
erty damage. If possible, in the vehicle's inte‐
rior use only mobile phones with direct con‐
nections to an exterior antenna in order to
exclude mutual disturbance and deflect the ra‐
diation from the vehicle's interior.◀
Hydroplaning
On wet or slushy roads, a wedge of water can
form between the tires and road surface.
This phenomenon is referred to as hydroplan‐
ing. It is characterized by a partial or complete
loss of contact between the tires and the road
surface, ultimately undermining your ability to
steer and brake the vehicle.
Driving through water ATTENTION
When driving too quickly through too
deep water, water can enter into the engine
compartment, the electrical system or the
transmission. There is a risk of damage to
property. When driving through water, do not
exceed the maximum indicated water level and
the maximum speed for driving through wa‐
ter.◀
When driving through water, observe the fol‐
lowing:▷Drive through calm water only.▷Drive through water only if it is not deeper
than maximum 19.6 inches/50 cm.▷Drive through water no faster than walking
speed, up to 3 mph/5 km/h.Braking safely
Your vehicle is equipped with ABS as a stand‐ ard feature.
Perform an emergency stop in situations that
require such.
Steering is still responsive. You can still avoid
any obstacles with a minimum of steering ef‐
fort.
Pulsation of the brake pedal and sounds from
the hydraulic circuits indicate that ABS is in its
active mode.
In certain braking situations, the perforated
brake discs can emit functional noises. How‐
ever, this has no effect on the performance and
operational reliability of the brake.
Objects in the movement area around
pedals and floor area
WARNING
Objects in the driver's floor area can limit
the pedal distance or block a depressed pedal.
There is risk of an accident. Stow objects in
the vehicle such that they are secured and
cannot enter into the driver's floor area. Use
floor mats that are suitable for the vehicle and
can be safely attached to the floor. Do not use
loose floor mats and do not layer several floor
mats. Make sure that there is sufficient clear‐
ance for the pedals. Ensure that the floor mats
are securely fastened again after they were re‐
moved, e.g., for cleaning.◀
Driving in wet conditions When roads are wet, salted, or in heavy rain,
press brake pedal ever so gently every few
miles.
Ensure that this action does not endanger
other traffic.
The heat generated in this process helps dry
the brake discs and pads.
In this way braking efficiency will be available
when you need it.Seite 184Driving tipsThings to remember when driving184
Online Edition for Part no. 01 40 2 969 976 - II/16
Page 187 of 265
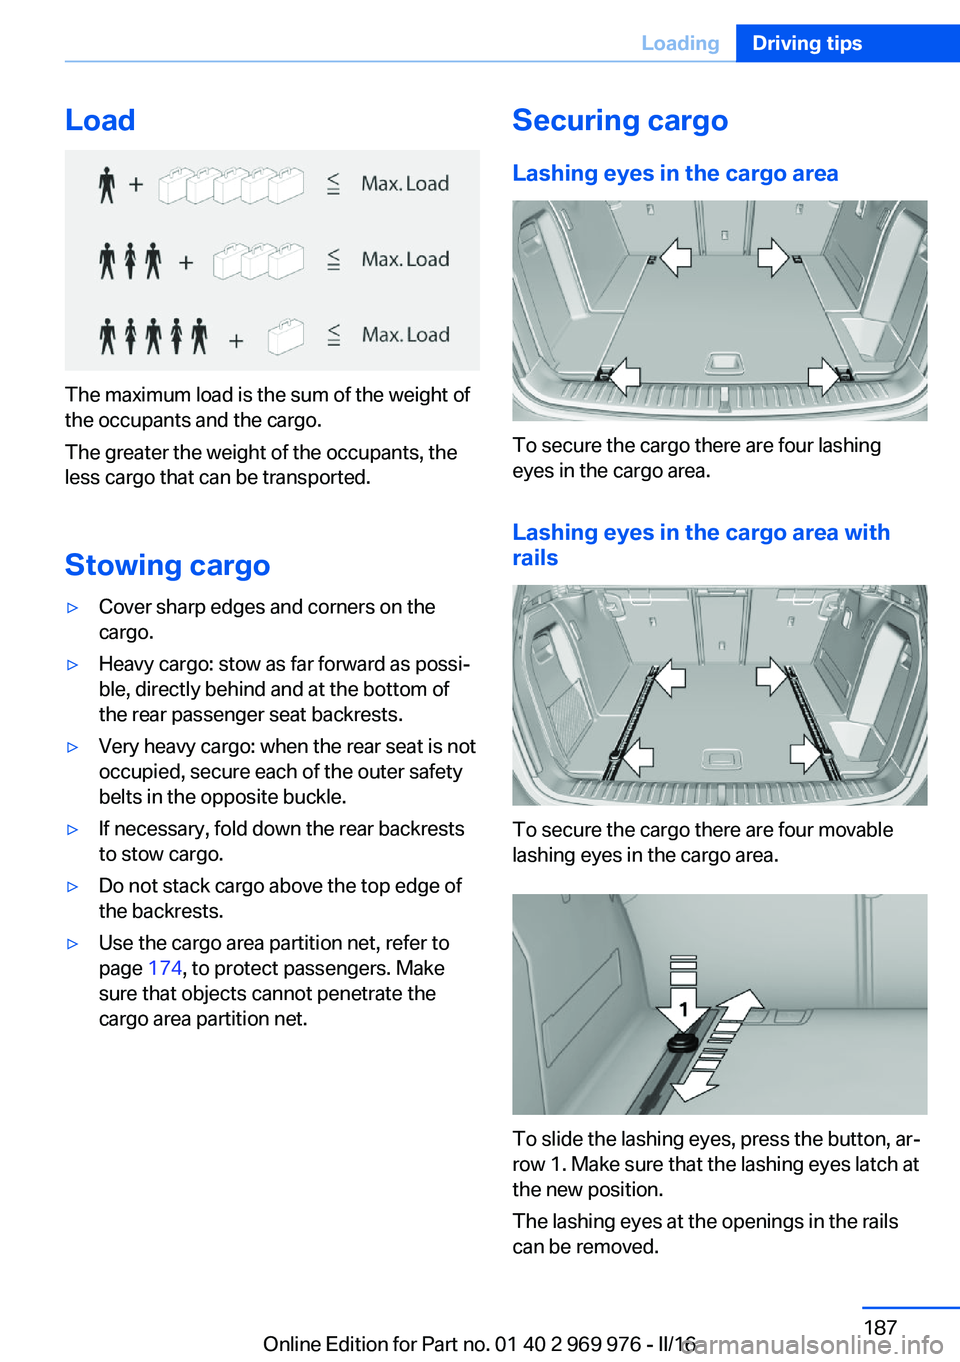
Load
The maximum load is the sum of the weight of
the occupants and the cargo.
The greater the weight of the occupants, the
less cargo that can be transported.
Stowing cargo
▷Cover sharp edges and corners on the
cargo.▷Heavy cargo: stow as far forward as possi‐
ble, directly behind and at the bottom of
the rear passenger seat backrests.▷Very heavy cargo: when the rear seat is not
occupied, secure each of the outer safety
belts in the opposite buckle.▷If necessary, fold down the rear backrests
to stow cargo.▷Do not stack cargo above the top edge of
the backrests.▷Use the cargo area partition net, refer to
page 174, to protect passengers. Make
sure that objects cannot penetrate the
cargo area partition net.Securing cargo
Lashing eyes in the cargo area
To secure the cargo there are four lashing
eyes in the cargo area.
Lashing eyes in the cargo area with
rails
To secure the cargo there are four movable
lashing eyes in the cargo area.
To slide the lashing eyes, press the button, ar‐
row 1. Make sure that the lashing eyes latch at
the new position.
The lashing eyes at the openings in the rails
can be removed.
Seite 187LoadingDriving tips187
Online Edition for Part no. 01 40 2 969 976 - II/16
Page 188 of 265
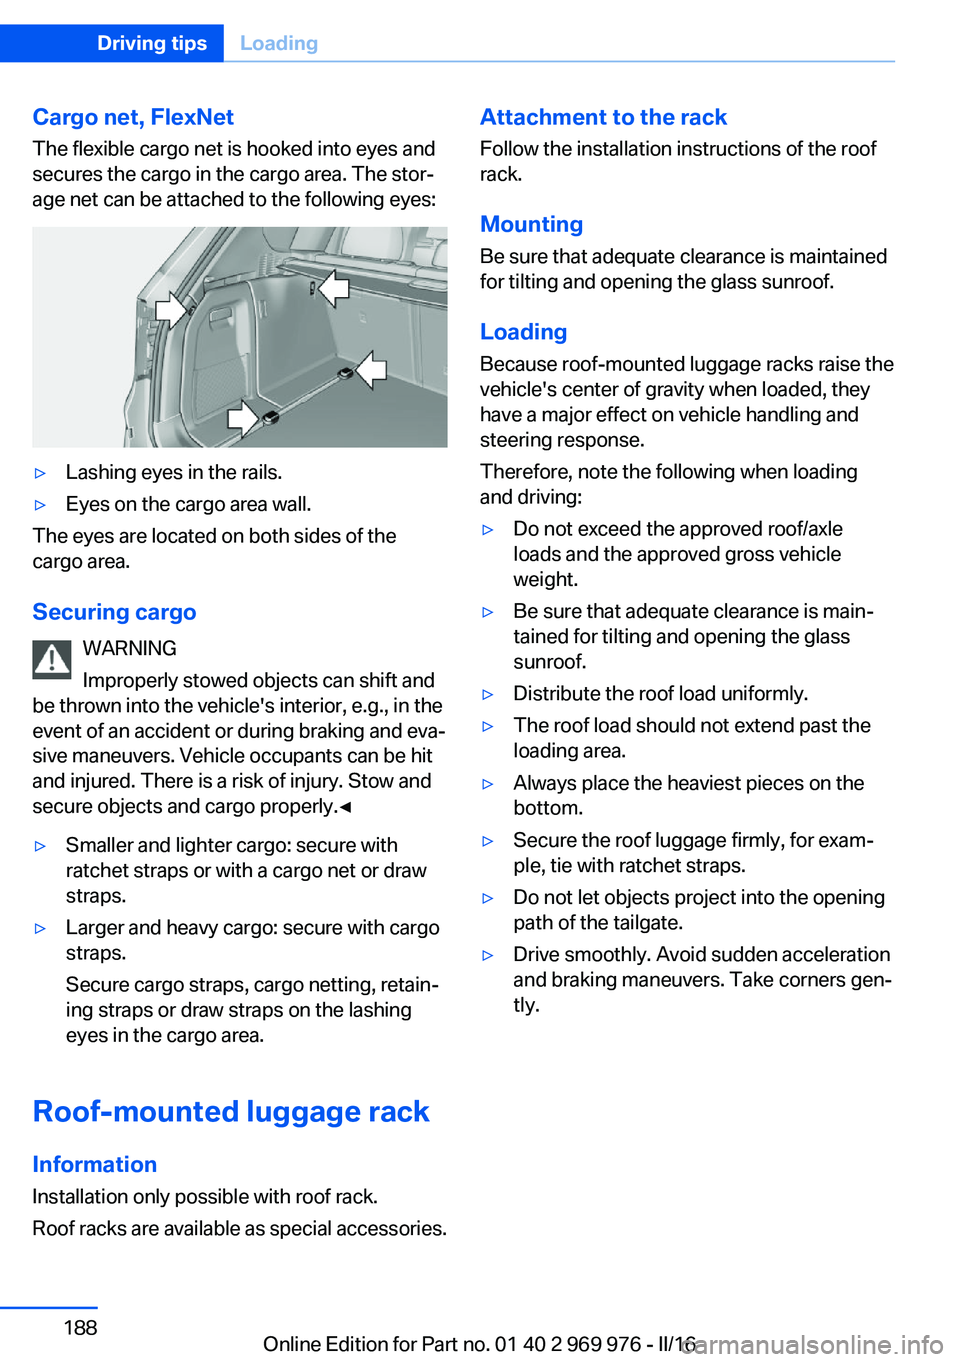
Cargo net, FlexNetThe flexible cargo net is hooked into eyes and
secures the cargo in the cargo area. The stor‐
age net can be attached to the following eyes:▷Lashing eyes in the rails.▷Eyes on the cargo area wall.
The eyes are located on both sides of the
cargo area.
Securing cargo WARNING
Improperly stowed objects can shift and
be thrown into the vehicle's interior, e.g., in the
event of an accident or during braking and eva‐
sive maneuvers. Vehicle occupants can be hit
and injured. There is a risk of injury. Stow and
secure objects and cargo properly.◀
▷Smaller and lighter cargo: secure with
ratchet straps or with a cargo net or draw
straps.▷Larger and heavy cargo: secure with cargo
straps.
Secure cargo straps, cargo netting, retain‐
ing straps or draw straps on the lashing
eyes in the cargo area.
Roof-mounted luggage rack
Information
Installation only possible with roof rack.
Roof racks are available as special accessories.
Attachment to the rack Follow the installation instructions of the roof
rack.
Mounting
Be sure that adequate clearance is maintained
for tilting and opening the glass sunroof.
LoadingBecause roof-mounted luggage racks raise thevehicle's center of gravity when loaded, they
have a major effect on vehicle handling and
steering response.
Therefore, note the following when loading
and driving:▷Do not exceed the approved roof/axle
loads and the approved gross vehicle
weight.▷Be sure that adequate clearance is main‐
tained for tilting and opening the glass
sunroof.▷Distribute the roof load uniformly.▷The roof load should not extend past the
loading area.▷Always place the heaviest pieces on the
bottom.▷Secure the roof luggage firmly, for exam‐
ple, tie with ratchet straps.▷Do not let objects project into the opening
path of the tailgate.▷Drive smoothly. Avoid sudden acceleration
and braking maneuvers. Take corners gen‐
tly.Seite 188Driving tipsLoading188
Online Edition for Part no. 01 40 2 969 976 - II/16
Page 210 of 265
Tire treadSummer tires
Do not drive with a tire tread depth of less than
0.12 inches/3 mm.
There is an increased danger of hydroplaning if
the tire tread depth is less than 0.12 in‐
ches/3 mm.
Winter tires
Do not drive with a tire tread depth of less than
0.16 inches/4 mm.
Below a tread depth of 0.16 inches/4 mm, tires
are less suitable for winter operation.
Minimum tread depth
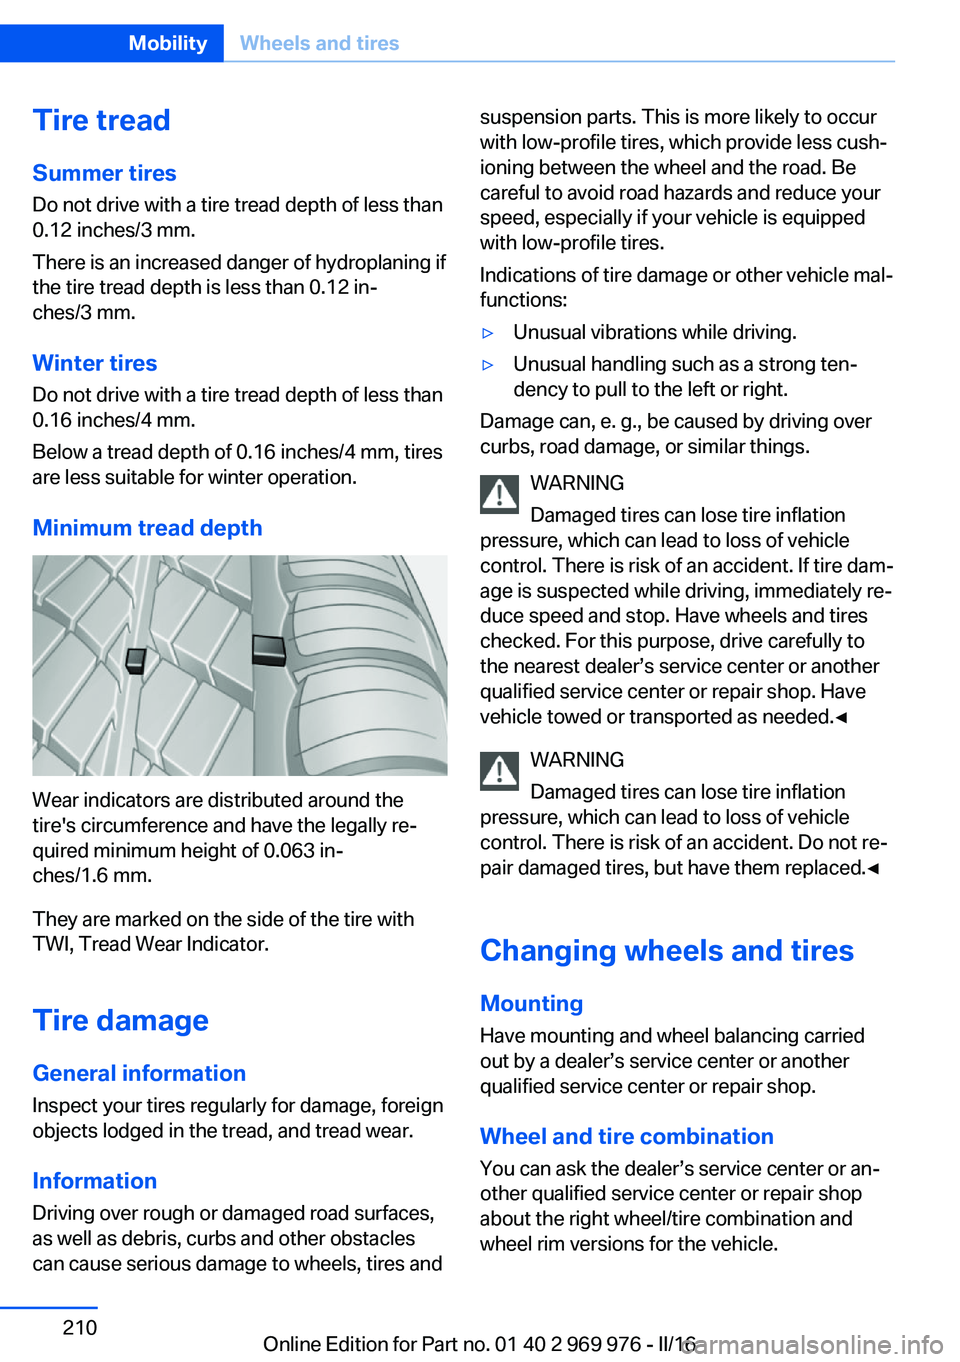
Wear indicators are distributed around the
tire's circumference and have the legally re‐
quired minimum height of 0.063 in‐
ches/1.6 mm.
They are marked on the side of the tire with
TWI, Tread Wear Indicator.
Tire damage
General information
Inspect your tires regularly for damage, foreign
objects lodged in the tread, and tread wear.
Information Driving over rough or damaged road surfaces,
as well as debris, curbs and other obstacles
can cause serious damage to wheels, tires and
suspension parts. This is more likely to occur
with low-profile tires, which provide less cush‐
ioning between the wheel and the road. Be
careful to avoid road hazards and reduce your
speed, especially if your vehicle is equipped
with low-profile tires.
Indications of tire damage or other vehicle mal‐
functions:▷Unusual vibrations while driving.▷Unusual handling such as a strong ten‐
dency to pull to the left or right.
Damage can, e. g., be caused by driving over
curbs, road damage, or similar things.
WARNING
Damaged tires can lose tire inflation
pressure, which can lead to loss of vehicle
control. There is risk of an accident. If tire dam‐
age is suspected while driving, immediately re‐
duce speed and stop. Have wheels and tires
checked. For this purpose, drive carefully to
the nearest dealer’s service center or another
qualified service center or repair shop. Have
vehicle towed or transported as needed.◀
WARNING
Damaged tires can lose tire inflation
pressure, which can lead to loss of vehicle
control. There is risk of an accident. Do not re‐
pair damaged tires, but have them replaced.◀
Changing wheels and tires
Mounting Have mounting and wheel balancing carriedout by a dealer’s service center or another
qualified service center or repair shop.
Wheel and tire combination
You can ask the dealer’s service center or an‐
other qualified service center or repair shop
about the right wheel/tire combination and
wheel rim versions for the vehicle.
Seite 210MobilityWheels and tires210
Online Edition for Part no. 01 40 2 969 976 - II/16
Page 215 of 265

If a tire inflation pressure of 2 bar cannot be
reached, contact your dealer’s service cen‐
ter or another qualified service center or
repair shop.
Stowing the Mobility System
1.Unscrew the filling hose of the sealant con‐
tainer from the wheel.2.Unscrew the connection hose of the com‐
pressor from the sealant container.3.Connect the filling hose of the sealant con‐
tainer previously connected to the tire
valve with the available connector on the
sealant container.
This prevents leftover sealant from escap‐
ing from the container.4.Wrap the empty sealant container in suita‐
ble material to avoid dirtying the cargo
area.5.Stow the Mobility System back in the vehi‐
cle.
Distributing the sealant
Immediately drive approx. 5 miles/10 km to en‐
sure that the sealant is evenly distributed in the
tire.
Do not exceed a speed of 50 mph/80 km/h.
If possible, do not drive at speeds less than
12 mph/20 km/h.
To correct the tire inflation pressure
1.Stop at a suitable location.2.Screw the connection hose of the com‐
pressor directly onto the tire valve stem.3.Insert the connector into the power socket
inside the vehicle.4.Correct the tire inflation pressure to
2.5 bar.▷Increase pressure: with the ignition
turned on or the engine running, switch
on the compressor.▷To reduce the pressure: press the but‐
ton on the compressor.
Continuing the trip
Do not exceed the maximum permissible
speed of 50 mph/80 km/h.
Reinitialize the Flat Tire Monitor.
Reinitialize the Tire Pressure Monitor.
Replace the nonworking tire and the sealant
container of the Mobility System as soon as
possible.
Snow chains
Fine-link snow chains
The manufacturer of your vehicle recommends
use of fine-link snow chains. Certain types of
fine-link snow chains have been tested by the
manufacturer of the vehicle and recommended
as road-safe and suitable.
Information regarding suitable snow chains is
available from a dealer’s service center or an‐
other qualified service center or repair shop.
Use WARNING
With the mounting of snow chains on un‐
suitable tires, the snow chains can come into
contact with vehicle parts. There is a risk of ac‐
cidents or a risk of property damage. Only
mount snow chains on tires that are desig‐
nated by their manufacturer as suitable for the
use of snow chains.◀
Use only in pairs on the rear wheels, equipped
with the tires of the following size:
▷205/65 R 17.▷225/60 R 17.▷245/50 R 18.▷245/45 R 19.
Do not mount snow chains on size 245/55 R
17 tires.
Seite 215Wheels and tiresMobility215
Online Edition for Part no. 01 40 2 969 976 - II/16