2017 BMW 6 SERIES GRAN COUPE steering wheel adjustment
[x] Cancel search: steering wheel adjustmentPage 45 of 261

WARNING
There is risk of jamming when moving
the seats. There is a risk of injury or risk of
property damage. Make sure that the area of
movement of the seat is clear prior to any ad‐
justment.◀
The adjustment procedure is interrupted:▷When a seat position switch is pressed.▷When a button of the seat, mirror, and
steering wheel memory is pressed briefly.
Activating the setting
1."Settings"2."Doors/key"3."Last seat position autom."
Alarm system
The conceptWhen the vehicle is locked, the vehicle alarm
system responds to:
▷Opening a door, the hood or the tailgate.▷Movements in the interior.▷Changes in the vehicle tilt, e.g., during at‐
tempts at stealing a wheel or when towing
the car.▷Disconnected battery voltage.
The alarm system briefly signals tampering:
▷Acoustic alarm.▷By switching on the hazard warning sys‐
tem.▷By flashing the daytime running lights.
Switching on and off
When you unlock or lock the vehicle, either
with the remote control, Comfort Access or at
the door lock, the alarm system is switched on
and off at the same time.
Door lock with the alarm system
switched on
Unlocking via the door lock will trigger the
alarm on some country-specific versions.
Switching off the alarm, refer to page 46.
Tailgate with the alarm system
switched on
The tailgate can be opened even when the
alarm system is switched on.
After the tailgate is closed, it is locked and
monitored again when the doors are locked.
The hazard warning system flashes once.
Panic mode You can trigger the alarm system if you find
yourself in a dangerous situation.
Press button on the remote control for
at least 3 seconds.
To switch off the alarm: press any button.
Indicator lamp on the interior mirror▷The indicator lamp flashes briefly every
2 seconds:
The alarm system is switched on.▷Indicator lamp flashes for approx. 10 sec‐
onds, then it flashes briefly every 2 sec‐
onds:
Interior motion sensor and tilt alarm sensor
are not active, as doors, hood, or tailgate
are not correctly closed. Correctly closed
access points are secured.Seite 45Opening and closingControls45
Online Edition for Part no. 01 40 2 969 305 - II/16
Page 51 of 261

AdjustingVehicle features and options
This chapter describes all standard, country-
specific and optional features offered with the
series. It also describes features that are not
necessarily available in your car, e. g., due to
the selected options or country versions. This
also applies to safety-related functions and
systems. The respectively applicable country
provisions must be observed when using the
respective features and systems.
Sitting safely The ideal seating position meeting the needs
of the occupants can make a vital contribution
to relaxed, fatigue-free driving.
The seating position plays an important role in
an accident in combination with:▷Safety belts, refer to page 55.▷Head restraints, refer to page 56.▷Airbags.
Seats
Information WARNING
Seat adjustments while driving can lead
to unexpected movements of the seat. Vehicle
control could be lost. There is risk of an acci‐
dent. Only adjust the seat on the driver's side
when the vehicle is stationary.◀
WARNING
With a backrest inclined too far to the
rear, the protective effect of the safety belt
cannot be ensured anymore. There is a danger
of sliding under the safety belt in an accident.
There is a risk of injury or danger to life. Adjust
the seat prior to starting the trip. Adjust the
backrest so that it is in the most upright posi‐
tion as possible and do not adjust again while
driving.◀
WARNING
There is risk of jamming when moving
the seats. There is a risk of injury or risk of
property damage. Make sure that the area of
movement of the seat is clear prior to any ad‐
justment.◀
Middle seat The 6 Series Gran Coupe is designed as a
4+1-seater vehicle.
The middle seat is of limited usefulness. It is
recommended that this seat only be used by
persons who can use the backrest as a substi‐ tute for the head restraint.
Adjusting the head restraints, refer to
page 56.
Overview1Active seat2Seat, mirror, and steering wheel memory3Backrest width4Lumbar support5Backrest, head restraint6Shoulder support7Forward/back, height, tilt8Thigh supportSeite 51AdjustingControls51
Online Edition for Part no. 01 40 2 969 305 - II/16
Page 57 of 261

Distance
Adjust the distance so that the head restraint is as close as possible to the back of the head.
Active head restraint
In the event of a rear-end collision with a cer‐
tain severity, the active head restraint automat‐
ically reduces the distance from the head.
Wear and tear after accidents or when dam‐
aged otherwise:
Have the active head restraint checked and if
needed replaced.
Adjusting the height
Adjusting electrically.
To ensure the active head restraint function,
the head restraint cannot be adjusted in height
in certain seat positions. Move the seat into a
lower position for head restraint adjustment.
Distance to the back of the head
▷Forward: by pulling.▷Back: press the button and push the head
restraint toward the rear.Adjusting the side extensions
Fold forward for increased lateral support in
the resting position.
Removing The head restraints cannot be removed.
Seat, mirror, and steering
wheel memory
The concept
Two driver's seat and exterior mirror positions
can be stored per profile and called up. Set‐
tings for the backrest width and lumbar sup‐
port are not stored in memory.
Information WARNING
Using the memory function while driving
can lead to unexpected movements of the
seat. Vehicle control could be lost. There is a
risk of an accident. Only retrieve the memory function when the vehicle is stationary.◀
WARNING
There is risk of jamming when moving
the seats. There is a risk of injury or risk of
property damage. Make sure that the area of
movement of the seat is clear prior to any ad‐ justment.◀
Seite 57AdjustingControls57
Online Edition for Part no. 01 40 2 969 305 - II/16
Page 60 of 261

Interior mirror, automatic dimming
feature
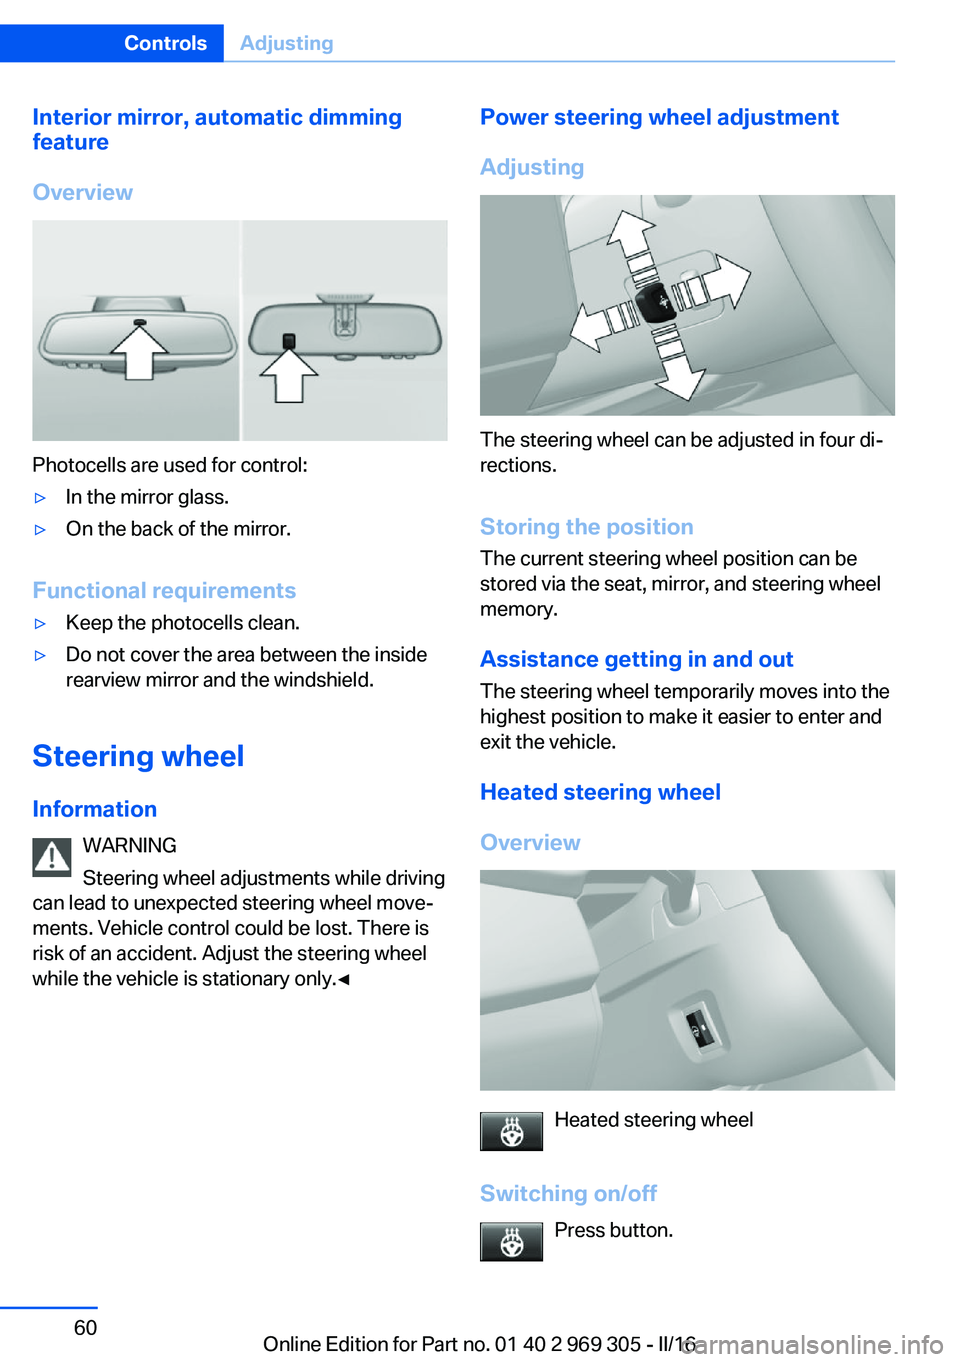
Overview
Photocells are used for control:
▷In the mirror glass.▷On the back of the mirror.
Functional requirements
▷Keep the photocells clean.▷Do not cover the area between the inside
rearview mirror and the windshield.
Steering wheel
Information WARNING
Steering wheel adjustments while driving
can lead to unexpected steering wheel move‐
ments. Vehicle control could be lost. There is
risk of an accident. Adjust the steering wheel
while the vehicle is stationary only.◀
Power steering wheel adjustment
Adjusting
The steering wheel can be adjusted in four di‐
rections.
Storing the position The current steering wheel position can be
stored via the seat, mirror, and steering wheel
memory.
Assistance getting in and out
The steering wheel temporarily moves into the
highest position to make it easier to enter and
exit the vehicle.
Heated steering wheel
Overview
Heated steering wheel
Switching on/off Press button.
Seite 60ControlsAdjusting60
Online Edition for Part no. 01 40 2 969 305 - II/16
Page 109 of 261

2."Vehicle status"3. "Tire Pressure Monitor (TPM)"
The status is displayed.
Status control display Tire and system status are indicated by the
color of the wheels and a text message on the
Control Display.
All wheels green System is active and will issue a warning rela‐
tive to the tire inflation pressures stored during
the last reset.
One wheel is yellow A flat tire or major drop in inflation pressure in
the indicated tire.
All wheels are yellow A flat tire or major drop in inflation pressure in
several tires.
Wheels, gray The system cannot detect a flat tire. Reasons
for this may be:
▷The system is being reset.▷Malfunction.
Additional information
The status control display additionally shows
the current tire inflation pressures and, de‐
pending on the model, tire temperatures. It
shows the actual values read; they may vary
depending on driving style or weather condi‐
tions.
Carry out reset
Reset the system after each adjustment of the
tire inflation pressure and after every tire or
wheel change.
On the Control Display and on the vehicle:1."Vehicle info"2."Vehicle status"3. "Perform reset"4.Start the engine - do not drive off.5.Reset tire inflation pressure: "Perform
reset".6.Drive away.
The wheels are displayed in gray and the sta‐
tus is displayed.
After driving faster than 19 mph/30 km/h for a
short period, the set tire inflation pressures are
accepted as reference values. The reset is
completed automatically while driving.
After a successfully completed Reset, the
wheels on the Control Display are shown in
green and "Tire Pressure Monitor (TPM)
active" is displayed.
You may interrupt this trip at any time. When
you continue the reset resumes automatically.
Low tire pressure message The yellow warning lamp lights up. A
Check Control message is displayed.
▷There is a flat tire or a major loss in
tire inflation pressure.▷No reset was performed for the system.
The system therefore issues a warning
based on the tire inflation pressures before
the last reset.1.Reduce your speed and stop cautiously.
Avoid sudden braking and steering maneu‐
vers.2.Check whether the vehicle is fitted with
normal tires or run-flat tires.
Run-flat tires, refer to page 212, are la‐
beled with a circular symbol containing the
letters RSC marked on the tire's sidewall.Seite 109SafetyControls109
Online Edition for Part no. 01 40 2 969 305 - II/16
Page 250 of 261

Everything from A to Z
IndexA ABS, Antilock Brake Sys‐ tem 133
ACC, Active Cruise Control with Stop&Go function 141
Acceleration Assistant, refer to Launch Control 80
Accessories and parts 8
Activated-charcoal filter 165
Active Blind Spot Detec‐ tion 128
Active Cruise Control with Stop&Go function,
ACC 141
Active Protection 130
Active seat, front 53
Active seat ventilation, front 54
Active Steering, integral 137
Adaptive brake assistant 133
Adaptive brake lights, see Brake force display 130
Adaptive drive 136
Adaptive Light Control 102
Additional information, iDrive 22
Additives, oil 222
Adjusting, steering wheel 60
Adjustments, seats/head re‐ straints 51
After washing vehicle 240
Airbags 105
Airbags, indicator/warning light 106
Air circulation, see Recircu‐ lated-air mode 164
Air, dehumidifying, see Cool‐ ing function 163
Air distribution, manual 164 Air flow, automatic climate
control 164
Air outlets, see Ventila‐ tion 166
Air pressure, tires 202
Alarm system 45
Alarm, unintentional 46
All around the center con‐ sole 16
All around the interior mir‐ ror 17
All around the steering wheel 14
All-season tires, see Winter tires 211
All-wheel-drive 135
Alternating-code hand-held transmitter 170
Alternative oil types 222
Animal detection, see Night Vision 123
Antifreeze, washer fluid 76
Antilock Brake System, ABS 133
Anti-slip control, see DSC 133
Anti-theft protection, vehi‐ cle 38
App, BMW Driver’s Guide 6
Approved axle load 247
Armrest, see Front center armrest 178
Armrest, see Rear center armrest 178
Arrival time 95
Ashtray 171
Assistance, Roadside Assis‐ tance 234
Assistance when driving off 133
Attentiveness assistant 130 AUTO H button 71
AUTO H button, see Auto‐ matic Hold 71
AUTO intensity 163
Automatic car wash 239
Automatic cruise control with Stop&Go function 141
Automatic Curb Monitor 59
Automatic deactivation, Front-seat passenger air‐
bags 107
Automatic headlamp con‐ trol 101
Automatic Hold 71
Automatic locking 44
Automatic recirculated-air control 164
Automatic Soft Closing, doors 41
Automatic transmission, see Steptronic transmission 77
AUTO program, automatic cli‐ mate control 163
AUTO program, intensity 163
Auto Start/Stop function 68
AUX-IN port, general informa‐ tion 173
Average fuel consumption 95
Average speed 95
Axle loads, weights 247
B Backrest curvature, see Lum‐ bar support 52
Backrest, seats 51
Backrest, width 53
Band-aids, see First-aid kit 234
Battery replacement, vehicle battery 231 Seite 250ReferenceEverything from A to Z250
Online Edition for Part no. 01 40 2 969 305 - II/16