2017 BMW 6 SERIES GRAN COUPE warning
[x] Cancel search: warningPage 211 of 261

Recommended tire brands
For each tire size, BMW recommends certain
tire brands. These can be identified by a star
on the tire sidewall.
New tires
Tire traction is not optimal due to manufactur‐
ing circumstances when tires are brand-new;
they achieve their full traction potential after a
break-in time.
Drive conservatively for the first
200 miles/300 km.
Retreaded tires
The manufacturer of your vehicle does not rec‐
ommend the use of retreaded tires.
WARNING
Retreaded tires can have different tire
casing structures. With advanced age the serv‐
ice life can be limited. There is risk of an acci‐
dent. The manufacturer of your vehicle does
not recommend the use of retreaded tires.◀
Winter tires
Winter tires are recommended for operating on
winter roads.
Although so-called all-season M+S tires pro‐
vide better winter traction than summer tires, they do not provide the same level of perform‐
ance as winter tires.
Maximum speed of winter tires
If the maximum speed of the vehicle is higher
than the permissible speed for the winter tires,
then a respective symbol is displayed in your
field of vision. The label is available from a
dealer’s service center or another qualified
service center or repair shop.
With mounted winter tires, observe and adhere
to the permissible maximum speed.
Run-flat tires If you are already using run-flat tires, for your
own safety you should replace them only with
the same kind. No spare tire is available in the
case of a flat tire. Further information is availa‐
ble from a dealer’s service center or another
qualified service center or repair shop.
Rotating wheels between axles Different wear patterns can occur on the frontand rear axles depending on individual driving
conditions. The tires can be rotated between
the axles to achieve even wear. Further infor‐
mation is available from a dealer’s service cen‐
ter or another qualified service center or repair
shop. After rotating, check the tire pressure
and correct if needed.
Rotating the tires between the axes is not per‐
missible on vehicles with different tire sizes or
rim sizes on the front and rear axles.
Storage Store wheels and tires in a cool, dry place with
as little exposure to light as possible.
Always protect tires against all contact with oil,
grease and fuels.
Do not exceed the maximum tire inflation pres‐
sure indicated on the side wall of the tire.Seite 211Wheels and tiresMobility211
Online Edition for Part no. 01 40 2 969 305 - II/16
Page 212 of 261

Run-flat tires
Label
RSC label on the tire sidewall.
The wheels consist of tires that are self-sup‐
porting, to a limited degree, and possibly spe‐
cial rims.
The support of the sidewall allows the tire to
remain drivable to a restricted degree in the
event of a tire inflation pressure loss.
Follow the instructions for continued driving
with a flat tire.
Changing run-flat tires
For your own safety, only use run-flat tires. No
spare tire is available in the case of a flat tire.
A dealer’s service center will be glad to answer
additional questions at any time.
Repairing a flat tire
Safety measures
▷Park the vehicle as far away as possible
from passing traffic and on solid ground.▷Switch on the hazard warning system.▷Secure the vehicle against rolling away by
setting the parking brake.▷Turn the steering wheel until the front
wheels are in the straight-ahead position
and engage the steering wheel lock.▷Have all vehicle occupants get out of the
vehicle and ensure that they remain out‐side the immediate area in a safe place,
such as behind a guardrail.▷If necessary, set up a warning triangle at an
appropriate distance.
Mobility System
The concept
With the Mobility System, minor tire damage
can be sealed temporarily to enable continued
travel. To accomplish this, sealant is pumped
into the tires, which seals the damage from the
inside.
The compressor can be used to check the tire
inflation pressure.
Information
▷Follow the instructions on using the Mobi‐
lity System found on the compressor and
sealant container.▷Use of the Mobility System may be ineffec‐
tive if the tire puncture measures approx.
1/8 in/4 mm or more.▷Contact a dealer’s service center or an‐
other qualified service center or repair
shop if the tire cannot be made drivable.▷If possible, do not remove foreign bodies
that have penetrated the tire.▷Pull the speed limit sticker off the sealant
container and apply it to the steering
wheel.▷The use of a sealant can damage the TPM
wheel electronics. In this case, have the
electronics checked at the next opportu‐
nity and have them replaced if needed.
DANGER
If the exhaust pipe is blocked or ventila‐
tion is insufficient, harmful exhaust gases can
enter into the vehicle. The exhaust gases con‐
tain carbon monoxide, an odorless and color‐
less but highly toxic gas. In enclosed areas, ex‐
haust gases can also accumulate outside of
Seite 212MobilityWheels and tires212
Online Edition for Part no. 01 40 2 969 305 - II/16
Page 215 of 261

valve with the available connector on the
sealant container.
This prevents leftover sealant from escap‐
ing from the container.4.Wrap the empty sealant container in suita‐
ble material to avoid dirtying the cargo
area.5.Stow the Mobility System back in the vehi‐
cle.
Distributing the sealant
Immediately drive approx. 5 miles/10 km to en‐
sure that the sealant is evenly distributed in the
tire.
Do not exceed a speed of 50 mph/80 km/h.
If possible, do not drive at speeds less than
12 mph/20 km/h.
To correct the tire inflation pressure
1.Stop at a suitable location.2.Screw the connection hose of the com‐
pressor directly onto the tire valve stem.3.Insert the connector into the power socket
inside the vehicle.4.Correct the tire inflation pressure to
2.5 bar.▷Increase pressure: with the ignition
turned on or the engine running, switch
on the compressor.▷To reduce the pressure: press the but‐
ton on the compressor.
Continuing the trip
Do not exceed the maximum permissible
speed of 50 mph/80 km/h.
Reinitialize the Flat Tire Monitor.
Reinitialize the Tire Pressure Monitor.
Replace the nonworking tire and the sealant
container of the Mobility System as soon as
possible.
Snow chains
Fine-link snow chains The manufacturer of your vehicle recommends
use of fine-link snow chains. Certain types of
fine-link snow chains have been tested by the
manufacturer of the vehicle and recommended
as road-safe and suitable.
Information regarding suitable snow chains is
available from a dealer’s service center or an‐
other qualified service center or repair shop.
Use WARNING
With the mounting of snow chains on un‐
suitable tires, the snow chains can come into
contact with vehicle parts. There is a risk of ac‐
cidents or a risk of property damage. Only
mount snow chains on tires that are desig‐
nated by their manufacturer as suitable for the
use of snow chains.◀
Use only in pairs on the rear wheels, equipped
with the tires of the following size:▷225/55 R 17.▷245/45 R 18.
Follow the snow chain manufacturer's instruc‐
tions.
Make sure that the snow chains are always
sufficiently tight. Re-tighten as needed ac‐
cording to the snow chain manufacturer's in‐
structions.
Do not initialize the Flat Tire Monitor after
mounting snow chains, as doing so may result
in incorrect readings.
Do not initialize the Tire Pressure Monitor after
mounting snow chains, as doing so may result
in incorrect readings.
When driving with snow chains, briefly activate
Dynamic Traction Control if needed.
Seite 215Wheels and tiresMobility215
Online Edition for Part no. 01 40 2 969 305 - II/16
Page 217 of 261
Engine compartmentVehicle features and optionsThis chapter describes all standard, country-
specific and optional features offered with the
series. It also describes features that are not
necessarily available in your car, e. g., due tothe selected options or country versions. This
also applies to safety-related functions and
systems. The respectively applicable country
provisions must be observed when using the
respective features and systems.
Important features in the engine compartment
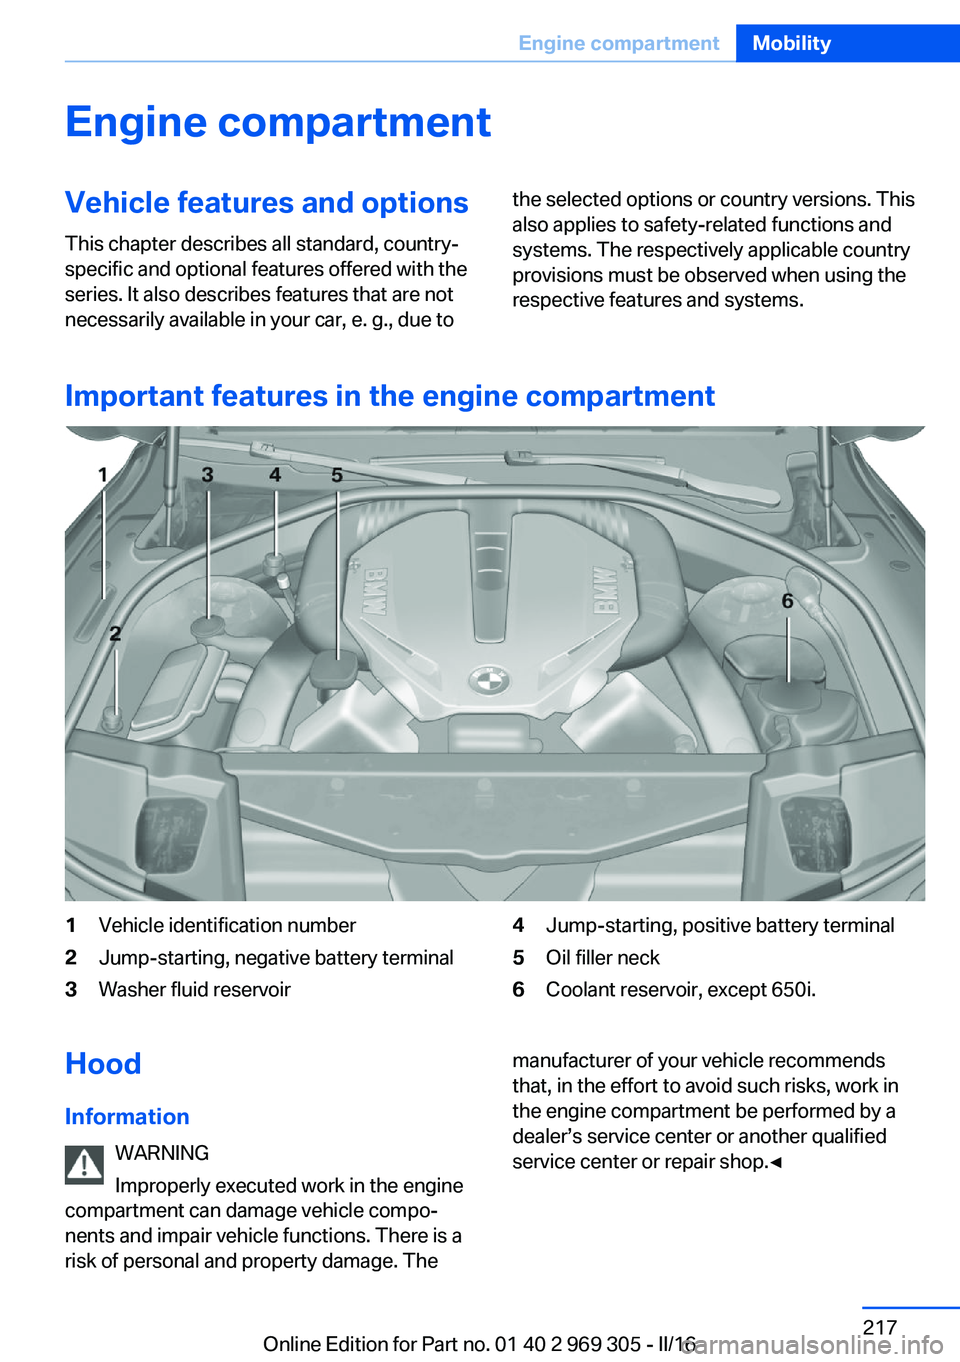
1Vehicle identification number2Jump-starting, negative battery terminal3Washer fluid reservoir4Jump-starting, positive battery terminal5Oil filler neck6Coolant reservoir, except 650i.Hood
Information WARNING
Improperly executed work in the engine
compartment can damage vehicle compo‐
nents and impair vehicle functions. There is a
risk of personal and property damage. Themanufacturer of your vehicle recommends
that, in the effort to avoid such risks, work in
the engine compartment be performed by a
dealer’s service center or another qualified
service center or repair shop.◀Seite 217Engine compartmentMobility217
Online Edition for Part no. 01 40 2 969 305 - II/16
Page 218 of 261
WARNING
The engine compartment accommo‐
dates moving components. Certain compo‐
nents in the engine compartment can also
move with the vehicle switched off, e.g., the ra‐
diator fan. There is a a risk of injury. Do not
reach into the area of moving parts. Keep arti‐
cles of clothing and hair away from moving
parts.◀
WARNING
There are protruding parts, e.g., locking
hook, on the inside of the hood. There is a a
risk of injury. If the hood is open, pay attention
to protruding parts and keep these areas
clear.◀
WARNING
An incorrectly locked hood can open
while driving and restrict visibility. There is risk
of an accident. Stop immediately and correctly
close the hood.◀
WARNING
Body parts can be jammed when open‐
ing and closing the hood. There is a a risk of in‐
jury. Make sure that the area of movement of
the hood is clear during opening and closing.◀
ATTENTION
Folded-away wipers can be jammed
when the hood is opened. There is a risk of damage to property. Make sure that the wipers
with the wiper blades mounted are folded
down onto the windshield before opening the
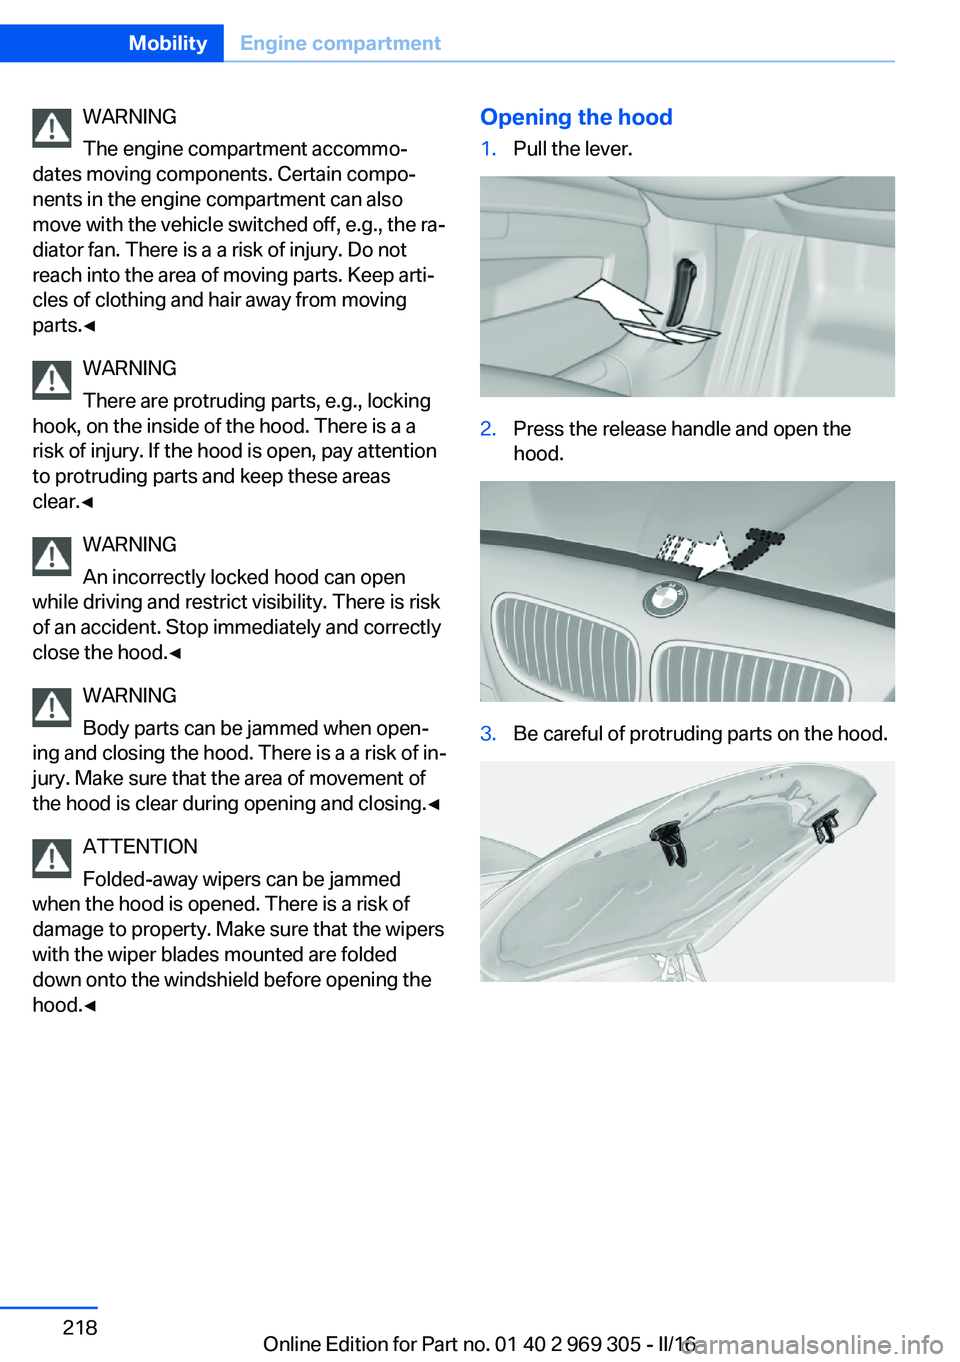
hood.◀Opening the hood1.Pull the lever.2.Press the release handle and open the
hood.3.Be careful of protruding parts on the hood.Seite 218MobilityEngine compartment218
Online Edition for Part no. 01 40 2 969 305 - II/16
Page 221 of 261
ATTENTION
Too much engine oil can damage the en‐
gine or the catalytic converter. There is a risk
of damage to property. Do not add too much
engine oil. When too much engine oil is added,
have oil level corrected by a dealer’s service
center or another qualified service center or re‐
pair shop.◀
Detailed measurement
The concept In the detailed measurement the engine oil
level is checked when the vehicle is stationary,
and displayed via a scale.
Gasoline engine:
If the engine oil level reaches the minimum
level, a check control message is displayed.
During the measurement, the idle speed is in‐
creased somewhat.
General information
A detailed measurement is only possible with
certain engines.
Requirements▷Vehicle is parked in a horizontal position.▷Steptronic transmission: selector lever in
selector lever position N or P and accelera‐
tor pedal not depressed.▷Engine is running and is at operating tem‐
perature.
Performing a detailed measurement
In order to perform a detailed measurement of
the engine oil level:
1."Vehicle info"2."Vehicle status"3. "Measure engine oil level"4."Start measurement"
The engine oil level is checked and displayed
via a scale.
Time: approx. 1 minute.
Adding engine oil Information WARNING
Operating materials, e.g., oils, greases,
coolants, fuels, can contain harmful ingredi‐
ents. There is a risk of injury or danger to life.
Observe the instructions on the containers.
Avoid the contact of articles of clothing, skin or
eyes with operating materials. Do not refill op‐
erating materials into different bottles. Store
operating materials out of reach of children.◀
ATTENTION
Too low of an engine oil level causes en‐
gine damage. There is a risk of damage to
property.
Add engine oil within the next
125 miles/200 km.◀
ATTENTION
Too much engine oil can damage the en‐
gine or the catalytic converter. There is a risk
of damage to property. Do not add too much
engine oil. When too much engine oil is added,
have oil level corrected by a dealer’s service
center or another qualified service center or re‐
pair shop.◀
General information Only add engine oil when the message is dis‐
played in the instrument cluster. The quantity
to be added is indicated in the message dis‐
played in the instrument cluster.
Switch off the ignition and safely park the vehi‐
cle before engine oil is added.
Take care not to add too much engine oil.
Overview The oil filler neck is located in the engine com‐
partment, refer to page 217.Seite 221Engine oilMobility221
Online Edition for Part no. 01 40 2 969 305 - II/16
Page 224 of 261
CoolantVehicle features and optionsThis chapter describes all standard, country-
specific and optional features offered with the
series. It also describes features that are not
necessarily available in your car, e. g., due to
the selected options or country versions. This
also applies to safety-related functions and
systems. The respectively applicable country
provisions must be observed when using the
respective features and systems.
Information WARNING
With the engine hot and the cooling sys‐
tem open, coolant can escape and lead to
scalding. There is a a risk of injury. Only open
the cooling system with the engine cooled
down.◀
WARNING
Additives are harmful and incorrect addi‐
tives can damage the engine. There is a risk of
injury and risk of property damage. Do not al‐
low additives to come into contact with skin,
eyes or articles of clothing. Use suitable addi‐
tives only.◀
Coolant consists of water and additives.
Not all commercially available additives are
suitable for the vehicle. Information about suit‐
able additives is available from a dealer’s serv‐
ice center or another qualified service center or
repair shop.
Coolant level
General information
If there is no Min. and Max. mark in the filler
neck of the coolant reservoir, have the coolantlevel checked if needed by a dealer’s service
center or another qualified service center or re‐
pair shop and add coolant as needed.
Overview
Depending on the engine installation, the cool‐
ant reservoir is located on the right side or the
left side of the engine compartment.
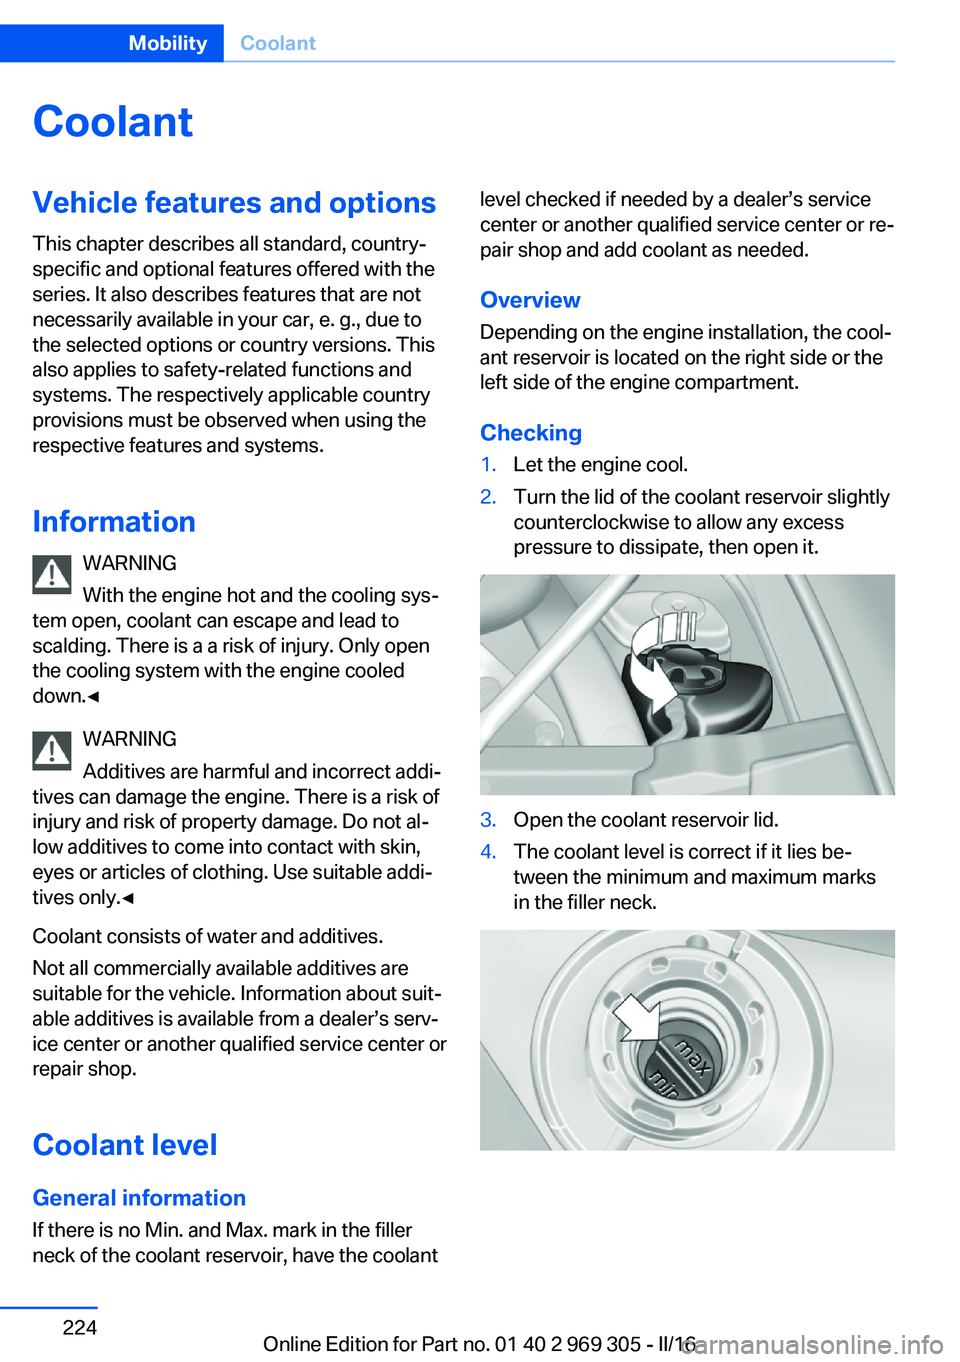
Checking1.Let the engine cool.2.Turn the lid of the coolant reservoir slightly
counterclockwise to allow any excess
pressure to dissipate, then open it.3.Open the coolant reservoir lid.4.The coolant level is correct if it lies be‐
tween the minimum and maximum marks
in the filler neck.Seite 224MobilityCoolant224
Online Edition for Part no. 01 40 2 969 305 - II/16
Page 227 of 261
Socket for OBD Onboard
Diagnosis
Information ATTENTION
The socket for Onboard Diagnosis is an
intricate component intended to be used in
conjunction with specialized equipment to
check the vehicle’s primary emissions system.
Improper use of the socket for Onboard Diag‐
nosis, or contact with the socket for Onboard
Diagnosis for other than its intended purpose,
can cause vehicle malfunctions and creates
risks of personal and property damage. Given
the foregoing, the manufacture of your vehicle
strongly recommends that access to the
socket for Onboard Diagnosis be limited to a
dealer's service center or another qualified
service center or repair shop or other persons
that have the specialized training and equip‐
ment for purposes of properly utilizing the
socket for Onboard Diagnosis.◀
Position
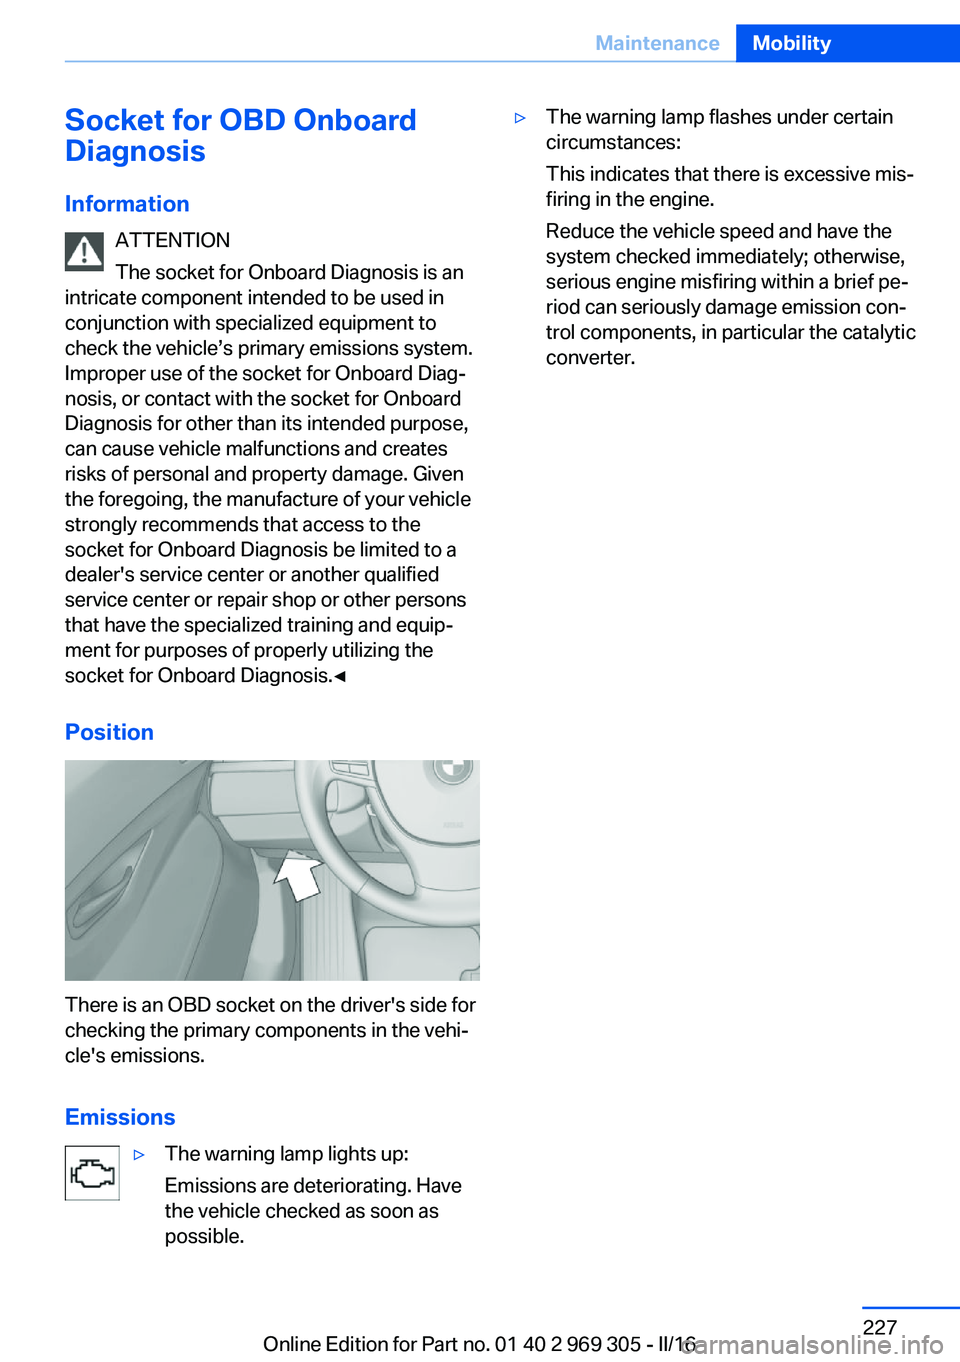
There is an OBD socket on the driver's side for
checking the primary components in the vehi‐
cle's emissions.
Emissions
▷The warning lamp lights up:
Emissions are deteriorating. Have
the vehicle checked as soon as
possible.▷The warning lamp flashes under certain
circumstances:
This indicates that there is excessive mis‐
firing in the engine.
Reduce the vehicle speed and have the
system checked immediately; otherwise,
serious engine misfiring within a brief pe‐
riod can seriously damage emission con‐
trol components, in particular the catalytic
converter.Seite 227MaintenanceMobility227
Online Edition for Part no. 01 40 2 969 305 - II/16