2017 AUDI TT ROADSTER engine
[x] Cancel search: enginePage 15 of 314

co
co
.... N
" N .... 0
" "' c:o
@ Tips
The oil pressure warning is not an o il level in
dicator. Always check the oil level reg ularly .
D Generator/vehicle battery
• Electric system: malfunction! Battery is not
being charged
There is a malfunction in the alternator or the ve
h icle elect rical system.
Dr ive t o an autho rized Aud i dea le r o r a uth orized
Au di Service Facility immediately. Tur n off all un
necessa ry e lectr ica l equi pment because it w ill
drain the batte ry. See your authorized A udi deal
er or authori zed Audi Service Facility if the bat
tery charge level is too low .
(•) Electrical system: low battery charge. Bat
tery w ill be charged while driving
The start ing a bili ty may be impai red.
I f t his message tu rns off aft er a lit tle while , the
ve hicl e ba ttery charged enough w hile dr iving.
If the message does not turn off, have an a uthor
iz ed A udi dealer o r au tho riz ed Aud i Serv ice Fac ili
ty repa ir th e malfunction.
~ Engine stop while driving
• Engine stopped : no power steering or brake
servo possible
There is a malfunction in the eng ine o r in the fue l
supp ly sys tem .
Mo re force is needed to steer and bra ke the mov
in g vehicle when t he engine is stopped. If the ve
hi cle is roll ing , try to b ring it to a stop off to the
side from moving traffic. See an au thoriz e d Au di
dea le r or autho riz e d Au di Serv ice Fa cility fo r as
sis tance.
A WARNING
If the eng ine stops while dr iving , yo u will
nee d to use more fo rce to bra ke the vehicle .
Th is increases the r isk o f an acci dent . There
w ill st ill be power steering if the ignit ion is
switched on w hil e the vehicle is rolling and
Instruments and ind icator lights
the re is suff ic ient battery charge. Ot herwise,
you must use greater force when stee ring.
~ Safety belt
The . indicator light stays on until the dr iver's
and fro nt passenger's* safety be lts a re fastened .
Above a certa in speed, the re will a lso be a war n
i ng tone .
(D Tips
For additional informat ion on safety belts,
se e
c:> page 189 .
@-c, Steering lock
• Steering: malfunction! Please stop veh icle
The re is a ma lfunction in the e lectron ic steering
lock . You cannot tur n the ign ition on .
Do
not tow yo ur vehicle because it cannot be
stee red. See an a uthori zed Audi dea ler or author
ized Audi Service Facility for ass istance.
f!m Steering lock: malfunction! Please contact
Service
T he re is a m alfu n cti on in the e lectron ic st eering
l ock .
Dr ive to an author ized A udi dealer or au tho riz e d
A udi Se rvice Fa cility i mmed iate ly to h ave the
ma lfunction correcte d.
D o not tow yo ur vehicle when there is a mal
f u nction in t he electron ic steer ing lock -th is
i nc reases the risk of an acc iden t.
6 Central indicator light
If the . or Pm in dicator light t urns on, check
t h e message in the i nstr ument cluster.
© -c> Engine start system
• Engine start system: malfunction! Please
contact Service
Do not switch the ignition off because you may
not be able to switch it on again.
Ill>-
13
Page 16 of 314

Instruments and indicator lights
Drive to an autho rized Aud i dea ler or a uth orized
Aud i Service Facility immediately to have t he
malfunct ion corrected .
11111 Engine start sy stem: malfunction! Plea se
contact Service
There is a malfunction in the eng ine start ing sys
tem.
Dr ive to an authorized Aud i deale r or authorized
Aud i Serv ice Facility immediately to have the
malfunct io n corrected.
f;. 11) Electronic stabilization control (ESC )
and
( 8) anti-lock braking system (ABS )
If the DJ indicato r light b links whi le driving, the
E SC or ASR (Anti-Slip Reg ulation) is actively reg u
lating.
If the
DJ indicato r light turns on, the system has
switched the ESC off . In this case, you can switch
the ignition off and then on to switch the ESC on
again. The indicator light turns off when the sys
tem is functioning fully.
Stabili zation control (E SC ): sport. Warning! Re
duced stability
I f t he II indicator light turns on, ESC sport
mode was switched on using the
I -" O FF I button
¢
page 89 . You can turn the ESC on again by
press the
I -" OFFI b utton again.
Stabilization control (E SC): off. Warning ! Re
duced stabil ity
I f t he II indicato r light tur ns on, t he ESC was re
s tricted or switched off using the
I ~ OF FI button
¢ page 89 . The message ESC OFF also appears .
You can turn the ESC on again by press the
I -" OF FI button again .
The system switches on whe n the ign ition is
sw itched on. The
II indicato r light turns off
when the system is functioning fully .
Stabilization control (ESC ): malfun ction ! Se e
owner 's manual
Stabilization control (ESC / AB S): malfun ction!
See owner' s manual
ABS: malfunction! See ow ner 's manual
14
If the DJ indicator light and the ABS indicator
li ght
rJE (USA mode ls)/ ti] (Canada models)
turn on and this message appears, there is a mal
funct ion in the ABS system or electronic differen
tia l lock. This also causes the ESC to malfunction .
The brakes still function with their normal power, but ABS is not active .
Drive to an authorized A udi dealer or authori zed
Audi Service Facility immediate ly to have the
malfunction corrected .
,&. WARNING
If the ... (USA models) JII (Canada mod
e ls) brake system indicator light turns on to
gether with the ABS and ESC ind ic a tor lights,
the ABS/ESC regulating function may have
failed. Functions that s tabilize the vehicle are
no longer avai lab le . This could cause the vehi
cle to swerve, which increases the risk that
the vehicle will slide. Drive carefully to the nearest authorized Aud i dea ler or authorized
Audi Service Fac ility and have the malfunction
corrected .
0) Tips
For additional informat ion on ESC and ABS,
see¢
page 88.
(0) Brake pads
&J Brake pads: wear limit reached . You can con
t inue driv ing . Please contact Se rvice
The brake pads are worn.
Drive to an authorized A udi dealer or authorized
Audi Se rvice Facility immediate ly to have the
brake pads checked.
App lies to : USA mode ls
The &J i ndicator lig ht turns on together with the
... indicator light
!f Safety systems
The E,I indicator lig ht monitors the safety sys
tems.
Page 17 of 314

co
co
Safety system
If them indicator light turns on or blinks, there
is a malfunction in a safety system.
Drive to an authorized Audi dealer or authorized
Audi Service Facility immediately to have the
malfunction corrected.
_& WARNING
-
Have the safety systems inspected immedi
ately. Otherwise, there is a risk that the sys
tems may not activate during a collision,
which increases the risk of serious injury or death.
c±::, Engine control
If the II indicator light turns on if there is a mal
function in the engine control.
Drive slowly to an authorized Audi dealer or au
thori zed Audi Service Facility to have the engine
checked.
C Malfunction indicator lamp (MIL)
The malfunction indicator lamp (MIL) is part of
the On Board Diagnostic system (OBD II) . The
¢..ij symbol turns on when the ignition is switched
on and turns off again once the engine is started
and running at a steady idle speed. This indicates
that the MIL is functioning correctly.
The indicator light turns on if there is a malfunc
tion in the engine electronics. See an authorized
Audi dealer or authorized Audi Service Facility to
have the malfunction corrected.
For additional information, see¢
page 17.
!?) Engine speed limitation
Appl ies to: vehicles with engine speed li m itation
(ii Maximum engine speed: XXXX rpm
The engine speed is automatically limited to the
speed displayed in the driver information system .
This protects the engine from overheating.
;:::: The engine speed limitation deactivates once the
" ~ engine is no longer in the critical temperature 0
" "' c:o
Instruments and indicator lights
range and you have released the accelerator ped
al once.
If the engine speed limitation was activated by
an engine control malfunction, the
II indicator
light also turns on. Make sure the engine speed
does not go above the speed displayed, for exam
ple when downshifting. Drive to an authorized
Audi dealer or authorized Audi Service Facility im
mediately to have the malfunction corrected.
~ Engine oil level (min.)
Ill Please check oil level
You may continue driving for the time being.
Check the engine oil level as soon as possible
<=> page 237.
-If the engine oil level is too low, add engine oil
¢page 239.
-If the engine oil level is correct and the indica
tor light still turns on, drive at low engine
speed to an authorized Audi dealer or author
ized Audi Service Facility .
"'' Engine oil sensor
• Oil level system: malfunction! Please con
tact Service
The sensor to check the engine oil level has
failed . Drive to an authorized Audi dealer or au
thorized Audi Service Facility immediately to have
the malfunction corrected .
• Oil level sensor: oil change necessary. Please
contact Service
The engine oil level is too high.
Drive to an authorized Audi dealer or authorized
Audi Service Facility immediately to have the
malfunction corrected.
(D Note
Refer to the description in the Owner's Man
ual ¢
page 239, Checking the engine oil level
and adding engine oil.
15
Page 19 of 314
CD
CD
.... N
" N .... 0 r--. V, co
@:.D Light/rain sensor
l!I Automatic headlights: malfunction! See
owner' s manual
El Automatic wipers : malfun ction! See owner 's
manual
The light/ra in sensor is malf unct ion ing.
The low beams remain switched on at all times
for safety reasons when the light switch is in the
AUTO position. You can continue to turn the
lights on and off using the light switch . You can
still cont rol a ll wipe r functions that a re inde
pendent of the ra in se nsor.
Drive to an authorized Aud i dea ler or a ut horized
Audi Service Facility immediately to have t he
malfunction corrected .
; Adaptive dampers
Applies to: vehicles with Audi drive select
B Suspension : malfunction! You may continue
driving
There is an adaptive damper malf unct ion.
Drive to an aut horize d Aud i dea le r or a uthorized
Aud i Service Facility immediately to have t he
malfunct ion corrected.
¢i ¢ Turn signals
If t he B or Ill indicator light b links, a t urn sig
n a l is turned on. If both indicator lig hts are blink
i ng, the eme rgency flash ers a re on .
On-Board Diagnostic
system (OBD)
Malfunction indicator lamp (MIL)
The malfunction indica to r l amp (MIL) ¢.j in the
in str ument cluster is part of the O n Board Diag
n os tic Sys tem ( OBD II).
The warning/indicator light turns on w hen the ig
ni tion is switched o n and turns off once the e n
g ine is s tarted an d is runn ing in id le at a stab le
speed. This indica tes th at the MIL is functioning
cor re ct ly.
Instruments and indicator lights
If the light does not turn off after starting the
engine
or turns on while driving, this may in di
cate there is a malfunction in the engine.
If the
indicato r turns on, the cata lytic conve rter may be
damaged .
Drive
with reduced engine performan ce (avo id
high speeds for extended per io d s of t ime and/o r
fast acceleration) and have the ma lfunction cor
rected. See an author ized Audi dealer or author
ized Audi Service Facility.
The in dicator may turn on if the e lectron ic speed
li miter is faulty. For add it iona l information, see
¢ page 72, Electronic speed limiter.
On-Board Diagnostics
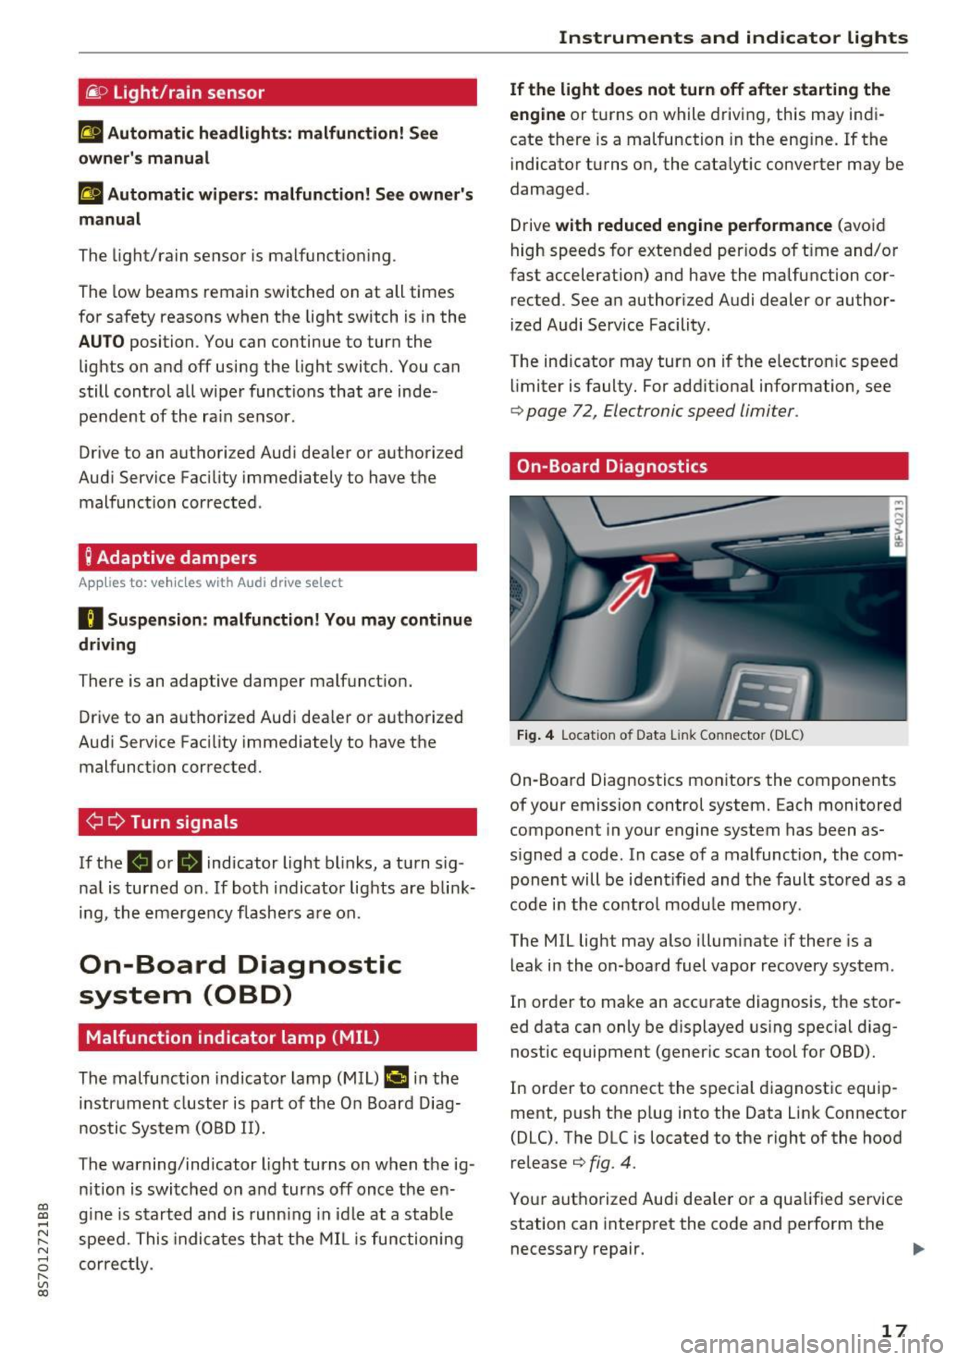
Fig. 4 Location of Data Link Connector (DLC)
On-Boa rd Diagnostics mo nitors the components
of your emission control system. Each monitored
component in your engine system has been as
s igned a code. In case o f a malfunction, the com
ponent will be i dent ified and the faul t st o red as a
co de i n t he co ntro l mo dule mem ory.
The MIL lig ht may also illum inate if there is a
leak in the on-boa rd fuel vapor recovery system .
In or de r to ma ke an acc urate diagnosis, the sto r
ed data can only be d isplayed using special d iag
nostic equipment (gener ic scan to ol for OBD).
In order to co nnect the s pecial diagnost ic equi p
ment, push the p lug into the Data Link Connector
(DLC). T he DLC is located to the right of the hood
re lease
¢ fig. 4.
You r aut horize d Aud i dea le r or a qua lified se rvice
station can inte rpret the code and perform the
necessary repair.
IJJI,
17
Page 21 of 314
CD
CD
.... N
" N .... 0 r--. V, co
Driver information system
Overview
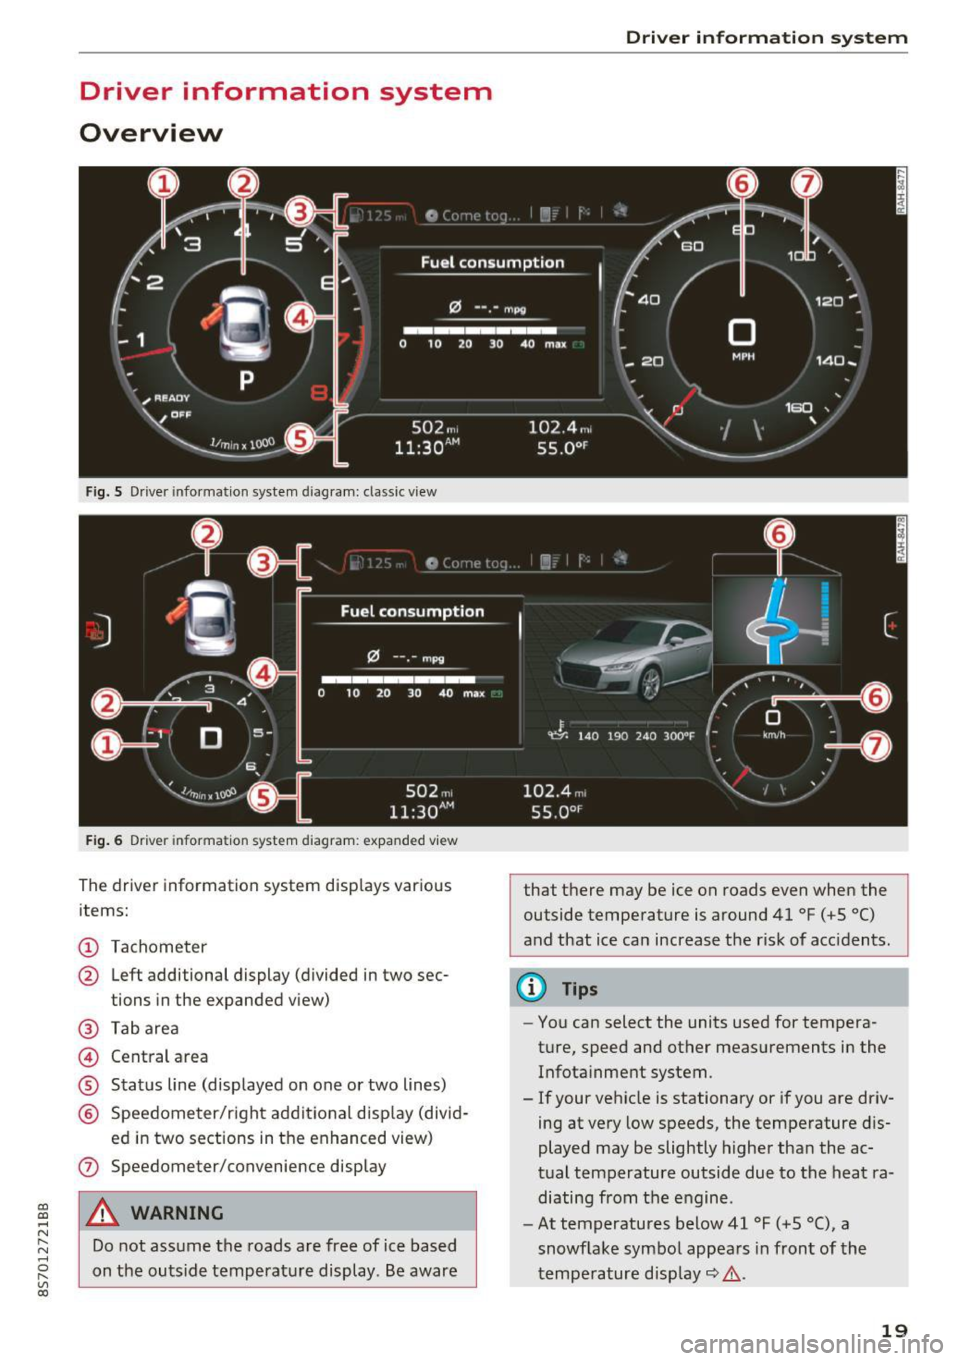
Fig. S Dr iver information system diagram: classic v iew
Fig. 6 D river information system diagram : expanded view
The driver information system displays various
items:
@ Tachometer
@ Left additional display (divided in two sec-
tions in the expanded view)
@ Tab area
@ Central area
® Status line (displayed on one or two lines)
@ Speedometer/right additional display (divid-
ed in two sections in the enhanced view)
(J) Speedometer/convenience display
A WARNING
Do not assume the roads are free of ice based
on the outside temperature display . Be aware
Driver in forma tion system
that there may be ice on roads even when the
outside temperature is around 41 °F ( +S °C)
and that ice can increase the risk of acc idents.
(D Tips
- You can select the units used for tempera
ture, speed and other measurements in the
Infotainment system.
- If your vehicle is stationary or if you are driv
ing at
very low speeds, the temperature dis
played may be slightly higher than the ac
tual temperature outside due to the heat ra
diating from the engine.
- At temperatures below 41 °F (+S °C), a
snowflake symbol appears in front of the
temperature display~ ,&.
19
Page 25 of 314
CD
CD
.... N
" N .... 0
" V, co
Tachometer
The tachometer displays the engine speed in rev
olutions per minute (RPM) .
The beginning of the red zone in the tachometer
indicates the maximum permissible engine speed
for all gears once the engine has been broken in
and when it is warm. Before reaching the red
zone, you should shift into the next higher gear,
choose the Dor S selector lever position, or re
move your foot from the accelerator pedal.
@ Note
The needle in the tachometer may only be in
the red area of the gauge for a short per iod of
time or there is a risk of damaging the engine .
The location where the red zone begins varies
depending on the engine.
@) For the sake of the environment
Upshifting early helps you to save fuel and re
duce operating noise.
Odometer
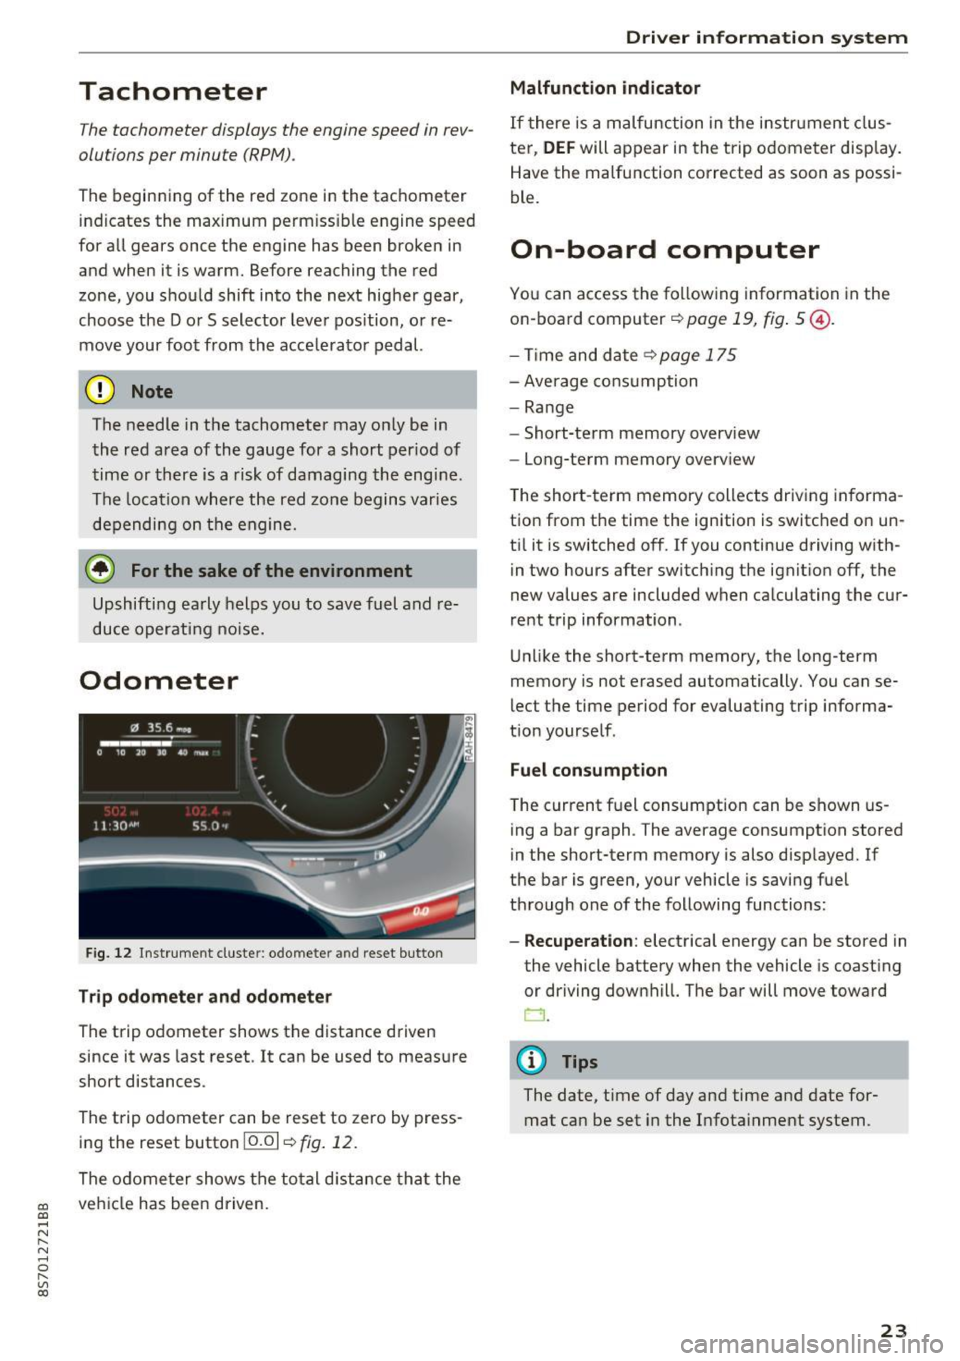
Fig. 12 Instrument cluste r: odomete r and reset button
Trip odometer and odometer
The trip odometer shows the distance driven
since it was last reset . It can be used to measure
short distances .
The trip odometer can be reset to zero by press ing the reset button 10.01
r=> fig. 12.
The odometer shows the total d istance that the
veh icle has been driven.
Driver in forma tion system
Malfunction indicator
If there is a malfunction in the instrument clus
ter,
DEF will appear in the trip odometer disp lay.
Have the malfunction corrected as soon as possi
ble.
On-board computer
You can access the following information in the
on-board computer
r=> page 19, fig . 5 @ .
-Time and date ~page 175
-Average consumption
-Range
- Short-term memory overv iew
- Long-term memory overview
The short -term memory collects driving informa
tion from the time the ignition is switched on un
til it is switched off. If you continue driving with·
in two hours after switching the ignition off, the
new values are included when calculating the cur
rent trip information .
Unlike the short-term memory, the long-term
memory is not erased automatically. You can se
lect the time period for evaluating trip informa
tion yourself .
Fuel consumption
The current fuel consumption can be shown us
ing a bar graph . The average consumption stored
in the short-term memory is also displayed. If
the bar is green, your vehicle is saving fuel
through one of the following functions:
- Recuperation : electrical energy can be stored in
the vehicle battery when the vehicle is coasting or driving downhill. The bar will move toward
CJ .
(D Tips
The date, time of day and time and date for
mat can be set in the Infotainment system.
23
Page 27 of 314
CD
CD
.... N
" N .... 0 r--. V, co
@ Key tag with PIN
Only applies to vehicles with Connectivity serv
ice*: open the key fob and rub the PIN until it is
v isib le . You can activate the Connectivity service*
on your vehicle using th is PIN code.
Replacing a key
If a key is lost, see an au thorized A udi dealer or
authorized Audi Service Facility. Have
this key de
activated.
It is important to bring all keys with
you. If a key is lost, you should report it to your
insurance company.
Number of keys
You can check the number of keys ass igned to
your veh icle in the Infotainment system . To do
this, select: the
I MENU ! button >Vehicle > left
control b utton
> Service & checks > Vehicle in
formation.
This way, you can make sure that you
have all the keys when purchasing a used vehicle .
Electronic immobilizer
The immobilizer prevents unauthorized use of
the vehicle.
Unde r certain circumstances, the vehicle may not
be ab le to start if there is a key from a different
vehicle manufacturer on the key chain .
Data in the master key
When driving, service and maintenance-relevant
data is continuously stored in your remote con
tro l key. Your Aud i service adviso r ca n read o ut
this da ta and tell you about the wo rk your veh icle
needs. This applies also to vehicles with a con
venience key*.
Personal convenience settings
I f two people use one vehicle, it is recommended
that each person always uses "t heir own" master
key. When the ignition is turned off or when the
vehicle is lock ed, persona l conven ience settings
for the following systems are stored and as
signed to the remote master key.
- Climate control system
- Parking aid*
- Active lane assist*
- Side assist*
Open ing and closing
-Drive se lect
T he sto red settings a re automa tica lly recalled
when you unlock the vehicle, open the doors or
turn on the ign ition.
& WARNING ~
A lways take the vehicle key with you when
l eav ing the vehicle, even for a short period of
time. This applies particularly when chi ldren
remain in the vehicle. Otherwise the children
could start the engine or operate e lectr ica l
equipment such as power windows.
@ Tips
-
The operation of the remote control key can
be temporarily disrupted by interference from
transmitters near the veh icle work ing in the
same frequency range (such as a cell phone or
radio equipment). A lways check if your vehicle
i s locked!
Removing the mechanical key
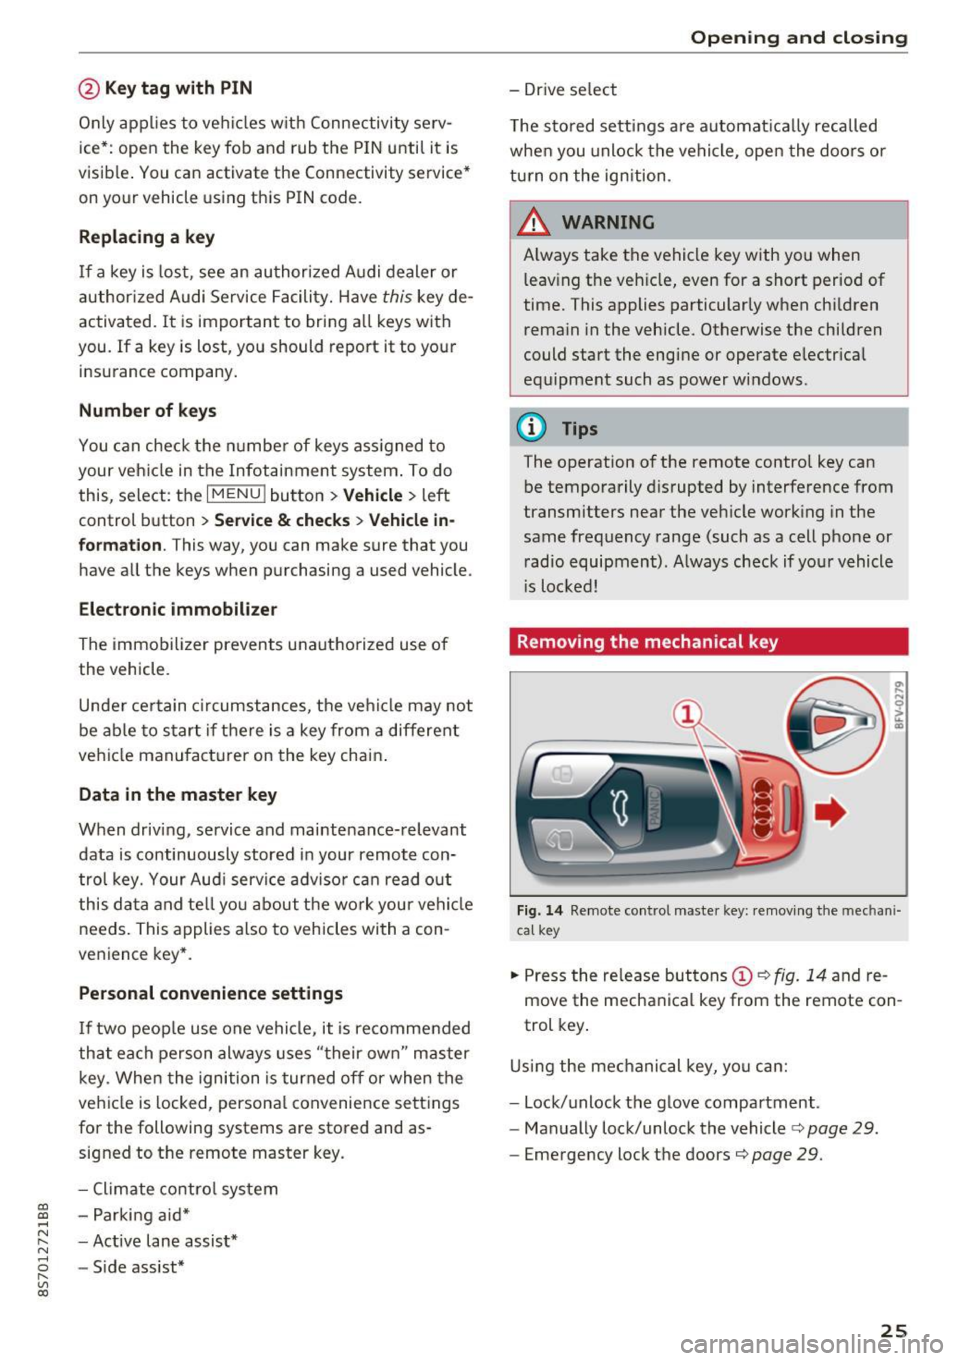
Fig . 14 Remote control mas ter key: remov ing the mechan i
ca l key
.,. Press the release but tons (D c::> fig. 14 and re
move the mechanical key from the remote con
trol key .
Using the mechanical key, you can:
- Lock/unlock the glove compartment.
- Manually lock/unlock the vehicle
c::> page 29.
-Eme rgency lock the doors c::> page 29.
25
Page 37 of 314
CD
CD
.... N
" N ...... 0 r--. V, co
-When operating the power top, visibility to
the rear is limited. Avoid operating the top
while driving in reverse.
(D Note
-To prevent damage to the power top:
- do not store any objects in the power top
storage compartment .
- make sure there is enough space above
the vehicle when opening or closing the
power top.
(D Tips
- To prevent the vehicle battery from draining
unnecessarily, do not open or close the pow
er top repeatedly when the engine is switch
ed off.
- A message will appear in the instrument cluster if there is a malfunction in the power
top
¢ page 35.
- The power top can also be operated manual
l y temporarily if there is a malfunction
¢ page 3 7, Power top emergency opera
tion.
An authori zed A udi dealer or au thor
i zed Audi Service Facility should diag nose
and correct the cause of the ma lfunction as
soon as possib le .
- If the vehicle is parked with the power top open, the vehicle interior is not p rotected
from damaging weather or unauthorized ac
cess. Lock any items you leave behind in the
l uggage compartment. Close the power top
before leaving the vehicle .
- The side windows automat ically lower
slight ly when opening or closing the power
top.
P owe r top
Power top convenience opening and closing
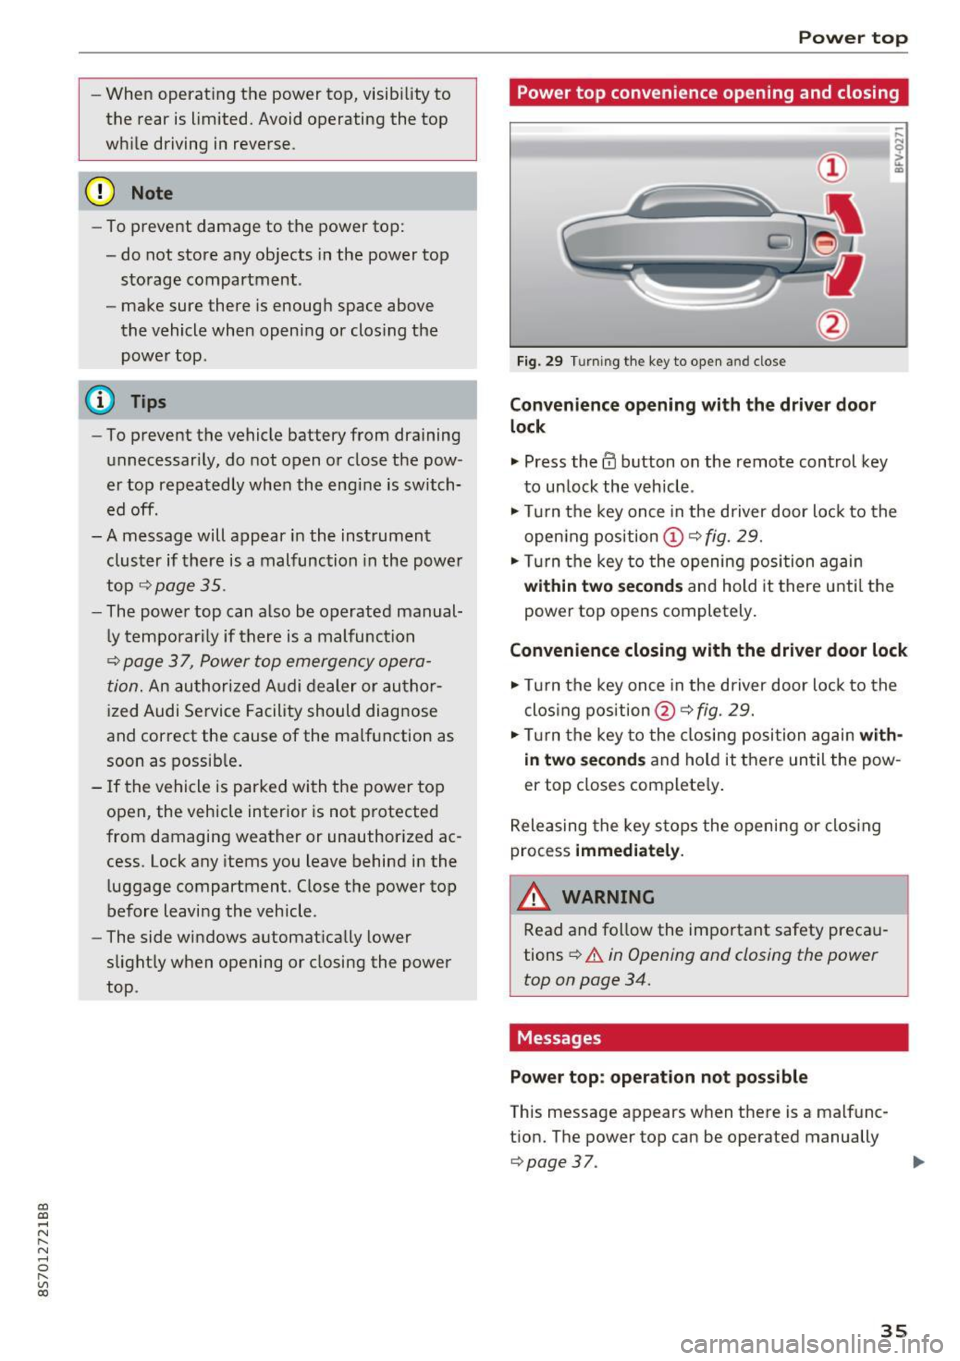
Fig. 29 Turning the key to open and close
Conven ience opening with the dri ver door
lock
.,. Press the 63 button on the remote control key
to un lock the vehicle .
.,. Turn the key once in the driver door lock to the
open ing pos ition
© ¢fig. 29.
.,. Turn the key to the opening posi tion again
within tw o second s and hold it there until the
power top opens completely.
Convenience closing with the driver door lock
.,. Turn the key once in the driver door lock to the
clos ing position @¢
fig. 29.
.,. Tur n the key to the closing position again
with
in two second s
and ho ld it there un til the pow
er top closes complete ly .
Releasing the key s tops the opening or clos ing
process
immedi ate ly.
A WARNING
-
Read and fo llow the important safety preca u
tions
¢ .&. in Opening and closing the power
top on page 34.
Messages
Pow er top : operation n ot pos sibl e
This message appears when there is a malfunc
t ion. The power top can be operated manually
¢ page 37. ..,.
35