2017 Alfa Romeo Giulia Hazard lights
[x] Cancel search: Hazard lightsPage 14 of 268

VEHICLE INTERIOR
Vehicle Interior
Description
1. Driver Seat
2. Power Windows/Power Mirrors
Controls
3. Gear Selector/Paddle Shifter
4. Hazard Warning Lights
5. “Alfa DNA Pro” System
03046S0001EMVehicle Interior
12
Page 83 of 268

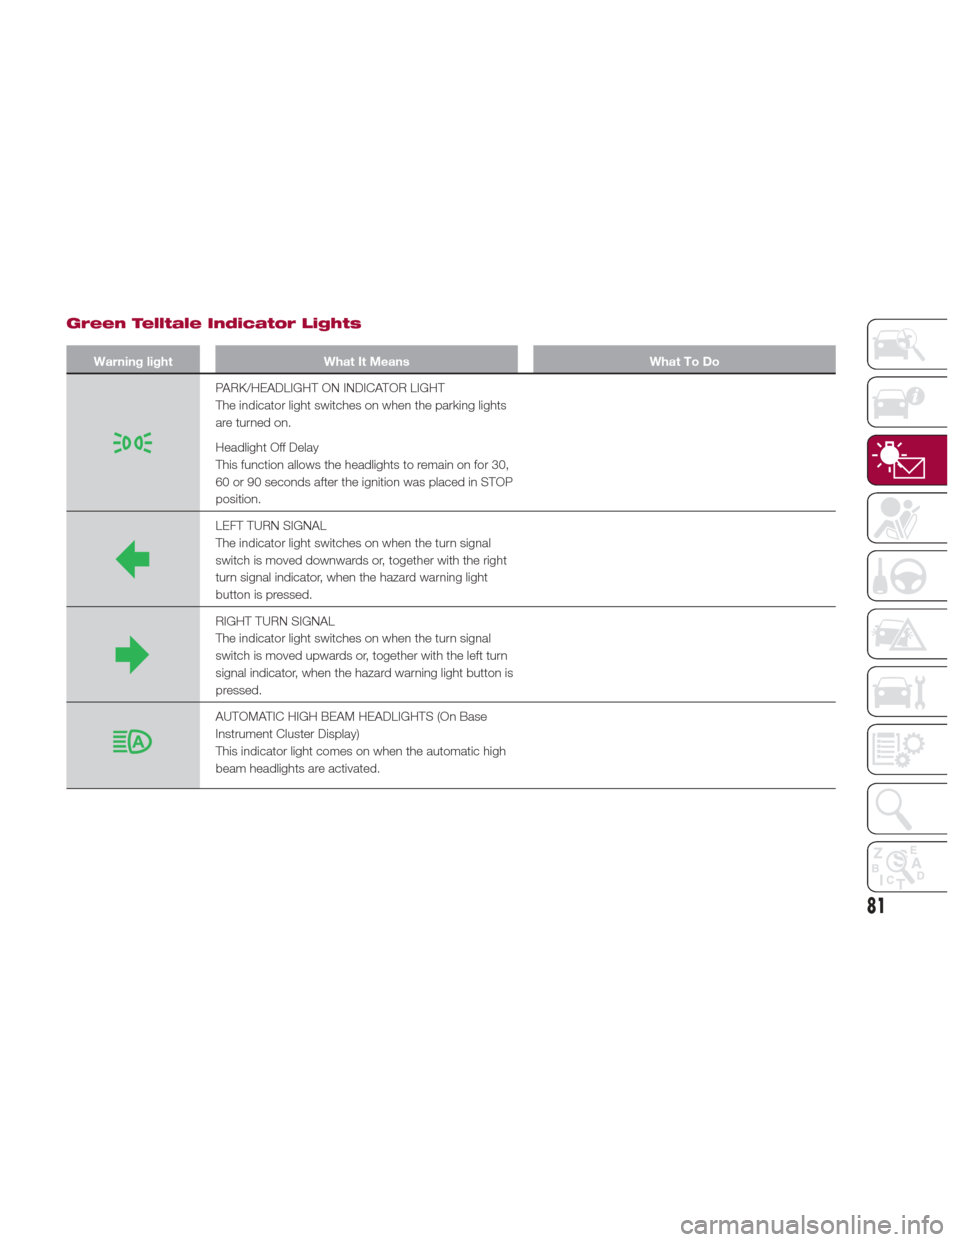
Green Telltale Indicator Lights
Warning lightWhat It Means What To Do
PARK/HEADLIGHT ON INDICATOR LIGHT
The indicator light switches on when the parking lights
are turned on.
Headlight Off Delay
This function allows the headlights to remain on for 30,
60 or 90 seconds after the ignition was placed in STOP
position.
LEFT TURN SIGNAL
The indicator light switches on when the turn signal
switch is moved downwards or, together with the right
turn signal indicator, when the hazard warning light
button is pressed.
RIGHT TURN SIGNAL
The indicator light switches on when the turn signal
switch is moved upwards or, together with the left turn
signal indicator, when the hazard warning light button is
pressed.
AUTOMATIC HIGH BEAM HEADLIGHTS (On Base
Instrument Cluster Display)
This indicator light comes on when the automatic high
beam headlights are activated.
81
Page 123 of 268

If you do have a collision which deploys
the air bags, any or all of the following
may occur:
The air bag material may sometimes
cause abrasions and/or skin reddening
to the occupants as the air bags deploy
and unfold. The abrasions are similar to
friction rope burns or those you might
get sliding along a carpet or gymnasium
floor. They are not caused by contact
with chemicals. They are not permanent
and normally heal quickly. However, if
you haven’t healed significantly within a
few days, or if you have any blistering,
see your doctor immediately.
As the air bags deflate, you may see
some smoke-like particles. The
particles are a normal by-product of the
process that generates the non-toxic
gas used for air bag inflation. These
airborne particles may irritate the skin,
eyes, nose, or throat. If you have skin or
eye irritation, rinse the area with cool
water. For nose or throat irritation, move
to fresh air. If the irritation continues,
see your doctor. If these particles settle
on your clothing, follow the garment
manufacturer’s instructions for cleaning.
Do not drive your vehicle after the air
bags have deployed. If you are involved
in another collision, the air bags will not
be in place to protect you.
Warning!
Deployed air bags and seat belt
pretensioners cannot protect you in
another collision. Have the air bags, seat
belt pretensioners, and the seat belt
retractor assemblies replaced by an
authorized dealer immediately. Also, have
the Occupant Restraint Controller System
serviced as well.
Note:
Air bag covers may not be obvious
in the interior trim, but they will open
during air bag deployment.
After any collision, the vehicle
should be taken to an authorized
dealer immediately.
Enhanced Accident Response
System
In the event of an impact, if the
communication network remains intact,
and the power remains intact,
depending on the nature of the event,
the ORC will determine whether to have
the Enhanced Accident Response
System perform the following functions:
Cut off fuel to the engine.
Flash hazard lights as long as the
battery has power or until the hazard
light button is pressed. The hazard lights can be deactivated by pressing
the hazard light button.
Turn on the interior lights, which
remain on as long as the battery has
power or for 15 minutes from the
intervention of the Enhanced Accident
Response System.
Unlock the power door locks.
Turn off the Fuel Pump Heater
(if equipped).
Turn off the HVAC Blower Motor.
Close the HVAC Circulation Door.
Enhanced Accident Response
System Reset Procedure
After the event occurs, when the
system is active, a message regarding
fuel cutoff is displayed. Turn the ignition
switch from ignition AVV/START or
ON/RUN to ignition STOP/OFF.
Carefully check the vehicle for fuel leaks
in the engine compartment and on the
ground near the engine compartment
and fuel tank before resetting the
system and starting the engine.
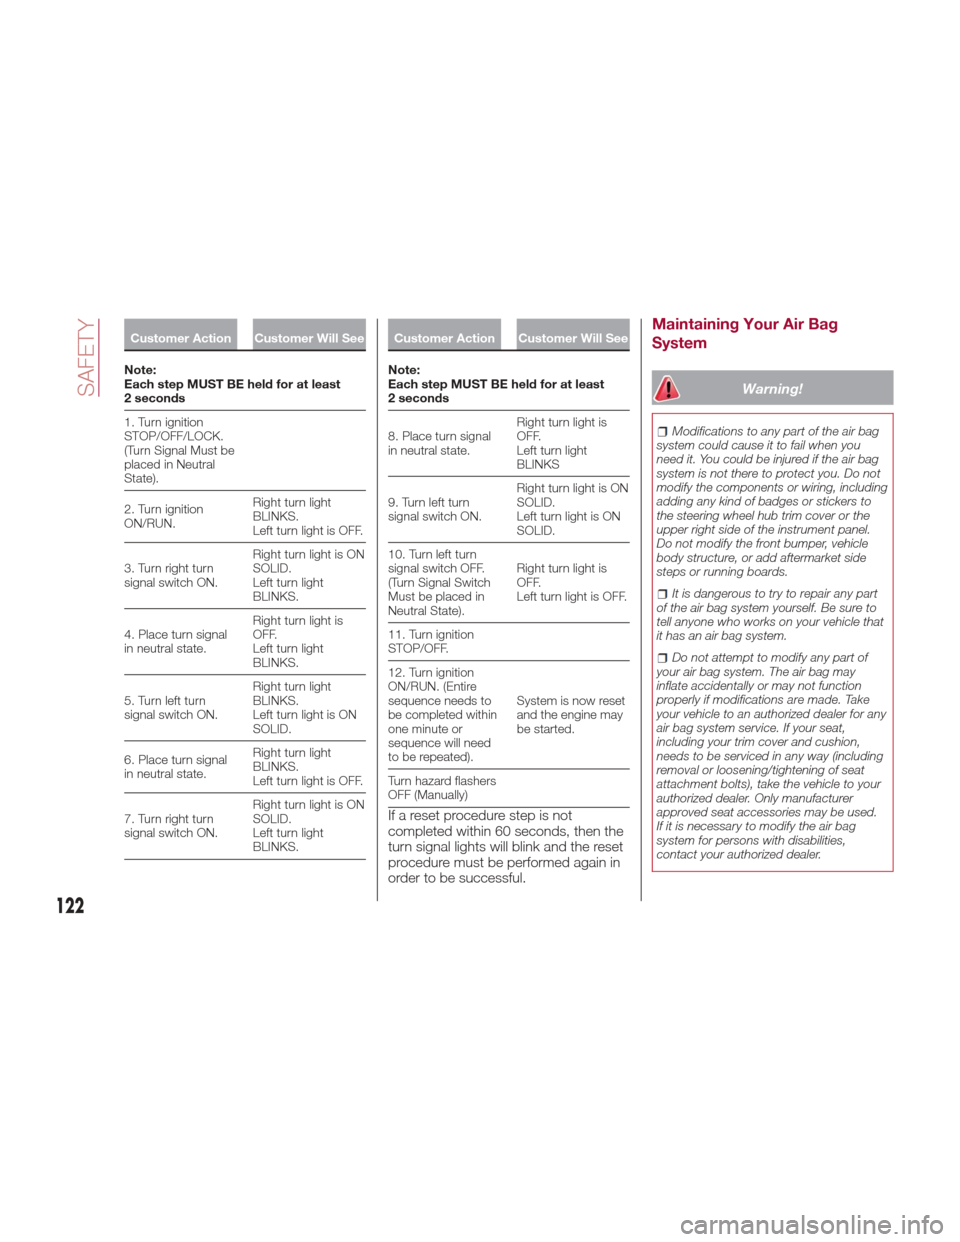
Depending on the nature of the event
the left and right turn signal lights,
located in the instrument panel, may
both be blinking and will continue to
blink. In order to move your vehicle to
the side of the road, you must follow
the system reset procedure.
121
Page 124 of 268

Customer Action Customer Will See
Note:
Each
step MUST BE held for at least
2 seconds
1. Turn ignition
STOP/OFF/LOCK.
(Turn Signal Must be
placed in Neutral
State).
2. Turn ignition
ON/RUN. Right turn light
BLINKS.
Left turn light is OFF.
3. Turn right turn
signal switch ON. Right turn light is ON
SOLID.
Left turn light
BLINKS.
4. Place turn signal
in neutral state. Right turn light is
OFF.
Left turn light
BLINKS.
5. Turn left turn
signal switch ON. Right turn light
BLINKS.
Left turn light is ON
SOLID.
6. Place turn signal
in neutral state. Right turn light
BLINKS.
Left turn light is OFF.
7. Turn right turn
signal switch ON. Right turn light is ON
SOLID.
Left turn light
BLINKS.
Customer Action Customer Will See
Note:
Each
step MUST BE held for at least
2 seconds
8. Place turn signal
in neutral state. Right turn light is
OFF.
Left turn light
BLINKS
9. Turn left turn
signal switch ON. Right turn light is ON
SOLID.
Left turn light is ON
SOLID.
10. Turn left turn
signal switch OFF.
(Turn Signal Switch
Must be placed in
Neutral State). Right turn light is
OFF.
Left turn light is OFF.
11. Turn ignition
STOP/OFF.
12. Turn ignition
ON/RUN. (Entire
sequence needs to
be completed within
one minute or
sequence will need
to be repeated). System is now reset
and the engine may
be started.
Turn hazard flashers
OFF (Manually)
If a reset procedure step is not
completed within 60 seconds, then the
turn signal lights will blink and the reset
procedure must be performed again in
order to be successful.
Maintaining Your Air Bag
System
Warning!
Modifications to any part of the air bag
system could cause it to fail when you
need it. You could be injured if the air bag
system is not there to protect you. Do not
modify the components or wiring, including
adding any kind of badges or stickers to
the steering wheel hub trim cover or the
upper right side of the instrument panel.
Do not modify the front bumper, vehicle
body structure, or add aftermarket side
steps or running boards.
It is dangerous to try to repair any part
of the air bag system yourself. Be sure to
tell anyone who works on your vehicle that
it has an air bag system.
Do not attempt to modify any part of
your air bag system. The air bag may
inflate accidentally or may not function
properly if modifications are made. Take
your vehicle to an authorized dealer for any
air bag system service. If your seat,
including your trim cover and cushion,
needs to be serviced in any way (including
removal or loosening/tightening of seat
attachment bolts), take the vehicle to your
authorized dealer. Only manufacturer
approved seat accessories may be used.
If it is necessary to modify the air bag
system for persons with disabilities,
contact your authorized dealer.
122
SAFETY
Page 181 of 268

IN CASE OF EMERGENCY
Have a flat tire or a burnt-out bulb?
At times, a problem such as these may
interfere with your driving experience.
The pages on emergencies can help
you to deal with critical situations
independently and with calm.
In an emergency, we recommend that
you call the phone number found in the
Warranty Book.
You may also consider contacting your
nearest authorized dealer.HAZARD WARNING LIGHTS . . . .180
BULB REPLACEMENT.........180
FUSES .................. .186
TIRE REPAIR KIT —
IF EQUIPPED ..............192
EMERGENCYSTARTING ......196
REFUELING IN EMERGENCY . . . .198
ENGINE OVERHEATING .......199
TOWING A DISABLED VEHICLE . .200
TOW HOOKS ..............201
ENHANCED ACCIDENT
RESPONSE SYSTEM (EARS) . . . .203
EVENT DATA RECORDER (EDR) . .203
179
Page 182 of 268

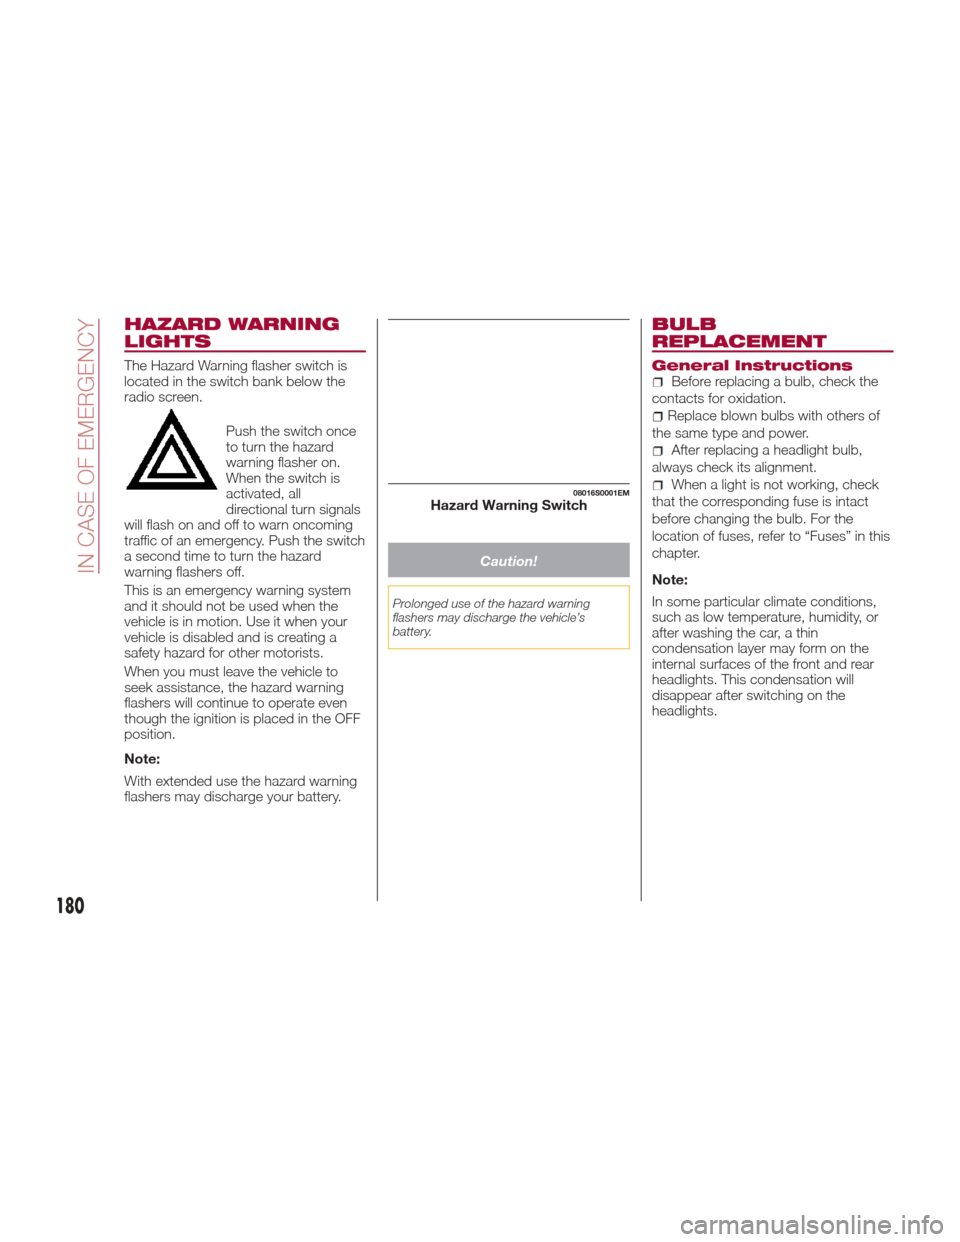
HAZARD WARNING
LIGHTS
The Hazard Warning flasher switch is
located in the switch bank below the
radio screen.Push the switch once
to turn the hazard
warning flasher on.
When the switch is
activated, all
directional turn signals
will flash on and off to warn oncoming
traffic of an emergency. Push the switch
a second time to turn the hazard
warning flashers off.
This is an emergency warning system
and it should not be used when the
vehicle is in motion. Use it when your
vehicle is disabled and is creating a
safety hazard for other motorists.
When you must leave the vehicle to
seek assistance, the hazard warning
flashers will continue to operate even
though the ignition is placed in the OFF
position.
Note:
With extended use the hazard warning
flashers may discharge your battery.
Caution!
Prolonged use of the hazard warning
flashers may discharge the vehicle’s
battery.
BULB
REPLACEMENT
General InstructionsBefore replacing a bulb, check the
contacts for oxidation.
Replace blown bulbs with others of
the same type and power.
After replacing a headlight bulb,
always check its alignment.
When a light is not working, check
that the corresponding fuse is intact
before changing the bulb. For the
location of fuses, refer to “Fuses” in this
chapter.
Note:
In some particular climate conditions,
such as low temperature, humidity, or
after washing the car, a thin
condensation layer may form on the
internal surfaces of the front and rear
headlights. This condensation will
disappear after switching on the
headlights.08016S0001EMHazard Warning Switch
180
IN CASE OF EMERGENCY
Page 207 of 268

SCHEDULED
SERVICING
Correct servicing is crucial for
guaranteeing a long life for the vehicle
under the best conditions.
For this reason, Alfa Romeo has
planned a series of checks and services
for your vehicle at fixed intervals based
on distance and time, as described in
the Scheduled Servicing Plan.
Before each service, it is always
necessary to carefully follow the
instructions in the Scheduled Servicing
Plan (e.g. periodically check level of
fluids, tire pressure, etc.).
Scheduled Servicing is offered by an
authorized dealer according to a set
time schedule. If, during each
operation, in addition to the ones
scheduled, the need arises for further
replacements or repairs, these may be
carried out with owners explicit consent
only.
Note:
Scheduled Servicing intervals are
required by the Manufacturer. Failure to
have them carried out may invalidate
the New Vehicle Limited Warranty.
You are advised to inform your
authorized dealer of any small operating
irregularities without waiting for the next
service.
Periodic Checks
Every month or every600miles
( 1,000 km) or before long trips check
and, if necessary, top off:
Engine coolant level.
Brake fluid level (if insufficient, see
your authorized dealer as soon as
possible).
Windshield washer fluid level.
Tire inflation pressure and condition.
Operation of lighting system
(headlights, direction indicators, hazard
warning lights, etc.).
Operation of windshield
washing/wiping system and
positioning/wear of wiper blades.
Every 2,000 miles ( 3,000km), check
and top off if required:
Engine oil level.
Heavy Usage Of The Car
If the vehicle is used under one of the
following conditions:
Dusty roads.
Short, repeated journeys less than
4 miles (7-8 km) at sub-zero outside
temperatures.
Engine often idling or driving long
distances at low speeds or long periods
of inactivity.
In the event of a long period of
inactivity. The following checks must be carried
out more often than indicated in the
Scheduled Servicing Plan:
Check cleanliness of hood and trunk
locks, cleanliness and lubrication of
linkage.
Visually inspect conditions of: engine,
transmission, pipes and hoses
(exhaust/fuel system/brakes) and
rubber elements (sleeves/bushes, etc.).
Check battery charge and battery
fluid level (electrolyte).
Visually inspect conditions of the
accessory drive belts.
Check and, if necessary, change
engine oil and replace oil filter.
Check and, if necessary, replace
cabin air filter.
Check and, if necessary, replace air
cleaner.
Severe Duty All Models
Change Engine Oil at 4,000 miles
(6,500 km) if the vehicle is operated in a
dusty and off-road environment or is
operated predominately at idle or only
very low engine RPM’s. This type of
vehicle use is considered Severe Duty.
205
Page 208 of 268

Maintenance Plan (2.9 V6 Engine)
Thousands of miles10
20
30
40
50
60
70
80
90
100
110
120
130
140
150
Years123456789101112131415
Thousands of kilometers16
32
48
64
80
96
112
128
144
160
176
192
208
224
240
Check battery charge status with the proper instrument. ●●●●●●●●●●●●●●●
Check tire condition/wear and adjust pressure, if
necessary. Check the tire repair kit recharge condition and
expiration date. ●●●●●●●●●
●●●●●●
Check operation of lighting system (headlights, direction
indicators, hazard warning lights, deck lid, passenger
compartment, glove compartment, instrument panel
warning lights, etc.). ●●●●●●●●●
●●●●●●
Check and, if necessary, top up fluid levels
(1)●●●●●●●●● ●●●●●●
Check engine control system operation (via diagnostic
tool). ●●●●●●●●●
●●●●●●
Visually inspect conditions of: exterior bodywork,
underbody protection, pipes and hoses (exhaust, fuel
system, brakes), rubber elements (sleeves, bushes, etc.). ●●●●●●●
Check position/wear of front windshield wiper blade. ●●●●●●●●
Check operation of the windshield wiper/washer system
and adjust nozzles, if necessary. ●●●●●●●●
(1) Top up using the fluids indicated in the “Fluids And Lubricants” section of the “Technical Specifications” chapter only after checking that the system is intact.
206
SERVICING AND MAINTENANCE