2017 Alfa Romeo Giulia ignition
[x] Cancel search: ignitionPage 182 of 268
HAZARD WARNING
LIGHTS
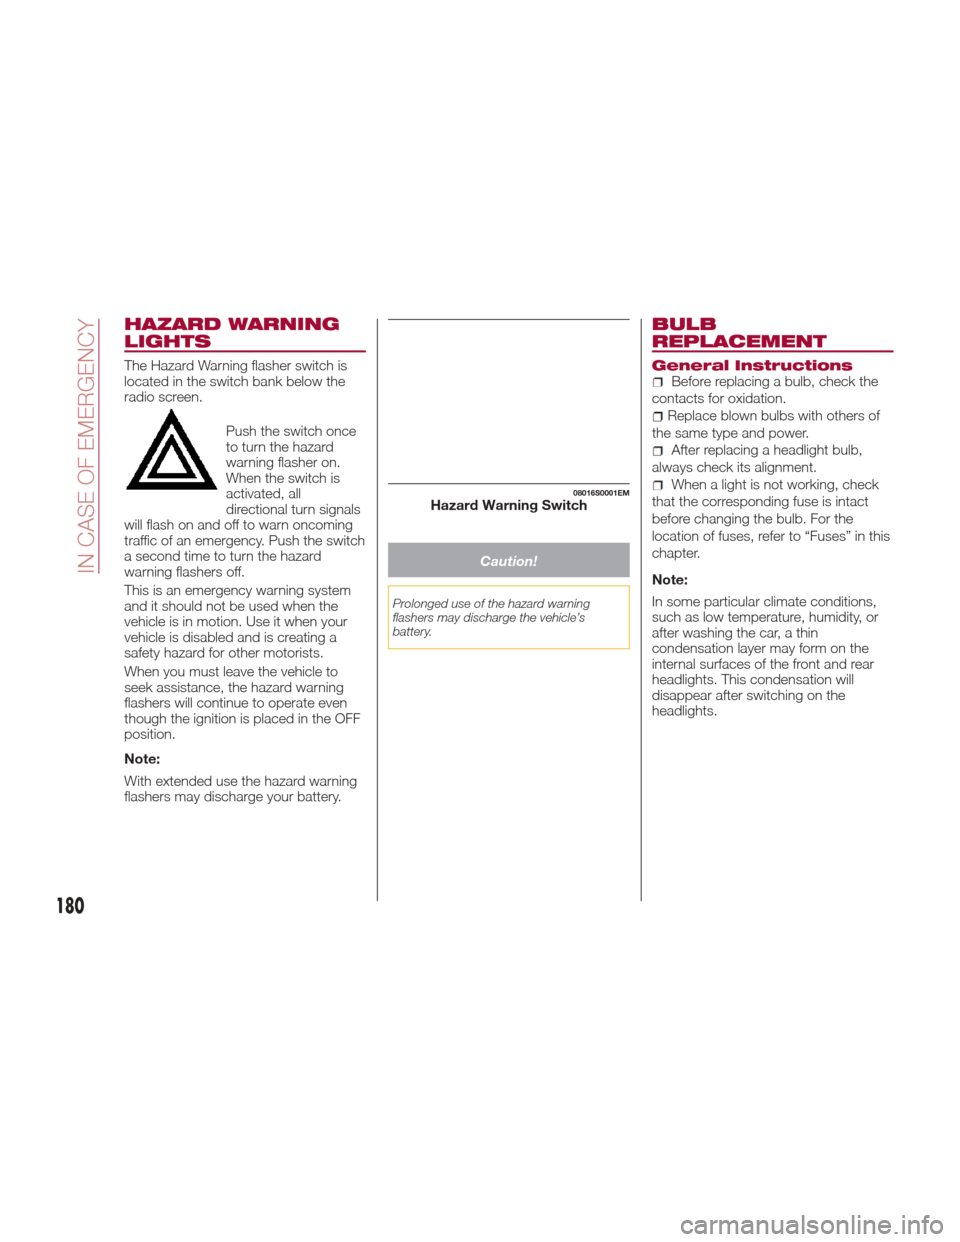
The Hazard Warning flasher switch is
located in the switch bank below the
radio screen.Push the switch once
to turn the hazard
warning flasher on.
When the switch is
activated, all
directional turn signals
will flash on and off to warn oncoming
traffic of an emergency. Push the switch
a second time to turn the hazard
warning flashers off.
This is an emergency warning system
and it should not be used when the
vehicle is in motion. Use it when your
vehicle is disabled and is creating a
safety hazard for other motorists.
When you must leave the vehicle to
seek assistance, the hazard warning
flashers will continue to operate even
though the ignition is placed in the OFF
position.
Note:
With extended use the hazard warning
flashers may discharge your battery.
Caution!
Prolonged use of the hazard warning
flashers may discharge the vehicle’s
battery.
BULB
REPLACEMENT
General InstructionsBefore replacing a bulb, check the
contacts for oxidation.
Replace blown bulbs with others of
the same type and power.
After replacing a headlight bulb,
always check its alignment.
When a light is not working, check
that the corresponding fuse is intact
before changing the bulb. For the
location of fuses, refer to “Fuses” in this
chapter.
Note:
In some particular climate conditions,
such as low temperature, humidity, or
after washing the car, a thin
condensation layer may form on the
internal surfaces of the front and rear
headlights. This condensation will
disappear after switching on the
headlights.08016S0001EMHazard Warning Switch
180
IN CASE OF EMERGENCY
Page 189 of 268
Warning!
When replacing a blown fuse, always
use an appropriate replacement fuse with
the same amp rating as the original fuse.
Never replace a fuse with another fuse of
higher amp rating. Never replace a blown
fuse with metal wires or any other material.
Failure to use proper fuses may result in
serious personal injury, fire and/or property
damage.
Before replacing a fuse, make sure that
the ignition is off and that all the other
services are switched off and/or
disengaged.
If the replaced fuse blows again, contact
an authorized dealer.
If a general protection fuse for safety
systems (air bag system, braking system),
power unit systems (engine system,
transmission system) or steering system
blows, contact an authorized dealer.
Fuse Location
The fuses, which can be replaced by
the user, are grouped in two boxes
below the passenger side foot board
and inside the trunk.
Control Unit Under
Passenger Side
Footboard
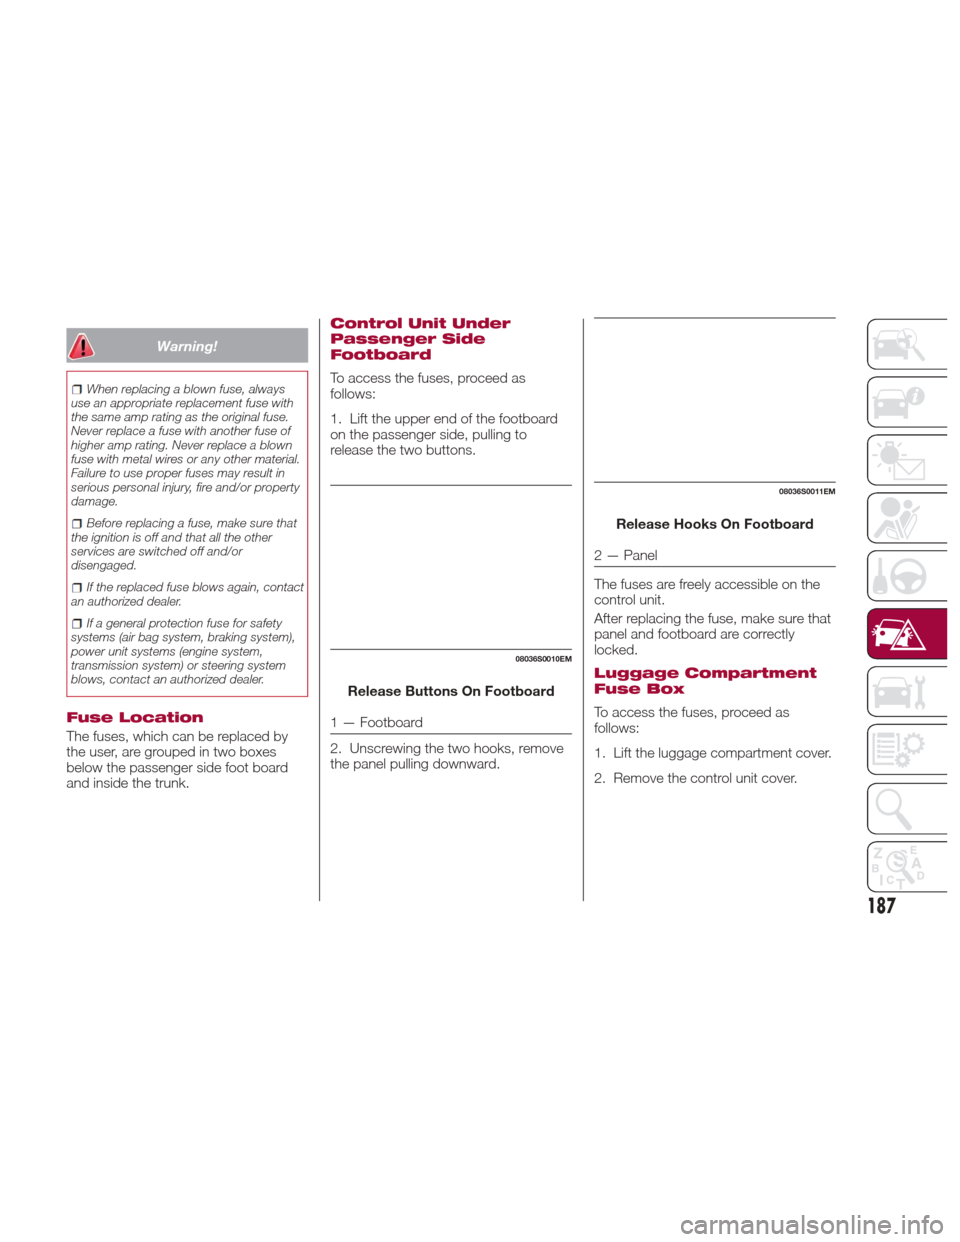
To access the fuses, proceed as
follows:
1. Lift the upper end of the footboard
on the passenger side, pulling to
release the two buttons.
Release Buttons On Footboard
1 — Footboard
2. Unscrewing the two hooks, remove
the panel pulling downward. Release Hooks On Footboard
2 — Panel
The fuses are freely accessible on the
control unit.
After replacing the fuse, make sure that
panel and footboard are correctly
locked.
Luggage Compartment
Fuse Box
To access the fuses, proceed as
follows:
1. Lift the luggage compartment cover.
2. Remove the control unit cover.
08036S0010EM
08036S0011EM
187
Page 199 of 268
Jump Starting
Warning!
Failure to follow this jump-starting
procedure could result in personal injury or
property damage due to battery explosion.
Caution!
Failure to follow these procedures could
result in damage to the charging system of
the booster vehicle or the discharged
vehicle.
Preparation For Jump Starting:
1. Firmly apply the parking brake, and
turn the ignition to the STOP position.
2. Switch off all electrical features in the
vehicle.
3.
If using another vehicle to jump-start
the battery, park the vehicle within the
jumper cables reach, set the parking
brake and make sure the ignition is OFF.
Warning!
Do not allow vehicles to touch each other
as this could establish a ground
connection and personal injury could
result.
Cable Connection
Proceed as follows to perform a jump
starting procedure:
1. Connect the positive (+) end of the
jumper cable to the positive (+) post of
the vehicle with the discharged battery
2. Connect the opposite end of the
positive (+) jumper cable to the positive
(+) post of the booster battery.
3. Connect the negative end (-) of the
jumper cable to the negative (-) post of
the booster battery.
4. Connect the opposite end of the
negative (-) jumper cable to a good
engine ground of the vehicle with the
discharged battery (exposed metal part
of the engine) away from the battery
and the fuel injection system.
Warning!
Do not connect the jumper cable to the
negative (-) post of the discharged battery.
The resulting electrical spark could cause
the battery to explode and could result in
serious injury. Only use the specific ground
point, do not use any other exposed metal
parts.
5. Start the engine in the vehicle that
has the booster battery, let the engine
idle a few minutes, and then start the
engine in the vehicle with the
discharged battery. If using a portable
battery booster pack, before starting
the vehicle, wait a few seconds after
completing the connection.
Cable Disconnection
Once the engine is started, remove the
connection cables in reverse sequence,
as described below:
1. Disconnect the negative (-) jumper
cable from the engine (-) ground of the
vehicle with the discharged battery.
2. Disconnect the negative end (-) of
the jumper cable from the negative (-)
post of the booster battery.
3. Disconnect the opposite end of the
positive (+) jumper cable from the
positive (+) post of the booster battery.
197
Page 212 of 268

ENGINE OIL
The engine oil level can be seen on the
instrument cluster display every time
the engine is started, or on the Connect
system display by activating on the
main menu (MENU button) the following
functions in sequence: “Apps”; “My
Car” and “Oil Level”.
Check on the display using the
6 notches that the oil level is between
the MIN and MAX level: 1 notch MIN
level, 6 notches MAX level.
If the oil level is close to or below the
MIN mark, add oil gradually through the
filler, considering that each notch
shown on the display corresponds to
approximately 8.8 fl oz (250 ml).
The oil level can also be checked
manually.
Caution!
Make sure not to add too much oil when
topping off the engine. Engine oil in excess
may damage the engine. Have the vehicle
checked. Never exceed the MAX level
when topping off engine oil. It is advisable
to check the oil level in intermediate steps
using the oil dipstick.
The oil level is not refreshed immediately on
the display after topping off. Consequently,
wait for the oil level to be refreshed on the
display and follow the procedure below.
Manual oil level checking
procedure
Check that the oil level is between the
MIN and MAX marks on dipstick, clean
it with a lint-free cloth and reinsert it.
Extract the dipstick again and check
that the level is between the MIN and
MAX marks.
Top-up and oil level indication
update on display
Ifaengineoiltop-offisneeded,inorder
to ensure the correct indication of the
oil level on the display, leave the car on
flat ground with the engine running for
approximately 5 minutes (temperature
higher than 176°F (80°C)) and proceed
with the process below:
Wait for five minutes, turn the ignition
to the ON mode without starting the
engine and wait for a few seconds. If
the indication is not correct after the
procedure, contact your authorized
dealer. Engine oil consumption
The maximum engine oil consumption
is usually 14.1 ounces (400 grams,
0.88 pounds) every 620 miles
(1,000 km). When the vehicle is new,
the engine needs to be run in; therefore
the engine oil consumption can only be
considered established after the first
3,100 - 3,730 miles (5,000 - 6,000 km).
Warning!
If the engine oil is being topped up, wait for
the engine to cool down before loosening
the filler cap, particularly for vehicles with
aluminium cap (if equipped). WARNING:
risk of burns!
Caution!
The oil level must never exceed the MAX
mark.
If the MAX mark is exceeded MAX (last
notch on the right turns red) after the fill-up,
go to your authorized dealer as soon as
possible to have the oil in excess removed.
Do not add oil with specifications different
from those of the oil already in the engine.
Used engine oil and oil filters contain
substances which are harmful to the
environment. To change the oil and filters,
we advise you to contact your authorized
dealer.
210
SERVICING AND MAINTENANCE
Page 217 of 268

Warning!
Use only refrigerants and compressor
lubricants approved by the manufacturer
for your air conditioning system. Some
unapproved refrigerants are flammable and
can explode, injuring you. Other
unapproved refrigerants or lubricants can
cause the system to fail, requiring costly
repairs. Refer to Warranty Information
Book, located in your owner’s information
kit, for further warranty information.
Lubricating Moving
Parts Of The Bodywork
Ensure that the locks and bodywork
junction points, including components
such as the seat guides, door hinges
(and rollers), trunk and hood are
periodically lubricated with
lithium-based grease to ensure correct,
silent operation and to protect them
from rust and wear.
Thoroughly clean the components,
eliminating every trace of dirt and dust.
After lubricating, eliminate excess oil
and grease. Also pay particular
attention to the hood closing devices,
to ensure correct operation. During
operations on the hood, to be carried
out with the engine cold, also
remember to check, clean and lubricate
the locking, release and safety devices.Lubricate the external lock barrels twice
a year. Apply a small amount of
high-quality lubricant directly into the
lock barrel.
If necessary, contact your authorized
dealer as soon as possible.
Windshield Wiper
Periodically clean the windshield and
rear window and rubber profile of the
windshield wiper blades, using a
sponge or a soft cloth and a
non-abrasive detergent. This eliminates
the salt or impurities accumulated when
driving.
Prolonged operation of the windshield
window wipers with dry glass may
cause the deterioration of the blades, in
addition to abrasion of the surface of
the glass. To eliminate the impurities on
the dry glass, always operate the
windshield washers.
In the event of very low outdoor
temperatures, below zero degrees,
ensure that the movement of the rubber
part in contact with the glass is not
obstructed. Use a suitable deicing
product to release it if required.
Avoid using the windshield wipers to
remove frost or ice.
Also avoid contact of the rubber profile
of the blades with petroleum derivatives
such as engine oil, gas, etc.
Warning!
Driving with worn windshield wiper blades
is a serious hazard, because visibility is
reduced in bad weather conditions.
Note:
The life of the windshield wiper blades
varies according to the usage
frequency. In any case, it is advised to
replace the blades approximately once
a year. When the blades are worn,
noise, marks on the glass or streaks of
water may be noticed. In the presence
of these conditions, clean the
windshield wiper blades or, if necessary,
replace them.
Raising The Windshield Wiper
Blades ("Service Position"
Function)
The "service position" function allows
the driver to replace the windshield
wiper blades more easily. It is also
recommended to activate this function
when it is snowing and to make it easier
to remove any dirt deposits in the area
where the blades are normally
positioned, when washing.
Activation Of The Function
To activate this function, disable the
windshield wiper before setting the
ignition device to STOP.
215
Page 218 of 268
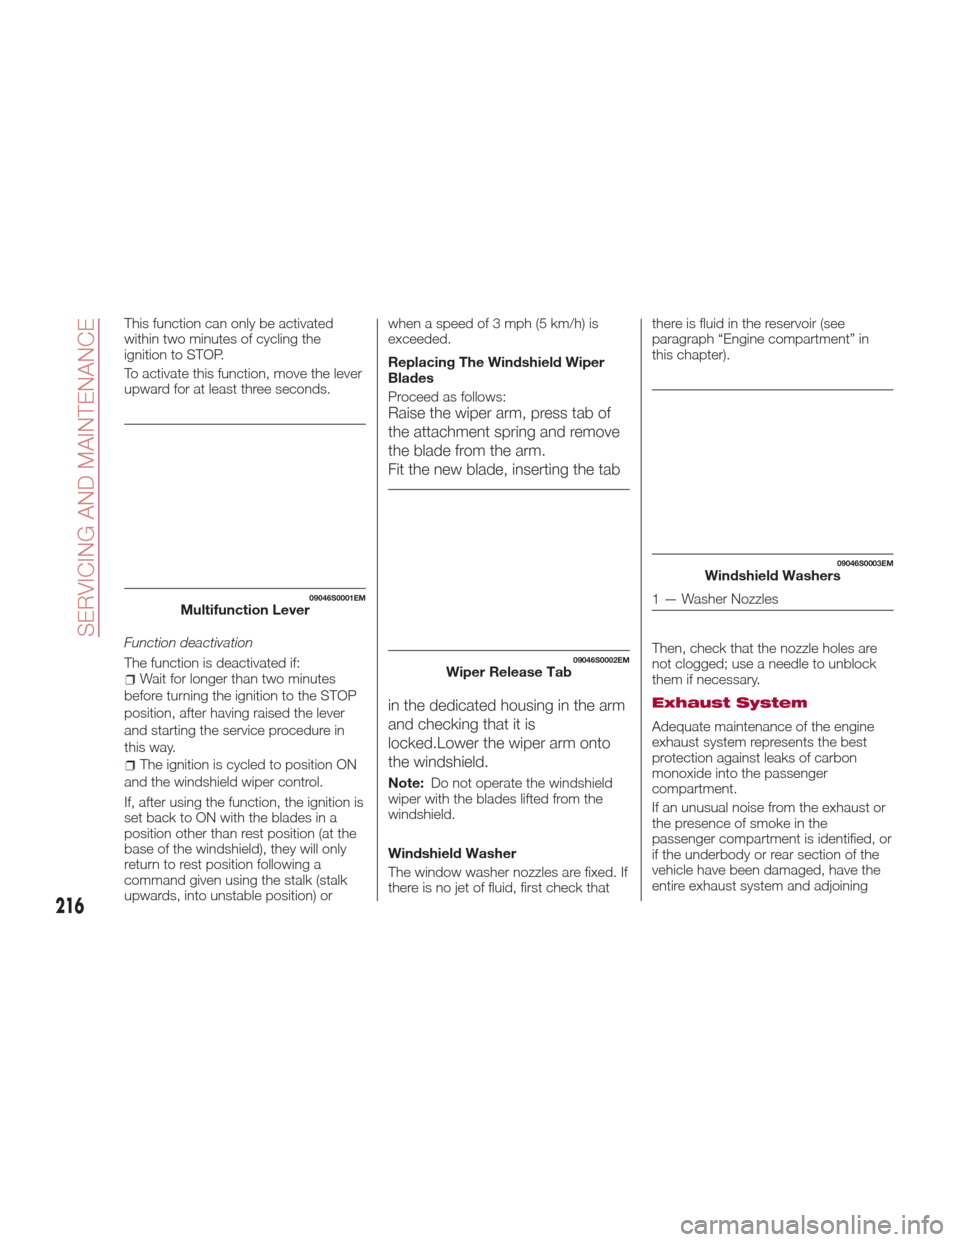
This function can only be activated
within two minutes of cycling the
ignition to STOP.
To activate this function, move the lever
upward for at least three seconds.
Function deactivation
The function is deactivated if:
Wait for longer than two minutes
before turning the ignition to the STOP
position, after having raised the lever
and starting the service procedure in
this way.
The ignition is cycled to position ON
and the windshield wiper control.
If, after using the function, the ignition is
set back to ON with the blades in a
position other than rest position (at the
base of the windshield), they will only
return to rest position following a
command given using the stalk (stalk
upwards, into unstable position) or when a speed of 3 mph (5 km/h) is
exceeded.
Replacing The Windshield Wiper
Blades
Proceed as follows:
Raise the wiper arm, press tab of
the attachment spring and remove
the blade from the arm.
Fit the new blade, inserting the tab
in the dedicated housing in the arm
and checking that it is
locked.Lower the wiper arm onto
the windshield.
Note:
Do not operate the windshield
wiper with the blades lifted from the
windshield.
Windshield Washer
The window washer nozzles are fixed. If
there is no jet of fluid, first check that there is fluid in the reservoir (see
paragraph “Engine compartment” in
this chapter).
Then, check that the nozzle holes are
not clogged; use a needle to unblock
them if necessary.
Exhaust System
Adequate maintenance of the engine
exhaust system represents the best
protection against leaks of carbon
monoxide into the passenger
compartment.
If an unusual noise from the exhaust or
the presence of smoke in the
passenger compartment is identified, or
if the underbody or rear section of the
vehicle have been damaged, have the
entire exhaust system and adjoining
09046S0001EMMultifunction Lever
09046S0002EMWiper Release Tab
09046S0003EMWindshield Washers
1 — Washer Nozzles
216
SERVICING AND MAINTENANCE
Page 219 of 268
bodywork areas checked at your
authorized dealer to identify any
components which are broken,
damaged, worn or have moved from
their correct fitting position.
Open welding or loose connections
may permit exhaust gas to enter the
passenger compartment.
Have the exhaust system checked
every time the vehicle is raised. Replace
the components where necessary (for
these operations, contact an authorized
dealer).
In normal operating conditions, the
catalytic converter does not require
maintenance. To ensure that it operates
correctly, however, and prevent it from
getting damaged, it is extremely
important that the engine operates
perfectly.
To minimize the risk of damaging the
catalytic converter, proceed as follows:
Do not stop the engine or deactivate
the ignition with gear engaged and
vehicle in motion.
Do not attempt to start the engine
by bump starting.
Do not persist in using the vehicle if
idling is very irregular or the operating
conditions are very notably irregular.
Warning!
Exhaust gases can injure or kill. They
contain carbon monoxide (CO), which is
colorless and odorless. Breathing it can
make you unconscious and can eventually
poison you.
A hot exhaust system can start a fire if
you park over materials that can burn.
Such materials might be grass or leaves
coming into contact with your exhaust
system. Do not park or operate your
vehicle in areas where your exhaust system
can contact anything that can burn.
Cooling System
Warning!
Turn vehicle off and disconnect the fan
motor lead before working near the radiator
cooling fan.
You or others can be badly burned by
hot engine coolant (antifreeze) or steam
from your radiator. If you see or hear steam
coming from under the hood, do not open
the hood until the radiator has had time to
cool. Never open a cooling system
pressure cap when the radiator or coolant
bottle is hot.
Keep hands, tools, clothing, and jewelry
away from the radiator cooling fan when
the hood is raised. The fan starts
automatically and may start at any time,
whether the engine is running or not.
When working near the radiator cooling
fan, disconnect the fan motor lead or turn
the ignition to the OFF mode. The fan is
temperature controlled and can start at any
time the ignition is in the ON mode.
You or others can be badly burned by
hot engine coolant (antifreeze) or steam
from your radiator. If you see or hear steam
coming from under the hood, do not open
the hood until the radiator has had time to
cool. Never try to open a cooling system
pressure cap when the radiator is hot.
Engine Coolant Check
Check the engine coolant level every oil
change or before long trips.
If there are impurities in the engine
coolant, the system must be drained,
flushed and refilled: contact an
authorized dealer.
Check the front part of the condenser
to check for any build-up of insects,
leaves or other debris. Should it be
dirty, clean it by spraying delicately with
water.
Check the hoses of the engine cooling
system to ensure that the rubber has
not deteriorated and that there are no
cracks, tears, cuts or obstructions in
the expansion tank side and radiator
side connectors. Should there be any
217
Page 236 of 268
Temperature Grades
The temperature grades are A (the
highest), B, and C, representing the
tire's resistance to the generation of
heat and its ability to dissipate heat,
when tested under controlled
conditions on a specified indoor
laboratory test wheel. Sustained high
temperature can cause the material of
the tire to degenerate and reduce tire
life, and excessive temperature can
lead to sudden tire failure. The grade C
corresponds to a level of performance,
which all passenger vehicle tires must
meet under the Federal Motor Vehicle
Safety Standard No. 109. Grades B
and A represent higher levels of
performance on the laboratory test
wheel, than the minimum required by
law.
Warning!
The temperature grade for this tire is
established for a tire that is properly
inflated and not overloaded. Excessive
speed, under-inflation, or excessive
loading, either separately or in
combination, can cause heat buildup and
possible tire failure.
STORING THE
VEHICLE
If the vehicle is left inactive for longer
than a month, the following precautions
should be observed:
Park the car in an area that is
covered and dry, and well-ventilated if
possible. Slightly open the windows.
Check that the electric park brake is
not activated.
Carry out the procedure: “manual
trunk opening device” procedure
described in this paragraph.
Disconnect the negative battery
terminal and check the battery charge.
Repeat this check once every three
months during storage.
If the battery is not disconnected
from the electrical system, check its
state of charge every thirty days.
Clean and protect the painted parts
using protective wax.
Clean and protect the shiny metal
parts using special compounds
available commercially.
Sprinkle talcum powder on the
windshield wiper rubber blades, and lift
them off the glass.
Cover the vehicle with a fabric or
perforated plastic sheet, paying
particular care not to damage the
painted surface by dragging any dust
that may have accumulated on it. Do
not use compact plastic sheets, as they do not allow humidity to evaporate from
the surface of the vehicle.
Inflate tires to +7.25 psi (+0.5 bar)
above the standard prescribed pressure
and check it periodically.
Do not drain the engine cooling
system.
Any time the car is left inactive for
two weeks or more, operate the air
conditioning system with engine idling
for at least five minutes, setting external
air and with fan set to maximum speed.
This operation will ensure appropriate
lubrication for the system, thus
minimizing the possibility of damage to
the compressor when the system is
operated again.
Note:
After cycling the ignition to STOP and
having closed the driver side door, wait
at least one minute before
disconnecting the electrical supply from
the battery. When reconnecting the
electrical supply to the battery, make
sure that the ignition is in the STOP
position and the driver side door is
closed.
Manual Trunk Opening Device
Proceed as follows if the battery needs
to be disconnected:
1. From the trunk interior covering,
rotate the plug to the left of the lock
and extract the strap connected to it.
234
SERVICING AND MAINTENANCE