2017 Alfa Romeo Giulia wheel
[x] Cancel search: wheelPage 119 of 268

collisions. A higher energy output is
used for more severe collisions.
This vehicle may be equipped with a
driver and/or front passenger seat belt
buckle switch that detects whether the
driver or front passenger seat belt is
buckled. The seat belt buckle switch
may adjust the inflation rate of the
Advanced Front Air Bags.
This vehicle may be equipped with
driver and/or front passenger seat track
position sensors that may adjust the
inflation rate of the Advanced Front Air
Bags based upon seat position.
Warning!
No objects should be placed over or
near the air bag on the instrument panel or
steering wheel because any such objects
could cause harm if the vehicle is in a
collision severe enough to cause the air
bag to inflate.
Do not put anything on or around the air
bag covers or attempt to open them
manually. You may damage the air bags
and you could be injured because the air
bags may no longer be functional. The
protective covers for the air bag cushions
are designed to open only when the air
bags are inflating.
Relying on the air bags alone could lead
to more severe injuries in a collision. The air
bags work with your seat belt to restrain
you properly. In some collisions, air bags
won’t deploy at all. Always wear your seat
belts even though you have air bags.
Front Air Bag Operation
Front Air Bags are designed to provide
additional protection by supplementing
the seat belts. Front air bags are not
expected to reduce the risk of injury in
rear, side, or rollover collisions. The front
air bags will not deploy in all frontal
collisions, including some that may
produce substantial vehicle damage —
for example, some pole collisions, truck
underrides, and angle offset collisions.
On the other hand, depending on the
type and location of impact, front air
bags may deploy in crashes with little
vehicle front-end damage but that
produce a severe initial deceleration.
Because air bag sensors measure
vehicle deceleration over time, vehicle
speed and damage by themselves are
not good indicators of whether or not
an air bag should have deployed.
Seat belts are necessary for your
protection in all collisions, and also are
needed to help keep you in position,
away from an inflating air bag. When the ORC detects a collision
requiring the front air bags, it signals the
inflator units. A large quantity of
non-toxic gas is generated to inflate the
front air bags.
The steering wheel hub trim cover and
the upper right side of the instrument
panel separate and fold out of the way
as the air bags inflate to their full size.
The front air bags fully inflate in less
time than it takes to blink your eyes.
The front air bags then quickly deflate
while helping to restrain the driver and
front passenger.
Knee Impact Bolsters
The Knee Impact Bolsters help protect
the knees of the driver and front
passenger, and position the front
occupants for improved interaction with
the front air bags.
Warning!
Do not drill, cut, or tamper with the knee
impact bolsters in any way.
Do not mount any accessories to the
knee impact bolsters such as alarm lights,
stereos, citizen band radios, etc.
117
Page 122 of 268

Warning!
Side Air Bags need room to inflate. Do
not lean against the door or window. Sit
upright in the center of the seat
Being too close to the Side Air Bags
during deployment could cause you to be
severely injured or killed.
Relying on the Side Air Bags alone could
lead to more severe injuries in a collision.
The Side Air Bags work with your seat belt
to restrain you properly. In some collisions,
Side Air Bags won’t deploy at all. Always
wear your seat belt even though you have
Side Air Bags.
Note:
Air bag covers may not be obvious in
the interior trim, but they will open
during air bag deployment.
Side Impacts
In side impacts, the side impact
sensors aid the ORC in determining the
appropriate response to impact events.
The system is calibrated to deploy the
Side Air Bags on the impact side of the
vehicle during impacts that require Side
Air Bag occupant protection. In side
impacts, the Side Air Bags deploy
independently; a left side impact
deploys the left Side Air Bags only and
a right side impact deploys the right
Side Air Bags only. The Side Air Bags will not deploy in all
side collisions, including some collisions
at certain angles, or some side
collisions that do not impact the area of
the passenger compartment. The Side
Air Bags may deploy during angled or
offset frontal collisions where the front
air bags deploy.
Rollover Events
Side Air Bags are designed to activate
in certain rollover events. The ORC
determines whether the deployment of
the Side Air Bags in a particular rollover
event is appropriate, based on the
severity and type of collision. Vehicle
damage by itself is not a good indicator
of whether or not Side Air Bags should
have deployed.
The Side Air Bags will not deploy in all
rollover events. The rollover sensing
system determines if a rollover event
may be in progress and whether
deployment is appropriate. In the event
the vehicle experiences a rollover or
near rollover event, and deployment of
the Side Air Bags is appropriate, the
rollover sensing system will also deploy
the seat belt pretensioners on both
sides of the vehicle.
The SABICs may help reduce the risk of
partial or complete ejection of vehicle
occupants through side windows in
certain rollover or side impact events.
The Occupant Restraint Controller
(ORC) monitors the internal circuits and
interconnecting wiring associated with
electrical Air Bag System Components
listed below:
Air Bag System Components
Occupant Restraint Controller (ORC)
Air Bag Warning Light
Steering Wheel and Column
Instrument Panel
Knee Impact Bolsters
Driver and Front Passenger Air Bags
Supplemental Side Air Bags
Supplemental Knee Air Bags
Front and Side Impact Sensors
Seat Belt Pretensioners
Seat Track Position Sensors
Seat Belt Buckle Switch
If A Deployment Occurs
The front air bags are designed to
deflate immediately after deployment.
Note:
Front and/or side air bags will not
deploy in all collisions. This does not
mean something is wrong with the air
bag system.
120
SAFETY
Page 124 of 268
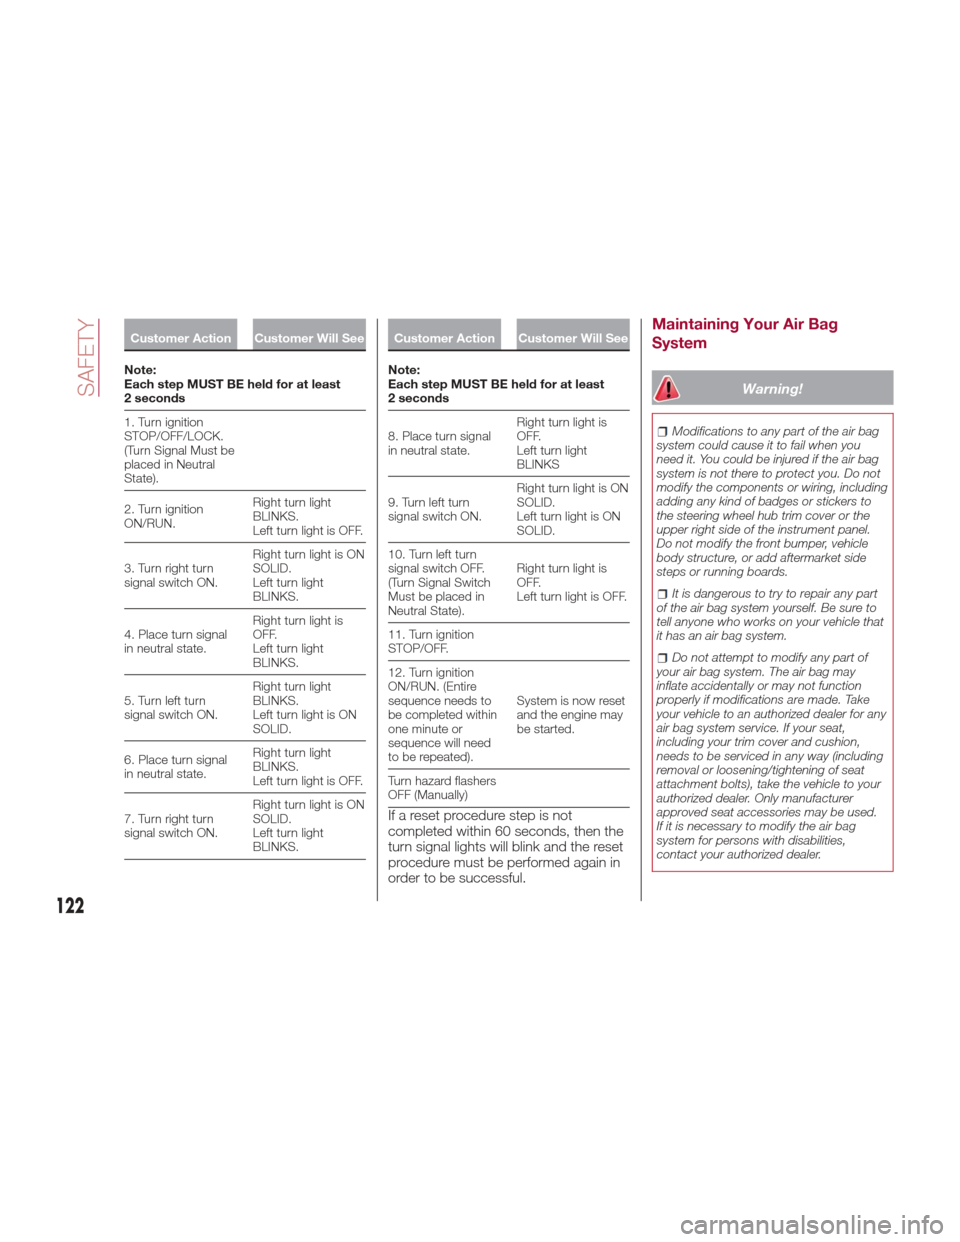
Customer Action Customer Will See
Note:
Each
step MUST BE held for at least
2 seconds
1. Turn ignition
STOP/OFF/LOCK.
(Turn Signal Must be
placed in Neutral
State).
2. Turn ignition
ON/RUN. Right turn light
BLINKS.
Left turn light is OFF.
3. Turn right turn
signal switch ON. Right turn light is ON
SOLID.
Left turn light
BLINKS.
4. Place turn signal
in neutral state. Right turn light is
OFF.
Left turn light
BLINKS.
5. Turn left turn
signal switch ON. Right turn light
BLINKS.
Left turn light is ON
SOLID.
6. Place turn signal
in neutral state. Right turn light
BLINKS.
Left turn light is OFF.
7. Turn right turn
signal switch ON. Right turn light is ON
SOLID.
Left turn light
BLINKS.
Customer Action Customer Will See
Note:
Each
step MUST BE held for at least
2 seconds
8. Place turn signal
in neutral state. Right turn light is
OFF.
Left turn light
BLINKS
9. Turn left turn
signal switch ON. Right turn light is ON
SOLID.
Left turn light is ON
SOLID.
10. Turn left turn
signal switch OFF.
(Turn Signal Switch
Must be placed in
Neutral State). Right turn light is
OFF.
Left turn light is OFF.
11. Turn ignition
STOP/OFF.
12. Turn ignition
ON/RUN. (Entire
sequence needs to
be completed within
one minute or
sequence will need
to be repeated). System is now reset
and the engine may
be started.
Turn hazard flashers
OFF (Manually)
If a reset procedure step is not
completed within 60 seconds, then the
turn signal lights will blink and the reset
procedure must be performed again in
order to be successful.
Maintaining Your Air Bag
System
Warning!
Modifications to any part of the air bag
system could cause it to fail when you
need it. You could be injured if the air bag
system is not there to protect you. Do not
modify the components or wiring, including
adding any kind of badges or stickers to
the steering wheel hub trim cover or the
upper right side of the instrument panel.
Do not modify the front bumper, vehicle
body structure, or add aftermarket side
steps or running boards.
It is dangerous to try to repair any part
of the air bag system yourself. Be sure to
tell anyone who works on your vehicle that
it has an air bag system.
Do not attempt to modify any part of
your air bag system. The air bag may
inflate accidentally or may not function
properly if modifications are made. Take
your vehicle to an authorized dealer for any
air bag system service. If your seat,
including your trim cover and cushion,
needs to be serviced in any way (including
removal or loosening/tightening of seat
attachment bolts), take the vehicle to your
authorized dealer. Only manufacturer
approved seat accessories may be used.
If it is necessary to modify the air bag
system for persons with disabilities,
contact your authorized dealer.
122
SAFETY
Page 137 of 268
STARTING THE
ENGINE
Starting The Engine
Before starting the engine, be sure to
adjust the seat, the interior rear view
mirrors, and the door mirrors, and
fasten the seat belt correctly.
Never press the accelerator pedal
before starting the engine.
If necessary, messages indicating the
starting procedure can be shown in the
display.
Warning!
When leaving the vehicle, always remove
the key fob from the vehicle and lock your
vehicle.
Never leave children alone in a vehicle,
or with access to an unlocked vehicle.
Allowing children to be in a vehicle
unattended is dangerous for a number of
reasons. A child or others could be
seriously or fatally injured. Children should
be warned not to touch the parking brake,
brake pedal or the transmission gear
selector.
Do not leave the key fob in or near the
vehicle, or in a location accessible to
children. A child could operate power
windows, other controls, or move the
vehicle.
Do not leave children or animals inside
parked vehicles in hot weather. Interior heat
build-up may cause serious injury or death.
Starting Procedure
Proceed as follows:
1. Apply the electric park brake and set
the gear selector to PARK (P) or
NEUTRAL (N).
2. Fully depress the brake pedal
without touching the accelerator.
3. Briefly push the ignition button.
4. If the engine doesn't start within a
few seconds, you need to repeat the
procedure.
If the problem persists, contact an
authorized dealer.
Warning!
Never pour fuel or other flammable liquid
into the throttle body air inlet opening in an
attempt to start the vehicle. This could
result in flash fire causing serious personal
injury.
Do not attempt to push or tow your
vehicle to get it started. Vehicles equipped
with an automatic transmission cannot be
started this way. Unburned fuel could enter
the catalytic converter and once the engine
has started, ignite and damage the
converter and vehicle.
If the vehicle has a discharged battery,
booster cables may be used to obtain a
start from a booster battery or the battery
in another vehicle. This type of start can be
dangerous if done improperly. Refer to
“Emergency Starting” in “In Case Of
Emergency” for further information.
Caution!
To prevent damage to the starter, do not
continuously crank the engine for more
than 25 seconds at a time. Wait
60 seconds before trying again.
Remote Starting System
— If Equipped
This system uses the key fob to start
the engine conveniently from outside
the vehicle while still maintaining
security. The system has a range of at
least 300 feet (91 meters).
The remote starting system also
activates the climate control (if
equipped), the heated seats (if
equipped), and the heated steering
wheel (if equipped), depending on
temperatures outside and inside of the
car.
Note:
The vehicle must be equipped with
an automatic transmission in order to
include remote start.
Obstructions between the vehicle
and key fob may reduce this range.
135
Page 138 of 268
How to use Remote Start
All of the following conditions must be
met before the engine will remote start:
Gear selector in PARK (P).
Doors closed.
Hood closed.
Trunk closed.
Hazard switch off.
Brake switch inactive (brake pedal
not pressed).
Battery at an acceptable charge
level.
PANIC button not pushed.
System not disabled from previous
remote start event.
Vehicle alarm system indicator
flashing.
Ignition in the OFF mode (if equipped
with keyless ignition system).
Fuel level meets minimum
requirement.
Remote Start Comfort Systems — If
Equipped
When Remote Start is activated, the
heated steering wheel and driver
heated seat features will automatically
turn on in cold weather.
These features will stay on through the
duration of remote start also until the
ignition is cycled to the ON/RUN mode. Remote Start Windshield Wiper
De–Icer Activation — If Equipped
When remote start is active and the
outside ambient temperature is less
than 39°F (4°C), the Windshield Wiper
De-Icer will be enabled. Exiting remote
start will resume previous operation,
except if the Windshield Wiper De-Icer
is active.
The Windshield Wiper De-Icer timer and
operation will continue.
Extended Park Starting
If the vehicle has not been started or
driven for at least 35 days, it is advisable
to follow the indications below.
To start the engine, proceed as follows:
1. Briefly push the ignition button
2. If the engine does not start, wait five
seconds and let the starter cool down
and then repeat the starting procedure
3. If the engine does not start after
eight attempts, let the starter cool down
for at least 10 seconds, and then repeat
the starting procedure
If the problem persists, contact your
authorized dealer.
Note:
After prolonged vehicle inactivity,
very difficult starting, that can be
noticed through rapid fatigue of the
starter, might also be due to a partially
flat battery. In this case, see the
"Emergency Starting" section in the "In
Case Of Emergency" chapter.
If Engine Fails To Start
Starting the Engine with Key Fob
Battery Run Down or Drained
If the ignition does not respond when
the button is pushed, the key fob
battery might be run down or drained.
Therefore, the system does not detect
the presence of the key fob in the
vehicle, and will display a dedicated
message.
In this case, follow the instructions
outlined in "Starting With A Discharged
Key Fob Battery" in the "Getting To
Know Your Vehicle" chapter, and start
the engine normally.
Warning!
Never pour fuel or other flammable liquid
into the throttle body air inlet opening in an
attempt to start the vehicle. This could
result in flash fire causing serious personal
injury.
Do not attempt to push or tow your
vehicle to get it started. Vehicles equipped
with an automatic transmission cannot be
started this way. Unburned fuel could enter
the catalytic converter and once the engine
has started, ignite and damage the
converter and vehicle.
136
STARTING AND OPERATING
Page 139 of 268
If the vehicle has a discharged battery,
booster cables may be used to obtain a
start from a booster battery or the battery
in another vehicle. This type of start can be
dangerous if done improperly. Refer to
“Emergency Starting” in “In Case Of
Emergency” for further information.
Caution!
To prevent damage to the starter, do not
continuously crank the engine for more
than 25 seconds at a time. Wait
60 seconds before trying again.
After Starting —
Warming Up The Engine
Proceed as follows:Travel slowly, letting the engine run at
a reduced RPM, without accelerating
suddenly.
It is recommended to wait until the
digital engine coolant temperature
indicator starts to rise for maximum
performance.
Stopping The Engine
To stop the engine, proceed as follows:
1. Park the vehicle in a position that is
not dangerous for oncoming traffic.
2. Engage the PARK (P) mode. 3. With engine idling, press the
START/STOP button on the steering
wheel to STOP the engine.
Note:
Do not leave the ignition in ON
mode when the engine is off.
To shut off the engine with vehicle
speed greater than 5 mph (8 km/h), you
must push and hold the ignition or push
the START/STOP button three times
consecutively within a few seconds.
The engine will shut down, and the
ignition will be placed in the ON mode
With the keyless ignition system, it is
possible to go away from the vehicle
taking the key fob with you, without the
engine switching off. The vehicle will
inform about the absence of the key on
board, only if the doors are closed.
Stopping the engine (cycling from the
ON to the STOP position) the
accessories are still powered for about
three minutes, or until a door is opened.
When the ignition is in the STOP/OFF
mode, the window switches remain
active for three minutes. Opening a
front door will cancel this function.
After severe driving, idle the engine to
allow the temperature inside the engine
compartment to cool before shutting off
the engine.
Turbocharger Cool
Down
Before switching the engine off, keep it
idling for a few minutes so that the
turbocharger can be suitably lubricated.
This procedure is particularly
recommended after severe driving.
After a full load operation, keep the
engine idling for three to five minutes
before switching it off.
This time allows the lubricating oil and
the engine coolant to eliminate the
excessive heat from combustion
chamber, bearings, inner components
and turbocharger.
137
Page 140 of 268
ELECTRIC PARK
BRAKE
The vehicle is equipped with electric
park brake to guarantee better use and
optimal performance compared to a
manually operated park brake.
The electric parking brake features a
switch located on the central console, a
motor with caliper for each rear wheel,
and an electronic control module.
The electric parking brake can be
engaged in two ways:
Manually, by pulling the switch on the
center console.
Automatically, in "Safe Hold" or "Auto
Park Brake" conditions. Note:
Normally, the electric parking brake is
engaged automatically when the engine
is stopped. This function can be
deactivated/activated on the Connect
system by selecting the following items
in sequence on the main menu:
"Settings", "Driver Assistance" and
"Automatic Parking Brake".
In addition to engaging the electric park
brake, along with steering and
positioning chocks in front of the
wheels (when on a steep slope), you
must always place the vehicle in the
PARK (P) mode before leaving.
Should the vehicle battery be faulty, the
battery must be replaced in order to
unlock the electric park brake.
Engaging The Park Brake Manually
Briefly pull the switch located on the
center console to manually engage the
electric park brake when the vehicle is
stationary.
Noise may be heard from the rear of the
vehicle when engaging the electric
parking brake.
A slight movement of the brake pedal
may be detected when engaging the
electric parking brake with the brake
pedal pressed.
With the electric parking brake
engaged, the BRAKE warning light on
the instrument panel and the switch will
illuminate.
Caution!
With the Electronic Parking Brake failure
warning light on, some functions of the
electric parking brake are deactivated. In
this case the driver is responsible for brake
activation and vehicle parking in complete
safety conditions.
If, under exceptional circumstances, the
use of the brake is required with the
vehicle in motion, keep the switch on
the center console pulled as long as the
brake action is necessary.
The BRAKE warning light may switch
on with the hydraulic system
temporarily unavailable, in this case
braking is controlled by the motors.
The brake lights will also automatically
switch on in the same way as for
normal braking with the use of the
brake pedal.
Release the switch on the center
console to stop the braking action with
the vehicle in motion.
If, through this procedure, the vehicle is
braked until a speed below 1.9 mph
(3 km/h) is reached and the switch is
kept pulled, the park brake will
definitively engage.
Note:
Driving the vehicle with the electric
parking brake engaged, or using it
07046S0001EMElectric Park Brake Switch
138
STARTING AND OPERATING
Page 141 of 268
several times to slow down the vehicle,
may cause severe damage to the
braking system.
Disengaging The Electric Park
Brake Manually
In order to manually release the park
brake, the ignition should be in the ON
mode. Press the brake pedal, and then
press the switch on the center console
briefly.
Noise may be heard from the rear of the
vehicle, and a slight movement of the
brake pedal may be detected during
disengagement.
After disengaging the electric parking
brake, the BRAKE warning light on the
instrument panel and the light on the
switch will turn off.
If the BRAKE warning light on the
instrument panel remains on with the
electric parking brake disengaged, this
indicates a fault: in this case, contact an
authorized dealer.
Warning!
Never leave children alone in a vehicle,
or with access to an unlocked vehicle.
Allowing children to be in a vehicle
unattended is dangerous for a number of
reasons. A child or others could be
seriously or fatally injured. Children should
be warned not to touch the park brake,
brake pedal or the gear selector.
Do not leave the key fob in or near the
vehicle or in a location accessible to
children. A child could operate power
windows, other controls, or move the
vehicle.
Be sure the park brake is fully
disengaged before driving; failure to do so
can lead to brake failure and a collision.
Always fully apply the park brake when
leaving your vehicle, or it may roll and
cause damage or injury.
Caution!
Never use gear position PARK (P) instead
of the electric parking brake. Always
engage the electric parking brake when
parking the vehicle to prevent injury or
damage caused by the unexpected
movement of the vehicle.
Electric Park Brake
Operating Modes
The electric park brake may operate as
follows:
"Dynamic Operating Mode": this
mode is activated by pulling the switch
repeatedly while driving.
"Static Engagement and Release
Mode": with the vehicle stationary, the
electric park brake can be activated by
pulling the switch on the central tunnel
once. On the other hand, push the switch and the brake pedal at the same
time to disengage the brake.
"Drive Away Release" — if equipped:
the electric park brake will automatically
disengage with the driver side seat belt
fastened and the detection of an action
performed by the driver to move the
vehicle (forward gear or reverse gear).
"Safe Hold": if the vehicle speed is
lower than 1.9 mph (3 km/h), the gear
selector is not in PARK (P) position and
the driver's intention of leaving the
vehicle is detected, the electric park
brake will automatically engage to hold
the vehicle in safety conditions.
"Auto Park Brake": if the vehicle
speed is below 1.9 mph (3 km/h), the
electric park brake will automatically
engage when the gear selector is in
PARK (P) position. The light on the
switch located on the center console
switches on together with the BRAKE
warning light on the instrument panel
when the park brake is engaged and
applied to the wheels. Each automatic
park brake engagement can be
cancelled by pressing the switch on the
center console and at the same time
moving the gear selector for the
transmission to position PARK (P).
139