2017 Alfa Romeo Giulia lock
[x] Cancel search: lockPage 39 of 268

INTERIOR LIGHTS
Front Map Reading
Lights
The front map/reading and overhead
lights are mounted in the overhead
console. Each light can be turned on by
pushing the corresponding switch on
the console. These switches are backlit
for night time visibility. To turn the lights
off, push the switch a second time.Note:
Before getting out of the vehicle,
ensure that the overhead lights are off.
This will prevent the battery level from
being drained once the doors are
closed. If a light is left on accidently, the
overhead lights turn off automatically
approximately 15 minutes after the
engine has been turned OFF.
Overhead Light Timing — If
Equipped
On certain models, to assist getting in
and out of the vehicle at night or in
poorly-lit areas, two timed modes have
been provided.
Timing While Getting Into The
Vehicle — The overhead lights turn on
according to the following modes:
Will illuminate for a few seconds
when the doors are unlocked.
Will illuminate for approximately three
minutes when one of the doors is
opened.
Will illuminate for a few seconds
when the doors are locked.
Timing is interrupted when the ignition
is turned to ON. Three Modes Are Provided For
Switching Off:
When all doors are closed after
entering the vehicle, the three-minute
timer will stop and a seconds timer will
start for the interior lights. This timing
will stop when the ignition is turned to
ON.
When doors are locked (either with
key fob or with key inserted on driver
side door), the overhead light turns off.
The interior lights will turn off after
15 minutes to preserve the battery.
Timing While Getting Out Of The
Vehicle — After turning the ignition
switch to STOP, the overhead lights will
turn on as follows:
For a few seconds after the engine
stops.
For approximately three minutes
when one of the doors is opened.
For a few seconds when the last
door is closed.
The timing stops automatically when
the doors are locked.
Courtesy Lights — If Equipped
On the driver and passenger sun visor,
there is a light which illuminates the sun
visor mirror when folded down.04136S0001EMOverhead Console
1 — Driver’s Reading/Map Light Switch
2 — Rear Overhead Lights Switch
3 — Overhead Lights Switch
4 — Front Map Reading Lights Switch
5 — Passenger’s Reading/Map Light
Switch
6 — Passenger’s Reading/Map Light
7 — Center Reading/Map Light
8 — Driver’s Reading/Map Light
37
Page 44 of 268
CLIMATE CONTROL
Passenger
Compartment Air Vents
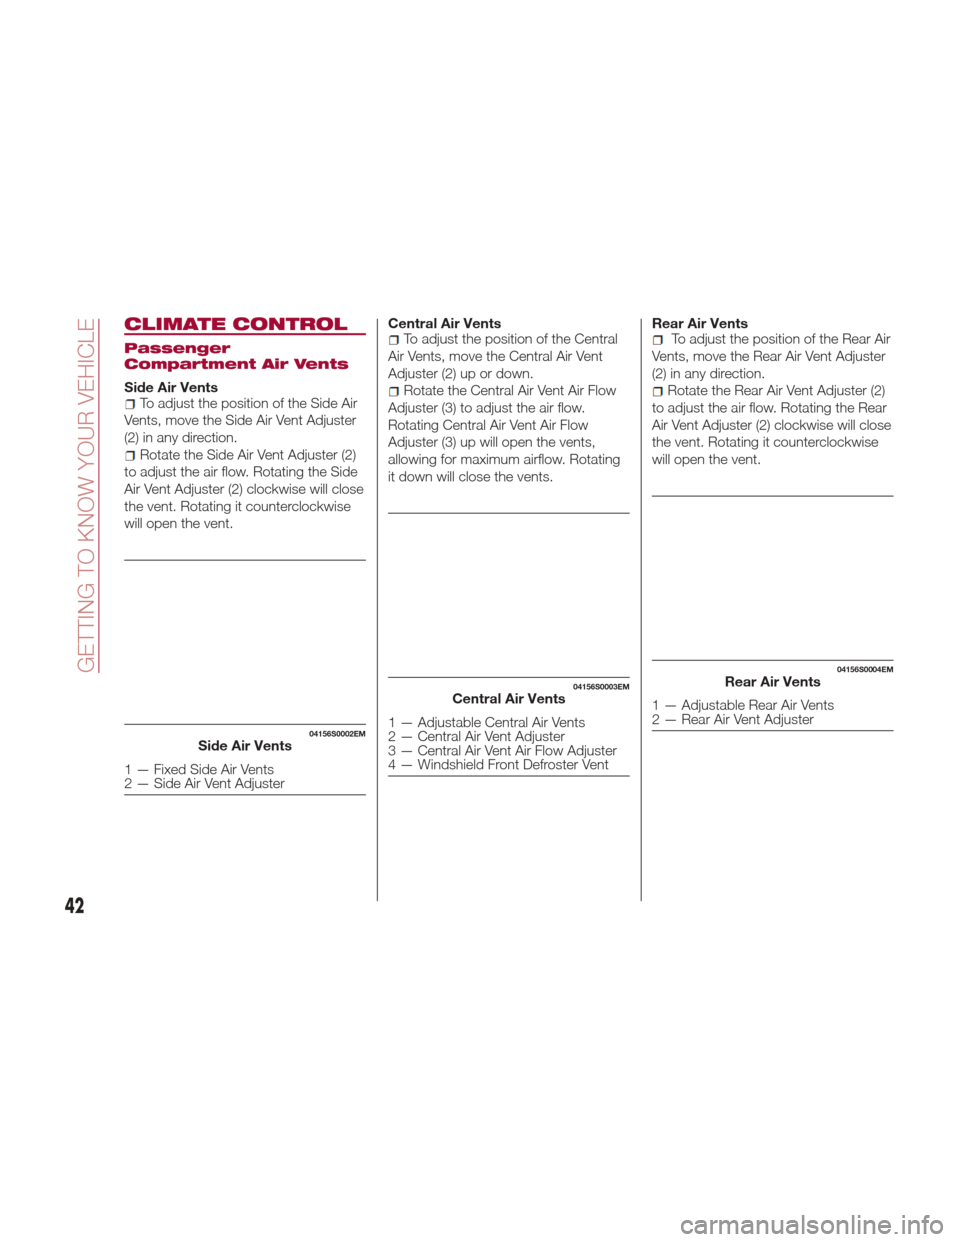
Side Air VentsTo adjust the position of the Side Air
Vents, move the Side Air Vent Adjuster
(2) in any direction.
Rotate the Side Air Vent Adjuster (2)
to adjust the air flow. Rotating the Side
Air Vent Adjuster (2) clockwise will close
the vent. Rotating it counterclockwise
will open the vent. Central Air Vents
To adjust the position of the Central
Air Vents, move the Central Air Vent
Adjuster (2) up or down.
Rotate the Central Air Vent Air Flow
Adjuster (3) to adjust the air flow.
Rotating Central Air Vent Air Flow
Adjuster (3) up will open the vents,
allowing for maximum airflow. Rotating
it down will close the vents. Rear Air Vents
To adjust the position of the Rear Air
Vents, move the Rear Air Vent Adjuster
(2) in any direction.
Rotate the Rear Air Vent Adjuster (2)
to adjust the air flow. Rotating the Rear
Air Vent Adjuster (2) clockwise will close
the vent. Rotating it counterclockwise
will open the vent.
04156S0002EMSide Air Vents
1 — Fixed Side Air Vents
2 — Side Air Vent Adjuster
04156S0003EMCentral Air Vents
1 — Adjustable Central Air Vents
2 — Central Air Vent Adjuster
3 — Central Air Vent Air Flow Adjuster
4 — Windshield Front Defroster Vent
04156S0004EMRear Air Vents
1 — Adjustable Rear Air Vents
2 — Rear Air Vent Adjuster
42
GETTING TO KNOW YOUR VEHICLE
Page 51 of 268
POWER WINDOWS
Power Window Switches
The power window switches work with
the ignition in the ON position and for
three minutes after the ignition has
been placed in the STOP position.
When one of the front doors is opened,
this operation is disabled.
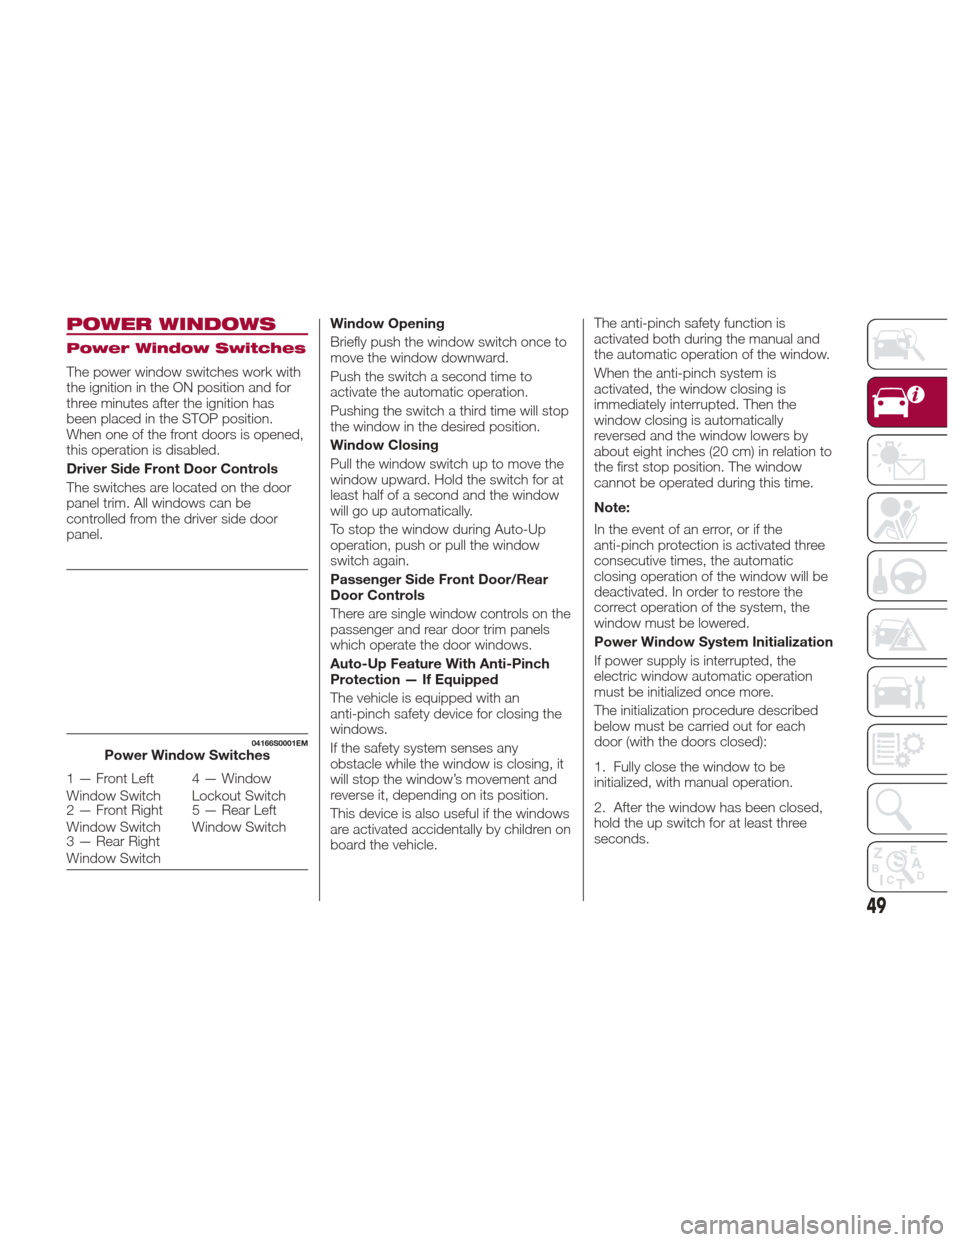
Driver Side Front Door Controls
The switches are located on the door
panel trim. All windows can be
controlled from the driver side door
panel.Window Opening
Briefly push the window switch once to
move the window downward.
Push the switch a second time to
activate the automatic operation.
Pushing the switch a third time will stop
the window in the desired position.
Window Closing
Pull the window switch up to move the
window upward. Hold the switch for at
least half of a second and the window
will go up automatically.
To stop the window during Auto-Up
operation, push or pull the window
switch again.
Passenger Side Front Door/Rear
Door Controls
There are single window controls on the
passenger and rear door trim panels
which operate the door windows.
Auto-Up Feature With Anti-Pinch
Protection — If Equipped
The vehicle is equipped with an
anti-pinch safety device for closing the
windows.
If the safety system senses any
obstacle while the window is closing, it
will stop the window’s movement and
reverse it, depending on its position.
This device is also useful if the windows
are activated accidentally by children on
board the vehicle.The anti-pinch safety function is
activated both during the manual and
the automatic operation of the window.
When the anti-pinch system is
activated, the window closing is
immediately interrupted. Then the
window closing is automatically
reversed and the window lowers by
about eight inches (20 cm) in relation to
the first stop position. The window
cannot be operated during this time.
Note:
In the event of an error, or if the
anti-pinch protection is activated three
consecutive times, the automatic
closing operation of the window will be
deactivated. In order to restore the
correct operation of the system, the
window must be lowered.
Power Window System Initialization
If power supply is interrupted, the
electric window automatic operation
must be initialized once more.
The initialization procedure described
below must be carried out for each
door (with the doors closed):
1. Fully close the window to be
initialized, with manual operation.
2. After the window has been closed,
hold the up switch for at least three
seconds.
04166S0001EMPower Window Switches
1 — Front Left
Window Switch
4 — Window
Lockout Switch
2 — Front Right
Window Switch 5 — Rear Left
Window Switch
3 — Rear Right
Window Switch
49
Page 52 of 268

Warning!
Never leave children unattended in a
vehicle, and do not let children play with
power windows. Do not leave the key fob
in or near the vehicle, or in a location
accessible to children. Occupants,
particularly unattended children, can
become entrapped by the windows while
operating the power window switches.
Such entrapment may result in serious
injury or death.
POWER SUNROOF —
IF EQUIPPED
Power Sunroof
The power sunroof consists of two
glass panels (the front one is mobile
and the rear one fixed) and is fitted with
two power operated sun shades.
Operation of the sunroof is only
possible with the ignition at AVV. Refer
to “Ignition” in this chapter for further
information.
Warning!
Never leave children unattended in a
vehicle, or with access to an unlocked
vehicle. Never leave the key fob in or near
the vehicle, or in a location accessible to
children. Do not leave the ignition of a
vehicle equipped with keyless ignition in the
AVV or ON mode. Occupants, particularly
unattended children, can become
entrapped by the power sunroof while
operating the power sunroof switch. Such
entrapment may result in serious injury or
death.
In a collision, there is a greater risk of
being thrown from a vehicle with an open
sunroof. You could also be seriously injured
or killed. Always fasten your seat belt
properly and make sure all passengers are
also properly secured.
Do not allow small children to operate
the sunroof. Never allow your fingers, other
body parts, or any object, to project
through the sunroof opening. Injury may
result.
Opening
To open the sunroof, push the
open/close button toward the rear of
the vehicle to open the roof completely.
The automatic motion can be
interrupted in any position by pushing
the open/close button again.
04186S0001EMSunroof And Power Shade Buttons
1 — Open/Close Button
2 — Vent Open/Close
3 — Power Shade Open/Close
50
GETTING TO KNOW YOUR VEHICLE
Page 54 of 268

HOOD
Opening
To open the hood, proceed as follows:
1. Pull the release lever located on the
driver’s side kick panel.
2. Go to the outside of the vehicle and
position yourself in front of the grille.
3. Lift the hood slightly.
4. From right to left, move the
under-hood latch to release the hood.5. Raise the hood completely. The
operation is assisted by the addition of
two gas shock absorbers which hold it
in the open position.
Note:
Do not tamper with the shock
absorber and accompany the hood
while lifting it.
Use both hands to lift the hood.
Before lifting, check that the windshield
wiper arms are not raised from the
windshield or in operation, that the
vehicle is stationary and that the
electric park brake is engaged.
Closing
As it is extremely light, to close the
hood, lower it to approximately
16 inches (40 cm) from the engine
compartment then apply a slight
pressure. Make sure that the hood is
completely closed and not only
fastened by the locking latch by trying
to open it. If it is not perfectly closed,
do not try to push the hood down but
open it and repeat the procedure
Note: Always check that the hood is
closed correctly to prevent it from
opening while the vehicle is travelling.
Since the hood is equipped with a
double locking system, one for each
side, you must check that it is closed
on both its side ends.
Warning!
Be sure the hood is fully latched before
driving your vehicle. If the hood is not fully
latched, it could open when the vehicle is
in motion and block your vision. Failure to
follow this warning could result in serious
injury or death.
04196S0001EMHood Release Lever
GUID-04196S0002EMLift Under Hood Latch Up Then Left
52
GETTING TO KNOW YOUR VEHICLE
Page 55 of 268
TRUNK
The trunk unlocking is electrically
operated and is deactivated when the
car is in motion.
Opening
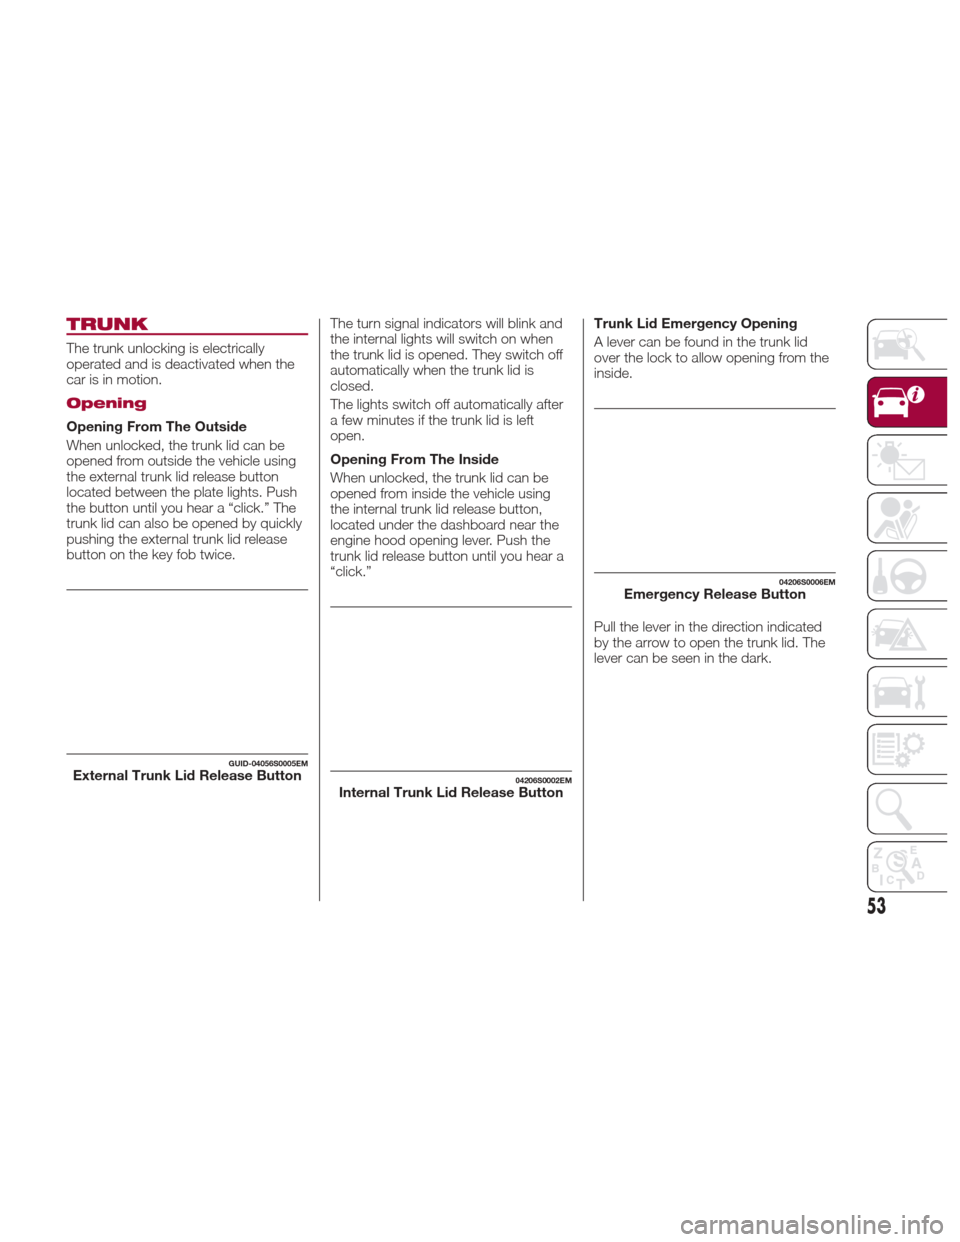
Opening From The Outside
When unlocked, the trunk lid can be
opened from outside the vehicle using
the external trunk lid release button
located between the plate lights. Push
the button until you hear a “click.” The
trunk lid can also be opened by quickly
pushing the external trunk lid release
button on the key fob twice.The turn signal indicators will blink and
the internal lights will switch on when
the trunk lid is opened. They switch off
automatically when the trunk lid is
closed.
The lights switch off automatically after
a few minutes if the trunk lid is left
open.
Opening From The Inside
When unlocked, the trunk lid can be
opened from inside the vehicle using
the internal trunk lid release button,
located under the dashboard near the
engine hood opening lever. Push the
trunk lid release button until you hear a
“click.”Trunk Lid Emergency Opening
A lever can be found in the trunk lid
over the lock to allow opening from the
inside.
Pull the lever in the direction indicated
by the arrow to open the trunk lid. The
lever can be seen in the dark.
GUID-04056S0005EMExternal Trunk Lid Release Button04206S0002EMInternal Trunk Lid Release Button
04206S0006EMEmergency Release Button
53
Page 56 of 268
Closing
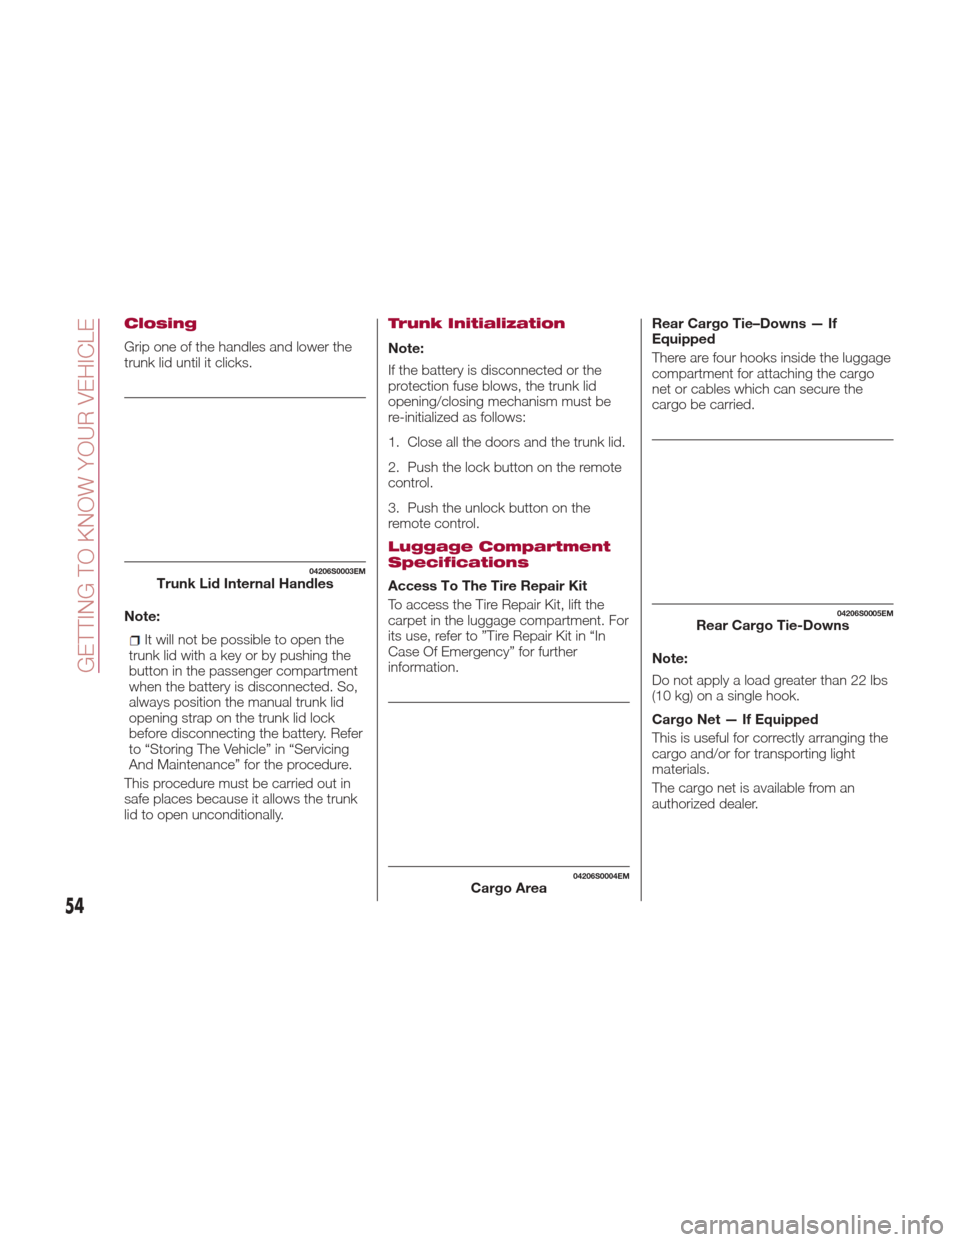
Grip one of the handles and lower the
trunk lid until it clicks.
Note:
It will not be possible to open the
trunk lid with a key or by pushing the
button in the passenger compartment
when the battery is disconnected. So,
always position the manual trunk lid
opening strap on the trunk lid lock
before disconnecting the battery. Refer
to “Storing The Vehicle” in “Servicing
And Maintenance” for the procedure.
This procedure must be carried out in
safe places because it allows the trunk
lid to open unconditionally.
Trunk Initialization
Note:
If the battery is disconnected or the
protection fuse blows, the trunk lid
opening/closing mechanism must be
re-initialized as follows:
1. Close all the doors and the trunk lid.
2. Push the lock button on the remote
control.
3. Push the unlock button on the
remote control.
Luggage Compartment
Specifications
Access To The Tire Repair Kit
To access the Tire Repair Kit, lift the
carpet in the luggage compartment. For
its use, refer to ”Tire Repair Kit in “In
Case Of Emergency” for further
information. Rear Cargo Tie–Downs — If
Equipped
There are four hooks inside the luggage
compartment for attaching the cargo
net or cables which can secure the
cargo be carried.
Note:
Do not apply a load greater than 22 lbs
(10 kg) on a single hook.
Cargo Net — If Equipped
This is useful for correctly arranging the
cargo and/or for transporting light
materials.
The cargo net is available from an
authorized dealer.
04206S0003EMTrunk Lid Internal Handles
04206S0004EMCargo Area
04206S0005EMRear Cargo Tie-Downs
54
GETTING TO KNOW YOUR VEHICLE
Page 57 of 268
INTERNAL
EQUIPMENT
Glove Compartment
To open the glove compartment
proceed as follows:
1. If equipped — unlock by placing the
emergency key in the lock on the
handle.
2. Pull handle to open the glove
compartment.
When the glove compartment is
opened, a light turns on to illuminate
the inside of the compartment.
Note:Do not insert objects of such a
size that the compartment cannot be
completely closed. Always make sure
that the glove compartment is
completely closed when driving.
Sun Visors
The sun visors are located at the sides
of the interior rear view mirror. They can
be adjusted forward and sideways.
To direct the visor toward the
passenger side window, detach the
visor from the interior rear view mirror
sidehookandturnittowardstheside
window.
Courtesy mirrors with lights are fitted on
the back of the sun visors and can be
used even in poor light conditions.
Note: A rear facing child restraint
system should never be fitted in the
front passenger seat. Always comply
with the instructions on the sun visor.
Refer to "Supplementary Restraint
System (SRS)" in "Safety" for more
information.
Homelink — If Equipped
Description
Homelink is a fixed system installed on
the vehicle. It can sync up to three
different devices that activate garage
doors, gates, lighting systems, and
home or office alarm systems.
Programming
Warning!
Vehicle exhaust contains carbon
monoxide, a dangerous gas. Do not run
your vehicle in the garage while
programming the transceiver. Exhaust gas
can cause serious injury or death.
Your motorized door or gate will open
and close while you are programming the
universal transceiver. Do not program the
transceiver if people, pets or other objects
are in the path of the door or gate. Only
use this transceiver with a garage door
opener that has a “stop and reverse”
feature as required by Federal safety
standards. This includes most garage door
opener models manufactured after 1982.
Do not use a garage door opener without
these safety features. Call toll-free
1-800-355-3515 or, on the Internet at
HomeLink.com for safety information or
assistance.
04246S0001EMOpening The Glove Compartment04246S0002EMRotate Sun Visor Toward Passenger Window
55