2017 Acura TLX clock
[x] Cancel search: clockPage 3 of 553

Contents
This owner’s manual should be considered a permanent part of the
vehicle and should remain with the vehicle when it is sold.
This owner’s manual covers all models of your vehicle. You may find
descriptions of equipment and features that are not on your
particular model.
Images throughout this owner’s manu al (including the front cover)
represent features and equipment that are available on some, but
not all, models. Your particular mo del may not have some of these
features.
This owner’s manual is for vehicles sold in the United States and
Canada.
The information and specifications in cluded in this publication were
in effect at the time of approval for printing. Honda Motor Co., Ltd.
reserves the right, however, to discontinue or change specifications
or design at any time without notice and without incurring any
obligation.2 Safe Driving P. 27
For Safe Driving P. 28 Seat Belts P. 32 Airbags P. 39
2Instrument Panel P. 69
Indicators P. 70 Gauges and Multi-Information Display P. 117
2Controls P. 137
Clock P. 138 Locking and Unlocking the Doors P. 139
Opening and Closing the Moonroof P. 160
Adjusting the Seats P. 179
2 Features P. 207
Audio System P. 208 Audio System Basic Operation P. 212
Customized Features P. 257 HomeLink® Universal Transceiver P. 275
2 Driving P. 315
Before Driving P. 316 Towing a Trailer P. 321
Multi-View Rear Camera P. 426 Refueling P. 427
2 Maintenance P. 431
Before Performing Maintenance P. 432 Maintenance MinderTM P. 435
Checking and Maintaining Wiper Blades P. 460
Climate Control System Maintenance P. 475
2Handling the Unexpected P. 483
Tools P. 484 If a Tire Goes Flat P. 485
Overheating P. 512 Indicator, Coming On/Blinking P. 514
When You Cannot Open the Trunk P. 527
2 Information P. 529
Specifications P. 530 Identification Numbers P. 532
Emissions Testing P. 535 Warranty Coverages P. 537
17 ACURA TLX-31TZ36200.book 2 ページ 2016年6月10日 金曜日 午後6時39分
Page 13 of 553

12
Quick Reference Guide
Controls (P 137)
Clock (P138)
You can also adjust the time manually.
aEnter the Clock Adjustment screen.
2 Clock (P138)
bRotate to change hour, then press
.
cRotate to change minute, then
press .
The navigation system receives signals from
GPS satellites, updating the clock
automatically.
Models with navigation system
ENGINE START/STOP
Button
(P161)
Press the button to change the vehicle’s
power mode.
Turn Signals (P164)
Lights (P165)
Turn Signal Control Lever
Right
Left
Light Control Switches
Low Beam High Beam
Flashing
17 ACURA TLX-31TZ36200.book 12 ページ 2016年6月10日 金曜日 午後6時39分
Page 138 of 553

137
Controls
This chapter explains how to operate the various controls necessary for driving.
Clock.................................................. 138
Locking and Unlocking the Doors
Key Types and Functions .................. 139
Low Keyless Access Remote Signal Strength ......................................... 141
Locking/Unlocking the Doors from the Outside .......................................... 142
Locking/Unlocking the Doors from the
Inside ............................................. 148
Childproof Door Locks ..................... 150
Auto Door Locking/Unlocking .......... 151
Opening and Closing the Trunk ....... 152
Security System ................................ 155
Immobilizer System .......................... 155 Security System Alarm...................... 155Opening and Closing the Windows
.... 158Opening and Closing the Moonroof....... 160Operating the Switches Around the
Steering Wheel
ENGINE START/STOP Button............. 161
Turn Signals ..................................... 164
Light Switches.................................. 165
Fog Lights
*...................................... 168
Daytime Running Lights ................... 168
Wipers and Washers ........................ 169
Brightness Control ........................... 172
Rear Defogger/Heated Door Mirror Button........................................ 173
Driving Position Memory System ...... 174
Adjusting the Steering Wheel .......... 176
Adjusting the Mirrors ....................... 177
Interior Rearview Mirror ................... 177
Power Door Mirrors ......................... 178
Adjusting the Seats .......................... 179
Front Seats ...................................... 179
Interior Lights/Interior Convenience
Items ................................................ 186
Interior Lights .................................. 186
Interior Convenience Items .............. 188
Climate Control System ................... 198
Using Automatic Climate Control .... 198
Automatic Climate Control Sensors......206
* Not available on all models
17 ACURA TLX-31TZ36200.book 137 ページ 2016年6月10日 金曜日 午後6時39分
Page 139 of 553

138
Controls
Clock
Adjusting the Clock
You can also adjust the time manually in the audio/information screen, with the
power mode in ON.
■Using the Settings menu on th e audio/information screen
1. Press the SETTINGS button.
2. Rotate to select System Settings, then
press .
u Repeat the procedure to select Clock
Adjustment .
3. Rotate to change hour, then press .
4. Rotate to change minute, then press
.
■Adjusting the Time
1Adjusting the Clock
These indications are used to show how to operate
the interface dial.
Rotate to select.
Press to enter.
You can customize the clock display to show the 12
hour clock or 24 hour clock. 2 Customized Features P. 257
You can turn the clock display in the audio/
information screen on and off. 2 Customized Features P. 257
The clock is automatica lly updated through the
navigation system, so the ti me does not need to be
adjusted.
Models with navigation system
17 ACURA TLX-31TZ36200.book 138 ページ 2016年6月10日 金曜日 午後6時39分
Page 221 of 553

220
uuAudio System Basic Operation uAudio/Information Screen
Features
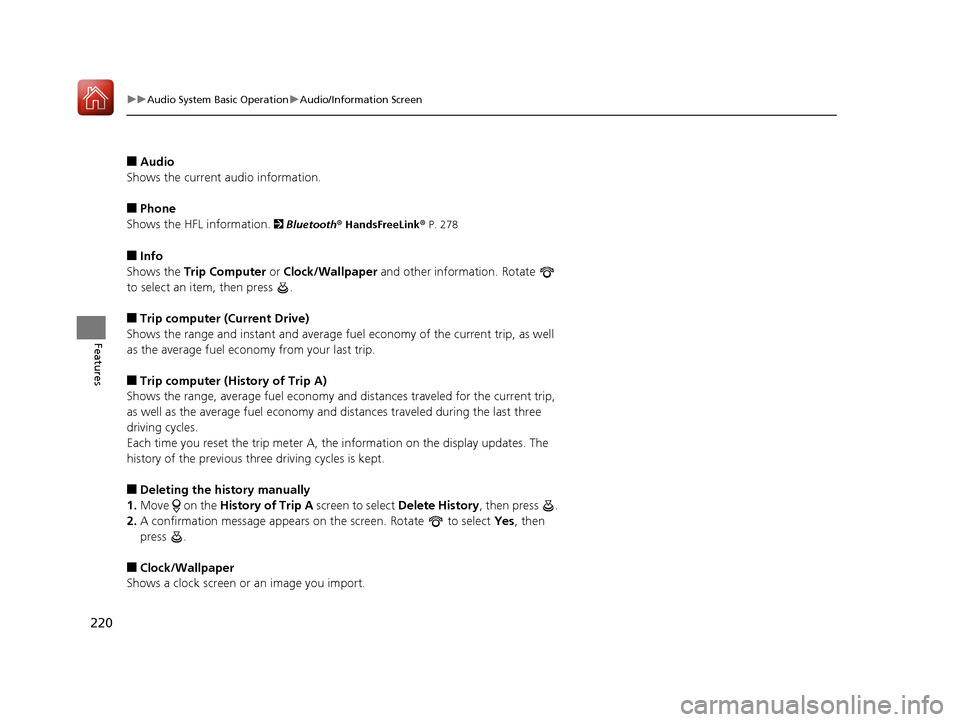
■Audio
Shows the current audio information.
■Phone
Shows the HFL information.
2 Bluetooth ® HandsFreeLink® P. 278
■Info
Shows the Trip Computer or Clock/Wallpaper and other information. Rotate
to select an item, then press .
■Trip computer (Current Drive)
Shows the range and instant and average fuel economy of the current trip, as well
as the average fuel economy from your last trip.
■Trip computer (History of Trip A)
Shows the range, average fuel economy an d distances traveled for the current trip,
as well as the average fuel economy and distances traveled during the last three
driving cycles.
Each time you reset the trip meter A, the information on the display updates. The
history of the previous th ree driving cycles is kept.
■Deleting the history manually
1. Move on the History of Trip A screen to select Delete History, then press .
2. A confirmation message appears on the screen. Rotate to select Yes, then
press .
■Clock/Wallpaper
Shows a clock screen or an image you import.
17 ACURA TLX-31TZ36200.book 220 ページ 2016年6月10日 金曜日 午後6時39分
Page 222 of 553

Continued221
uuAudio System Basic Operation uAudio/Information Screen
Features
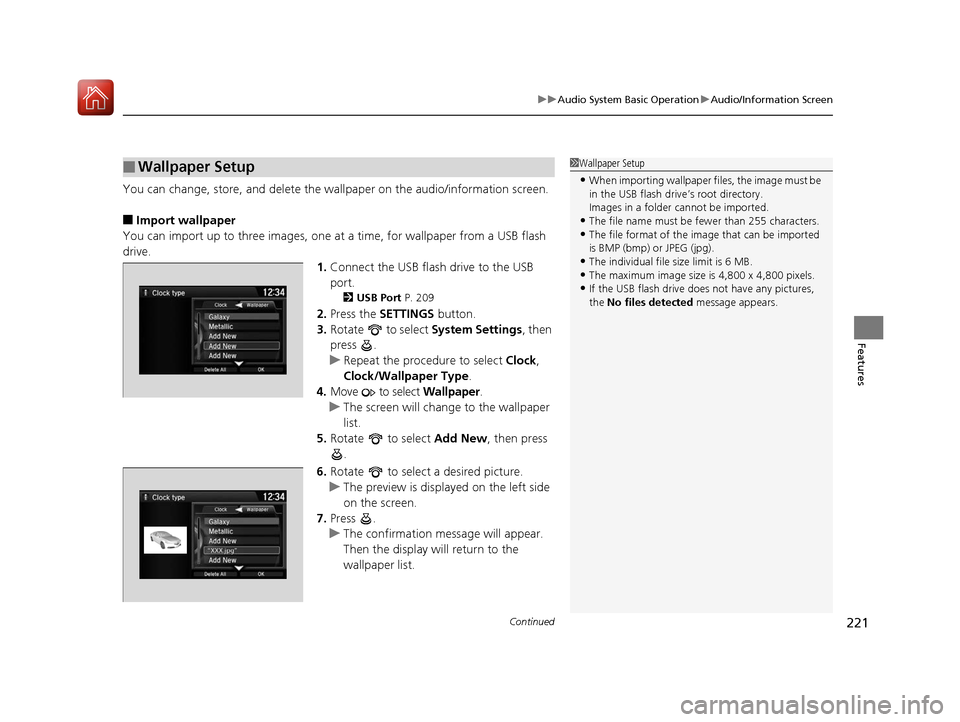
You can change, store, and delete the wa llpaper on the audio/information screen.
■Import wallpaper
You can import up to three images, one at a time, for wallpaper from a USB flash
drive.
1.Connect the USB flash drive to the USB
port.
2 USB Port P. 209
2.Press the SETTINGS button.
3. Rotate to select System Settings, then
press .
u Repeat the procedure to select Clock,
Clock/Wallpaper Type .
4. Move to select Wallpaper.
u The screen will change to the wallpaper
list.
5. Rotate to select Add New, then press
.
6. Rotate to select a desired picture.
u The preview is displayed on the left side
on the screen.
7. Press .
u The confirmation message will appear.
Then the display will return to the
wallpaper list.
■Wallpaper Setup1Wallpaper Setup
•When importing wallpaper files, the image must be
in the USB flash drive’s root directory.
Images in a folder cannot be imported.
•The file name must be fewer than 255 characters.•The file format of the im age that can be imported
is BMP (bmp) or JPEG (jpg).
•The individual file size limit is 6 MB.•The maximum image size is 4,800 x 4,800 pixels.
•If the USB flash drive doe s not have any pictures,
the No files detected message appears.
17 ACURA TLX-31TZ36200.book 221 ページ 2016年6月10日 金曜日 午後6時39分
Page 223 of 553

uuAudio System Basic Operation uAudio/Information Screen
222
Features
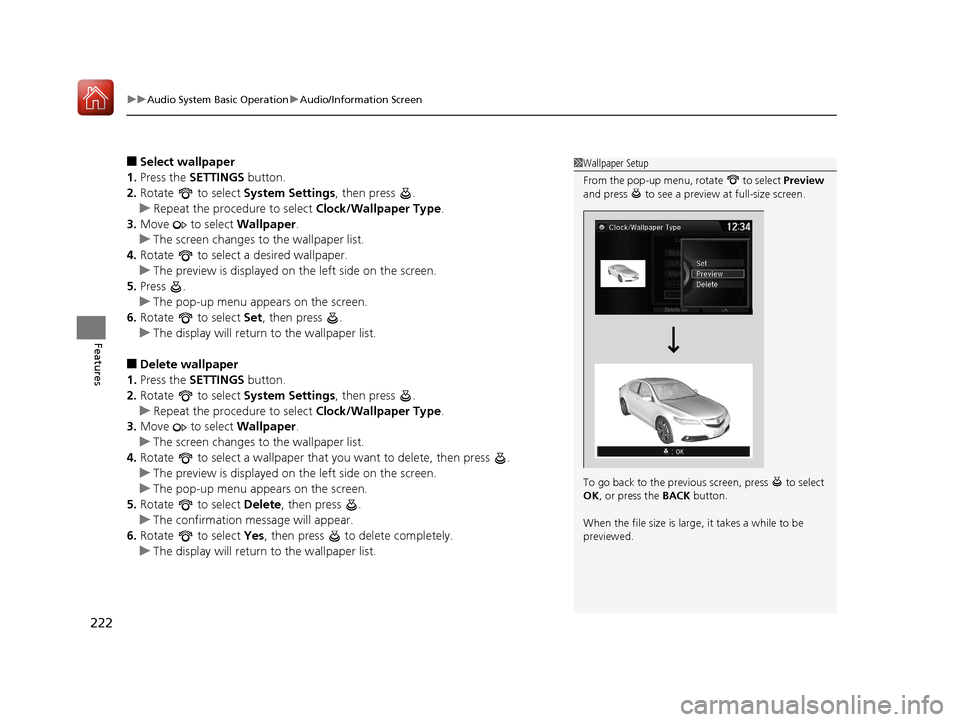
■Select wallpaper
1. Press the SETTINGS button.
2. Rotate to select System Settings, then press .
u Repeat the procedure to select Clock/Wallpaper Type.
3. Move to select Wallpaper.
u The screen changes to the wallpaper list.
4. Rotate to select a desired wallpaper.
u The preview is displayed on the left side on the screen.
5. Press .
u The pop-up menu appears on the screen.
6. Rotate to select Set, then press .
u The display will return to the wallpaper list.
■Delete wallpaper
1. Press the SETTINGS button.
2. Rotate to select System Settings, then press .
u Repeat the procedure to select Clock/Wallpaper Type.
3. Move to select Wallpaper.
u The screen changes to the wallpaper list.
4. Rotate to select a wallpaper that you want to delete, then press .
u The preview is displayed on the left side on the screen.
u The pop-up menu appears on the screen.
5. Rotate to select Delete, then press .
u The confirmation message will appear.
6. Rotate to select Yes, then press to delete completely.
u The display will return to the wallpaper list.
1Wallpaper Setup
From the pop-up menu, rotate to select Preview
and press to see a preview at full-size screen.
To go back to the previous screen, press to select
OK , or press the BACK button.
When the file size is large, it takes a while to be
previewed.
17 ACURA TLX-31TZ36200.book 222 ページ 2016年6月10日 金曜日 午後6時39分
Page 259 of 553

258
uuCustomized Features u
Features
■Customization flow
Press the SETTINGS button.
Voice Prompt
Brightness
Contrast
Black Level
Bluetooth Status
Bluetooth Device List
Edit pairing code
Default
Display
System
SettingsBluetooth
Voice
Recognition
Sync Display Brightness
Factory Data Reset
Background Color
Header Clock Display
Clock
Clock Adjustment
Clock Format
Clock
Language
Display Operation Restriction Tips*
Others
Wallpaper
Clock/Wallpaper Type
* Not available on all models
17 ACURA TLX-31TZ36200.book 258 ページ 2016年6月10日 金曜日 午後6時39分