2017 Acura RLX steering
[x] Cancel search: steeringPage 433 of 557

uuSurround View Camera System*uWhen Parking Your Vehicle
432
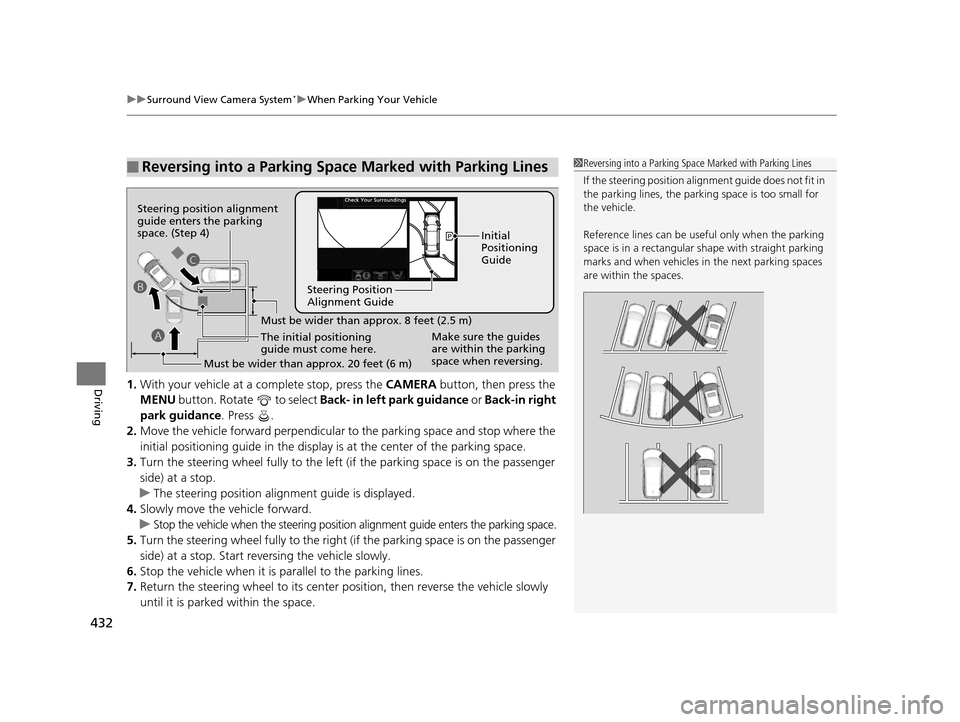
Driving1. With your vehicle at a complete stop, press the CAMERA button, then press the
MENU button. Rotate to select Back- in left park guidance or Back-in right
park guidance . Press .
2. Move the vehicle forward perpendicular to the parking space and stop where the
initial positioning guide in the display is at the center of the parking space.
3. Turn the steering wheel fully to the left (if the parking space is on the passenger
side) at a stop.
u The steering position alignment guide is displayed.
4. Slowly move the vehicle forward.
u
Stop the vehicle when the steering position alignment guide enters the parking space.
5. Turn the steering wheel fully to the right (if the parking space is on the passenger
side) at a stop. Start reve rsing the vehicle slowly.
6. Stop the vehicle when it is parallel to the parking lines.
7. Return the steering wheel to its center po sition, then reverse the vehicle slowly
until it is parked within the space.
■Reversing into a Parking Space Marked with Parking Lines1 Reversing into a Parking Space Marked with Parking Lines
If the steering position ali gnment guide does not fit in
the parking lines, the parking space is too small for
the vehicle.
Reference lines can be usef ul only when the parking
space is in a rectangular shape with straight parking
marks and when vehicles in the next parking spaces
are within the spaces.
Must be wider than approx. 8 feet (2.5 m)
The initial positioning
guide must come here.
Must be wider than approx. 20 feet (6 m) Make sure the guides
are within the parking
space when reversing.Initial
Positioning
Guide
Steering Position
Alignment Guide
A
B
C
Steering position alignment
guide enters the parking
space. (Step 4)
17 ACURA RLX-31TY26300.book 432 ページ 2016年6月17日 金曜日 午前8時12分
Page 434 of 557

Continued433
uuSurround View Camera System*uWhen Parking Your Vehicle
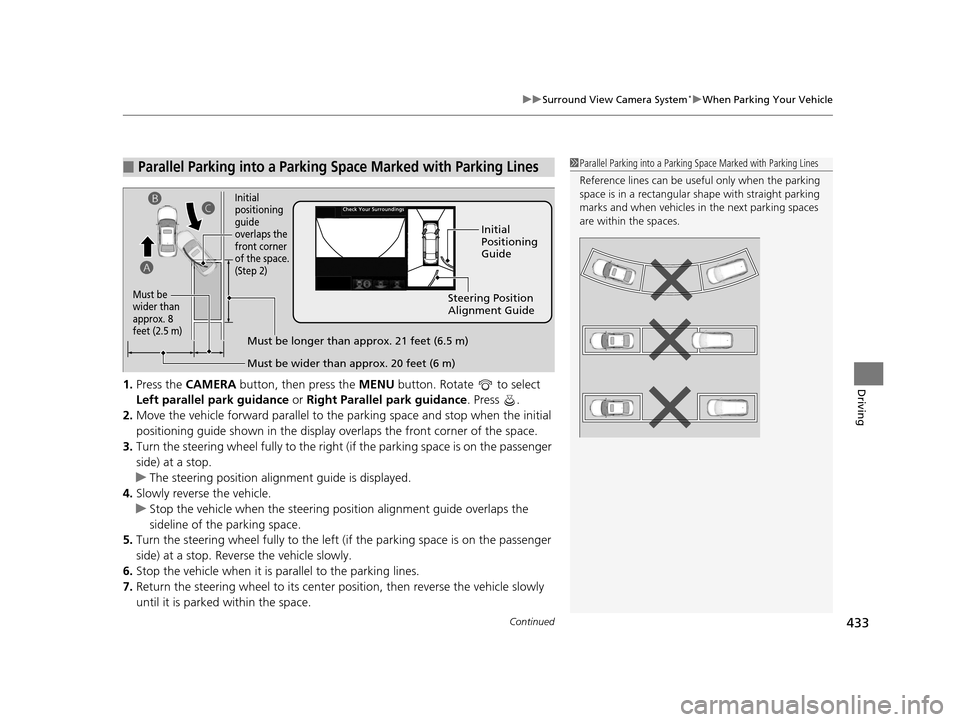
Driving1. Press the CAMERA button, then press the MENU button. Rotate to select
Left parallel park guidance or Right Parallel park guidance. Press .
2. Move the vehicle forward parallel to the parking space and stop when the initial
positioning guide shown in the display overlaps the front corner of the space.
3. Turn the steering wheel fully to the right (if the parking space is on the passenger
side) at a stop.
u The steering position alig nment guide is displayed.
4. Slowly reverse the vehicle.
u Stop the vehicle when the steering position alignment guide overlaps the
sideline of the parking space.
5. Turn the steering wheel fully to the left (if the parking space is on the passenger
side) at a stop. Revers e the vehicle slowly.
6. Stop the vehicle when it is parallel to the parking lines.
7. Return the steering wheel to its center pos ition, then reverse the vehicle slowly
until it is parked within the space.
■Parallel Parking into a Parking Space Marked with Parking Lines1Parallel Parking into a Parking Space Marked with Parking Lines
Reference lines can be usef ul only when the parking
space is in a rectangular shape with straight parking
marks and when vehicles in the next parking spaces
are within the spaces.
Initial
Positioning
Guide
Steering Position
Alignment Guide
Must be wider than approx. 20 feet (6 m)
Must be
wider than
approx. 8
feet (2.5 m)
Must be longer than approx. 21 feet (6.5 m)
A B
C
Initial
positioning
guide
overlaps the
front corner
of the space.
(Step 2)
17 ACURA RLX-31TY26300.book 433 ページ 2016年6月17日 金曜日 午前8時12分
Page 435 of 557

uuSurround View Camera System*uWhen Parking Your Vehicle
434
Driving
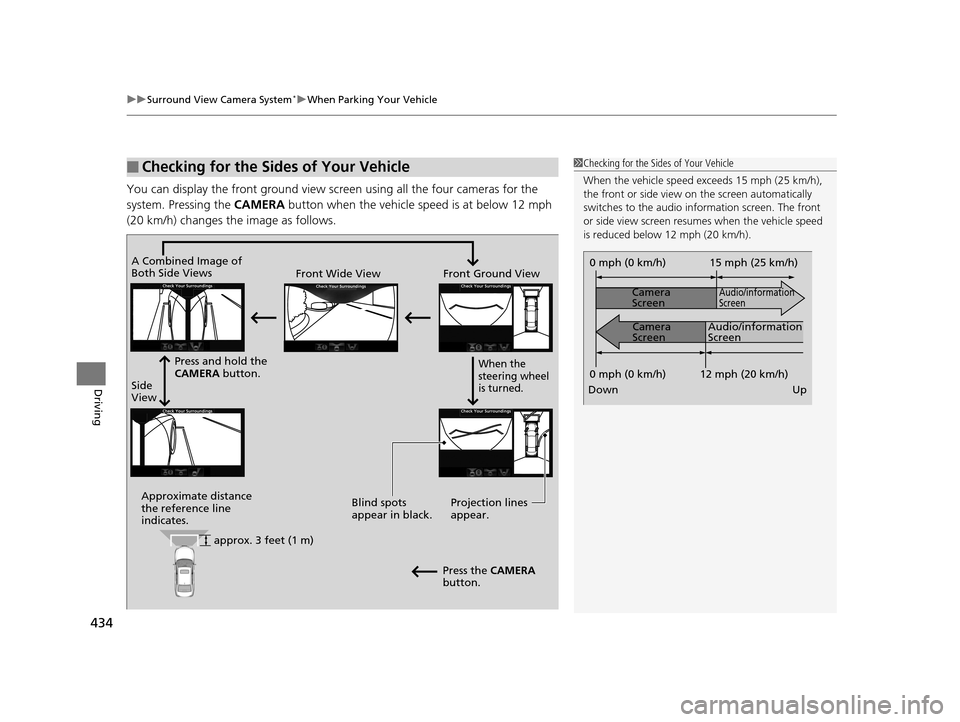
You can display the front ground view screen using all the four cameras for the
system. Pressing the CAMERA button when the vehicle speed is at below 12 mph
(20 km/h) changes the image as follows.
■Checking for the Sides of Your Vehicle1 Checking for the Sides of Your Vehicle
When the vehicle speed exceeds 15 mph (25 km/h),
the front or side view on the screen automatically
switches to the audio information screen. The front
or side view screen resumes when the vehicle speed
is reduced below 12 mph (20 km/h).
0 mph (0 km/h)
Down Up Camera
Screen
Camera
Screen
Audio/information
Screen
Audio/information
Screen 15 mph (25 km/h)
0 mph (0 km/h) 12 mph (20 km/h)
Side
View Front Wide View Front Ground View
Press and hold the
CAMERA button.
A Combined Image of
Both Side Views
Approximate distance
the reference line
indicates. Blind spots
appear in black.
Projection lines
appear.
Press the CAMERA
button.
When the
steering wheel
is turned.
approx. 3 feet (1 m)
17 ACURA RLX-31TY26300.book 434 ページ 2016年6月17日 金曜日 午前8時12分
Page 449 of 557

448
uuMaintenance MinderTMuTo Use Maintenance MinderTM
Maintenance
■Maintenance Service Items1Maintenance Service Items
•Independent of the Maintenance Minder
information, replace the brake fluid every 3 years.
•Inspect idle speed every 160,000 miles (256,000
km).
•Adjust the valves during services A, B, 1, 2, or 3 if
they are noisy.
Maintenance Minder Message
System Message
Indicator
Main Item Sub Items
*1: If a message Maintenance Due Now does not appear more than 12 months after the display is
reset, change the engine oil every year.
# : See information on maintenance and emissions warranty.
CODEMaintenance Main Items
A
●Replace engine oil*1
B●Replace engine oil*1 and oil filter●Inspect front and rear brakes●Inspect tie rod ends, steering gearbox, boots, and
drain plug
●Inspect suspension components●Inspect driveshaft boots●Inspect brake hoses and li nes (Including ABS/VSA)●Inspect all fluid levels and condition of fluids●Inspect exhaust system#
●Inspect fuel lines and connections#
●Check expiration informat ion for Temporary Tire
Repair Kit bottle
*2: If you drive in dusty conditions, replace the air cleaner element every 15,000 miles (24,000 km).
*3: If you drive primarily in urban areas that have high concentrations of soot in the air from industry and from diesel-powered vehicles, replace the dust and pollen filter every 15,000 miles (24,000 km).
*4: If you drive regularly in very high temperatures (over 110°F, 43°C), in very low temperatures (under - 20°F, -29°C), replace every 60,000 miles/100,000 km.
CODEMaintenance Sub Items
1
●Rotate tires
2●Replace air cleaner element*2
●Replace dust and pollen filter*3
3●Replace transmission fluid
4●Replace spark plugs●Replace timing belt and inspect water pump*4
●Inspect valve clearance
5
●Replace engine coolant
17 ACURA RLX-31TY26300.book 448 ページ 2016年6月17日 金曜日 午前8時12分
Page 465 of 557

464
uuReplacing Light Bulbs uFront Side Marker Light Bulbs
Maintenance
Front Side Marker Light Bulbs
When replacing, use the following bulbs.
1.Turn the steering wheel all the way to the
opposite side from the light being replaced.
Passenger’s side : Turn the steering wheel
to the left.
Driver’s side : Turn the steering wheel to
the right.
2. Remove the holding clips (A) and (B), pull
the inner fender back.
3. Turn the socket counter-clockwise and
remove it, then remove the old bulb.
4. Insert a new bulb.
Side Turn Signal/Emergency Indicator Lights
Door mirror side turn lights are LED type. Have an authorized Acura dealer inspect
and replace the light assembly.
Front Side Marker Light: 2 CP
1 Front Side Marker Light Bulbs
When removing the clip, insert a flat-tip screwdriver,
then lift and remove the clip.
Insert the clip with the pin raised, and push until it is
flat.
Holding clip (B-type)
Clip
Push until the
pin is flat.
Inner Fender
Clip (A)Clips (B)
Bulb Socket
17 ACURA RLX-31TY26300.book 464 ページ 2016年6月17日 金曜日 午前8時12分
Page 480 of 557

479
uuChecking and Maintaining Tires uWinter Tires
Maintenance
Winter Tires
If driving on snowy or frozen roads, mount all season marked M+S tires, snow tires,
or tire chains; reduce speed; and maintain sufficient distance between vehicles when
driving.
Be particularly careful wh en operating the steering wheel or brakes to prevent
skidding.
Use tire chains, snow tires, or all season tires when necessary or according to the law.
When mounting, refer to the following points.
For winter tires:
• Select the size and load ranges that are the same as the original tires.
• Mount the tires to all four wheels.
For tire chains:
• Install them on the front tires only.
• Because your vehicle has limited tire clea rance, we strongly recommend using the
chains listed below:
• Follow the chain manufactur er’s instruction when installing. Mount them as
tightly as you can.
• Check that the chains do not touch the brake lines or suspension.
• Drive slowly.
Cable-type: SCC Radial Chain SC1040
1Winter Tires
NOTICE
Traction devices that are th e wrong size or improperly
installed can damage your vehicle’s brake lines,
suspension, body, and wheels. Stop driving if they are
hitting any part of the vehicle.
When tire chains are mounted, follow the chain
manufacturer’s instructi ons regarding vehicle
operational limits.
If your vehicle is equipped with summer tires, be
aware that these tires are not designed for winter
driving conditions. For more information, contact a
dealer.
3WARNING
Using the wrong chains, or not properly
installing chains, can damage the brake
lines and cause a crash in which you can be
seriously injured or killed.
Follow all instruction s in this owner’s
manual regarding the selection and use of
tire chains.
17 ACURA RLX-31TY26300.book 479 ページ 2016年6月17日 金曜日 午前8時12分
Page 490 of 557

489
Handling the Unexpected
This chapter explains how to handle unexpected troubles.
ToolsTypes of Tools .................................. 490
If a Tire Goes Flat Temporarily Repairi ng a Flat Tire....... 491
Changing a Flat Tire ......................... 503
Engine Does Not Start Checking the Engine ........................ 509
If the Keyless Access Remote Battery is Weak ............................................. 510
Emergency Engine Stop ................... 511
Jump Starting .................................... 512
Shift Lever Does Not Move .............. 515
Overheating How to Handle Overheating ............. 516 Indicator, Coming On/Blinking
If the Low Oil Pressure Indicator Comes
On ............................................. 518
If the Charging System Indicator Comes
On ................................................. 518
If the Malfunction Indicator Lamp Comes On or Blinks ................................... 519
If the Brake System Indicator (Red) Comes On .. 519
If the Electric Power Steering (EPS) System Indicator Comes On .............................. 520
If the Electric Parking Brake System Indicator Comes On............................................. 520
If the Low Tire Pressure/TPMS Indicator Comes On or Blinks ....................... 521
Fuses Fuse Locations ................................. 522
Inspecting and Changing Fuses ........ 526
Emergency Towing ........................... 527
When You Cannot Unlock the Fuel Fill Door ................................................. 528
When You Cannot Open the Trunk ..... 529
Refueling
Refueling From a Portable Fuel Container ... 530
17 ACURA RLX-31TY26300.book 489 ページ 2016年6月17日 金曜日 午前8時12分
Page 492 of 557

491Continued
Handling the Unexpected
If a Tire Goes Flat
Temporarily Repairing a Flat Tire
If the tire has a large cut or is otherwise severely damaged, you will need to have the
vehicle towed. If the tire only has a small puncture, from a nail for instance, you can
use the temporary tire repair kit so that you can drive to the nearest service station
for a more permanent repair.
If a tire goes flat while driving, grasp the steering wheel firmly, and brake gradually
to reduce speed. Then stop in a safe place.
1. Park the vehicle on a firm, level, and n on-slippery surface and apply the parking
brake.
2. Move the shift lever to
(P.
3. Turn on the hazard warning lights an d set the power mode to VEHICLE OFF
(LOCK).
Vehicles with temporary tire repair kit
1 Temporarily Repairing a Flat Tire
The kit should not be used in the following situations.
Instead, contact a dealer or a roadside assistant to
have the vehicle towed.
•The tire sealant has expired.•More than one tire is punctured.•The puncture or cut is larger than 3/16 inch (4 mm).•The tire side wall is da maged or the puncture is
outside the contact area.
•Damage has been caused by driving with the tire
extremely under inflated.
•The tire bead is no longer seated.•The rim is damaged.
Do not remove a nail or screw that punctured the
tire. If you remove it from the tire, you may not be
able to repair the puncture using the kit.
NOTICE
Do not use a puncture-repairing agent other than the
one provided in the kit that came with your vehicle. If
a different agent is used, you may permanently
damage the tire pressure sensor.
When the puncture is:Kit Use
Smaller than 3/16 inch
(4 mm)Yes
Larger than 3/16 inch (4 mm)No
Contact
Area
17 ACURA RLX-31TY26300.book 491 ページ 2016年6月17日 金曜日 午前8時12分