Page 164 of 557

163Continued
Controls
Interior Lights/Interior Convenience Items
Interior Lights
■ON
The interior lights come on regardless whether
the doors are open or closed.
■Door activated
The interior lights come on in the following
situations:
• When any doors are opened.
• You unlock the driver’s door.
• When the power mode is set to VEHICLE
OFF (LOCK).
■OFF
The interior lights remain off regardless
whether the doors are open or closed.
■Interior Light Switches1 Interior Light Switches
In the door activated position, the interior lights fade
out and go off about 30 se conds after the doors are
closed.
The lights go off after 30 seconds in the following
situations:
•When you unlock the driver’s door but do not open
it.
•When you set the power mode to VEHICLE OFF
(LOCK) but do not open a door.
You can change the interi or lights dimming time.
2 Customized Features P. 103, 262
The interior lights go off i mmediately in the following
situations:
•When you lock the driver’s door.
•When you close the driver’s door in ACCESSORY
mode.
• When you set the power mode to ON.
If you leave any doors open, the interior lights go off
after about 15 minutes.
Door Activated Position
Off
On
17 ACURA RLX-31TY26300.book 163 ページ 2016年6月17日 金曜日 午前8時12分
Page 167 of 557
uuInterior Lights/Interior Convenience Items uInterior Convenience Items
166
Controls
You can lock the glove box, trunk, and/or
navigation system, entering a PIN code from
the On Demand Multi-Use Display
TM.
To lock:
1. Select Shortcuts .
2. Select Valet.
3. Select the item you want to be PIN-
protected from the locked area, then select
OK .
■Valet Mode1Valet Mode
If you need to give the key to someone else, lock the
trunk pass-through cover first, and give the keyless
access remote without a buil t-in key as a valet key.
2 Trunk Pass-through Cover P. 174
Locked Area
17 ACURA RLX-31TY26300.book 166 ページ 2016年6月17日 金曜日 午前8時12分
Page 168 of 557

Continued167
uuInterior Lights/Interior Convenience Items uInterior Convenience Items
Controls
4. The previous code is displayed. Select OK.
u You will receive a confirmation message
on the display. Select OK.
When you enter the PIN code for the first time
or if you want to change the code:
1. Select Shortcuts .
2. Select Valet.
3. Select the item you want to be PIN-
protected from the locked area, then select
OK .
4. Enter your selected four-digit PIN code,
then select OK.
5. You will be asked to enter the same four-
digit PIN code again. Enter, then select OK.
u You will receive a confirmation message
on the display. Select OK.
To unlock:
1. Select Valet.
2. Select Unlock .
3. Enter the four-digit PIN code you have
previously selected, then select OK.1Valet Mode
The PIN code entering screen also appears when you
press:
•The glove box open button
•The trunk release button on the driver's door, on
the trunk, or on the remote
While the glove box or the trunk is PIN-protected.
If you have locked all the items of the locked area, the
PIN code entering screen appears with the power
mode in ACCESSORY.
You can cancel the valet mode when you manually
open the trunk. 2 When You Cannot Open the Trunk P. 529
If you have only set Navi, Phone, Audio PIN-
protected but forgot your four-digit PIN code, you
need to go to a dealer to have the set valet mode
reset.
17 ACURA RLX-31TY26300.book 167 ページ 2016年6月17日 金曜日 午前8時12分
Page 175 of 557
174
uuInterior Lights/Interior Convenience Items uInterior Convenience Items
Controls
Pull the rear seat armrest down and push the
button to open the cover.
You have access to the trunk from this
opening in the rear seat-back.
The cover latches when you push it back to
the original position.
You can lock and unlock this cover using the
built-in key.
■Trunk Pass-through Cover
Lock
Button
Cover
17 ACURA RLX-31TY26300.book 174 ページ 2016年6月17日 金曜日 午前8時12分
Page 182 of 557

181Continued
Controls
Climate Control System
Using Automatic Climate Control
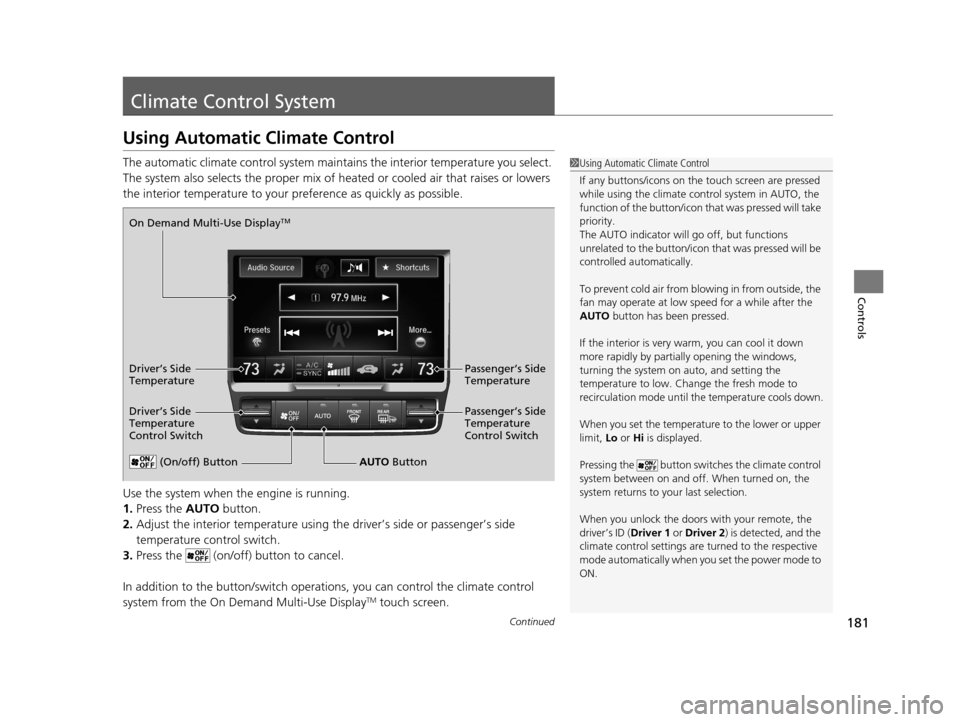
The automatic climate control system maintains the interior temperature you select.
The system also selects the proper mix of heat ed or cooled air that raises or lowers
the interior temperature to your pr eference as quickly as possible.
Use the system when the engine is running.
1. Press the AUTO button.
2. Adjust the interior temperature using the driver’s side or passenger’s side
temperature control switch.
3. Press the (on/off) button to cancel.
In addition to the button/switch operati ons, you can control the climate control
system from the On Demand Multi-Use Display
TM touch screen.
1 Using Automatic Climate Control
If any buttons/icons on the touch screen are pressed
while using the climate control system in AUTO, the
function of the button/icon th at was pressed will take
priority.
The AUTO indicator will go off, but functions
unrelated to the button/icon that was pressed will be
controlled automatically.
To prevent cold air from bl owing in from outside, the
fan may operate at low speed for a while after the
AUTO button has been pressed.
If the interior is very warm, you can cool it down
more rapidly by partial ly opening the windows,
turning the system on auto, and setting the
temperature to low. Change the fresh mode to
recirculation mode until the temperature cools down.
When you set the temperature to the lower or upper
limit, Lo or Hi is displayed.
Pressing the button switches the climate control
system between on and off. When turned on, the
system returns to your last selection.
When you unlock the doors with your remote, the
driver’s ID ( Driver 1 or Driver 2) is detected, and the
climate control settings are turned to the respective
mode automatically when you set the power mode to
ON.
(On/off) ButtonAUTO Button
On Demand Multi-Use Display
TM
Driver’s Side
Temperature
Control Switch
Passenger’s Side
Temperature
Control Switch Passenger’s Side
Temperature
Driver’s Side
Temperature
17 ACURA RLX-31TY26300.book 181 ページ 2016年6月17日 金曜日 午前8時12分
Page 197 of 557

196
Features
Audio System Basic Operation
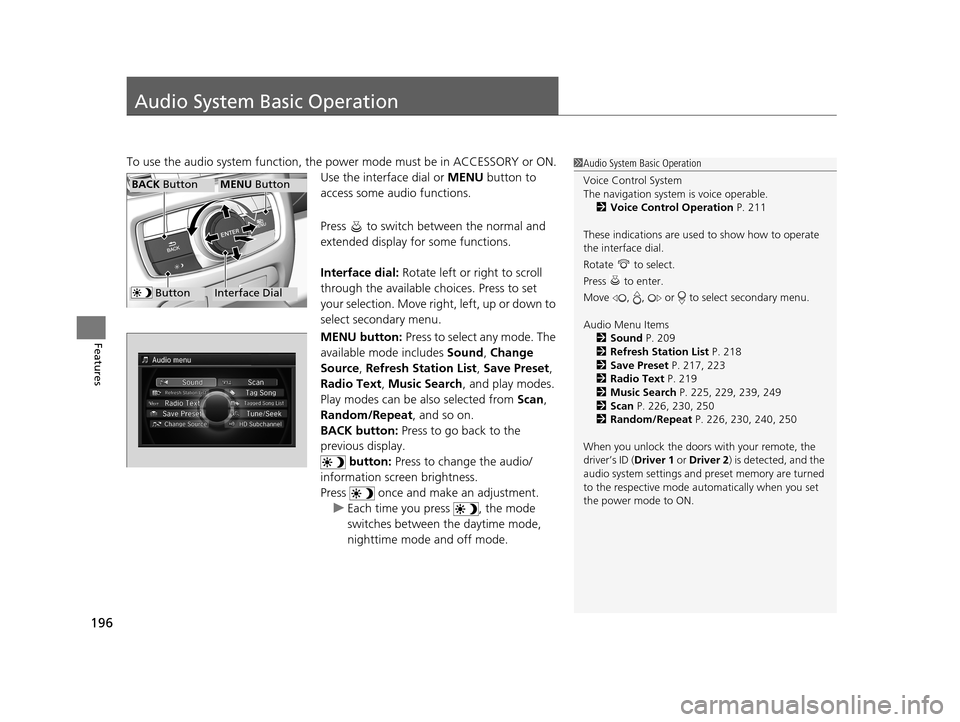
To use the audio system function, the power mode must be in ACCESSORY or ON.
Use the interface dial or MENU button to
access some audio functions.
Press to switch between the normal and
extended display fo r some functions.
Interface dial: Rotate left or right to scroll
through the available choices. Press to set
your selection. Move right, left, up or down to
select secondary menu.
MENU button: Press to select any mode. The
available mode includes Sound, Change
Source , Refresh Station List , Save Preset ,
Radio Text, Music Search , and play modes.
Play modes can be also selected from Scan,
Random/Repeat , and so on.
BACK button: Press to go back to the
previous display.
button: Press to change the audio/
information screen brightness.
Press once and make an adjustment. u Each time you press , the mode
switches between the daytime mode,
nighttime mode and off mode.1Audio System Basic Operation
Voice Control System
The navigation system is voice operable.
2 Voice Control Operation P. 211
These indications are used to show how to operate
the interface dial.
Rotate to select.
Press to enter.
Move , , or to select secondary menu.
Audio Menu Items 2 Sound P. 209
2 Refresh Station List P. 218
2 Save Preset P. 217, 223
2 Radio Text P. 219
2 Music Search P. 225, 229, 239, 249
2 Scan P. 226, 230, 250
2 Random/Repeat P. 226, 230, 240, 250
When you unlock the doors with your remote, the
driver’s ID ( Driver 1 or Driver 2) is detected, and the
audio system settings and pr eset memory are turned
to the respective mode automatically when you set
the power mode to ON.
Interface Dial
MENU ButtonBACK Button
Button
17 ACURA RLX-31TY26300.book 196 ページ 2016年6月17日 金曜日 午前8時12分
Page 207 of 557

206
uuAudio System Basic Operation uAudio/Information Screen
Features
■Audio
Shows the current audio information.
■Navigation
Shows the navigation screen.
2 Refer to the Navigation System Manual
■Phone
Shows the HFL information.
2 Bluetooth ® HandsFreeLink® P. 290
■Info
Shows the Trip Computer or Clock/Wallpaper and other information. Rotate
to select an item, then press .
■Trip computer (Current Drive)
Shows the range, and instant and average fu el economy of the current trip, as well
as the average fuel economy from your last trip.
■Trip computer (History of Trip A)
Shows the range, average fuel economy and distances traveled for the current trip, as well
as the average fuel economy and distances tr aveled during the last three driving cycles.
Each time you reset the trip meter A, the information on the display updates. The
history of the previous th ree driving cycles is kept.
■Deleting the history manually
1. Move on the History of Trip A screen to select Delete History, then press .
2. You will receive a confirmation message on the screen. Rotate to select Yes,
then press .
■Clock/Wallpaper
Shows a clock screen or an image you import.
17 ACURA RLX-31TY26300.book 206 ページ 2016年6月17日 金曜日 午前8時12分
Page 208 of 557

Continued207
uuAudio System Basic Operation uAudio/Information Screen
Features
You can change, store, and delete the wa llpaper on the audio/information screen.
■Import wallpaper
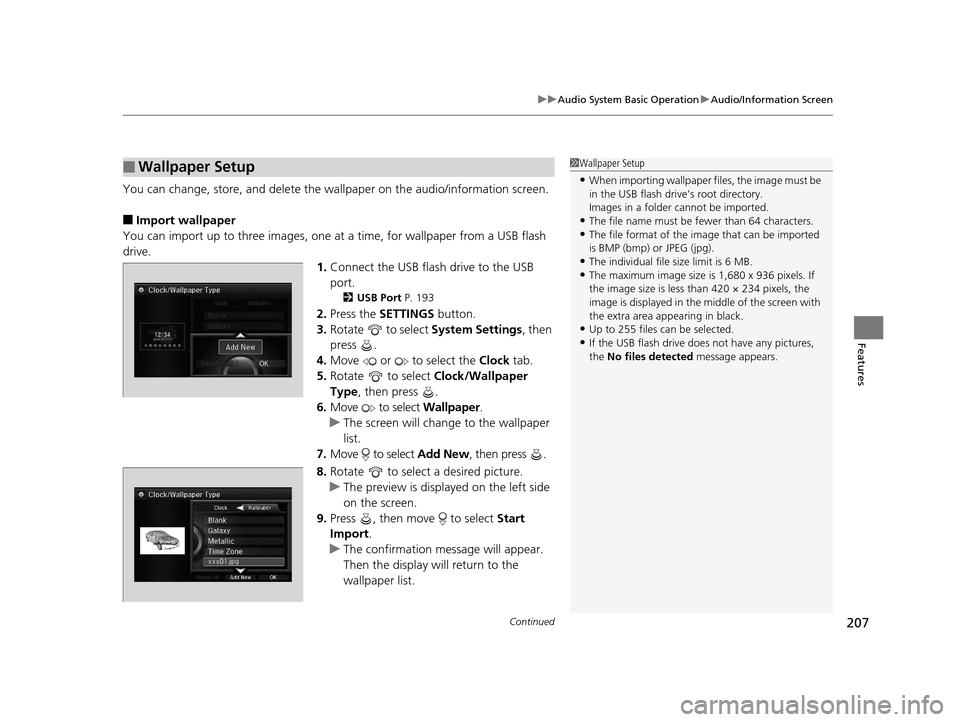
You can import up to three images, one at a time, for wallpaper from a USB flash
drive.
1.Connect the USB flash drive to the USB
port.
2 USB Port P. 193
2.Press the SETTINGS button.
3. Rotate to select System Settings, then
press .
4. Move or to select the Clock tab.
5. Rotate to select Clock/Wallpaper
Type , then press .
6. Move to select Wallpaper.
u The screen will change to the wallpaper
list.
7. Move to select Add New, then press .
8. Rotate to select a desired picture.
u The preview is displayed on the left side
on the screen.
9. Press , then move to select Start
Import.
u The confirmation message will appear.
Then the display will return to the
wallpaper list.
■Wallpaper Setup1Wallpaper Setup
•When importing wallpaper files, the image must be
in the USB flash drive’s root directory.
Images in a folder cannot be imported.
•The file name must be fewer than 64 characters.•The file format of the im age that can be imported
is BMP (bmp) or JPEG (jpg).
•The individual file size limit is 6 MB.•The maximum image size is 1,680 x 936 pixels. If
the image size is less than 420 × 234 pixels, the
image is displayed in the middle of the screen with
the extra area appearing in black.
•Up to 255 files can be selected.
•If the USB flash drive doe s not have any pictures,
the No files detected message appears.
17 ACURA RLX-31TY26300.book 207 ページ 2016年6月17日 金曜日 午前8時12分