Page 400 of 473
399
uuChecking and Maintaining Tires uTire and Wheel Replacement
Maintenance
Tire and Wheel Replacement
Replace your tires with radials of the same size, load range, speed rating, and
maximum cold tire pressure rating (as shown on the tire’s sidewall). Using tires of a
different size or construction can cause the ABS and vehicle stability assist (VSA ®)
and SH-AWD ® systems to work incorrectly.
It is best to replace all four tires at the same time.
If you replace a wheel, only use TPMS spec ified wheels approved for your vehicle.
Make sure that the wheel’s specifications match those of the original wheels.1 Tire and Wheel Replacement
3WARNING
Installing improper tires on your vehicle can
affect handling and stability. This can cause
a crash in which you can be seriously hurt or
killed.
Always use the size and type of tires
recommended in this owner’s manual.
17 NSX-31T6N6000.book 399 ページ 2016年4月22日 金曜日 午後3時44分
Page 418 of 473

417
Handling the Unexpected
This chapter explains how to handle unexpected troubles.
ToolsTypes of Tools .................................. 418
If a Tire Goes Flat Temporarily Repairi ng a Flat Tire....... 419
Handling of the Jack ........................ 430
Power System Won’t Start Checking the Procedure ................... 431
If the Keyless Access Remote Battery is Weak ............................................. 432
Emergency Power System Off........... 433
Jump Starting .................................... 434
Overheating How to Handle Overheating ............. 436 Indicator, Coming On/Blinking
If the 12-Volt Battery Charging System Indicator Comes On ....................... 438
If the Malfunction Indicator Lamp Comes On or Blinks ................................... 438
If the Brake System Indicator (Red) Comes On ................................................. 439
If the Electric Power Steering (EPS) System Indicator Comes On ....................... 439
If the Electric Parking Brake System Indicator Comes On ....................... 440 If the Low Tire Pressure/TPMS Indicator
Comes On or Blinks ....................... 441
If the Transmission System Indicator Blinks along with the Warning Message... 442
If the Low Oil Level Symbol Appears.....442Fuses Fuse Locations ................................. 443
Inspecting and Changing Fuses ........ 447
Emergency Towing ........................... 448
When You Cannot Unlock the Fuel Fill Door ................................................. 449
When You Cannot Open the Hatch.....450RefuelingRefueling from a Portable Fuel Container .... 451
17 NSX-31T6N6000.book 417 ページ 2016年4月22日 金曜日 午後3時44分
Page 420 of 473

419Continued
Handling the Unexpected
If a Tire Goes Flat
Temporarily Repairing a Flat Tire
If the tire has a large cut or is otherwise severely damaged, you will need to have the
vehicle towed. If the tire only has a sma ll puncture, from a small nail for instance,
you can use the temporary tire repair kit so that you can drive to the nearest service
station for a more permanent repair.
If a tire goes flat while driving, grasp the steering wheel firmly, and brake gradually
to reduce speed. Then stop in a safe place.
1. Park the vehicle on a firm, level, and non-slippery surface. Apply the parking
brake.
2. Change the gear position to
(P.
3. Turn on the hazard warning lights an d set the power mode to VEHICLE OFF
(LOCK).
1 Temporarily Repairing a Flat Tire
The kit should not be used in the following situations.
Instead, contact an authorized Acura NSX dealer or a
roadside assistant to have the vehicle towed.
•The tire sealant has expired.•More than one tire is punctured.•The puncture or cut is larger than 3/16 inch (4 mm).•The tire side wall is da maged or the puncture is
outside the contact area.
•Damage has been caused by driving with the tire
extremely under inflated.
•The tire bead is no longer seated.•The rim is damaged.
Do not remove a nail or screw that punctured the
tire. If you remove it from the tire, you may not be
able to repair the puncture using the kit.
NOTICE
Do not use a puncture-repairing agent other than the
one provided in the kit that came with your vehicle. If
a different agent is used, you may permanently
damage the tire pressure sensor.
When the puncture is:Kit Use
Smaller than 3/16 inch
(4 mm)Yes
Larger than 3/16 inch (4 mm)No
Contact
Area
17 NSX-31T6N6000.book 419 ページ 2016年4月22日 金曜日 午後3時44分
Page 423 of 473

uuIf a Tire Goes Flat uTemporarily Repairing a Flat Tire
422
Handling the Unexpected
6. Plug in the compressor to the accessory
power socket.
u Be careful not to pinch the cord in a
door or window.
2 Accessory Power Socket P. 154
7.Turn the power system on.
u Keep the power system on while
injecting sealant and air.
2 Carbon Monoxide Gas P. 67
8.Turn the air compressor on to inflate the
tire.
u The compressor starts injecting sealant
and air into the tire.
9. After the air pressure reaches 32 psi (220
kPa), turn off the compressor.
1Injecting Sealant and Air
NOTICE
Do not operate the temporary tire repair kit compressor
for more than 15 minutes. The compressor can overheat
and become permanently damaged.
Until the sealant injection is complete, the pressure
shown on the pressure gauge will appear higher than
actual. After the sealant injection is complete the
pressure will drop and then begi n to rise again as the tire
is inflated with air. This is normal. To accurately measure
the air pressure using the ga uge, turn the air compressor
off only after the sealant injection is complete.
If the required air pressure is not reached within 15
minutes, the tire may be too severely damaged for
the kit to provide the necessa ry seal and your vehicle
will need to be towed.
See an authorized Acura NSX dealer for a replacement
sealant bottle and proper disposal of an empty bottle.
3WARNING
Running the engine with the vehicle in an
enclosed or even partly enclosed area can
cause a rapid build-up of toxic carbon
monoxide.
Breathing this colorless, odorless gas can
cause unconsciousness and even death.
Only run the engine to power the air
compressor with th e vehicle outdoors.
Air Compressor Switch
OFF
ON
17 NSX-31T6N6000.book 422 ページ 2016年4月22日 金曜日 午後3時44分
Page 424 of 473
423
uuIf a Tire Goes Flat uTemporarily Repairing a Flat Tire
Continued
Handling the Unexpected
10. Unplug the kit from the accessory power
socket.
11. Unscrew the sealant/ai r hose from the tire
valve stem. Reinstall the valve cap.
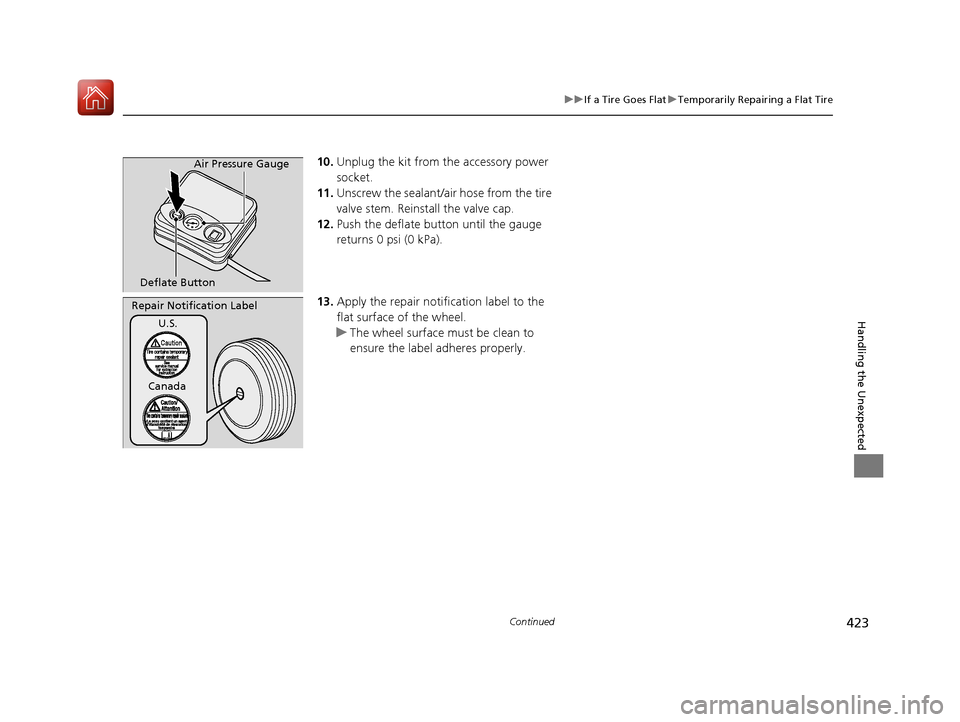
12. Push the deflate button until the gauge
returns 0 psi (0 kPa).
13. Apply the repair notification label to the
flat surface of the wheel.
u The wheel surface must be clean to
ensure the label adheres properly.
Deflate Button Air Pressure Gauge
Repair Notification Label
U.S.
Canada
17 NSX-31T6N6000.book 423 ページ 2016年4月22日 金曜日 午後3時44分
Page 426 of 473
425
uuIf a Tire Goes Flat uTemporarily Repairing a Flat Tire
Continued
Handling the Unexpected
4. Recheck the air pressure using the gauge
on the air compressor.
u Do not turn the air compressor on to
check the pressure.
5. If the air pressure is:
• Less than 19 psi (130 kPa):
Do not add air or continue driving. The
leak is too severe. Call for help and have
your vehicle towed.
2 Emergency Towing P. 448
•32 psi (220 kPa) or more:
Continue driving for another five
minutes or until you reach the nearest
service station if less than five minutes
away. Do not exceed 50 mph (80 km/h).
u Stop and check the air pressure again. If
the air pressure does not go down after
the five minute drive, you do not need to
check the pressure any more. Drive to
the nearest service station to fix or
replace the tire.
17 NSX-31T6N6000.book 425 ページ 2016年4月22日 金曜日 午後3時44分
Page 427 of 473

uuIf a Tire Goes Flat uTemporarily Repairing a Flat Tire
426
Handling the Unexpected
• Greater than 19 psi (130 kPa), but less than
32 psi (220 kPa):
Turn the air compressor on to inflate the
tire until the tire pressure reaches 32 psi
(220 kPa).
2 Injecting Sealant and Air P. 421
Then drive carefully for five more minutes
or until you reach the nearest service station
if less than five minutes away.
Do not exceed 50 mph (80 km/h).
u You should repeat this procedure as long
as the air pressure is within this range.
1Distributing the Sealant in the Tire
Refer to the driver’s doorja mb label for the specified
pressure.
3WARNING
Running the engine with the vehicle in an
enclosed or even partly enclosed area can
cause a rapid build-up of toxic carbon
monoxide.
Breathing this colorless, odorless gas can
cause unconsciousness and even death.
Only run the engine to power the air
compressor with th e vehicle outdoors.
Deflate ButtonAir Pressure Gauge
Air Compressor Switch
OFF
ON
17 NSX-31T6N6000.book 426 ページ 2016年4月22日 金曜日 午後3時44分
Page 430 of 473
429
uuIf a Tire Goes Flat uTemporarily Repairing a Flat Tire
Handling the Unexpected
7. Turn the air compressor switch on to
inflate the tire.
u The compressor starts to inject air into
the tire.
u If you have turned the power system
on, keep the power system on while
injecting air.
8. Inflate the tire to the specified air pressure.
9. Turn off the kit.
u Check the pressure gauge on the air
compressor.
u If overinflated, press the deflate button.
10. Unplug the kit from the accessory power
socket.
11. Unscrew the air hose from the tire valve
stem. Reinstall the valve cap.
12. Push the deflate button until the gauge
returns 0 psi (0 kPa).
13. Repackage and properly stow the kit.Air Compressor Switch
OFF
ON
Deflate Button Air Pressure Gauge
17 NSX-31T6N6000.book 429 ページ 2016年4月22日 金曜日 午後3時44分