2017 Acura NSX window
[x] Cancel search: windowPage 18 of 116

30 || 31
SAFETYSAFETY
n Airbag System Components
8
8
8
8109876
6
811
The front, driver’s knee, side, and side curtain airbags are deployed according to the direction
and severity of impact. Both side curtain airbags are deployed in a rollover. The airbag
system includes:
uTwo SRS (Supplemental Restraint System) front airbags. The driver’s airbag is stored in
the center of the steering wheel; the passenger’s airbag is stored in the dashboard. Both
are marked SRS AIRBAG.
vDriver’s knee airbag. The knee airbag is stored under the steering column. It is marked
SRS AIRBAG.
wTwo side airbags, one for the driver and one for a passenger. The airbags are stored in
the outer edges of the seatbacks. Both are marked SIDE AIRBAG.
xTwo side curtain airbags, one for each side of the vehicle. The airbags are stored in the
ceiling, above the side windows. The front and rear pillars are marked SIDE CURTAIN
AIRBAG.
y An electronic control unit that, when the power system is on, continually monitors
information about the various impact sensors, seat and buckle sensors, rollover sensor,
airbag activators, seat belt tensioners, and other vehicle information. During a crash
event the unit records such information.
zAutomatic seat belt tensioners. In addition, the driver’s and passenger’s seat belt
buckles incorporate sensors that detect whether or not the belts are fastened.
{Weight sensors in the passenger’s seat. The passenger’s airbag will be turned off if the
weight on the seat is 65 lbs (29 kg) or less (the weight of an infant or small child).
|Impact sensors that can detect a moderate-to-severe front or side impact.
}An indicator on the dashboard that alerts you that the passenger’s front airbag has
been turned off.
~An indicator on the instrument panel that alerts you to a possible problem with your
airbag system or seat belt tensioners.
11A rollover sensor that can detect if your vehicle is about to roll over and signal the
control unit to deploy both side curtain airbag.
Page 20 of 116

34 || 35
SAFETYSAFETY
• Never put a seat belt over yourself or a passenger and a child. During a crash, the belt would
likely pr
ess deep into the child and cause serious or fatal injuries.
•
Never let two children use
the same seat belt. Both children could be very seriously injured
in a crash.
•
Do not allow childr
en to operate the doors, windows, or seat adjustments.
•
Do not leave children in the
vehicle unattended, especially in hot weather when the inside
of the vehicle can get hot enough to kill them. They could also activate vehicle controls,
causing it to move unexpectedly.
Allowing a child to play with a seat belt or wrap one around their neck can result in
serious injury or death.
Instruct children not to play with any seat belt and make sure any unused seat belt a
child can reach is buckled, fully retracted, and locked.
WARNING
Children who are unrestrained or improperly restrained can be seriously injured or
killed in a crash.
Any child too small for a seat belt should be properly restrained in a child seat.
A larger child should be properly restrained with a seat belt, using a booster seat if
necessary.
WARNING
n Protecting Infants
An infant must be properly r
estrained in a rear-facing, reclining child seat until the infant
reaches the seat maker’s weight or height limit for the seat, and the infant is at least one
year old. Because rear-facing child seats should not be used in this vehicle, you should
never carry an infant in this vehicle.
Placing a rear-facing child seat in the front seat can result in serious injury or
death during a crash.
Never install a rear-facing child seat in this vehicle.
WARNING
Page 32 of 116

58 || 59
VEHICLE CONTROLSVEHICLE CONTROLS
n Using the Front Door Inner Handle
To unlock: Pull
the inner handle. The door unlocks and opens
in one motion.
To lock: Press the lock side of the switch to lock both doors.
Inner Handle
Both doors unlock when opening the driver’s door from the inside.
Do not pull an inner handle while the vehicle is moving.
n
Opening the Hatch
To unlock:
Press the hatch release button on the driver’s door.
Hatch Release Button
n Hatch Main Switch
To disable all hatch r elease methods: Use the hatch main
switch in the glove compartment.
Main Switch
ON
OFF
Power Window Operation
The power windows can be opened and closed when the vehicle is on by using the switches on
the doors. The switches on the driver’s side can be used to open and close boith windows.
n
Automatic Operation
To open: Push the
switch down firmly.
To close: Pull the switch up firmly.
The window opens or closes completely. To stop the window
at any time, push or pull the switch again briefly.
ON
OF F
Lock ButtonPower Window
Indicator
Driver’s
Window
Switch Passenger’s
Window Switch
n Manual Operation
To open: Push the switch
down lightly.
To close: Pull the switch up lightly.
Release the switch when the windows reach the desired position.
n
Power Window Lock
Push in the power
window lock button so only the driver’s window can be operated.
Closing a power window on someone’s hands or fingers can cause serious injury.
Make sure your passengers are away from the windows before closing them.
WARNING
Page 41 of 116

76 || 77
VEHICLE CONTROLSVEHICLE CONTROLS
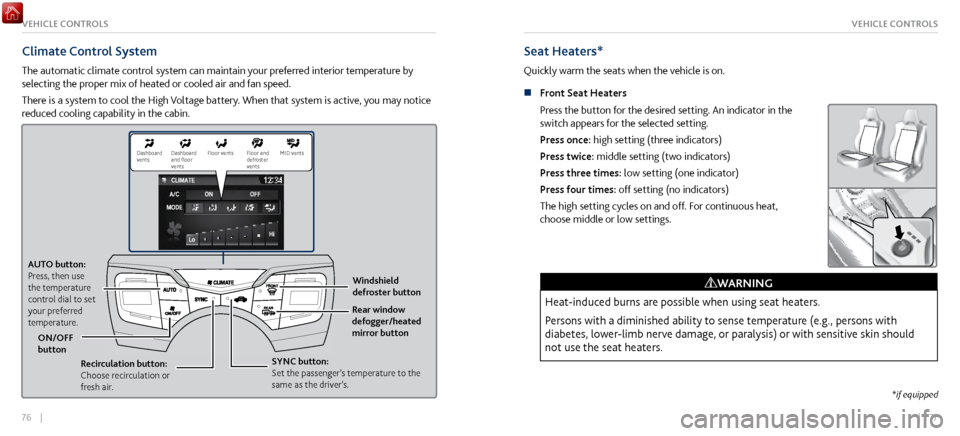
Climate Control System
The automatic climate control system can maintain your preferred interior temperature by
selecting the proper mix of heated or cooled air and fan speed.
There is a system to cool the High Voltage battery. When that system is active, you may notice
reduced cooling capability in the cabin.
Seat Heaters*
Quickly warm the seats when the vehicle is on.
n
Front Seat Heaters
Press the button for the desired setting. An indicator in the
switch appears for the selected setting.
Press once: high setting (three indicators)
Press twice: middle setting (two indicators)
Press three times: low setting (one indicator)
Press four times: off setting (no indicators)
The high setting cycles on and off. For continuous heat,
choose middle or low settings.
Heat-induced burns are possible when using seat heaters.
Persons with a diminished ability to sense temperature (e.g., persons with
diabetes, lower-limb nerve damage, or paralysis) or with sensitive skin should
not use the seat heaters.
WARNING
*if equipped
AUTO button:
Press, then use
the temperature
control dial to set
your preferred
temperature.
ON/OFF
button Windshield
defroster button
SYNC button:
Set the passenger’s temperature to the
same as the driver’s. Rear window
defogger/heated
mirror button
Recirculation button:
Choose recirculation or
fresh air.
Dashboard
vents Dashboard
and floor
vents Floor vent
s Floor and MID vents
defroster
vent s
Page 54 of 116

102 || 103
n Talk Button Tips
•
For a list of phone-related
voice commands, see page 220.
•
When using the Talk button,
wait until you hear a beep before speaking.
•
To bypass the system pr
ompts, simply press the Talk button again to say your command.
•
When the Talk button is pr
essed, all available voice commands are highlighted in yellow.
•
Speak in a clear, natural voice.
•
Reduce all background noise.
•
Adjust the dashboar
d and side vents away from the microphone in the ceiling.
•
Close the windows.
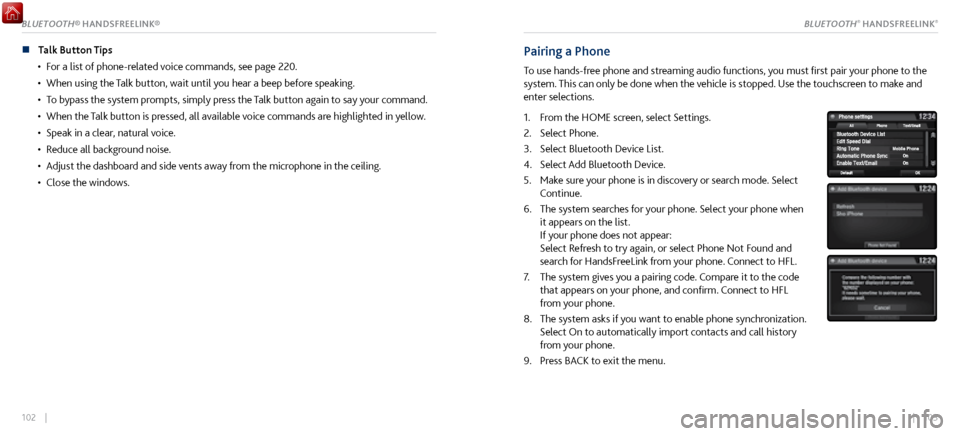
Pairing a Phone
To use hands-free phone and streaming audio functions, you must first pair your phone to the
system. This can only be done when the vehicle is stopped. Use the touchscreen to make and
enter selections.
1.
From the HOME scr
een, select Settings.
2.
Select Phone.
3.
Select Bluetooth Device List.
4.
Select Add Bluetooth Device.
5.
Make sure y
our phone is in discovery or search mode. Select
Continue.
6.
The system searches for y
our phone. Select your phone when
it appears on the list.
If your phone does not appear:
Select Refresh to try again, or select Phone Not Found and
search for HandsFreeLink from your phone. Connect to HFL.
7.
The system gives you a pairing code.
Compare it to the code
that appears on your phone, and confirm. Connect to HFL
from your phone.
8.
The system asks if you want
to enable phone synchronization.
Select On to automatically import contacts and call history
from your phone.
9.
Press BACK to exit
the menu.
BLUETOOTH® HANDSFREELINK®BLUETOOTH® HANDSFREELINK®
Page 60 of 116

114 || 115
NAVIGATIONNAVIGATION
NAVIGATION*
Learn how to enter a destination and operate the navigation system.
Basic Navigation Operation
A real-time navigation system uses GPS and a map database to show your current location and
help guide you to a desired destination. You can operate the system using voice commands or
the system controls.
To reduce the potential for driver distraction, certain manual functions may be inoperable or
grayed out while the vehicle is moving. Voice commands are always available.
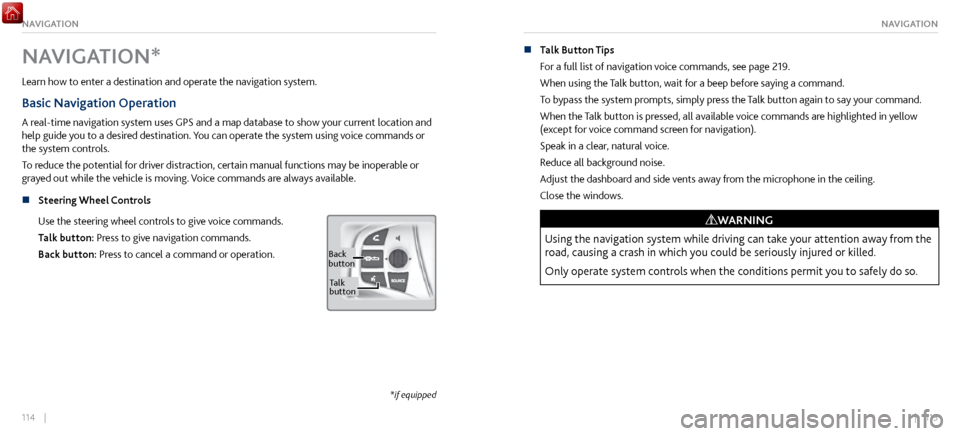
n
Steering Wheel Controls
Use
the steering wheel controls to give voice commands.
Talk button: Press to give navigation commands.
Back button: Press to cancel a command or operation.
Back
button
Ta lk
button
*if equipped
n Talk Button Tips
For a full list
of navigation voice commands, see page 219.
When using the Talk button, wait for a beep before saying a command.
To bypass the system prompts, simply press the Talk button again to say your command.
When the Talk button is pressed, all available voice commands are highlighted in yellow
(except for voice command screen for navigation).
Speak in a clear, natural voice.
Reduce all background noise.
Adjust the dashboard and side vents away from the microphone in the ceiling.
Close the windows.
Using the navigation system while driving can take your attention away from the
road, causing a crash in which you could be seriously injured or killed.
Only operate system controls when the conditions permit you to safely do so.
WARNING
Page 65 of 116

124 || 125
DRIVINGNAVIGATION
n Traffic
View traffic flow and incidents in select metr
o areas. Traffic alerts are accompanied by an
audible beep. Pop-up messages and traffic information can be viewed when you are on the
map screen. You can also select traffic to avoid. Traffic coverage is limited in Canada.
Viewing traffic
1.
From the map scr
een, select the traffic icon.
2.
Select Traffic Conditions.
3.
Traffic icons are shown on
the map. Select the magnifying
glass icon to display a full list of traffic delays.
To mute traffic alerts and voice guidance: From the map screen, press MENU. Select Mute.
To lower voice guidance volume, see page 117.
Avoiding traffic on your route
1.
From the map scr
een, select the traffic icon.
2.
Select Traffic on R
oute.
3.
Select an incident to avoid fr
om the list.
4. Select the menu icon.
5.
Select Avoid.
DRIVING
Learn about preparation for driving and other features.
Before Driving
n Break In
Avoid har d braking for the first 200 miles (300 km). You should also follow this
recommendation when the brake pads are replaced.
n
Exterior Checks
Make sure ther
e are no obstructions on the windows, door mirrors, exterior lights, or other
parts of the vehicle.
Remove any frost, snow, or ice.
Make sure the hood and hatch are securely closed.
Heat from the engine and exhaust can ignite flammable materials in the engine
compartment, causing a fire. If you’ve parked your vehicle for an extended period, inspect
and remove any debris that may have collected, such as dried grass and leaves that have
fallen or have been carried in for use as a nest by a small animal. Also check for leftover
flammable materials after you or someone else has performed maintenance on your vehicle.
Make sure the tires are in good condition.
Make sure there are no people or objects behind or around the vehicle.
Page 88 of 116

170 || 171
HANDLING THE UNEXPECTEDHANDLING THE UNEXPECTED
n Hood Fuse Box B
Located near the 12-volt battery
. Remove the maintenance cover, then push the tabs to
open the box.
AmpsCircuit Protected
160 A�60A30A30A30A30A40A
230 A
320 A
47. 5A
5
6 7.
5A20 A
7
8 7.
5A10 A
9�
107. 5A
11
12 7.
5A
�13�
14 �
15�
16 �
1710A
SBW
�
F/B Main 2
Wiper
Passenger Power Window IG Main1
Driver Power Window ESB
IG Main2
IMA Moto r
BM S
Stop
Turbo W/ G
Hazard WA/
C/ P
�
AEV
FI-ECU Backup �
�
�
�
�
IMA Motor
n Driver’s Side Fuse Box
Located under the dashboard.
Circuit Protected Amps110A
215 A
37.5 A
4�
520 A
6
20 A
715 A
87.5 A
97.5 A
1010 A
1110 A
12�1310 A
147.5 A
15
(20A )
16
(7.5 A)
17(20A )
1810 A
19�
207.5 A
21
7.5 A
227.5 A
237.5 A
Passenger’s Door Handle Door LockSMART �
Front Accessory Power Socket
Fuel Pum p
MISS SO L
ENG
VSA/ABS SRS
Power System 2
�
Power System 1
Fuel Lid
Driver’s Power Seat Reclining *
�
Seat Heater *
Driver’s Door Handle �
Passenger’s Side Door Unlock
Daytime Running Lights
Key Lock
Air Conditionin g
24Feed Back IG1a 7.5A
25Instrument Panel Lights7.5A
26Power Lumbar Support *(7.5
A)
27Parking Lights7.5A
28Sub Main15 A29Meter10 A30DR27.5A
31Sub Fuel Pump15 A
32SR S10 A
33Passenger’s Side Door Lock 7.5A34Driver’s Door Lock7.5A
35Driver’s Door Unlock7.5A
36Driver’s Power Seat Sliding *(2
0A )
37
7.5A
Right Daytime Running
Light
38
7.5A39 Left Daytime Running LightFeed Back IG1b7.5A
40ACC7.5A
41��42��
AmpsCircuit Protecte d
Fuse Label
Circuit Protected Amps110A
215 A
37.5 A
4�
520 A
6
20 A
715 A
87.5 A
97.5 A
1010 A
1110 A
12�1310 A
147.5 A
15
(20A )
16
(7.5 A)
17(20A )
1810 A
19�
207.5 A
21
7.5 A
227.5 A
237.5 A
Passenger’s Door Handle Door LockSMART �
Front Accessory Power Socket
Fuel Pum p
MISS SO L
ENG
VSA/ABS SRS
Power System 2
�
Power System 1
Fuel Lid
Driver’s Power Seat Reclining *
�
Seat Heater *
Driver’s Door Handle �
Passenger’s Side Door Unlock
Daytime Running Lights
Key Lock
Air Conditionin g
24Feed Back IG1a 7.5A
25Instrument Panel Lights7.5A
26Power Lumbar Support *(7.5
A)
27Parking Lights7.5A
28Sub Main15 A29Meter10 A30DR27.5A
31Sub Fuel Pump15 A
32SR S10 A
33Passenger’s Side Door Lock 7.5A34Driver’s Door Lock7.5A
35Driver’s Door Unlock7.5A
36Driver’s Power Seat Sliding *(2
0A )
37
7.5A
Right Daytime Running
Light
38
7.5A39 Left Daytime Running LightFeed Back IG1b7.5A
40ACC7.5A
41��42��
AmpsCircuit Protecte d
*if equipped