2017 Acura MDX remote
[x] Cancel search: remotePage 54 of 170

| 47
V
EHICLE CONTROLS
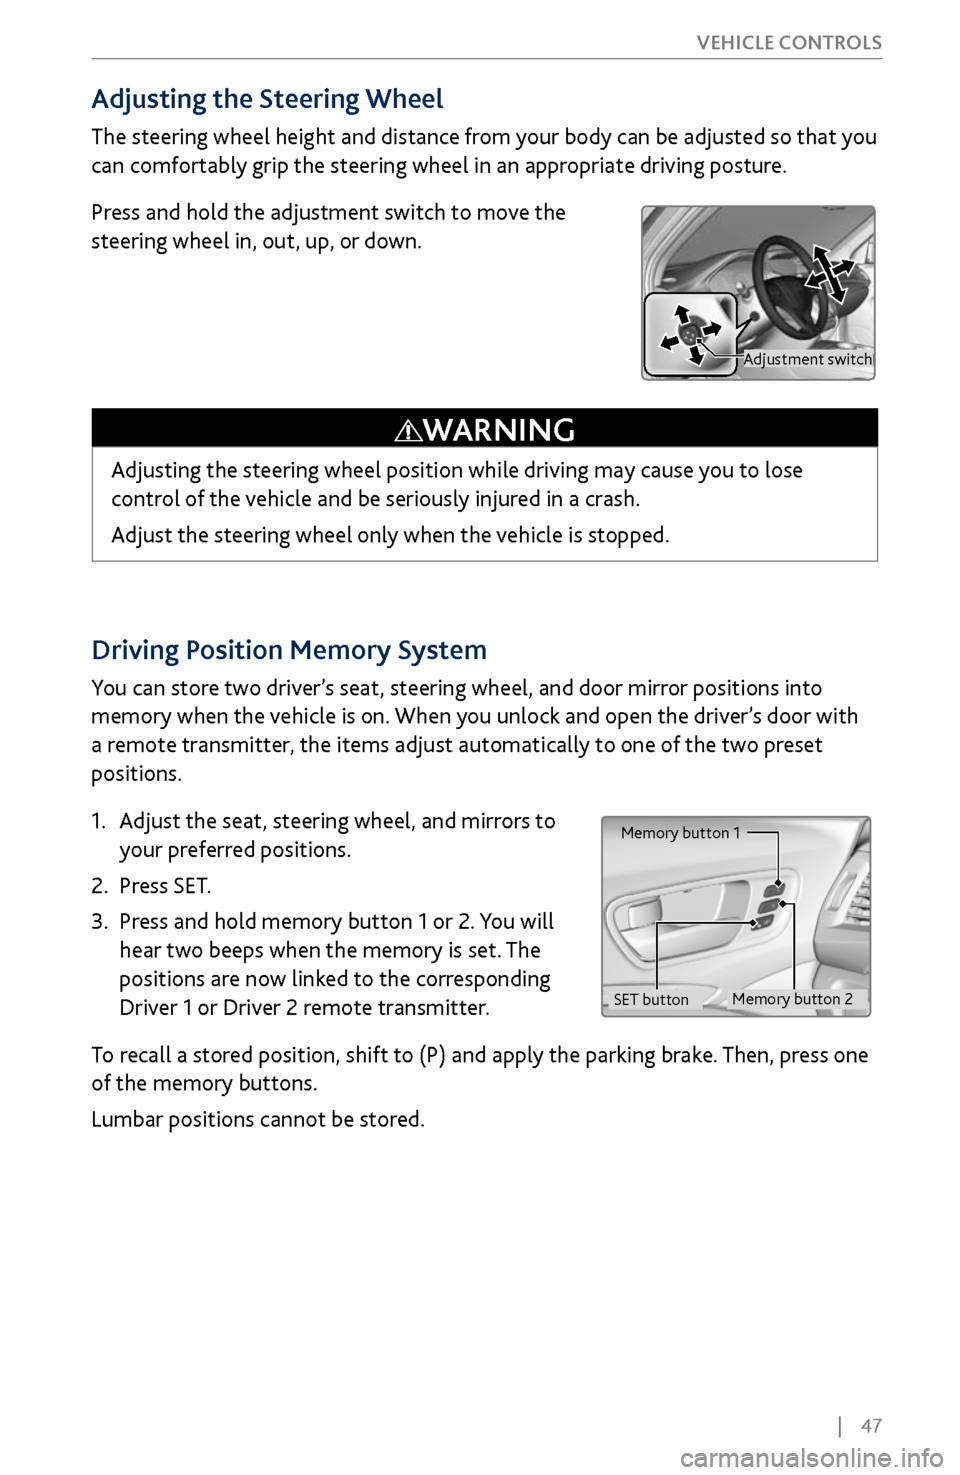
Driving Position Memory System
You can store two driver’s seat, steering wheel, and door mirror positions into
memory when the vehicle is on. When you unlock and open the driver’s door with
a remote transmitter, the items adjust automatically to one of the two preset
positions.
1.
Adjust the seat
, steering wheel, and mirrors to
your preferred positions.
2.
Press SET.
3.
Press and hold memory button 1 or 2.
You will
hear two beeps when the memory is set. The
positions are now linked to the corresponding
Driver 1 or Driver 2 remote transmitter.
To recall a stored position, shift to (P) and apply the parking brake. Then, press one
of the memory buttons.
Lumbar positions cannot be stored.
Memory button 1
Memory button 2
SET button
Adjusting the Steering Wheel
The steering wheel height and distance from your body can be adjusted so that you
can comfortably grip the steering wheel in an appropriate driving posture.
Press and hold the adjustment switch to move the
steering wheel in, out, up, or down.
Adjusting the steering wheel position while driving may cause you to lose
control of the vehicle and be seriously injured in a crash.
Adjust the steering wheel only when the vehicle is stopped.
WARNING
Adjustment switch
Page 57 of 170

50 |
V
EHICLE CONTROLS
HomeLink®
Universal Transceiver
Program your vehicle to operate up to three remote-controlled devices around your
home—such as garage doors, lighting, or home security systems—using the buttons
on the ceiling.
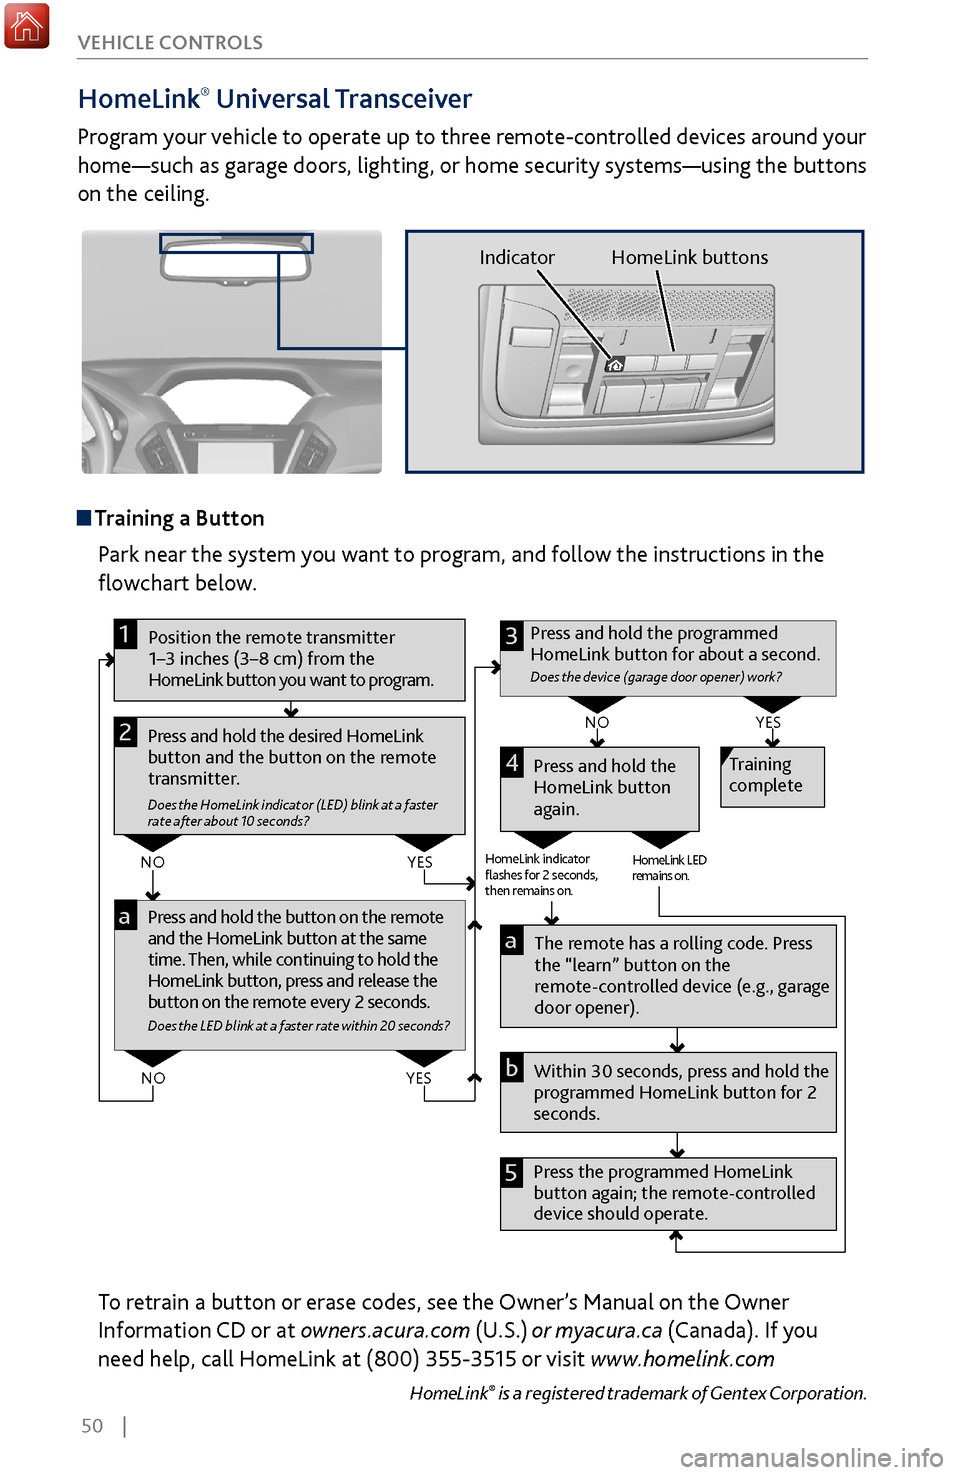
Training a Button
Park near the system you want to program, and follow the instructions in the
flowchart below.
Pr ess and hold the button on the r emote
and the HomeLink button at the same
time. Then, while continuing to hold the
HomeLink button, press and r elease the
button on the remote every 2 seconds.
Does the LED blink at a faster ra te within 20 seconds ?
Press and hold the
HomeLink button
again. Training
complete
YES
NO
HomeLink indicator
�ashes for 2 seconds,
then rem ains on. HomeLink LED
r
emains on.YES
NO
YES
NO
Position the remote transmitter
1–3 inches (3–8 cm) from the
HomeLink button you want to program.1
Press and hold the desired HomeLink
button and the button on the remote
transmitter.
Does the HomeLink indicator (LED) blink at a f aster
rate after about 10 seconds ?
2
a
The remote has a ro lling code. Press
the “learn” button on the
remote-controlled device (e.g., garage
door opener).
Press the programmed HomeLink
button again; the re mote-controlled
device should operate. Within 30 seconds, press and hold the
programmed HomeLink button for 2
seconds.a
Press and hold the programmed
HomeLink button for about a second.
Does the devic e (garage door opener) work ?
3
b
4
5
To retrain a button or erase codes, see the Owner’s Manual on the Owner
Information CD or at owners.acura.com (U.S.) or myacura.ca (Canada). If you
need help, call HomeLink at (800) 355-3515 or visit www.homelink.com
HomeLink® is a registered trademark of Gentex Corporation.
Indicator HomeLink buttons
Page 62 of 170

| 55
V
EHICLE CONTROLS
*if equipped
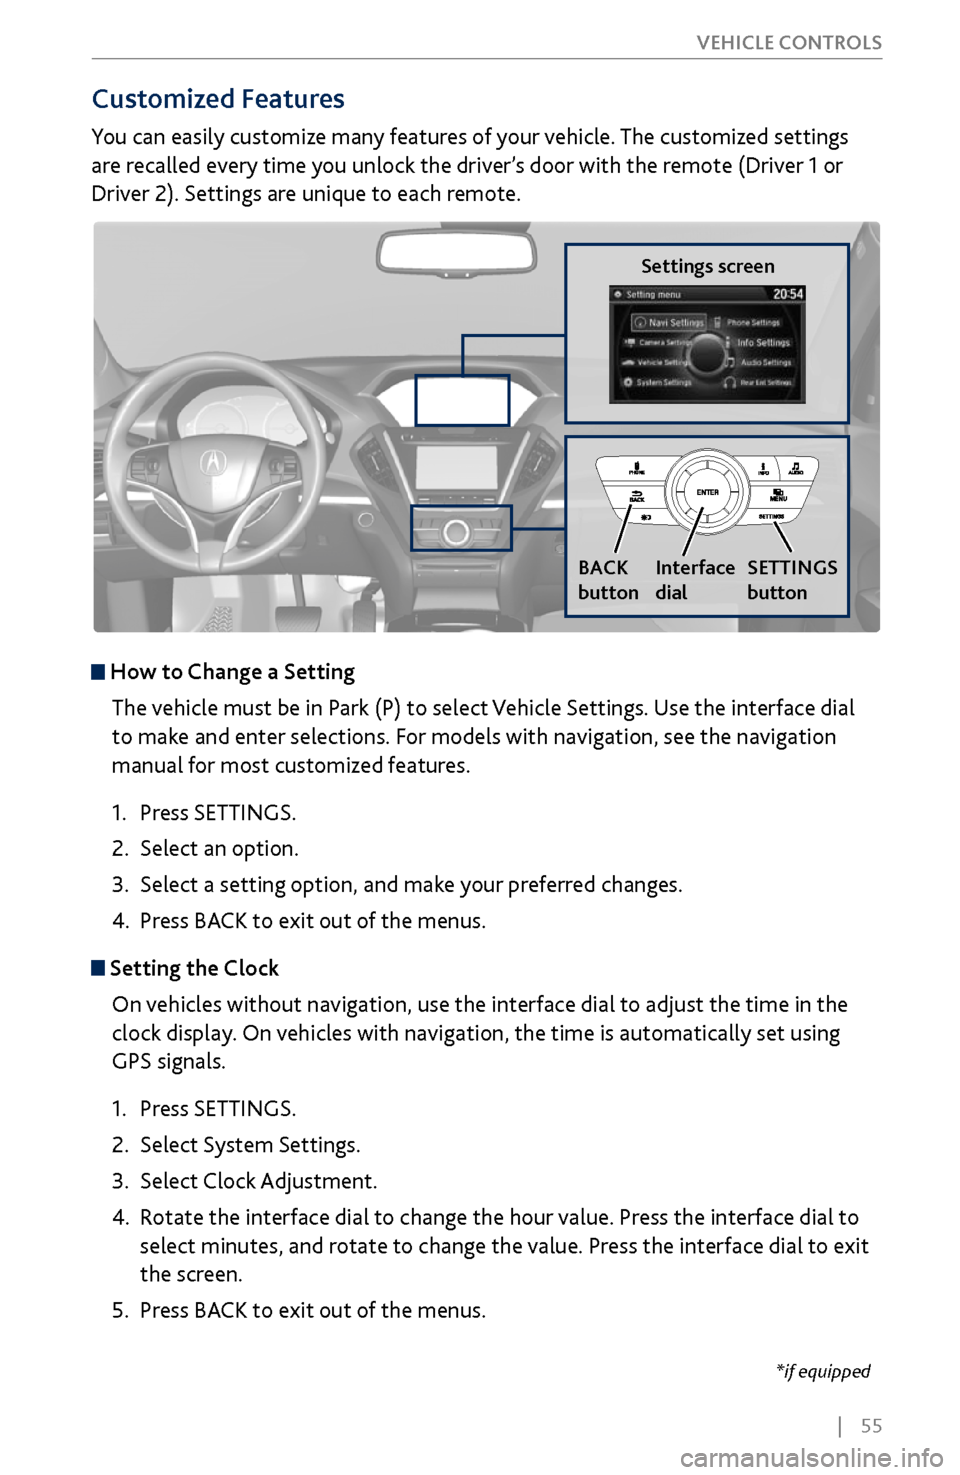
Customized Features
You can easily customize many features of your vehicle. The customized settings
are recalled every time you unlock the driver’s door with the remote (Driver 1 or
Driver 2). Settings are unique to each remote.
How to
Change a Setting
The vehicle must be in Park (P) to select Vehicle Settings. Use the interface dial
to make and enter selections. For models with navigation, see the navigation
manual for most customized features.
1.
Press SETTINGS.
2.
Select an option.
3.
Select a setting option, and make
your preferred changes.
4.
Press BA
CK to exit out of the menus.
Setting the Clock
On vehicles without navigation, use the interface dial to adjust the time in the
clock display. On vehicles with navigation, the time is automatically set using
GPS signals.
1.
Press SETTINGS.
2.
Select System Settings.
3.
Select Clock Adjustment
.
4.
Rotate the interface dial to
change the hour value. Press the interface dial to
select minutes, and rotate to change the value. Press the interface dial to exit
the screen.
5.
Press BA
CK to exit out of the menus.
Settings screen
BACK
button
Interface
dial SETTINGS
button
Page 75 of 170

68 |
AUDIO AND CONNECTIVITY
*if equipped
System Components
Retrieve the wireless headphones and open the overhead screen to use the
system.
Overhead screen
9-inch RES*: Pull down the bottom edge of the
screen, and extend it until it locks into place.
Ultrawide RES*: Press OPEN. Extend the screen
until it locks into place.
Fold the screen back into the ceiling when not in
use.
Press the release button to detach the rear remote control panel, if desired.
Auxiliary/HDMI* inputs
Auxiliary inputs can be used for video game systems and other devices. Wired
headphones can also be used.
Wireless headphones
Your vehicle comes with two sets of wireless
headphones.
For each, the power button and volume dial are on
the right earpiece.
Auxiliary
input jacks
Release button
Ultrawide RES*
HDMI input can be used for
video game systems and
other devices.
Wired
headphone
volume
Wired
headphone
jacks
Page 76 of 170

| 69
AUDIO AND CONNECTIVITY
1. Make sure REAR POWER is turned on in the front audio controls.
2.
From
the rear control panel, press the desired audio source button (or the
SOURCE button for Ultrawide RES).
3.
Press the arr
ow/ENTER buttons to highlight options on the screen and select
them. Use the other rear control panel buttons to operate the system.
Remote Control and Rear Operation
You can operate the system using the rear remote control panel.
DVD/AUX button:
Play a DVD, USB, iPod,
or auxiliary source.
TUNE/SKIP button:
Change DVD
chapters, audio
stations, or tracks. TITLE/SCROLL
button: Display
DVD status or
CD titles.
Play/Pause
button
(CD/DVD)
Power button: Turn
the system on or off. CH/FOLDER button:
Change channels,
stations, or folders.
Light button:
Illuminate the
remote buttons.
CANCEL button:
Go back to the
previous display.
CD/HDD button:
Play a CD or HDD.
XM button:
Play XM Radio.FM/AM button:
Play FM or AM radio.
MENU button:
Display menu options.
SETUP button:
Display setup options. Arrow/ENTER button:
Highlight and select
items.
Page 87 of 170

80 |
Subscription Features
In addition to standard service, receive benefits such as collision notification,
emergency assistance, online security, enhanced navigation searches, and
important messages about your vehicle. Requires enrollment and privacy
agreement. To subscribe or get more information, visit owners.acura.com (U.S.) or
myacura.ca (Canada) or contact a dealer.
Emergency AssistanceIf your vehicle’s airbags deploy or if the unit detects that the vehicle is severely
impacted, your vehicle automatically attempts to connect to the AcuraLink
operator if your phone is paired to the system and there is sufficient cellular
coverage.
If you need to manually connect to the operator,
open the cover on the ceiling console and press
ASSIST when the vehicle is on.
Once connected, information about your vehicle,
its positioning, and its condition will be sent to the
operator; you can also speak to the operator when
connected.
Security FeaturesTo use security features, you need your user ID and personal identification
number (PIN). Some of these features are also available with the AcuraLink
smartphone app. Visit owners.acura.com/apps (U.S.) or myacura.ca (Canada) to
download.
•
Stolen
vehicle tracking: Searches and tracks down your vehicle position.
•
Remote door
lock/unlock: Remotely lock or unlock doors.
•
Vehicle finder: Locate
your vehicle in large areas, such as a crowded parking lot.
•
Security alarm
notification: If your vehicle’s security system detects tampering,
the provider notifies you.
Operator Assistance
Press LINK on the ceiling console to connect to an
operator when trying to find a destination or for
roadside assistance.
ASSIST
button
LINK button
ACURALINK®
Page 103 of 170

96 |
DRIVING
Remote Engine Start*
Start your vehicle’s engine from extended distances using the two-way remote
transmitter before you enter the vehicle.
Green indicator:
Confirms doors are
locked or engine is
running.Amber indicator:
Remote is
communicating with
vehicle.
Red indicator:
Remote is out of
range or cannot
communicate with
the vehicle, or engine
is stopped.ENGINE HOLD button:
After pressing the LOCK
button, press and hold
to start the engine.
LOCK button
Make sure the vehicle is in a safe location when using remote engine start (i.e., a
well ventilated area, away from any flammable materials).
Starting the Engine
Press the LOCK button, then press and hold the ENGINE HOLD button to
remotely start the engine.
The engine runs for up to 10 minutes. To extend the run time for another
10 minutes, repeat the procedure during the initial 10 minutes.
While the engine is running, the climate control system adjusts the cabin
temperature, the security system remains on, and lights and accessories remain off.
Stopping the Engine Press and hold ENGINE.
The engine will also stop if it has been running for more than 10 minutes, or if any
door is opened without using the remote or keyless access.
Engine exhaust contains toxic carbon monoxide gas.
Breathing carbon monoxide can kill you or cause unconsciousness.
Never use the remote engine starter when the vehicle is parked in a garage
or other area with limited ventilation.
WARNING
*if equipped
Page 127 of 170

120 |
HANDLING THE UNEXPECTED
Jump Starting
Turn off the power to all electric devices, including audio and lights. Turn off the
engine, then open the hood (see page 139).
1.
Remov
e the engine cover (see page 139).
2.
Connect the first
jumper cable to your vehicle’s
battery (+) terminal.
3.
Connect the other end of the
first jumper cable
to the booster battery (+) terminal. Use a 12-volt
booster battery only.
4.
Connect the second jumper cable
to the booster
battery (-) terminal.
5.
Connect the other end of the
second jumper cable
to the engine hanger as shown. Do not connect
this jumper cable to any other part.
6.
If your
vehicle is connected to another vehicle,
start the assisting vehicle’s engine and increase its
rpm slightly.
7.
Attempt to start
your vehicle’s engine. If it turns
over slowly, make sure that the jumper cables
have good metal-to-metal contact.
WARNING: Battery posts, terminals, and related accessories contain lead and lead
compounds. Wash your hands after handling.
HANDLING THE UNEXPECTED
Learn about what to do in critical or emergency situations.
Keyless Access Remote Battery Strength
If the battery life in your remote transmitter is weak, a message appears in the MID
with information on how to start the engine.
1.
Touch the back of the
remote transmitter to the
ENGINE START/STOP button while the indicator
is flashing.
2.
With the brake pedal pr
essed, press the ENGINE
START/STOP button within 10 seconds.
Booster battery
Engine
hanger
Engine coverPin