2017 Acura MDX Washer
[x] Cancel search: WasherPage 7 of 170

*if equipped
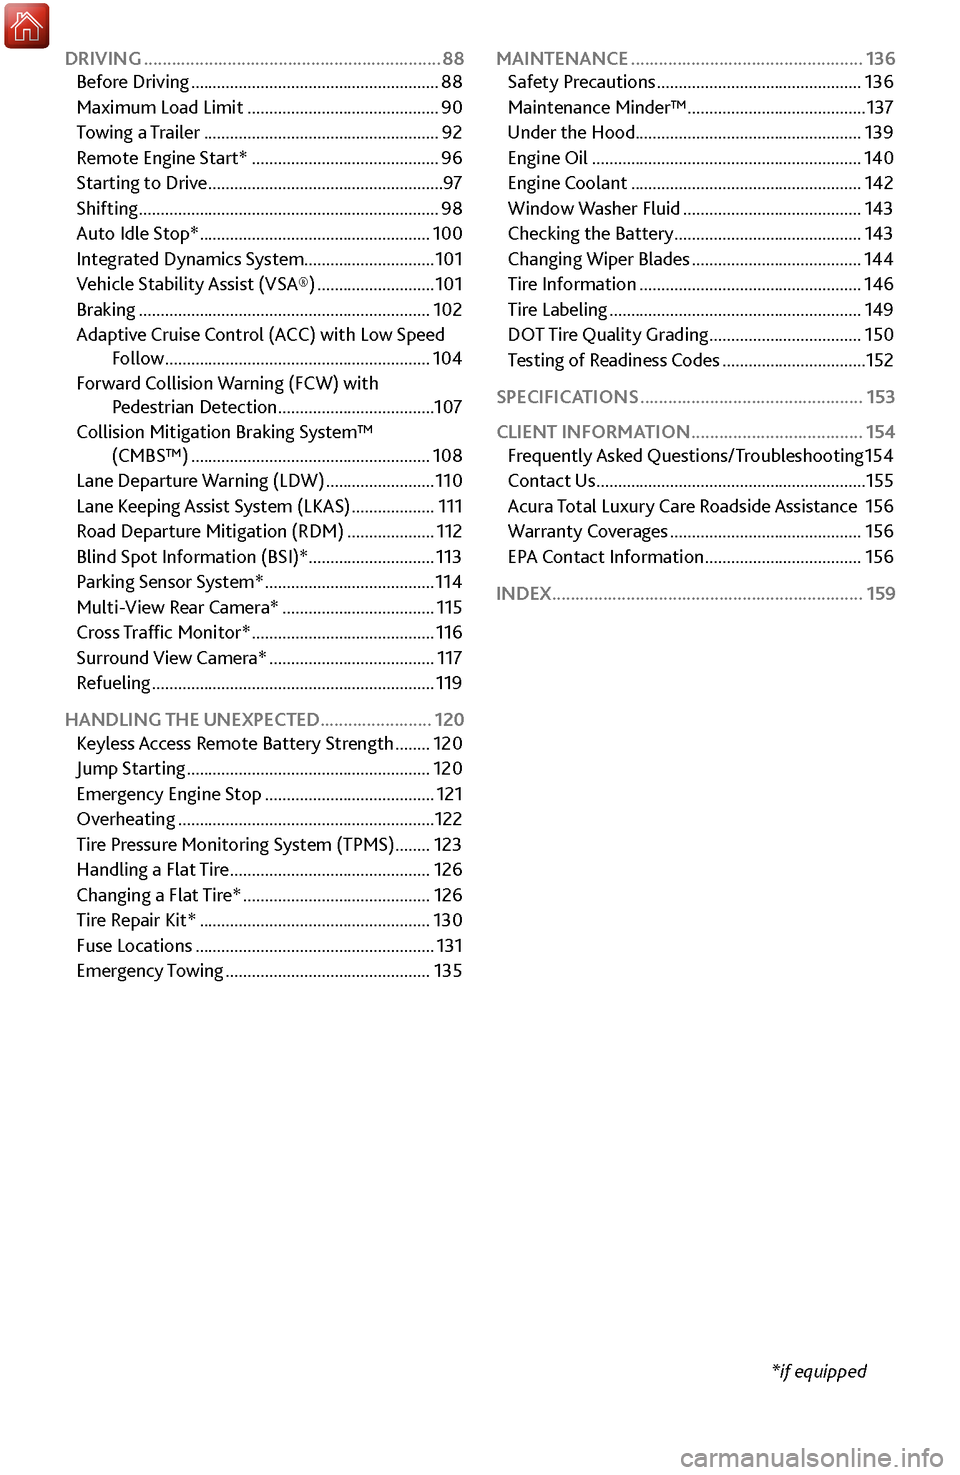
DRIVING
................................................................
88
Before Driving ......................................................... 88
Maximum Load Limit ............................................ 90
Towing
a Trailer
......................................................
92
Remote
Engine Start*
...........................................
96
Starting to Driv
e
......................................................
97
Shifting ..................................................................... 98
Auto Idle Stop* ..................................................... 100
Integrated Dynamics S
ystem
..............................101
Vehicle Stability Assist (VSA®)
........................... 101
Braking ................................................................... 102
Adaptiv
e Cruise Control (ACC)
with Low Speed
F
ollow
.............................................................
104
Forwar
d Collision Warning (FCW) with
Pedestrian Detection
.................................... 107
Collision Mitigation Braking
System™
(CMBS™)
....................................................... 108
Lane Departure
Warning (LDW)
.........................
110
Lane Keeping
Assist System (LKAS)
...................
111
Road Departur
e Mitigation (RDM)
....................
112
Blind Spot Information (BSI)*
............................. 113
Parking Sensor System*
....................................... 114
Multi-View
Rear Camera*
...................................
115
Cross T
raffic Monitor*
..........................................
116
Surround View
Camera*
......................................
117
Refueling ................................................................. 119
HANDLING THE UNEXPECTED ........................
120
Keyless Access Remote Battery Strength
........ 120
Jump Starting ........................................................ 120
Emergency
Engine Stop
.......................................
121
Overheating ........................................................... 122
Tire Pr
essure Monitoring System (TPMS)
........
123
Handling a Flat Tir
e
..............................................
126
Changing a Flat Tir
e*
...........................................
126
Tire R
epair Kit*
.....................................................
130
Fuse Locations ....................................................... 131
Emer
gency Towing
...............................................
135MAINTENANCE
..................................................
136
Safety Precautions ............................................... 136
Maintenance Minder™ ......................................... 137
Under the
Hood
.................................................... 139
Engine Oil
.............................................................. 140
Engine Coolant ..................................................... 142
Window Washer
Fluid
.........................................
143
Checking the Battery ........................................... 143
Changing Wiper Blades ....................................... 144
Tire Information ................................................... 146
Tire Labeling .......................................................... 149
DOT
Tire Quality Grading
...................................
150
Testing
of Readiness Codes
.................................
152
SPECIFICATIONS
................................................ 153
CLIENT INFORMATION
..................................... 154
Fr
equently Asked Questions/Troubleshooting
154
Contact Us .............................................................. 155
Acura
Total Luxury Care Roadside Assistance
156
Warranty Co
verages
............................................
156
EPA C
ontact Information
....................................
156
INDEX...................................................................
159
Page 8 of 170

| 1
V
ISUAL INDEX
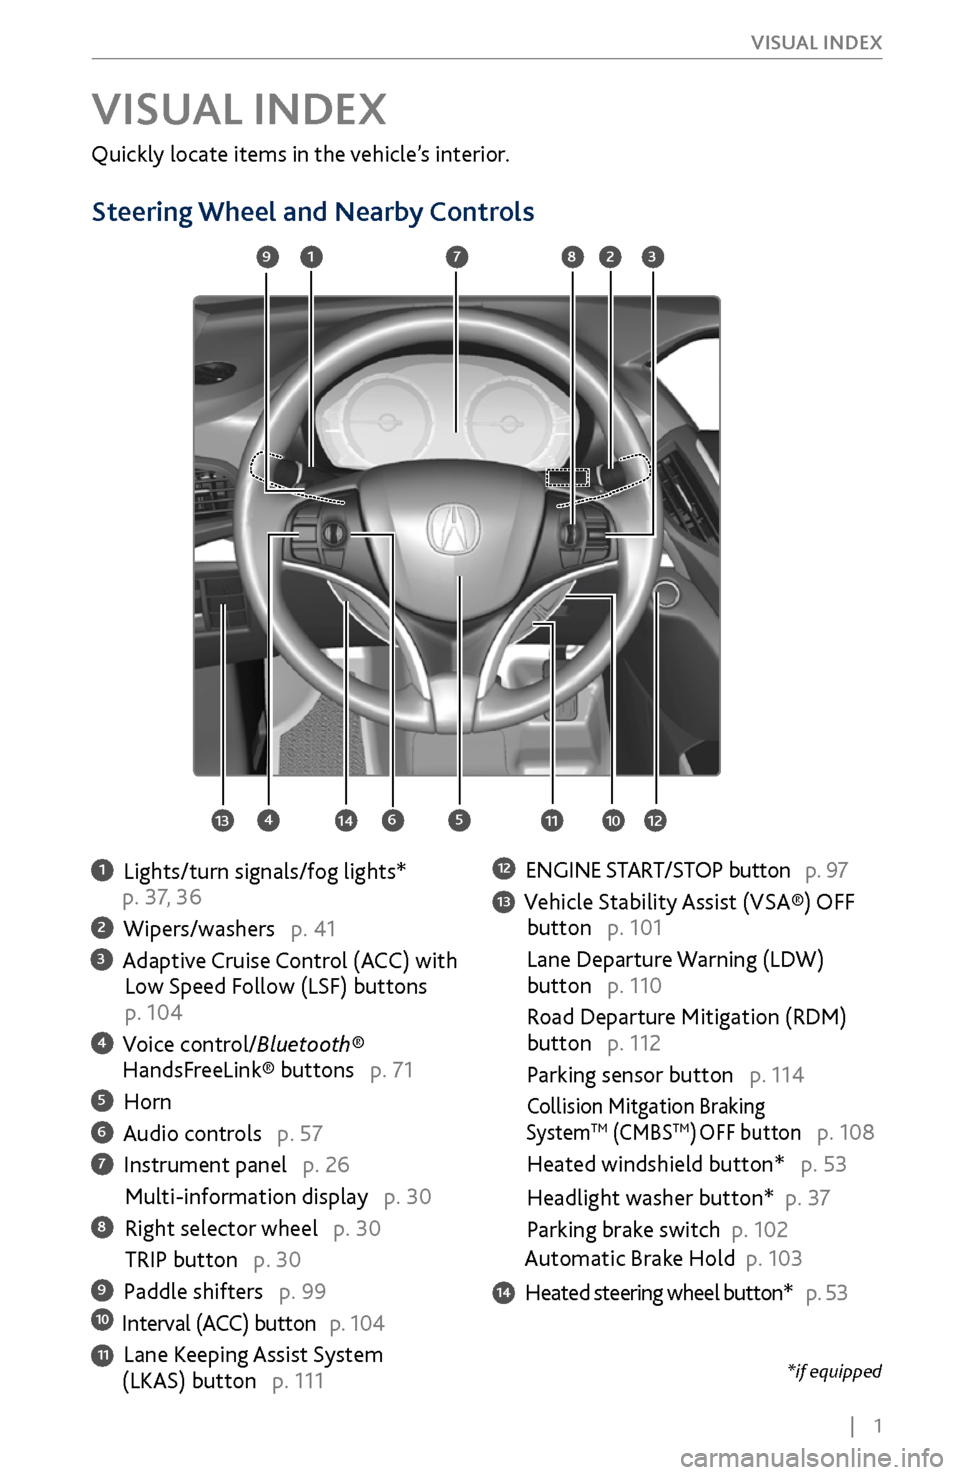
Quickly locate items in the vehicle’s interior.
Steering Wheel and Nearby Controls
1 Lights/turn signals/fog lights*
p. 37, 36
2 Wipers/washers p. 41
3 Adaptive Cruise Control (ACC) with Low Speed Follow (LSF) buttons
p. 104
4 Voice control/Bluetooth® HandsFreeLink® buttons p. 71
5 Horn
6 Audio controls p. 57
7 Instrument panel p. 26
Multi-information display p. 30
8 Right selector wheel p. 30
TRIP button p. 30
9 Paddle shifters p. 9910 Interval (ACC) button p. 104
11 Lane Keeping Assist System (LKAS) button p. 111
12 ENGINE START/STOP button p. 97
13 Vehicle Stability Assist (VSA®) OFF
button p. 101
Lane Departure W
arning (LDW)
button p. 110
Road Departure Mitigation (RDM)
button p. 112
Parking sensor button p. 114
Collision Mitgation Braking SystemTM (CMBSTM) OFF button p. 108
Heated windshield button* p. 53
Headlight washer button* p. 3
7
Parking brake switch
p. 102
Automatic Brake Hold p. 103
14 Heated steering wheel button* p. 53
VISUAL INDEX
1
45
9
61011
7283
131412
*if equipped
Page 44 of 170

| 37
V
EHICLE CONTROLS
Interior and Exterior Lights
Operate interior and exterior lights when the vehicle is on or off.
Exterior Lights
Rotate the switch on the headlight lever to operate the exterior lights. Push the
lever forward to turn on the high beams. Return the lever to its original position
for low beams.
OFF
All exterior lights are off
.
AUTO
Turn on the automatic lighting
feature. Headlights turn on or
off depending on ambient
brightness when the v
ehicle is on.
Headlights automatically come
on after the wipers ar
e engaged for a
certain time.
Turn on exterior lights except headlights.
Turn on all exterior lights including headlights.
Turn on fog lights.*
Brightness Control Adjust instrument panel brightness when the
vehicle is on.
To brighten: Press the + button.
To dim: Press the - button.
A beep sounds when the brightness reaches
minimum or maximum.
Headlight Washers* Turn the headlights on. Press the headlight
washer button to operate the washers.
The headlight washers also operate when you
first turn on the windshield wipers.
High
beams
Low beams Flash high beams
*if equipped
Fog lights*
Page 48 of 170

| 41
V
EHICLE CONTROLS
Wiper Operation
The windshield wipers and washers can be used when the vehicle is on. Move the
wiper lever up or down to the desired position.
*if equipped
Headlight-Wiper Integration
When the headlights are in the AUTO position, they automatically turn on when
the front wipers operate several times within a certain interval. The headlights
turn off shortly after the wipers are turned off, or if there is enough ambient light.
Mist
Pull toward
you for
washer.
OFF
INT (intermittent)*/
AUTO (automatic)*
LO: low speed
HI: high speed
Intermittent Wipers* When you move the lever to the INT position, the wipers operate based on the
delay adjustment.
Rotate the adjustment ring to adjust the wiper delay.
Long delayRotate the
adjustment
ring.
Short delay
INT position
Page 49 of 170

42 |
V
EHICLE CONTROLS
Rear Wiper
Rotate the end of the wiper lever to operate the
rear wiper.
When you change the gear to Reverse (R) and
the front wipers are activated, the rear wiper
activates even if the switch is off.
Automatic Rain-Sensing Wipers*When you move the lever to the AUTO position while driving in rainy weather,
the wipers operate based on the amount of detected rainfall.
Put the lever in the AUTO position only when driving in rainy weather.
Rotate the adustment ring to adjust the rainfall sensor sensitivity.
Return the lever to the OFF position when rain stops.
Do not use the wipers when the windshield is dry. The windshield will get
scratched, or the rubber blades will get damaged.
In cold weather, the blades may freeze to the windshield, becoming stuck.
Operating the wipers in this condition may damage the wipers. Use the defroster
to warm the windshield, or manually clear the windshield of ice and snow before
turning on the wipers.
NOTICE
OFF
INT: Intermittent
ON: Continuous wipe
Washer
Washer
Always ensure the wiper lever is in the OFF position before cleaning the
windshield or entering a car wash to prevent damage to the wiper system.
NOTICE
Low sensitivity High sensitivityRotate the
adjustment
ring.AUTO position
Page 141 of 170

134 |
HANDLING THE UNEXPECTED
Located near the battery. Push the tabs to open the box.
Circuit ProtectedAmps1Main Fus
e150A
2
VSA MTR40A
VSA FSR20A
Stop & Horn Hazard*30 A
Hazard*
RR Blower & BM S
DC/DC 3*60 A
RR F/B-2 60A
AS F/B-
260A
EPS60A
3 H/L Washer
*(30 A)
IG 1 B Main 30A
R/B Main 60A
DR F/B-1 50A
AS F/B- 1 50A
RR F/B-1 60A
IG 1 A Mai n 30A
DR F/B-2 50A
4F I Main 40 A
5 FR Blower 40A
6R R DEF4 0A
7 IG 1 Main ST 30 A
8 Stop & Horn
*20
A
Stop*10 A
9 Hazard 10A
10 BMS
11 Small LT
*7.5 A
Circuit Protected
Amps
30A
7.5A
Circuit Protected Amps
1 Main Fuse 150A
2 VSA MTR
40A
VSA FS R2 0A
Stop & Horn Hazard
*30 A
Hazard*
RR Blower & BM S
DC/DC 3*60 A
RR F/B-2 60A
AS F/B- 26 0A
EPS6 0A
3
H/L Washer*(30 A)IG 1 B Main30AR/B Main60 ADR F/B-150AAS F/B- 150ARR F/B-160 AIG 1 A Mai n30ADR F/B-250A
4F I Main 40 A
5FR Blower40 A
6R R DEF40A7IG 1 Main ST30 A
8 Stop & Horn*20
A
Stop*10 A9Hazard10 A
10 BMS
11Small LT*7.5 A
Circuit ProtectedAmps
30A
7.5A
Rear Fuse Box
Located on the left side of the cargo area. Remove the cover using a cloth-
wrapped flat-tip screwdriver to access.
Fuse Label
Fuse BoxCover
Circuit ProtectedAmpsCircuit Protected Amps1PTG Closer20 A23USB Charge15 A4Fuel Lid 7.5A
5 Seat Slide 20A
6 � �
7 RR Heat Seat
*(20 A)
8 � �
9
10
11
12 Rear Wiper 10A
13 Rear ECU 7.5 A
14 (20 A)
15
16
17
18 PTG MTR 40A
��
��
��
��
SH-AWD
*
��
EPB-R
30A
EPB-L 30A
Circuit Protected AmpsCircuit ProtectedAmps1 PTG Closer 20A
2
3 USB Charge 15 A
4 Fuel Lid 7.5A5Seat Slide20A6��7RR Heat Seat*(20 A)8��9101112Rear Wiper10A13Rear ECU7.5 A14(20 A)15161718PTG MTR40 A
��
��
��
��
SH-AWD*
��
EPB-R30A
EPB-L 30A
*if equipped
Page 146 of 170

| 139
MAINTENANCE
Under the Hood
Brake Fluid
Washer Fluid
Radiator Cap
Engine Coolant
Reserve Tan
k Batter
y
Engine Oil Dipstick
(Orange) Engine Oil Fill Ca
p
Opening the Hood
1.
Park the
vehicle on a level surface, and set the
parking brake.
2.
Pull the hood release handle under
the lower left
corner of the dashboard.
3.
Push up the hood latch lever in
the center of the
hood to release the lock mechanism, and open
the hood.
4.
Lift the hood up about halfway.
The hydraulic
supports will continue to lift and hold it up.
When closing, lower the hood to approximately
12 inches (30 cm), then press down firmly with
your hands.
Lever
Hood release handle
Pull
Lever
Engine Compartment CoverCertain parts in the engine compartment are
protected by a cover. You may need to remove the
cover when you perform certain maintenance work.
Pull up on the engine cover, and remove it from the
pins.
Do not open the hood when the wiper arms are raised. The hood will strike the
wipers, and may damage either the hood or the wipers. Do not open the hood
during auto idle stop operation.*
NOTICE
*if equipped
Page 150 of 170

| 143
MAINTENANCE
Window Washer Fluid
Add washer fluid as necessary (see page 139). Pour it carefully, and do not
overflow the reservoir.
For Jump starting, see page 120.
Checking the Battery
The battery condition is monitored by the sensor on the negative terminal. If there
is a problem with the sensor, have your vehicle checked by a dealer. Check the
battery terminals monthly for corrosion.
The battery gives off explosive hydrogen gas during normal operation.
A spark or flame can cause the battery to explode with enough force to kill or
seriously hurt you.
When conducting any battery maintenance, wear protective clothing and a
face shield, or have a skilled technician do it.
WARNING
If the washer fluid is low,
a message appears on the
multi-information display.Wa sher Fluid Lo w
WARNING: Battery posts, terminals, and related accessories contain lead and lead
compounds. Wash your hands after handling.
If there is a problem with
the battery sensor, a
message appears on the
multi-information display.Charging
System Problem
Do not use engine antifreeze or a vinegar/water solution in the windshield washer
reservoir. Antifreeze can damage your vehicle’s paint. A vinegar/water solution can
damage the windshield washer pump.
NOTICE
If your battery is labeled AGM, consult your dealer before you connect a battery
charger. AGM batteries require compatible chargers.