Page 44 of 170

| 37
V
EHICLE CONTROLS
Interior and Exterior Lights
Operate interior and exterior lights when the vehicle is on or off.
Exterior Lights
Rotate the switch on the headlight lever to operate the exterior lights. Push the
lever forward to turn on the high beams. Return the lever to its original position
for low beams.
OFF
All exterior lights are off
.
AUTO
Turn on the automatic lighting
feature. Headlights turn on or
off depending on ambient
brightness when the v
ehicle is on.
Headlights automatically come
on after the wipers ar
e engaged for a
certain time.
Turn on exterior lights except headlights.
Turn on all exterior lights including headlights.
Turn on fog lights.*
Brightness Control Adjust instrument panel brightness when the
vehicle is on.
To brighten: Press the + button.
To dim: Press the - button.
A beep sounds when the brightness reaches
minimum or maximum.
Headlight Washers* Turn the headlights on. Press the headlight
washer button to operate the washers.
The headlight washers also operate when you
first turn on the windshield wipers.
High
beams
Low beams Flash high beams
*if equipped
Fog lights*
Page 45 of 170

38 |
V
EHICLE CONTROLS
Auto High-Beam System
Automatically changes the low beam headlights to high beam headlights when
necessary.
How It Works
When you are driving at night above 35 mph (56 km/h) and the headlight lever is
in the low beam position with the switch rotated to AUTO, the system changes
between low and high beams depending on the surrounding conditions.
15-degrees
Your vehicle Oncoming
vehicle
Vehicle ahead
of you
If a vehicle is detected ahead of you, the headlights stay in low beams. If the
system does not detect any vehicles ahead of you, the headlights change to high
beams.
Certain conditions, such as weather and brightness of other vehicles’ lights, can
affect system operation.
Turning the System On or Off Make sure the headlight lever is in the low beam
position with the switch rotated to the AUTO
position. The auto high-beam system indicator
appears when the system is on.
The system is canceled temporarily when you drive
at speeds below 25 mph (40 km/h), the vehicle
speed is below 15 mph (24 km/h), or the windshield
wipers run at high speed for more than a few
seconds.
To disable the system: When the vehicle is on and parked, pull the headlight
lever towards you and hold it for 40 seconds. The auto high-beam indicator
blinks twice.
To re-enable the system: When the vehicle is on and parked, pull the headlight
lever towards you and hold it for 30 seconds. The auto high-beam indicator
blinks once.
To temporarily cancel operation, do either of the following:
•
Flash the high beams by mo
ving the lever toward you. Flash the high beams
again to resume auto high beam operation.
•
Engage high beams by moving
the lever into the high beam position. Return the
lever to the low beam position to resume auto high beam operation.
SwitchHeadlight
Page 46 of 170
| 39
V
EHICLE CONTROLS
If you find the timing of beam changes inconvenient for driving, change the
beams manually.
For the system to work properly:
•
Do not place
an object that reflects light on the dashboard.
•
Keep the
windshield around the camera clean. When cleaning the windshield,
be careful not to apply windshield cleanser to the camera lens.
•
Do not attach an object, stick
er or film in the area around the camera.
•
Do not touch the camera lens.
If
the camera receives a strong impact or requires repair, consult a dealer.
If the Cannot Operate message appears, park
your vehicle in a safe place. Wipe away debris
blocking the windshield, then start driving again.
If the message remains on even after driving for a
while with the clean windshield, have your vehicle
checked by a dealer.
Page 47 of 170
40 |
V
EHICLE CONTROLS
Interior Lights
Change the interior light settings using the switches on the ceiling.
Front lights
On position: Interior lights remain on.
Door-activated position: Interior lights come on
when any of the doors are opened, the driver’s door
is unlocked, or the vehicle is turned off.
Off position: Interior lights remain off.
Press the map light button to turn lights on or off.
Cargo lights
Located on the inside of the tailgate door.
On position: The light comes on when the tailgate
is open and goes off when it is closed.
Off position: The light stays off.
Door-activated position
On
Off
On Off
One-Touch Turn Signal
Use this quick and convenient method to signal a lane change.
Lightly push the turn signal lever up or down for a
three-blink sequence.
For a continuous signal, push the lever up or down
until it locks into place.
Right
Left
Page 48 of 170
| 41
V
EHICLE CONTROLS
Wiper Operation
The windshield wipers and washers can be used when the vehicle is on. Move the
wiper lever up or down to the desired position.
*if equipped
Headlight-Wiper Integration
When the headlights are in the AUTO position, they automatically turn on when
the front wipers operate several times within a certain interval. The headlights
turn off shortly after the wipers are turned off, or if there is enough ambient light.
Mist
Pull toward
you for
washer.
OFF
INT (intermittent)*/
AUTO (automatic)*
LO: low speed
HI: high speed
Intermittent Wipers* When you move the lever to the INT position, the wipers operate based on the
delay adjustment.
Rotate the adjustment ring to adjust the wiper delay.
Long delayRotate the
adjustment
ring.
Short delay
INT position
Page 53 of 170

46 |
V
EHICLE CONTROLS
Adjusting the
Mirrors
Adjust the angle of the mirrors for the best visibility when you are sitting in the
correct driving position.
Automatic Dimming Rearview Mirror
When driving after dark, the automatic dimming
function reduces the glare from headlights behind
you. Power door mirrors also dim.*
The function cancels when the gear is changed to
Reverse (R).
Power Door MirrorsAdjust the power door mirrors when the vehicle is on.
L/R selector switch: Select the left or right
mirror. After adjusting the mirror, return the
switch to the center position.
Mirror position adjustment switch: Press the
switch left, right, up, or down to move the mirror.
Folding door mirror button*: Press to fold the
door mirrors in or out.
Reverse Tilt Door MirrorsEither side door mirror can tilt downward when
you change the gear to Reverse (R) to improve
visibility on the selected side of the vehicle
when reversing. The mirror returns to its original
position when you change the gear out of
Reverse.
When in Reverse, slide the selector switch to the
left or right side.
*if equipped
Adjustment switch Selector switchFolding
button*
Selector switch
Page 57 of 170

50 |
V
EHICLE CONTROLS
HomeLink®
Universal Transceiver
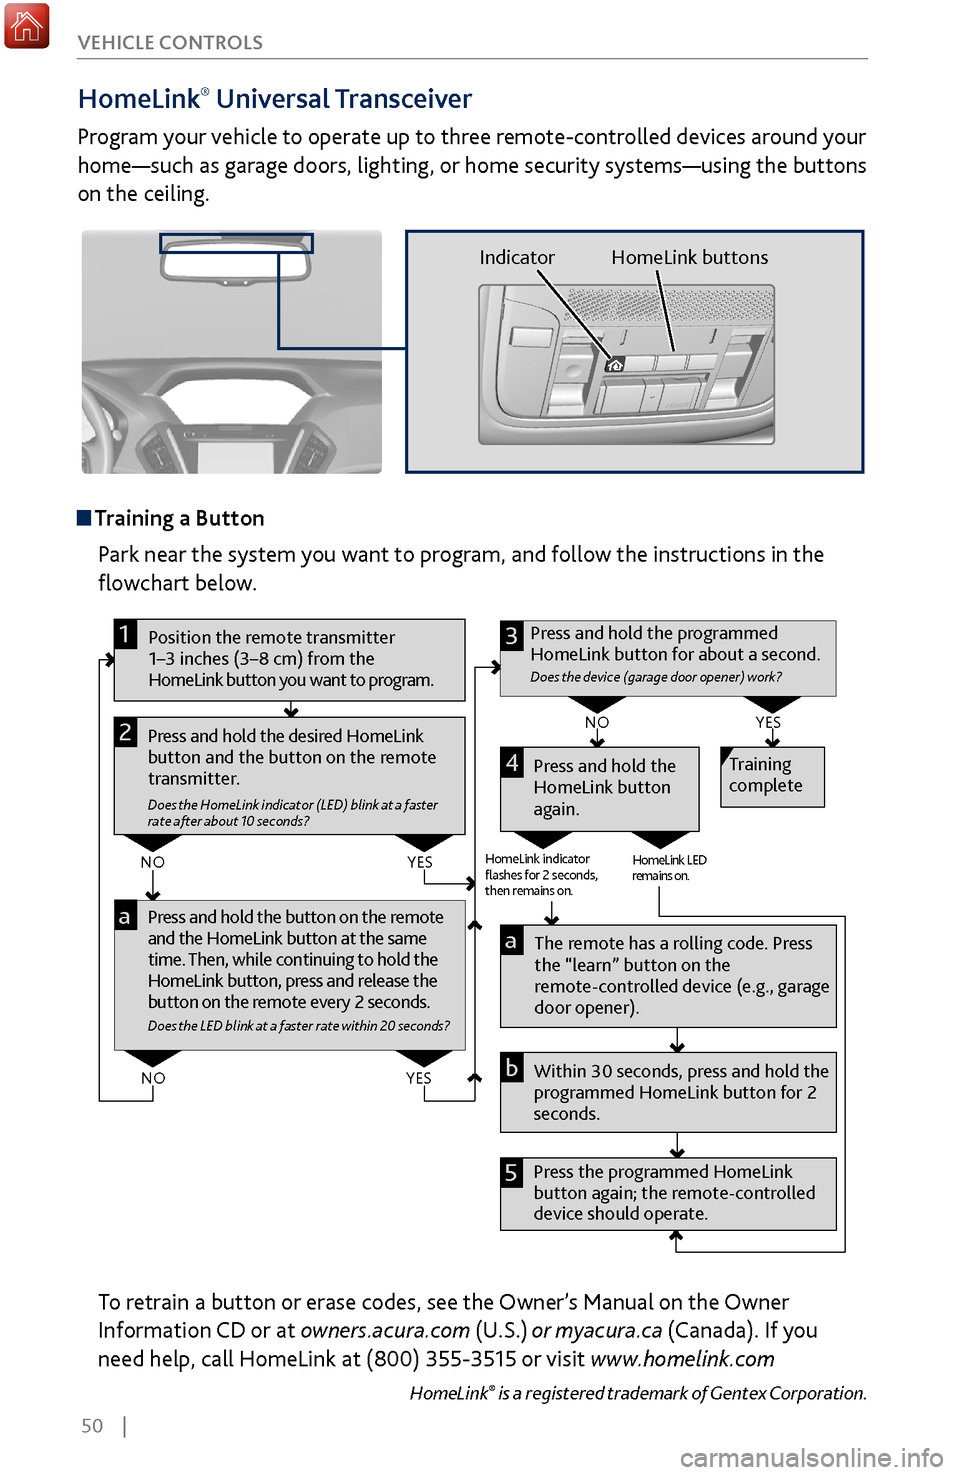
Program your vehicle to operate up to three remote-controlled devices around your
home—such as garage doors, lighting, or home security systems—using the buttons
on the ceiling.
Training a Button
Park near the system you want to program, and follow the instructions in the
flowchart below.
Pr ess and hold the button on the r emote
and the HomeLink button at the same
time. Then, while continuing to hold the
HomeLink button, press and r elease the
button on the remote every 2 seconds.
Does the LED blink at a faster ra te within 20 seconds ?
Press and hold the
HomeLink button
again. Training
complete
YES
NO
HomeLink indicator
�ashes for 2 seconds,
then rem ains on. HomeLink LED
r
emains on.YES
NO
YES
NO
Position the remote transmitter
1–3 inches (3–8 cm) from the
HomeLink button you want to program.1
Press and hold the desired HomeLink
button and the button on the remote
transmitter.
Does the HomeLink indicator (LED) blink at a f aster
rate after about 10 seconds ?
2
a
The remote has a ro lling code. Press
the “learn” button on the
remote-controlled device (e.g., garage
door opener).
Press the programmed HomeLink
button again; the re mote-controlled
device should operate. Within 30 seconds, press and hold the
programmed HomeLink button for 2
seconds.a
Press and hold the programmed
HomeLink button for about a second.
Does the devic e (garage door opener) work ?
3
b
4
5
To retrain a button or erase codes, see the Owner’s Manual on the Owner
Information CD or at owners.acura.com (U.S.) or myacura.ca (Canada). If you
need help, call HomeLink at (800) 355-3515 or visit www.homelink.com
HomeLink® is a registered trademark of Gentex Corporation.
Indicator HomeLink buttons
Page 64 of 170

| 57
AUDIO AND CONNECTIVITY
Do not insert an automotive type cigarette lighter element. This can overheat the
power socket.
NOTICE
Adjusting the
Sound
Adjust various sound settings. Use the interface dial to make and enter
selections.
1.
Press MENU.
2.
Select Sound.
3.
Select the sound setting to adjust
.
4.
Adjust the setting to the desir
ed level.
5.
Press BACK
to exit the menu.
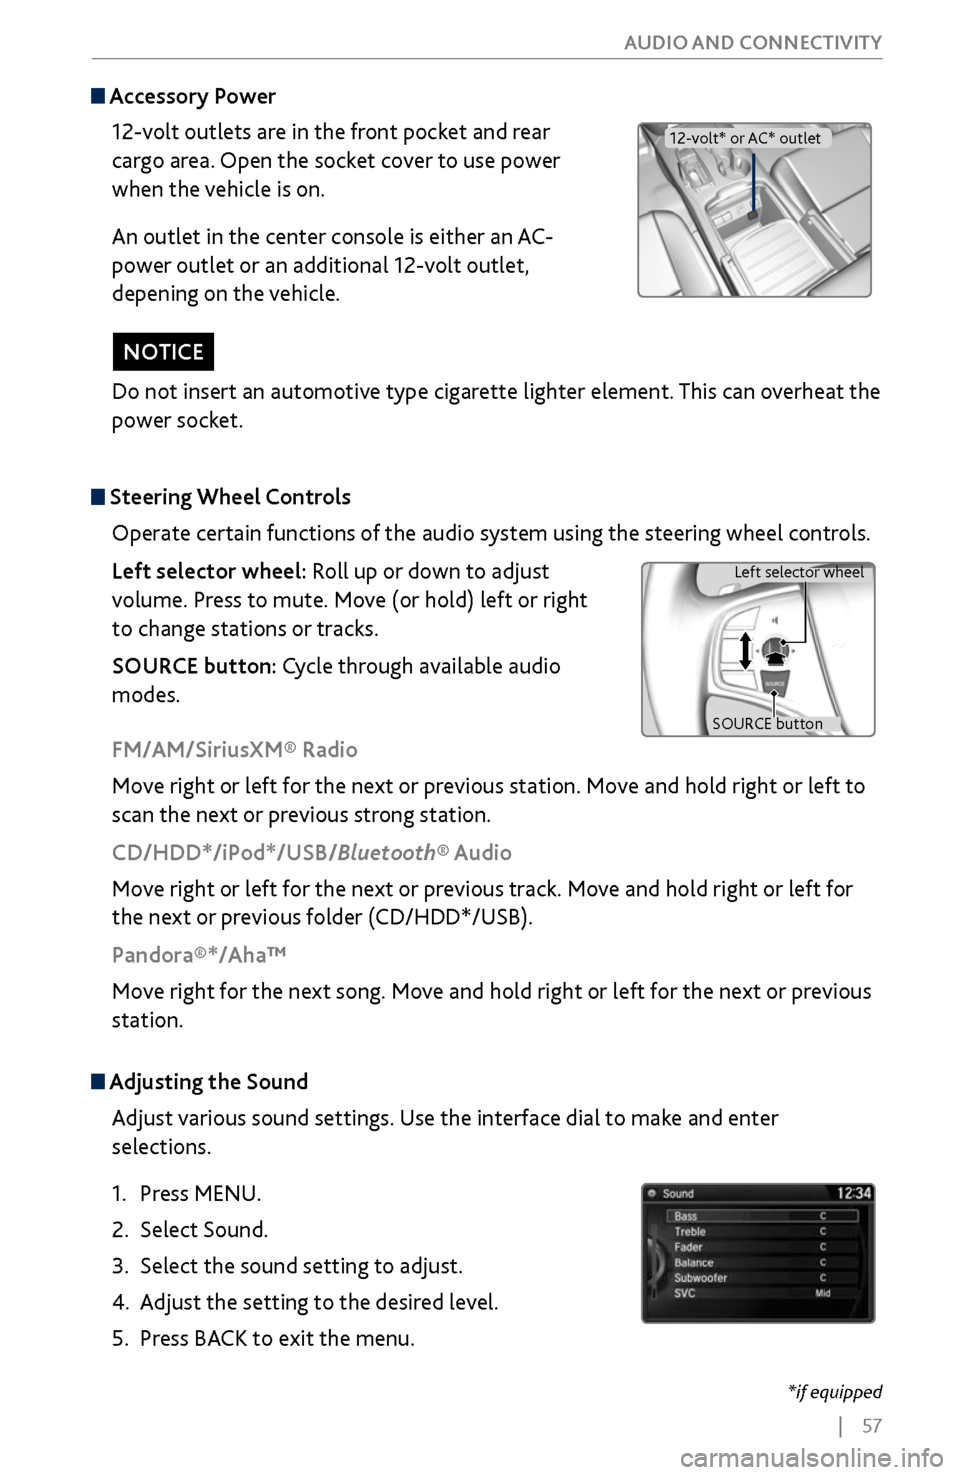
Steering Wheel Controls
Operate certain functions of the audio system using the steering wheel controls.
Left selector wheel: Roll up or down to adjust
volume. Press to mute. Move (or hold) left or right
to change stations or tracks.
SOURCE button: Cycle through available audio
modes.
SOURCE button Left selector wheel
FM/AM/SiriusXM® Radio
Move right or left for the next or previous station. Move and hold right or left to
scan the next or previous strong station.
CD/HDD*/iPod*/USB/Bluetooth® Audio
Move right or left for the next or previous track. Move and hold right or left for
the next or previous folder (CD/HDD*/USB).
Pandora®*/Aha™
Move right for the next song. Move and hold right or left for the next or previous
station.
Accessory Power
12-volt outlets are in the front pocket and rear
cargo area. Open the socket cover to use power
when the vehicle is on.
An outlet in the center console is either an AC-
power outlet or an additional 12-volt outlet,
depening on the vehicle.
12-volt* or AC* outlet
*if equipped