2017 Acura MDX mirror
[x] Cancel search: mirrorPage 307 of 369

306
Other Features
Surround View Camera*
The Surround View Camera System allows the driver to check the blind spots
through the images displayed on the audio/information screen.
Using this support system will reduce the driver's stress in the following situations.
•Backing up the vehicle into a parking space marked with parking lines.
• Checking both ways at intersections with poor visibility.
• Parallel-parking in a parking sp ace marked with parking lines.
• Checking for obstacles in front of the vehicle.
• Checking for obstacles at the rear of the vehicle.
• Checking for obstacles around the front right and left sides of the vehicle.1Surround View Camera*
Always keep the camera lens clean and
unobstructed. The rearview camera has a lens
that makes distances appear different than they
actually are. Always take care when backing up,
and look behind you for obstacles.
Navigation controls ar e disabled when in
Reverse.
Adjusting the brightness for the camera display
does not affect the br ightness of the audio/
information screen.
If you turn the guide lines off, they remain off
until you turn them back on.
The Surround View Camera System is designed
to reduce the driver's stress of operating the
vehicle. Use this system as support for visual
checks to confirm the safety in areas likely to be
blind spots.
The Surround View Camera System does not
eliminate all blind spots. Visually confirm safety
around the vehicle with yo ur own eyes and the
mirrors. Do not rely on the camera view.
*: Not available on all models
Page 312 of 369

311
Surround View Camera*Switching the Screen
Other Features
■Rear View Screen (When Gear Position is in Position)R1 Rear View Screen (When Select Lever is in
Position)
You can also select to switch the display for the
following marks on the screen. : Rear Ground View
: Rear Normal View
: Rear Wide View
R
Visually confirm safety around the
vehicle with your own eyes and/or
using the mirrors.
The view area displayed on the screen is
restricted. It may not show all people or
obstacles around you. Relying only on
the view on the screen may cause an
accident.
Minimize the time spent looking at
the view screen while driving.
Failure to do so may cause an accident as
you cannot pay sufficient attention to
your surroundings.
CAMERA button
or ENTER button
CAMERA button
or ENTER button
CAMERA
button or
ENTER
button
Rear Ground
View
Rear View
Rear Wide
View
R
Shift Button
Page 321 of 369

320
Surround View Camera*Checking for Obstacles at the Rear of the Vehicle
Other Features
Checking for Obstacles at the Rear of the Vehicle
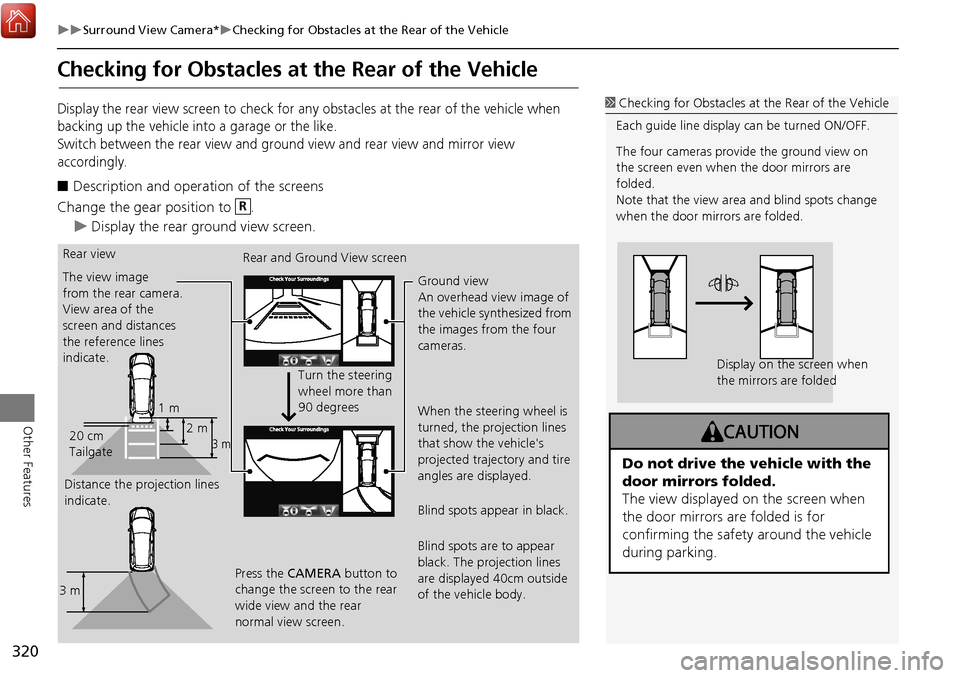
Display the rear view screen to check for any obstacles at the rear of the vehicle when
backing up the vehicle into a garage or the like.
Switch between the rear view and ground view and rear view and mirror view
accordingly.
■Description and operation of the screens
Change the gear position to .
Display the rear ground view screen.
1 Checking for Obstacles at the Rear of the Vehicle
Each guide line display can be turned ON/OFF.
The four cameras provide the ground view on
the screen even when the door mirrors are
folded.
Note that the view area and blind spots change
when the door mirrors are folded.
Display on the screen when
the mirrors are folded
Do not drive the vehicle with the
door mirrors folded.
The view displayed on the screen when
the door mirrors are folded is for
confirming the safety around the vehicle
during parking.
R
Rear view
The view image
from the rear camera.
View area of the
screen and distances
the reference lines
indicate.
Distance the projection lines
indicate. Rear and Ground View screen
Turn the steering
wheel more than
90 degrees
Press the CAMERA button to
change the screen to the rear
wide view and the rear
normal view screen. Ground view
An overhead view image of
the vehicle synthesized from
the images from the four
cameras.
When the steering wheel is
turned, the projection lines
that show the vehicle's
projected trajectory and tire
angles are displayed.
Blind spots appear in black.
Blind spots are to appear
black. The projection lines
are displayed 40cm outside
of the vehicle body.
1 m
3 m2 m
20 cm
Tailgate
3 m
Page 322 of 369

321
Surround View Camera*Checking the Right and Left Sides of the Vehicle at Intersections with Poor Visibility
Other Features
Checking the Right and Left Sides of the Vehicle at
Intersections with Poor Visibility
Display the front blind view screen when conforming the right and left sides of the
vehicle at intersections with poor visibility.
■ Description and Operation of the Screens
To switch the screens, press the CAMERA button when the vehicle speed is below 12km/h.
Display the front blind view screen.
The view image from the
rear camera.
Tailgate Rear Normal View Rear Wide View
Press the CAMERA button to change the
screen to the rear ground view screen.
1 m 3 m
2 m1Checking for Obstacles at the Rear of the Vehicle
Each side view is not displayed when the door
mirrors are folded.
1 Checking the Right and Left Sides of the Vehicle at
Intersections with Poor Visibility
As the system uses a wide-angle view, the
displayed images on the screen will be largely
distorted and different fr om the actual distance.
The front blind view screen is switched in the
order shown in the figure on P.310.
Front blind view
The view image from the
front camera.
Front blind view screen
The view area of the screen is
180 degrees.
Page 323 of 369

322
Surround View Camera*Checking for Obstacles in Front of the Vehicle
Other Features
Checking for Obstacles in Front of the Vehicle
Display the front view and ground view screen to check for any obstacles in front of
the vehicle when parking the vehi cle in a garage or the like.
■ Description and Operation of the Screens
To switch the screens, press the CAMERA button when the vehicle speed is below 12km/
h.
Display the front view and ground view screen.
1 Checking for Obstacles in Front of the Vehicle
Each guide line display can be turned ON/OFF.
The front view and ground view screen are
switched to in the order shown in the figure on
P.310.
The four cameras provide the ground view on
the screen even when the door mirrors are
folded.
Note that the view area and blind spots change
when the door mirrors are folded.
Display on the screen when
the mirrors are folded
Do not drive the vehicle with the
door mirrors folded.
The view displayed on the screen when
the door mirrors are folded is for
confirming the safety around the vehicle
during parking.
Front view
Motion that the projection
lines indicate. Front view and ground view screen
Ground view
An overhead view image of
the vehicle synthesized from
the images from the four
cameras.
When the steering wheel is
turned, the projection lines
that show the vehicle's
projected trajectory and tire
angles are displayed.
Blind spots appear in black.
The view image from the front
camera.
View area of the screen and
distances the reference lines
indicate.
Turn the
steering wheel
1 m
Page 324 of 369

323
Surround View Camera*Checking for Obstacles Around the Front Sides of the Vehicle
Other Features
Checking for Obstacles Around the Front Sides of the
Vehicle
Display the side view screen to check the right and left sides of the vehicle when
pulling up the vehicle to a curve or tollbooth or passing an oncoming car in a narrow
driving condition.
The left side view screen displays only the left side view, and the right and left side
view screen display the views of both sides. Switch the screens accordingly.
■ Description and Operation of the Screens
Display the side view and ground view screen.
To switch the screens, press the CAMERA button when the vehicle speed is
below 12km/h.
1 Checking for obstacles around the front sides of
the vehicle
Each guide line display can be turned ON/OFF.
When the door mirrors are folded, the side view
screen is not displayed.
The side view screen is switched in the order
shown in the figure on P.310.
Side view
The view image
from the side
camera. Side view screen
Press and hold the
CAMERA button
Distance the projection lines
indicate is approximately 30
cm from the outside of the
vehicle
30 cm
30 cm 30 cm
Page 329 of 369

328
TroubleshootingAbout camera view image
Other Features
About camera view image
ConditionCausesolutionRefer to:
Camera view
images are hard
to see.The images may not be displayed clearly when:
•At night, in rainy condition, and a dark location
• The camera lens has insects, moist, or debris stuck to
the camera lens.
• The camera lens is scratched.
• The temperature of the camera is high.
• Strong light such as the sun's light shines on the
camera.*
• When light shines on the camera in a dark location.
* When strong light shines on the camera, halation which fogs around the light source or smearing
which creates the streaks of the light may occur. • When the camera view image is not clearly
displayed due to weather conditions, etc,
visually confirm the safety using mirrors.-
Camera view
images are not
clear.If the camera lens is dirty, clear images are not
displayed.•When the camera lens is dirty, wipe off the
dirt, debris, and the like using water, mild
detergent, or glass cleaner.
• Never use any benzine, thinner, or polishing
powder such as cleanser. It will cause
damage to the lens.-
Camera position
is shifted.The camera body or its surrounding parts have been
subject to some severe impact or pressure.•Do not have any severe impacts or pressures
on the camera body or its surrounding
parts.
• In case of being subject to an impact, stop
using the camera and contact a dealer.-