Page 251 of 369
250
Bluetooth® HandsFreeLink®Making a Call
Bluetooth
® HandsFreeLink
®
HMENU button (on Phone screen) Call History
Call history is stored by All, Dialed , Received , and Missed .
1. Move w or y to select All,
Dialed , Received , and Missed .
2. Rotate i to select a number.
Press u.
Dialing starts automatically.
1. Press the h button.
2. Move the left selector wheel right
to select Call History .
3. Roll the left selector wheel to select
a number.
4. Push the left selector wheel or the
h button.
Dialing starts automatically.
■Using Call History1 Using Call History
The call history displa ys the last 20 dialed,
received, or missed calls.
(Appears only when a phone is connected to
HFL.)
These icons next to the number indicate the
following: : Dialed calls
: Received calls
: Missed calls
The call history displa ys the last 12 dialed,
received, or missed calls.
Multi-information DisplayMulti-information Display
Page 252 of 369

251
Bluetooth® HandsFreeLink®Making a Call
Bluetooth
® HandsFreeLink
®
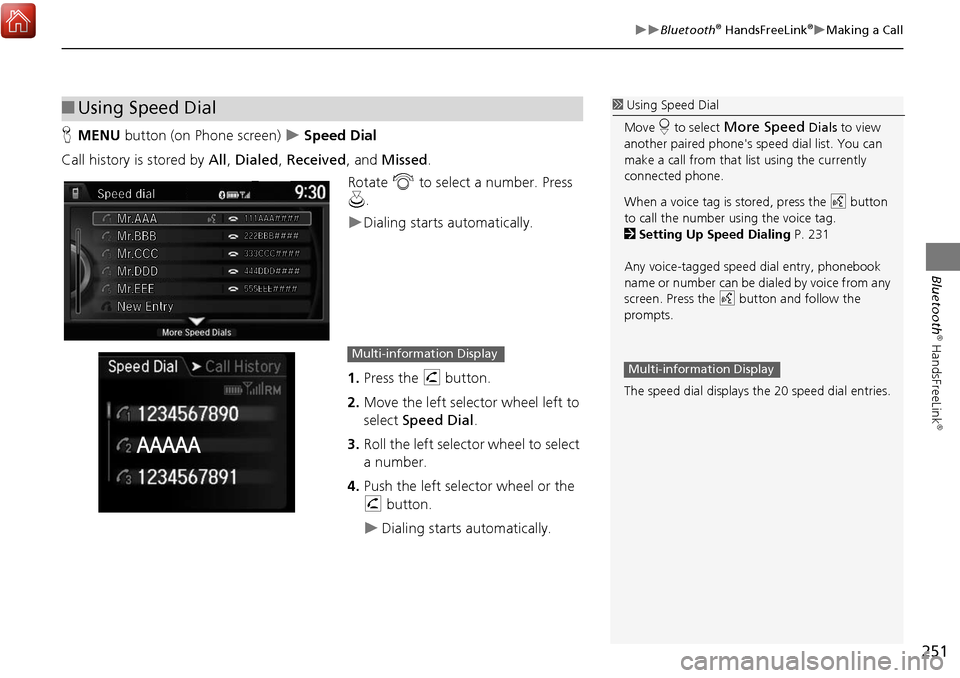
HMENU button (on Phone screen) Speed Dial
Call history is stored by All, Dialed , Received , and Missed .
Rotate i to select a number. Press
u .
Dialing starts automatically.
1. Press the h button.
2. Move the left selector wheel left to
select Speed Dial .
3. Roll the left selector wheel to select
a number.
4. Push the left selector wheel or the
h button.
Dialing starts automatically.
■Using Speed Dial1 Using Speed Dial
Move r to select
More Speed Dials to view
another paired phone's sp eed dial list. You can
make a call from that list using the currently
connected phone.
When a voice tag is stored, press the d button
to call the number using the voice tag.
2 Setting Up Speed Dialing P. 231
Any voice-tagged spee d dial entry, phonebook
name or number can be dialed by voice from any
screen. Press the d button and follow the
prompts.
The speed dial displays the 20 speed dial entries.
Multi-information DisplayMulti-information Display
Page 306 of 369
305
Multi-view Rear Camera*About Your Multi-View Rear Camera
Other Features
HSETTINGS button Camera Settings
Rotate i to select an item. Press
u .
The following items are available:
• Fixed Guideline :
On (factory default) : Guidelines appear when you shift into Reverse.
Off : Guidelines do not appear when the dynamic guideline is off.
• Dynamic Guideline :
On (factory default) : Guidelines move according to the steering wheel direction.
Off : Guidelines do not move.
■Multi-View Rear Camera Settings
Page 315 of 369
314
Surround View Camera*Backing Up The Vehicle into a Parking Space Marked with Parking Lines
Other Features
The following section describes how to back up the vehicle into a parking space with
the rear right of the vehicle in first.
1. Move the vehicle forward perpendicular to the parking space and stop where the
initial positioning guide comes to the center of the parking space.
2. Turn the steering wheel fully to the left while stopped.
The steering position alignment guide is displayed.
■How to park
Initial positioning guide
Steering position
alignment guide
1 How to park
When you need operation instruction, press and
hold the CAMERA button while the parking
guide screen is displayed. The instruction screen
appears on the screen. To close the Instruction
screen, press the BACK button or press and hold
the CAMERA button.
Page 316 of 369
315
Surround View Camera*Backing Up The Vehicle into a Parking Space Marked with Parking Lines
Other Features
3.Slowly move the vehicle forw ard with the steering wheel turned fully to the left.
4. Stop the vehicle when the steering positi on alignment guide enters the parking
space.
5. Turn the steering wheel fully to the left while stopped and back up the vehicle
slowly.
6. Stop the vehicle when it is pa rallel to the parking lines.
7. Straighten the steering wheel, and then back up and park the vehicle at the
proper position.
Make sure that
the steering
position
alignment guide
comes within the
parking space.
1 How to park
If the steering position alignment guide does not
fit in the parking lines, the parking space is too
small for the vehicle.
This system does not work for:
•Parking spaces with crooked parking lines.
•Parking spaces where the surrounding vehicles
are parked off the parking lines.
Page 319 of 369
318
Surround View Camera*Parallel Parking the Vehicle into a Parking Space Marked with Parking Lines.
Other Features
The following section describes how to parallel-park the vehicle into a parking space
at the right side of the street.
1. Move the vehicle forward parallel to the parking space and stop where the initial
positioning guide overlaps the front corner of the parking space.
2. Turn the steering wheel fully to the right while stopped.
The steering position alignment guide is displayed.
■How to park
Positioning
guide
Steering position
alignment guide
1 How to park
When you need operation instruction, press and
hold the CAMERA button while the parking
guide screen is displayed. The instruction screen
appears on the screen. To close the Instruction
screen, select press the BACK button or press
and hold the CAMERA button.
Page 320 of 369
319
Surround View Camera*Parallel Parking the Vehicle into a Parking Space Marked with Parking Lines.
Other Features
3.Slowly back up the vehicle with the st eering wheel turned fully to the right.
4. Stop the vehicle when the steering positi on alignment guide overlaps the sideline
of the parking space.
5. Turn the steering wheel fully to the left while stopped and back up the vehicle
slowly.
6. Stop the vehicle when it is pa rallel to the parking lines.
7. Straighten the steering wheel, and then back up and park the vehicle at the
proper position.
Make sure that
the steering
position alignment
guide overlaps the
sideline of the
parking space.
1 How to park
Always take care when backing up, and look
behind you for obstacles.
This system does not work for:
•Parking spaces with crooked parking lines.
•Parking spaces where th e surrounding vehicles
are parked off th e parking lines.
•Parking spaces without parking lines.
Page 321 of 369

320
Surround View Camera*Checking for Obstacles at the Rear of the Vehicle
Other Features
Checking for Obstacles at the Rear of the Vehicle
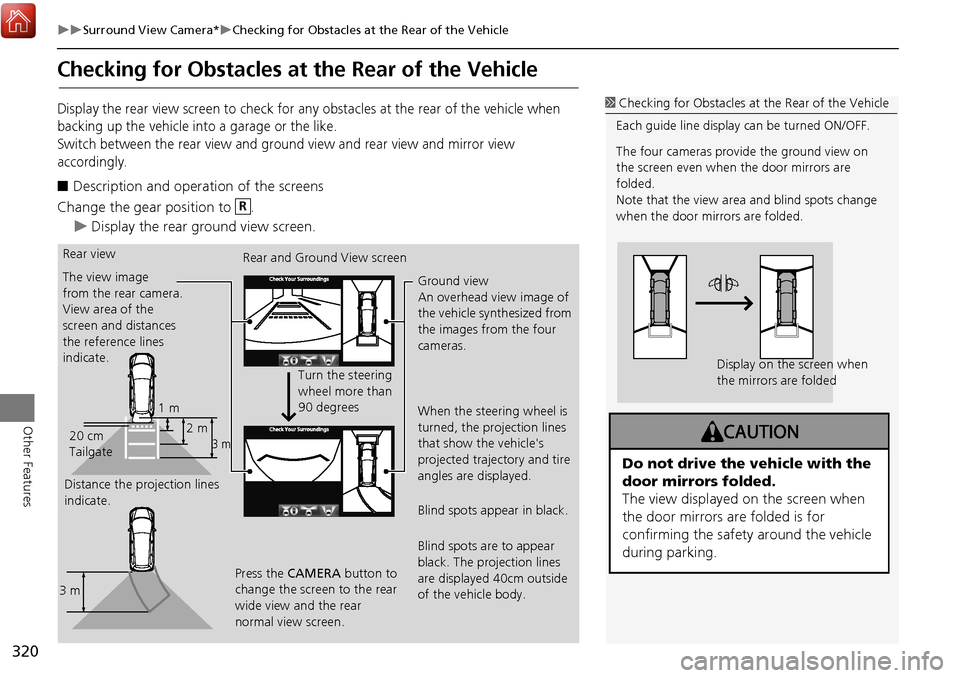
Display the rear view screen to check for any obstacles at the rear of the vehicle when
backing up the vehicle into a garage or the like.
Switch between the rear view and ground view and rear view and mirror view
accordingly.
■Description and operation of the screens
Change the gear position to .
Display the rear ground view screen.
1 Checking for Obstacles at the Rear of the Vehicle
Each guide line display can be turned ON/OFF.
The four cameras provide the ground view on
the screen even when the door mirrors are
folded.
Note that the view area and blind spots change
when the door mirrors are folded.
Display on the screen when
the mirrors are folded
Do not drive the vehicle with the
door mirrors folded.
The view displayed on the screen when
the door mirrors are folded is for
confirming the safety around the vehicle
during parking.
R
Rear view
The view image
from the rear camera.
View area of the
screen and distances
the reference lines
indicate.
Distance the projection lines
indicate. Rear and Ground View screen
Turn the steering
wheel more than
90 degrees
Press the CAMERA button to
change the screen to the rear
wide view and the rear
normal view screen. Ground view
An overhead view image of
the vehicle synthesized from
the images from the four
cameras.
When the steering wheel is
turned, the projection lines
that show the vehicle's
projected trajectory and tire
angles are displayed.
Blind spots appear in black.
Blind spots are to appear
black. The projection lines
are displayed 40cm outside
of the vehicle body.
1 m
3 m2 m
20 cm
Tailgate
3 m