2017 Abarth 124 Spider USB port
[x] Cancel search: USB portPage 196 of 220

REG (Regional Programme);
ALC (Automatic volume adjustment);
BASS (Low pitch sound);
TREB (Treble sound);
FADE (Front/back volume balance);
BAL (Left/right volume balance);
BEEP (Audio operation sound);
12Hr < > 24Hr (12 Hr/24 Hr time
adjustment).
CLOCK
Setting the time
The clock can be set at any time when
the ignition is switched to ACC or ON.
To adjust the time, press the clock
buttonFM/AMfor about 2 seconds
until a beep is heard. The clock's
current time will flash.
Time adjustment
To adjust the time, press the
hour/minute set button
/
while the clock's current time is
flashing.
The hours advance while the hour set
button
is pressed. The minutes
advance while the minute
set
button is pressed.
Press the clock buttonFM/AMagain
to start the clock.
OPERATING THE RADIO
Radio ON: press a band selector
button FM/AM to turn the radio on.
Band selection: press the band
selector buttonFM/AMto switch the
bands as follows: M1–FM2–MW/LW
Manual tuning: select the station by
pressing the tuning button
/
lightly.
Seek tuning: press tuning button
/. The search stops when a
station is found.
Scan tuning: press and hold the scan
buttonMEDIAto automatically sample
strong stations. Scanning stops at each
station for about 5 seconds. To hold a
station, press and hold the scan button
MEDIA again during this interval.
Preset channel tuning
The 6 preset channels can be used to
store 6 MW/LW and 12 FM stations.
To set a channel first select MW/LW,
FM1, or FM2. Tune to the desired
station.
Press a channel preset button for
about 2 seconds until a beep is heard.
The preset channel number or station
frequency will be displayed. The station
is now held in the memory.
Repeat this operation for the other
stations and bands you want to store.
To tune one in the memory, selectMW/LW, FM1, or FM2 and then press
its channel preset button. The station
frequency or the channel number will be
displayed.
AUX / USB / iPod MODE
Auxiliary jack / USB port
Audio can be heard from the vehicle's
speakers by connecting a commercially
available portable audio unit to the
auxiliary jack. A commercially-available,
non-impedance (3.5 Ø) stereo mini plug
lead is required. In addition, audio can
be played from the vehicle audio device
by connecting a USB device or an iPod
to the USB port.
How to use AUX mode
Switch the ignition to ACC or ON, press
the power/volume dial to turn the audio
system on and press theMEDIA
button of the audio unit to change to
the AUX mode.
How to use USB mode
This unit does not support a USB
3.0 device. In addition, other devices
may not be supported depending on
the model or OS version.
Playback
Switch the ignition to ACC or ON, press
the power/volume dial to turn the audio
system on and press theMEDIA
194
MULTIMEDIA
Page 202 of 220

Displays the favorites list. Press
and hold to store the currently
tuned station to the favorites list.
Searches your desired station
from the station list. Tunes to
each station in the station list for
10 seconds. Select again when
your desired station is tuned. If
the station list is not available, it
switches to the station list update
screen. Perform the station list
updating.
Switches the TA mode on and
off.
/Returns to the
previous/goes to the next
station. Touch and hold to
return to the top station in
the previous/next ensemble.
Displays the DAB radio setting
screen.
Displays sound settings to adjust
audio quality level.
SETTINGS
NOTE Depending on the grade and
specification, the screen display may
differ.
Select the
icon on the home screen
to display the Settings screen. Switch
the tab and select the setting item you
want to change.You can customize settings in the setup
display as follows:
“Display”: refer to “Volume/Display/
Sound controls” paragraph in Radio 7”
supplement;
“Sound”: refer to “Volume/Display/
Sound controls” paragraph in Radio 7”
supplement;
“Clock”: “Adjust Time”, “GPS Sync”,
“Time Format”, “Time Zone Select”,
“Daylight Savings Time”;
“Vehicle”: rain sensing Wiper/Door
Lock/Other;
“Devices”: selectBluetooth®or
“Network Management”;
“System”: “Tool Tips”, “Language”,
“Temperature”, “Distance”, “Music
Database Update”, “Factory Reset”,
“About (agreements and disclaimers)”,
“About (version Information)”
AUX / USB / iPod MODE
Audio can be heard from the vehicle's
speakers by connecting a commercially
available portable audio unit to the
auxiliary jack. A commercially-available,
non-impedance (3.5 Ø) stereo mini plug
lead is required.
In addition, audio can be played from
the vehicle audio device by connecting
a USB device or an iPod to the USB
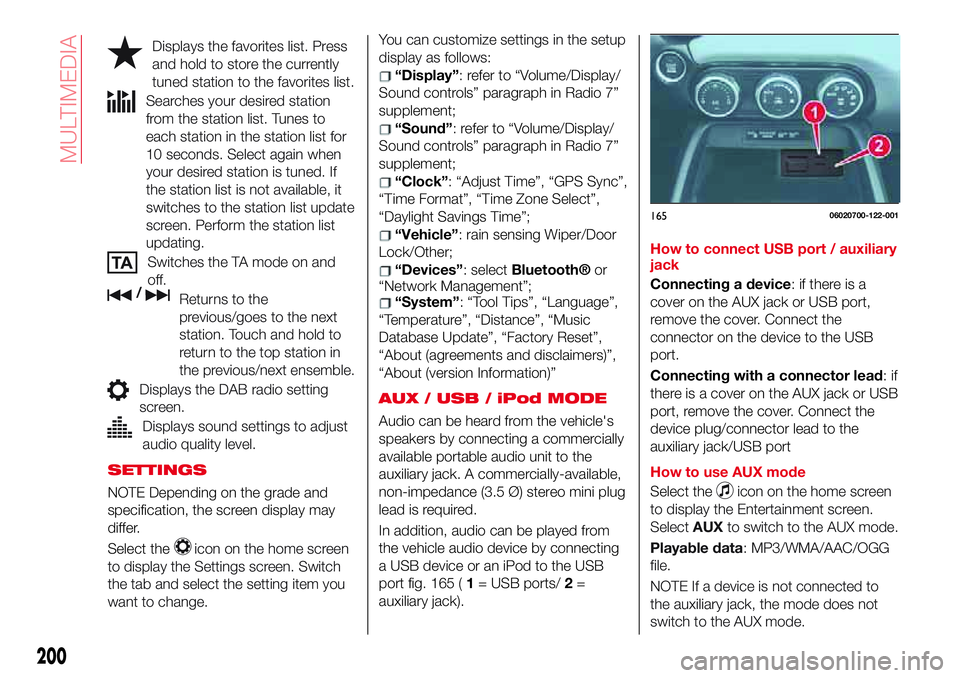
port fig. 165 (1= USB ports/2=
auxiliary jack).How to connect USB port / auxiliary
jack
Connecting a device: if there is a
cover on the AUX jack or USB port,
remove the cover. Connect the
connector on the device to the USB
port.
Connecting with a connector lead:if
there is a cover on the AUX jack or USB
port, remove the cover. Connect the
device plug/connector lead to the
auxiliary jack/USB port
How to use AUX mode
Select the
icon on the home screen
to display the Entertainment screen.
SelectAUXto switch to the AUX mode.
Playable data: MP3/WMA/AAC/OGG
file.
NOTE If a device is not connected to
the auxiliary jack, the mode does not
switch to the AUX mode.
16506020700-122-001
200
MULTIMEDIA
Page 203 of 220

NOTE Adjust the audio volume using
the portable audio device, commander
switch, or audio control switch. Audio
adjustments can also be made using
the portable audio device's volume
setting.
NOTE If the connection plug is pulled
out from the auxiliary jack while in AUX
mode, noise may occur.
NOTE This unit does not support a
USB 3.0 device. In addition, other
devices may not be supported
depending on the model or OS version.
USB devices formatted to FAT32 are
supported (USB devices formatted to
other formats such as NTFS are not
supported).
Bluetooth® HANDS FREE
Device pairing
To use
Bluetooth®audio and
Hands-Free, the device equipped with
Bluetooth®has to be paired to the
unit using the following procedure. A
maximum of seven devices including
Bluetooth®audio devices and
hands-free mobile phones can be
paired.
NOTE The
Bluetooth®system may
not operate for 1 or 2 minutes after the
ignition is switched to ACC or ON.
However, this does not indicate a
problem. If the
Bluetooth®system
does not connect automatically after
1 or 2 minutes have elapsed, makesure that the
Bluetooth®setting on
the device is normal and attempt to
reconnect the
Bluetooth®device from
the vehicle side.
NOTE To consult the list of compatibles
mobile phones visit the
http://124spiderinfotainment.com
website.
Pairing procedure
Proceed as follows:
select theicon on the home
screen to display the “Settings” screen;
select theDevicestab;
selectBluetooth®andturntheBluetooth®setting on;selectAdd New Deviceto display
the message and switch to the device
operation. Using your device, perform a
search for the
Bluetooth®device
(peripheral device);
select “124 Spider” from the device
list searched by the device;
Device withBluetooth®version
2.0 input the displayed 4-digit pairing
code into the device. Device with
Bluetooth®version 2.1 or higher make
sure the displayed 6-digit code on the
audio is also displayed on the device,
and touch theYes. Connection
permission and phonebook access
permission for your mobile device may
be required depending on the mobile
device. If pairing is successful, the
functions of the device connected to
Bluetooth®are displayed;
devices compatible with SMS
function SMS messages is downloaded
automatically. A download permission
operation for your device may be
required depending on the device.
After a device is registered, the system
automatically identifies the device.
Device selection
If several devices have been paired, the
Bluetooth®unit links the device last
paired. If you would like to link a
different paired device, it is necessary to
change the link. The order of device
priority after the link has been changed
is maintained even when the ignition is
switched off.
Connecting other devices
Proceed as follows:
select theicon on the home
screen to display the “Settings” screen;
select theDevicestab then select
Bluetooth®.TurntheBluetooth®
setting on and select the name of the
device you would like to connect;
Phone And Audio selection
connects both devices as hands-free
and
Bluetooth®audio.Phone Only
selectionconnects as a hands-free
device.Audio Only selection
connects as
Bluetooth®audio.
Making a call
Telephone calls can be made by saying
the contact name in the downloaded
201