2017 Abarth 124 Spider display
[x] Cancel search: displayPage 129 of 220

IMPORTANT When parking, take the
utmost care over obstacles that may be
above or under the camera range.
IMPORTANT Always use extreme
caution and verify the real conditions of
the area behind the vehicle with you
own eyes. Reversing while looking only
at the screen is dangerous and can
lead to an accident or collision with an
object. The rear-view monitor is simply
a system to aid reversing. The images
on the screen can show a situation that
differs from the real one.
When the display is cold, the images
could scroll on the monitor or the
screen and could be more blurred than
usual, making it difficult to check the
conditions of the area around the
vehicle. Always use extreme caution
and verify the real conditions of the area
behind the vehicle with you own eyes.
IMPORTANT Do not apply excessive
force to the camera. You could alter the
position and angle of the camera. Do
not disassemble, modify or remove it as
this could compromise the hermetic
seal.
IMPORTANT The camera cover is
made of plastic. Do not apply
degreasing agents, organic solvents,
wax, or glass coating agents to thecamera cover. If any are spilled on the
cover, wipe off with a soft cloth
immediately.
IMPORTANT Do not rub the camera
cover forcefully with an abrasive or hard
brush. The camera cover or lens may
be scratched which might affect the
images.
IMPORTANT If water, snow or mud is
deposited on the camera lens, clean it
with a soft cloth. If this does not clean
it, use a mild detergent.
IMPORTANT If the camera is subjected
to abrupt temperature changes (from
hot to cold or vice versa), the rear-view
monitor may not work properly.
IMPORTANT When replacing tires,
contact an Abarth Dealership.
Replacing the tires can cause the guide
lines that appear on the display to be
diverted.
IMPORTANT If the vehicle has been
involved in a frontal, lateral or rear
collision, the rear parking camera’s
alignment (location or installation angle)
may have been altered. Contact an
Abarth Dealership.
IMPORTANT If the display shows "no
video signal", there may be a problem
with the camera. Contact an Abarth
Dealership.
127
REAR CAMERA
(PARKVIEW REAR
BACKUP CAMERA)
(where provided)
OPERATION
159)
29)
The camera is located on the tailgate
fig. 101.
Switching to the rear view monitor
display
Shift the selector lever or shift lever to
reverse (R) with the ignition switched
ON to switch the display to the rear
view monitor display.
10107040110-124-008AB
Page 130 of 220

IMPORTANT The guide lines are fixed
on the screen. They are not
synchronized with the driver’s actions
on the steering wheel. Always use the
utmost caution and check the area
behind the vehicle and the surrounding
area with your own eyes when
reversing.
REAR VIEW MONITOR
OPERATION
NOTE Images displayed on the monitor
from the rear view parking camera are
reversed images (mirror images).
Give due consideration to the above
warnings before you use the rear-view
monitor:
shift the selector lever or shift lever to
reverse (R) to switch the display to the
rear view monitor display A fig. 103;
confirming the surrounding
conditions, reverse the vehicle B
fig. 103;
after your vehicle begins entering the
parking space, continue backing up
slowly so that the distance between the
vehicle width lines and the sides of the
parking space on the left and right are
roughly equal;
continue to adjust the steering wheel
until the vehicle width guide lines are
parallel to the left and right sides of the
parking space;
once they are parallel A fig. 104,
straighten the wheels and back your
vehicle slowly into the parking space B
10307080913-989-989AB
128
STARTING AND OPERATING
VIEWING THE DISPLAY
Guide lines which indicate the width of
the vehicle (yellow) are displayed on the
screen fig. 1020as a reference to the
approximate width of the vehicle in
comparison to the width of the parking
space you are about to back into.
Use this display view for parking your
vehicle in a parking space or garage.
vehicle width guide lines (yellow):
these guide lines serve as a reference
showing the width of the vehicle.
distance guide lines: these lines
indicate the approximate distance of a
point measured from the rear of the
vehicle (from the end of the bumper).
The red and yellow line indicates the
points at about 50 cm, for the red line
and1mfortheyellowline, from the
rear bumper (central point of each line).
10207080913-111-111AB
Page 131 of 220

between the displayed image, such as
indicated below, and the actual
conditions when parking, always verify
the safety at the rear of the vehicle and
the surrounding area directly with your
eyes:
in the image of the parking space (or
garage) displayed on the screen, the
back end and distance guide lines may
appear aligned in the monitor, but they
may not actually be aligned on the
ground;
when parking in a space with a
division line on only one side of the
parking space, the division line and the
vehicle width guide line appear aligned
in the monitor, but they may not actually
be aligned on the ground.
PICTURE QUALITY
ADJUSTMENT
160)
Picture quality adjustment can be done
while the selector lever or shift lever is in
reverse (R).
There are four settings which can be
adjusted including, brightness, contrast,
tint, and color. When adjusting, pay
sufficient attention to the vehicle
surroundings:
select the iconfig. 105 on the
screen to display the tabs;
select the desired tab item;
adjust the brightness, contrast, tint,
and color using the slider. If you need to
reset, press the reset button;
select the icon on the screen to close
the tab.
IMPORTANT Adjusting the rear-view
monitor image quality must always be
done when the vehicle is stationary. Do
not adjust the rear-view monitor image
quality while vehicle driving. Adjusting
the image quality (brightness, contrast,
colour and hue) of the rear-view monitor
while driving the vehicle is dangerous
since it could distract the driver and
cause a serious accident.
10507080914-111-111
129
fig. 104. Continue checking the
vehicle's surroundings and then stop
the vehicle in the best possible position
(if the parking space has division lines,
check whether the vehicle width guide
lines are parallel to them);
when the selector lever or shift lever
is shifted from reverse (R) to another
selector lever or shift lever position, the
screen returns to the previous display.
NOTE
Because there may be a difference
10407080913-990-990AB
Page 193 of 220
TIPS, CONTROLS
AND GENERAL
INFORMATION
ROAD SAFETY
221) 222)
Learn how to use the various system
functions before setting off.
Read the instructions for the system
carefully before setting off.
RECEPTION CONDITIONS
Reception conditions change
constantly while driving.
Reception may be interfered with by the
presence of mountains, buildings or
bridges, especially when you are far
away from the broadcaster.
IMPORTANT The volume may be
increased when receiving traffic alerts
and news.
CARE AND
MAINTENANCE
57) 58)
Observe the following precautions to
ensure the system is fully operational:
the display lens should not come into
contact with pointed or rigid objects
which could damage its surface; use a
soft, dry anti-static cloth to clean and
do not press;
never use alcohol, petrols and
derivatives to clean the display lens;
prevent any liquid from entering the
system: this could damage it beyond
repair.
IMPORTANT
INFORMATION
Look at the screen only when it is
necessary and safe. If you need to look
at the screen for a long time, pull over
to a safe place so as not to be
distracted while driving.
Immediately stop using the system in
the event of a fault. Otherwise the
system might be damaged.
Contact a Dealership as soon as
possible to have the system repaired.
WARNING
221)Follow the safety rules below:
otherwise serious injuries may occur to the
occupants or the system may be
damaged.
222)If the volume is too loud this can be
dangerous. Adjust the volume so that you
can still hear background noises (e.g.
horns, ambulances, police vehicles, etc.).
IMPORTANT
57)Only clean the front panel and the
display lens with a soft, clean, dry,
anti-static cloth. Cleaning and polishing
products may damage the surface. Never
use alcohol, petrols and derivatives.
58)Do not use the display as a base for
supports with suction pads or adhesives for
external navigators or smartphones or
similar devices.
191
Page 196 of 220
REG (Regional Programme);
ALC (Automatic volume adjustment);
BASS (Low pitch sound);
TREB (Treble sound);
FADE (Front/back volume balance);
BAL (Left/right volume balance);
BEEP (Audio operation sound);
12Hr < > 24Hr (12 Hr/24 Hr time
adjustment).
CLOCK
Setting the time
The clock can be set at any time when
the ignition is switched to ACC or ON.
To adjust the time, press the clock
buttonFM/AMfor about 2 seconds
until a beep is heard. The clock's
current time will flash.
Time adjustment
To adjust the time, press the
hour/minute set button
/
while the clock's current time is
flashing.
The hours advance while the hour set
button
is pressed. The minutes
advance while the minute
set
button is pressed.
Press the clock buttonFM/AMagain
to start the clock.
OPERATING THE RADIO
Radio ON: press a band selector
button FM/AM to turn the radio on.
Band selection: press the band
selector buttonFM/AMto switch the
bands as follows: M1–FM2–MW/LW
Manual tuning: select the station by
pressing the tuning button
/
lightly.
Seek tuning: press tuning button
/. The search stops when a
station is found.
Scan tuning: press and hold the scan
buttonMEDIAto automatically sample
strong stations. Scanning stops at each
station for about 5 seconds. To hold a
station, press and hold the scan button
MEDIA again during this interval.
Preset channel tuning
The 6 preset channels can be used to
store 6 MW/LW and 12 FM stations.
To set a channel first select MW/LW,
FM1, or FM2. Tune to the desired
station.
Press a channel preset button for
about 2 seconds until a beep is heard.
The preset channel number or station
frequency will be displayed. The station
is now held in the memory.
Repeat this operation for the other
stations and bands you want to store.
To tune one in the memory, selectMW/LW, FM1, or FM2 and then press
its channel preset button. The station
frequency or the channel number will be
displayed.
AUX / USB / iPod MODE
Auxiliary jack / USB port
Audio can be heard from the vehicle's
speakers by connecting a commercially
available portable audio unit to the
auxiliary jack. A commercially-available,
non-impedance (3.5 Ø) stereo mini plug
lead is required. In addition, audio can
be played from the vehicle audio device
by connecting a USB device or an iPod
to the USB port.
How to use AUX mode
Switch the ignition to ACC or ON, press
the power/volume dial to turn the audio
system on and press theMEDIA
button of the audio unit to change to
the AUX mode.
How to use USB mode
This unit does not support a USB
3.0 device. In addition, other devices
may not be supported depending on
the model or OS version.
Playback
Switch the ignition to ACC or ON, press
the power/volume dial to turn the audio
system on and press theMEDIA
194
MULTIMEDIA
Page 197 of 220
button to switch to the USB mode and
start playback.
Track search
Press the track up button
once to
skip forward to the beginning of the
next track.
Press the track down button
within a few seconds after
playback begins to track down to the
beginning of the previous track.
Press the track down button
after
a few seconds have elapsed to start
playback from the beginning of the
current track.
How to use iPod mode
An iPod may not be compatible
depending on the model or OS version.
In this case, an error message is
displayed.
NOTE The iPod functions on the iPod
cannot be operated while it is
connected to the unit because the unit
controls the iPod functions.Track search
Press the track up button
once to
skip forward to the beginning of the
next track.
Press the track down button
within a few seconds (depends
on iPod software version) after playback
begins to track down to the beginning
of the previous track.
Press the track down button
after
a few seconds (depends on iPod
software version) have elapsed to start
playback from the beginning of the
current track.
Category search: press the category
down button5to select the previous
category and press the category up
button6to select the next category.
The types of categories include Playlist,
Artist, Album, Song, Podcast, Genre,
Composer, and Audio book.
List search: press the list down button
to select the previous list and press
the list up button
to select the next
list. When the selected category is
Song or Audio book, there is no list.
Bluetooth® HANDS FREE
Device pairing
To use
Bluetooth®audio and
Hands-Free, the device equipped with
Bluetooth®hastobepairedtothe
unit using the following procedure. A
maximum of seven devices including
Bluetooth®audio devices and
hands-free mobile phones can be
paired.
NOTE The
Bluetooth®system may
not operate for 1 or 2 minutes after the
ignition is switched to ACC or ON.
However, this does not indicate a
problem. If the
Bluetooth®system
does not connect automatically after
1 or 2 minutes have elapsed, make
sure that the
Bluetooth®setting on
the device is normal and attempt to
reconnect the
Bluetooth®device from
the vehicle side.
Pairing code setting
The 4-digit pairing code setting for
registration of your cell phone (pairing)
can be set beforehand. The initial
setting value is “0000”.
Proceed as follows:
1: press the pick-up button or talk
button with a short press;
2Say: [Beep] “Setup”
3Prompt: “Select one of the
following: Pairing options, confirmation
prompts, language, passcode, select
phone or select music player.”
195
Page 199 of 220
RADIO 7”
STEERING WHEEL
CONTROLS
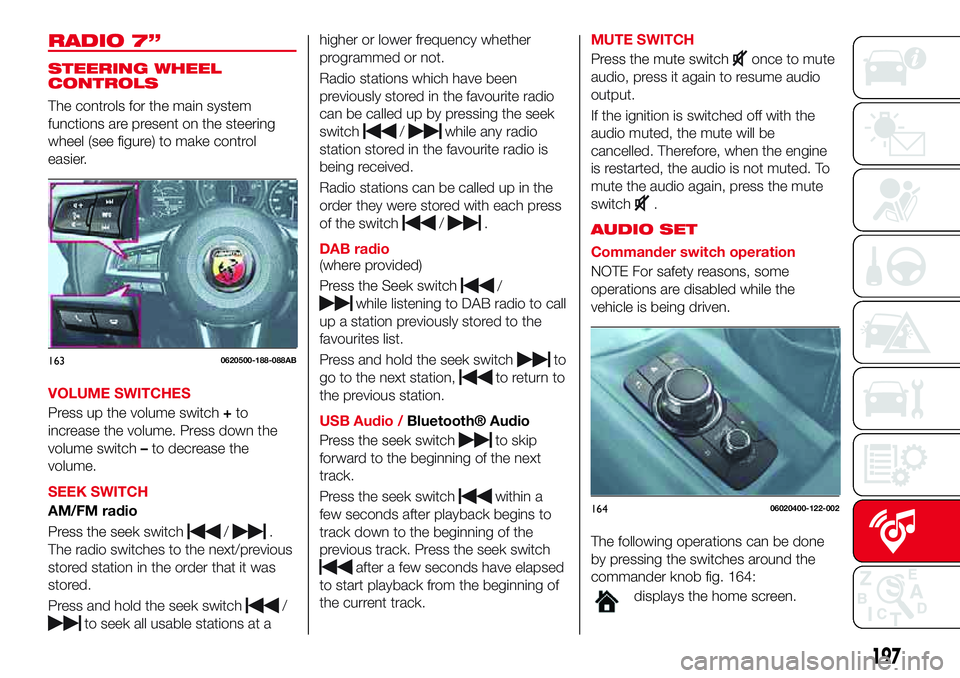
The controls for the main system
functions are present on the steering
wheel (see figure) to make control
easier.
VOLUME SWITCHES
Press up the volume switch+to
increase the volume. Press down the
volume switch–to decrease the
volume.
SEEK SWITCH
AM/FM radio
Press the seek switch
/.
The radio switches to the next/previous
stored station in the order that it was
stored.
Press and hold the seek switch
/
to seek all usable stations at ahigher or lower frequency whether
programmed or not.
Radio stations which have been
previously stored in the favourite radio
can be called up by pressing the seek
switch
/while any radio
station stored in the favourite radio is
being received.
Radio stations can be called up in the
order they were stored with each press
of the switch
/.
DAB radio
(where provided)
Press the Seek switch
/
while listening to DAB radio to call
up a station previously stored to the
favourites list.
Press and hold the seek switch
to
go to the next station,
to return to
the previous station.
USB Audio /
Bluetooth® Audio
Press the seek switch
to skip
forward to the beginning of the next
track.
Press the seek switch
within a
few seconds after playback begins to
track down to the beginning of the
previous track. Press the seek switch
after a few seconds have elapsed
to start playback from the beginning of
the current track.MUTE SWITCH
Press the mute switch
once to mute
audio, press it again to resume audio
output.
If the ignition is switched off with the
audio muted, the mute will be
cancelled. Therefore, when the engine
is restarted, the audio is not muted. To
mute the audio again, press the mute
switch
.
AUDIO SET
Commander switch operation
NOTE For safety reasons, some
operations are disabled while the
vehicle is being driven.
The following operations can be done
by pressing the switches around the
commander knob fig. 164:
displays the home screen.
1630620500-188-088AB
16406020400-122-002
197
Page 200 of 220
displays the Entertainment
screen.
NAVdisplays the Navigation screen
(only navigation-equipped
vehicles). If the SD card for the
navigation system is not inserted,
the compass indicating the
direction in which the vehicle is
moving is displayed.
displays the Favourites screen.
Long-press to store particular
items in “Favourites” (radio,
phonebook and destination of
the navigation system can be
programmed).
returns to previous screen.
Volume dial operation
Press theVOLdial to switch the audio
MUTE on and off.
Turn the volume dial to adjust the
volume. The volume increases by
turning the dial clockwise, and
decreases by turning it anticlockwise.
Selection of icons on screen
Tilt or turn the commander knob and
move the cursor to the desired icon.
Press the commander knob and select
the icon.
NOTE Long-press operation of the
commander knob is also possible for
some functions.Touch panel operation
Touch & Tap: touch or tap on the item
indicated on the screen. The operation
is launched and the next item is
displayed.
Slide: touch the setting item displaying
a slider bar. Touch the slider with your
finger and move to the desired level.
Swipe: touch the screen with your
finger and move up or down. Items
which were not displayed can be
displayed.
IMPORTANT Do not press the screen
strongly or press it with a sharp-pointed
object. Otherwise, the screen could be
damaged.
NOTE For safety reasons, touch panel
operation is disabled while the vehicle is
moving.
AUDIO SOUND
ADJUSTMENT
Select theicon on the home screen
to display the Settings screen.
Select theSoundto select the item you
would like to change:
Bass(Low pitch sound): + Side low
pitch enhancement/– Side: low pitch
reduction;
Treble(Treble sound): + Side: treble
enhancement/– Side: treble reduction;
Fade(Front/rear volume balance):
Front (front speaker volumeenhancement)/Rear (rear speaker
volume enhancement);
Balance(Left/right volume balance):
Left (left speaker volume
enhancement)/Right (right speaker
volume enhancement);
ALC(Automatic volume adjustment)
(standard audio): Off-Adjustment at
seven levels;
Bose®AudioPilot(Automatic
volume adjustment) (Bose®Sound
System, where provided): On/Off;
Beep(Audio operation sound):
On/Off.
HOME SCREEN
Icons visualized on home screen are:
Applications: information such
as average fuel economy,
maintenance, and warnings can
be verified. Depending on the
grade and specification, the
screen display may differ.
Entertainment: operates audio
such as the radio. The audio
source most recently used is
displayed. An audio source
which cannot be used at that
time is skipped and the previous
audio source is displayed. To
change the audio source, select
the icon displayed at the bottom
of the screen.
198
MULTIMEDIA