Page 240 of 426

CAMSHAFT
6-13
EAS2GC1238REMOVING THE CAMSHAFT
1. Remove:• Timing mark accessing screw “1”
• Crankshaft end accessing screw “2”
2. Align: • Alignment mark
▼▼▼▼▼▼▼▼▼▼▼▼▼▼▼▼▼▼▼▼▼▼▼▼▼▼▼▼▼▼▼▼
a. Turn the crankshaft counterclockwise with a
wrench.
b. Align the top dead center (TDC) mark “a” on the rotor with the alignment mark “b” on the
crankcase cover.
TIP
Align the alignment ma rk “c” on the exhaust
camshaft sprocket and the alignment mark “d”
on the intake camshaft sprocket with the edge
of the cylinder head.
▲▲▲▲▲▲▲▲▲▲▲▲▲▲▲▲▲▲▲▲▲▲▲▲▲▲▲▲▲▲▲▲
3. Remove: • Timing chain tensioner cap bolt “1”
• Timing chain tensioner “2”
•Gaskets 4. Remove:
• Bolt (camshaft cap) “1”
• Camshaft cap “2”
• Clip “3”
TIP
• Remove the bolts (camshaft cap) in a criss-
cross pattern, working from the outside in.
• In order to prevent the clip from falling into the
crankcase, remove the camshaft cap.
ECA
NOTICE
The bolts (camshaft cap) must be removed
evenly to prevent damage to the cylinder
head, camshafts or camshaft caps.
5. Remove:
• Exhaust camshaft “1”
• Intake camshaft “2”
TIP
Attach a wire “3” to the timing chain to prevent
it from falling into the crankcase.
12
ab
d
c
1
2
1
2
3
Page 242 of 426

CAMSHAFT
6-15
c. Install the dowel pins and the camshaft caps.
TIP
• Tighten the camshaft cap bolts in a crisscross pattern from innermost to outer caps.
• Do not turn the camshaft when measuring the
camshaft journal-to-camshaft cap clearance.
d. Remove the camshaft caps and then mea- sure the width of the Plastigauge® “1”.
▲▲▲▲▲▲▲▲▲▲▲▲▲▲▲▲▲▲▲▲▲▲▲▲▲▲▲▲▲▲▲▲
5. Measure:• Camshaft journal diameter “a”Out of specification Replace the cam-
shaft.
Within specification Replace the cylinder
head and the camshaft caps as a set.
EAS2GC1240CHECKING THE TIMING CHAIN AND CAM-
SHAFT SPROCKET
1. Check: • Timing chain “1”
Damage/stiffness Replace the timing
chain and camshaft as a set. 2. Check:
• Camshaft sprocketMore than 1/4 tooth wear “a” Replace the
camshaft and the timing chain as a set.
EAS2GC1241CHECKING THE TIMING CHAIN TENSION-
ERS
1. Check: • Timing chain tensioner
Crack/damage Replace.
▼▼▼▼▼▼▼▼▼▼▼▼▼▼▼▼▼▼▼▼▼▼▼▼▼▼▼▼▼▼▼▼
a. While pressing the tensioner rod lightly with
your fingers, use a thin screwdriver “1” to
wind the tensioner rod up fully clockwise.
b. When releasing the screwdriver by pressing lightly with your fingers, make sure that the
tensioner rod will come out smoothly.
c. If not, replace the tensioner assembly.
▲▲▲▲▲▲▲▲▲▲▲▲▲▲▲▲▲▲▲▲▲▲▲▲▲▲▲▲▲▲▲▲
Camshaft cap bolts 10 Nm (1.0 m·kgf, 7.2 ft·lbf)
Camshaft journal diameter 21.959–21.972 mm (0.8645–
0.8650 in)
T R..
1
a. 1/4 tooth
b. Correct
1. Timing chain roller
2. Camshaft sprocket
a
b 1
2
Page 243 of 426

CAMSHAFT
6-16
EAS2GC1242CHECKING THE DECOMPRESSION SYS-
TEM
1. Check:• Decompression system
▼▼▼▼▼▼▼▼▼▼▼▼▼▼▼▼▼▼▼▼▼▼▼▼▼▼▼▼▼▼▼▼
a. Check that the decompressor cam “1”
moves smoothly.
b. Check that the decompressor lever pin “2” projects from the camshaft.
▲▲▲▲▲▲▲▲▲▲▲▲▲▲▲▲▲▲▲▲▲▲▲▲▲▲▲▲▲▲▲▲
EAS2GC1243INSTALLING THE CAMSHAFTS
1. Install:• Exhaust camshaft “1”
• Intake camshaft “2”
▼▼▼▼▼▼▼▼▼▼▼▼▼▼▼▼▼▼▼▼▼▼▼▼▼▼▼▼▼▼▼▼
a. Turn the crankshaft counterclockwise with a
wrench.
TIP
• Apply molybdenum disulfide oil to the cam-shafts.
• Apply the engine oil on the decompression
system.
b. Align the top dead center (TDC) mark “a” on the rotor with the alignment mark “b” on the
crankcase cover. c. Fit the timing chain “3” onto both camshaft
sprockets and install the camshafts on the
cylinder head.
TIP
Make sure that the alignment mark “c” on the
exhaust camshaft sprocket and the alignment
mark “d” on the intake camshaft sprocket are
aligned with the edge of the cylinder head.
ECA
NOTICE
Do not turn the crankshaft during the cam-
shaft installation. Damage or improper
valve timing will result.
d. Install the clips, the camshaft caps and the bolts (camshaft cap).
TIP
• Before installing the clips, cover the cylinder head with a clean cloth to prevent the clips
from coming off into the cylinder head cavity.
• Apply the engine oil to the threads and con- tact surfaces.
• Tighten the bolts to the specified torque in two or three steps in the proper tightening se-
quence as shown.
ECA
NOTICE
The bolts (camshaft cap) must be tightened
evenly, or damage to the cylinder head,
camshaft caps, and camshaft will result.
1
2
Bolt (camshaft cap)
10 Nm (1.0 m·kgf, 7.2 ft·lbf)
ab
c
3
d
T R..
Page 244 of 426

CAMSHAFT
6-17
▲▲▲▲▲▲▲▲▲▲▲▲▲▲▲▲▲▲▲▲▲▲▲▲▲▲▲▲▲▲▲▲
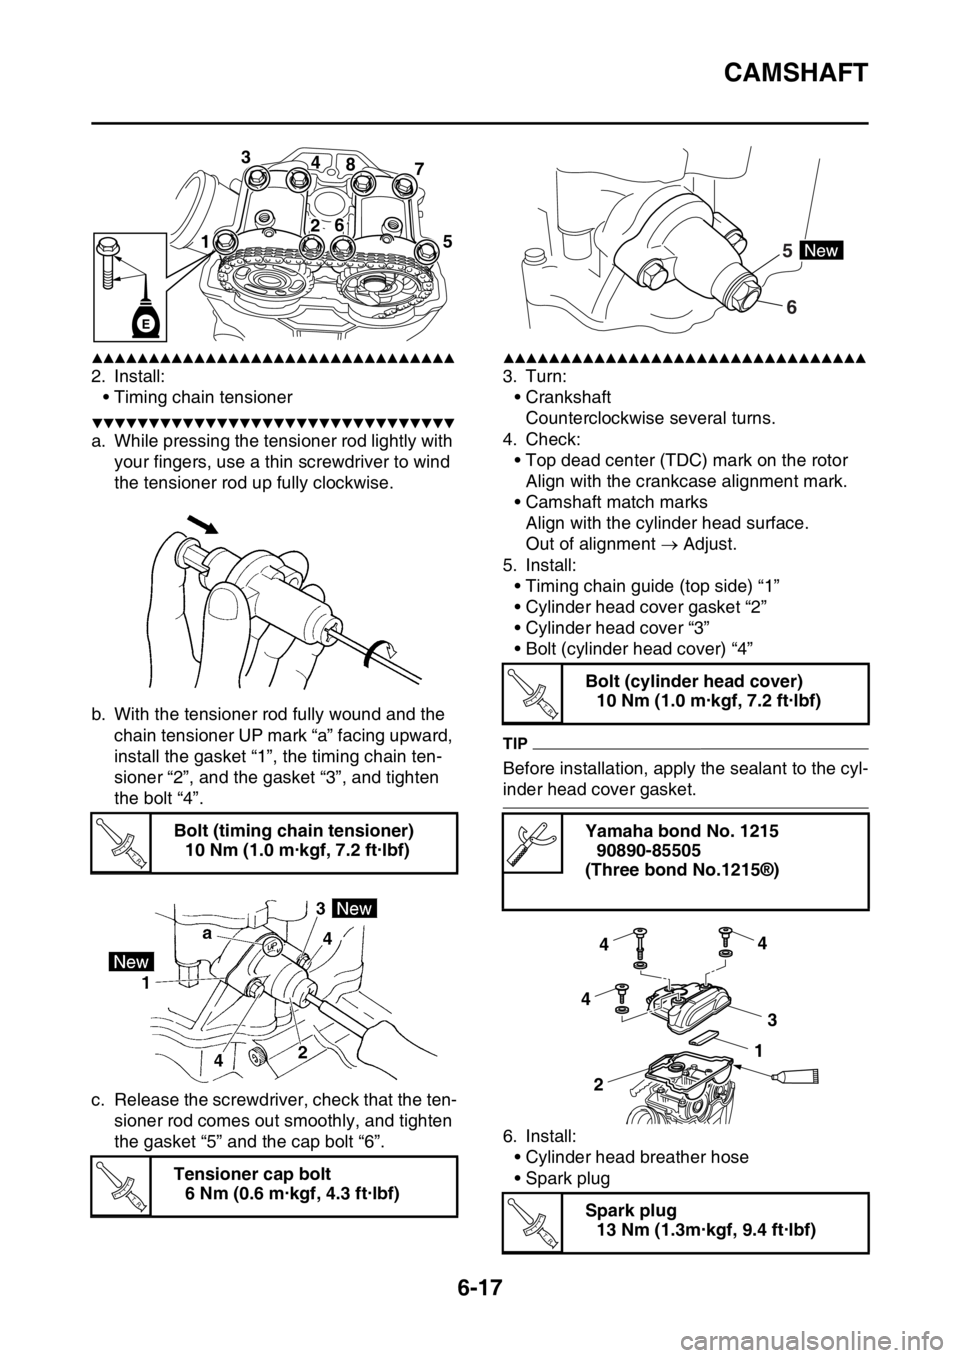
2. Install:• Timing chain tensioner
▼▼▼▼▼▼▼▼▼▼▼▼▼▼▼▼▼▼▼▼▼▼▼▼▼▼▼▼▼▼▼▼
a. While pressing the tensioner rod lightly with
your fingers, use a thin screwdriver to wind
the tensioner rod up fully clockwise.
b. With the tensioner rod fully wound and the chain tensioner UP mark “a” facing upward,
install the gasket “1”, the timing chain ten-
sioner “2”, and the gasket “3”, and tighten
the bolt “4”.
c. Release the screwdriver, check that the ten- sioner rod comes out smoothly, and tighten
the gasket “5” and the cap bolt “6”.
▲▲▲▲▲▲▲▲▲▲▲▲▲▲▲▲▲▲▲▲▲▲▲▲▲▲▲▲▲▲▲▲
3. Turn:• Crankshaft
Counterclockwise several turns.
4. Check: • Top dead center (TDC) mark on the rotor
Align with the crankcase alignment mark.
• Camshaft match marks Align with the cylinder head surface.
Out of alignment Adjust.
5. Install: • Timing chain guide (top side) “1”
• Cylinder head cover gasket “2”
• Cylinder head cover “3”
• Bolt (cylinder head cover) “4”
TIP
Before installation, apply the sealant to the cyl-
inder head cover gasket.
6. Install:• Cylinder head breather hose
• Spark plug
Bolt (timing chain tensioner)
10 Nm (1.0 m·kgf, 7.2 ft·lbf)
Tensioner cap bolt 6 Nm (0.6 m·kgf, 4.3 ft·lbf)
3 48
7
1 5
26
E
T R..
T R..
Bolt (cylinder head cover)
10 Nm (1.0 m·kgf, 7.2 ft·lbf)
Yamaha bond No. 1215 90890-85505
(Three bond No.1215®)
Spark plug 13 Nm (1.3m·kgf, 9.4 ft·lbf)
6
5
T R..
4
4
4 3
2 1
T R..
Page 279 of 426
KICKSTATER
6-52
3. Install:• Spring guide “1”
TIP
Slide the spring guide into the kick shaft, make
sure the groove “a” in the spring guide fits on
the stopper of the torsion spring.
4. Install:• Kick shaft assembly “1”
TIP
• Before installation, apply molybdenum disul-fide grease to the contacting surfaces of the
kick shaft ratchet wheel guide “2” and the kick
shaft stopper “a”.
• Apply the engine oil on the kick shaft.
• Slide the kick shaft assembly into the crank-
case and make sure the kick shaft stopper “a”
fits into the kick shaft ratchet wheel guide. 5. Install:
• Torsion spring “1”
TIP
Turn the torsion spring clockwise and hook into
the proper hole “a” in the crankcase.
EAS2GC1286INSTALLING THE KICK IDLE GEAR
1. Install:• Kick idle gear “1”
• Washer “2”
• Circlip “3”
TIP
• Apply the engine oil on the kick idle gear inner circumference.
• Install the kick idle gear with its depressed
side “a” toward you.
1
2
a
b
New
Page 281 of 426
SHIFT SHAFT
6-54
EAS2GC1288REMOVING THE SHIFT GUIDE AND SHIFT
LEVER ASSEMBLY
1. Remove:• Bolt (shift guide)
• Shift guide “1”
• Shift lever assembly “2”
TIP
Make sure that the shift lever assembly is re-
moved together with the shift guide.
EAS2GC1289REMOVING THE SEGMENT
1. Remove:
• Bolt (segment) “1”
• Segment “2”
TIP
Turn the segment counterclockwise until it
stops and loosen the bolt.
ECA
NOTICE
If the segment gets an impact, the stopper
lever may be damaged. Take care not to
give an impact to it when removing the bolt.
EAS2GC1290CHECKING THE SHIFT SHAFT
1. Check:• Shift shaft “1”
Bends/damage/wear Replace.
• Shift shaft spring “2” Damage/wear Replace.
EAS2GC1291CHECKING THE SHIFT GUIDE AND SHIFT
LEVER ASSEMBLY
1. Check:
• Shift guide “1”
• Shift lever “2”
•Pawl “3”
• Pawl pin “4”
• Spring “5”Wear/damage Replace.
EAS2GC1292CHECKING THE STOPPER LEVER
1. Check:
• Stopper lever “1”Wear/damage Replace.
• Torsion spring “2”
Broken Replace.
1
2
1
2 3
4
5
12
Page 285 of 426
OIL PUMP AND BALANCER GEAR
6-58
Removing the balancer
OrderPart name Q’tyRemarks
Primary driven gear Refer to “CLUTCH” on page 6-41.
Right crankcase cover Refer to “CLUTCH” on page 6-41.
Generator rotor Refer to “GENERATOR AND STARTER
CLUTCH” on page 6-63.
1 Nut (balancer) 1
2 Nut (primary drive gear) 1
3 Nut (balancer shaft driven gear) 1
4 Lock washer 1
5Balancer 1
6 Straight key 1
7 Conical washer 1
8 Primary drive gear 1
9 Balancer shaft drive gear 1
10 Lock washer 1
11 Balancer weight gear 1
For installation, reverse the removal proce-
dure.
45 Nm (4.5 m kgf, 33 ft Ibf)T.R.
100 Nm (10 m kgf, 72 ft lbf)T.R.
50 Nm (5.0 m kgf, 36 ft Ibf)T.R.
New
10 Nm (1.0 m kgf, 7.2 ft Ibf)T.R.
11
LT
Page 288 of 426

OIL PUMP AND BALANCER GEAR
6-61
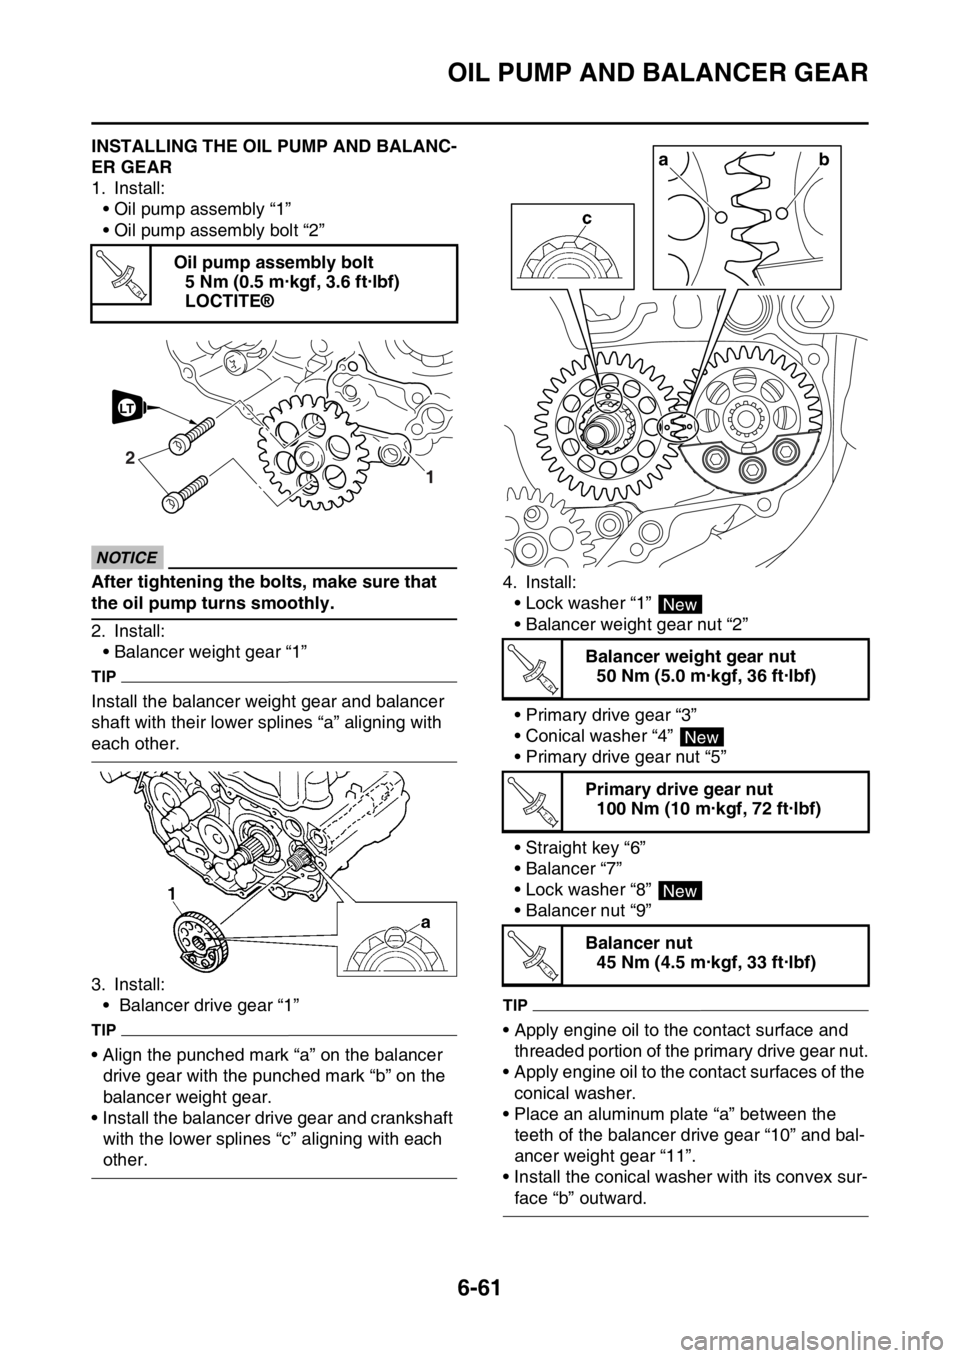
EAS2GC1304INSTALLING THE OIL PUMP AND BALANC-
ER GEAR
1. Install:• Oil pump assembly “1”
• Oil pump assembly bolt “2”
ECA1DX1023
NOTICE
After tightening the bolts, make sure that
the oil pump turns smoothly.
2. Install:• Balancer weight gear “1”
TIP
Install the balancer weight gear and balancer
shaft with their lower sp lines “a” aligning with
each other.
3. Install:
• Balancer drive gear “1”
TIP
• Align the punched mark “a” on the balancer drive gear with the punched mark “b” on the
balancer weight gear.
• Install the balancer drive gear and crankshaft with the lower splines “c” aligning with each
other. 4. Install:
• Lock washer “1”
• Balancer weight gear nut “2”
• Primary drive gear “3”
• Conical washer “4”
• Primary drive gear nut “5”
• Straight key “6”
•Balancer “7”
• Lock washer “8”
• Balancer nut “9”
TIP
• Apply engine oil to the contact surface and threaded portion of the primary drive gear nut.
• Apply engine oil to the contact surfaces of the
conical washer.
• Place an aluminum plate “a” between the teeth of the balancer drive gear “10” and bal-
ancer weight gear “11”.
• Install the conical wash er with its convex sur-
face “b” outward.
Oil pump assembly bolt
5 Nm (0.5 m·kgf, 3.6 ft·lbf)
LOCTITE®
T R..
1
2
LT
Balancer weight gear nut50 Nm (5.0 m·kgf, 36 ft·lbf)
Primary drive gear nut 100 Nm (10 m·kgf, 72 ft·lbf)
Balancer nut 45 Nm (4.5 m·kgf, 33 ft·lbf)
ba
New
T R..
New
T R..
New
T R..