2016 YAMAHA WR 450F brake
[x] Cancel search: brakePage 130 of 426

CHASSIS
3-32
3. Hold the vehicle upright and apply the front brake.
4. Check:
• Front fork operationPush down hard on the handlebar several
times and check if the front fork rebounds
smoothly.
Unsmooth operation Correct or replace.
Refer to “FRONT FORK” on page 5-40.
EAS2GC1112CHECKING THE FRONT FORK PROTEC-
TOR GUIDE
1. Check:
• Protector guide “1”Out of specification Replace.
TIP
The protector guide reaches the limit of its use
when it is worn down to the same height “a” as
of the outer tube circumference.
EAS2GC1113CLEANING THE FRONT FORK OIL SEAL
AND DUST SEAL
1. Remove:
•Protector
• Dust seal “1”
ECA
NOTICE
Be careful not to damage the dust seal and
the inner tube by a driver. 2. Clean:
• Dust seal “a”
• Oil seal “b”
TIP
• Clean the dust seal and oil seal after every
run.
• Apply lithium-soap-based grease on the inner
tube.
EAS2GC1114AIR BLEEDING FROM FRONT FORK
TIP
If the front fork initial movement feels stiff dur-
ing a run, relieve the front fork internal pres-
sure.
1. Use a suitable stand to raise the front wheel off the ground.
EWA
WARNING
Securely support the vehicle so that there is
no danger of it falling over.
2. Remove the air bleed screw “1” and release the internal pressure from the front fork.
1
a
1
LS
a
b
Page 136 of 426

CHASSIS
3-38
c. Turn the front fork to the right and left a few times, and make sure that the steering ro-
tates smoothly. If it does not turn smoothly,
remove the lower bracket and check the up-
per and lower bearings.
Refer to “STEERING HEAD” on page 5-53.
d. Loosen the ring nut fully turn and then tight- en it to specification with a steering nut
wrench.
EWA
WARNING
Do not overtighten the lower ring nut.
e. Check the steering head for looseness or binding by turning the front fork all the way in
both directions. If any binding is felt, remove
the lower bracket and check the upper and
lower bearings.
Refer to “STEERING HEAD” on page 5-53.
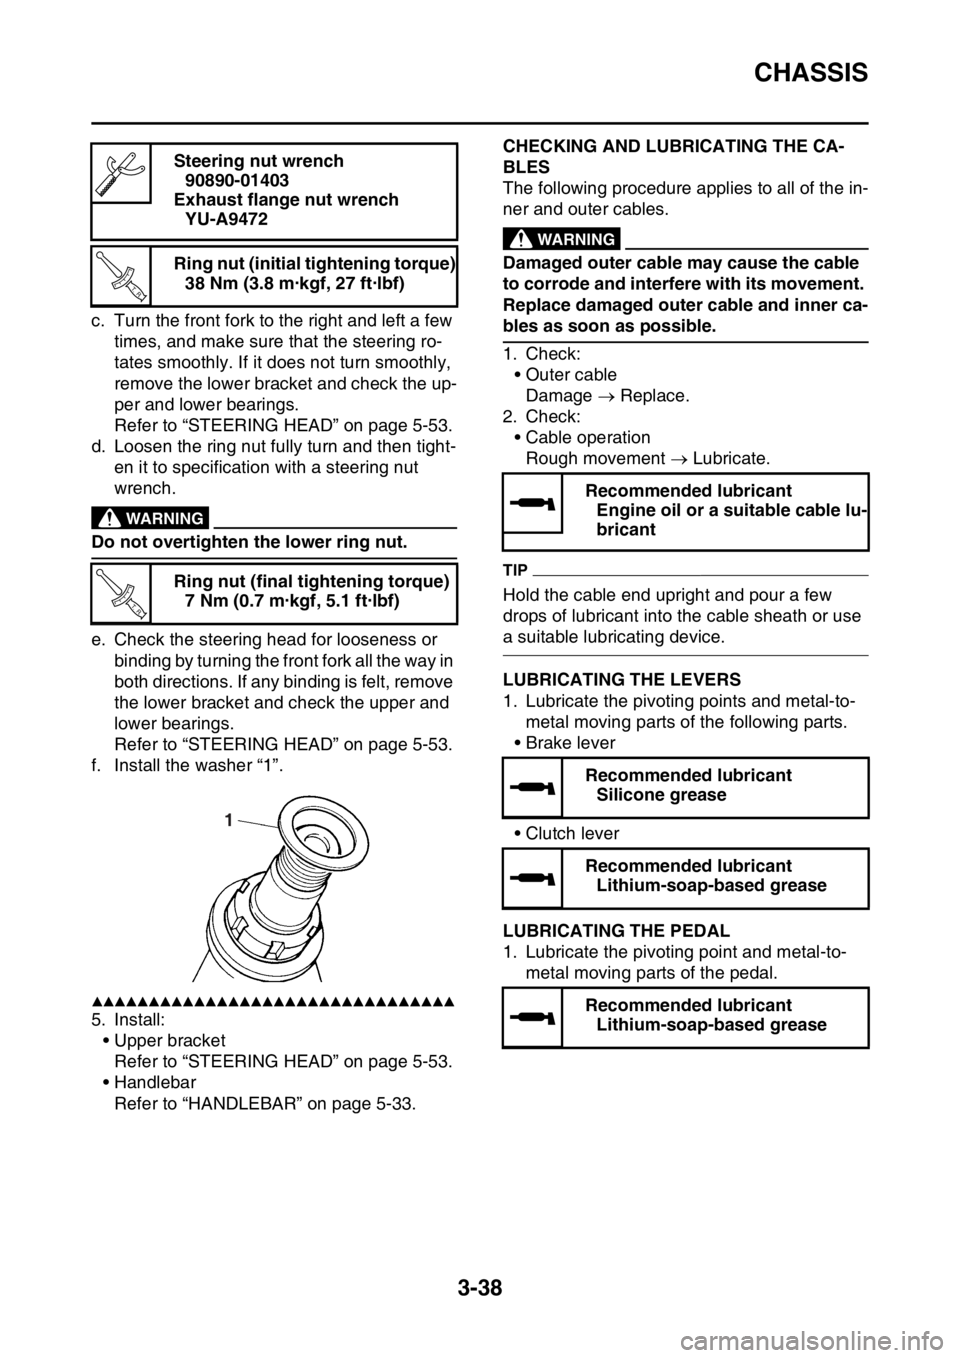
f. Install the washer “1”.
▲▲▲▲▲▲▲▲▲▲▲▲▲▲▲▲▲▲▲▲▲▲▲▲▲▲▲▲▲▲▲▲
5. Install: • Upper bracketRefer to “STEERING HEAD” on page 5-53.
• Handlebar
Refer to “HANDLEBAR” on page 5-33.
EAS2GC1124CHECKING AND LUBRICATING THE CA-
BLES
The following procedure applies to all of the in-
ner and outer cables.
EWA
WARNING
Damaged outer cable may cause the cable
to corrode and interfere with its movement.
Replace damaged outer cable and inner ca-
bles as soon as possible.
1. Check:• Outer cableDamage Replace.
2. Check: • Cable operationRough movement Lubricate.
TIP
Hold the cable end upright and pour a few
drops of lubricant into the cable sheath or use
a suitable lubricating device.
EAS2GC1125LUBRICATING THE LEVERS
1. Lubricate the pivoting points and metal-to-
metal moving parts of the following parts.
•Brake lever
• Clutch lever
EAS2GC1126LUBRICATING THE PEDAL
1. Lubricate the pivoting point and metal-to-
metal moving parts of the pedal.
Steering nut wrench
90890-01403
Exhaust flange nut wrench YU-A9472
Ring nut (initial tightening torque) 38 Nm (3.8 m·kgf, 27 ft·lbf)
Ring nut (final tightening torque) 7 Nm (0.7 m·kgf, 5.1 ft·lbf)
T R..
T R..
1
Recommended lubricantEngine oil or a suitable cable lu-
bricant
Recommended lubricant Silicone grease
Recommended lubricant Lithium-soap-based grease
Recommended lubricant Lithium-soap-based grease
Page 151 of 426

5
CHASSIS
GENERAL CHASSIS........................................................................................ 5-1
REMOVING THE LEFT SIDE COVER ....................................................... 5-3
REMOVING THE SEAT ............................................................................. 5-3
FRONT WHEEL ................................................................................................ 5-4
REMOVING THE FRONT WHEEL............................................................. 5-5
CHECKING THE FRONT WHEEL ............................................................. 5-5
DISASSEMBLING THE FRONT WHEEL ................................................... 5-6
ASSEMBLING THE FRONT WHEEL ......................................................... 5-6
INSTALLING THE FRONT WHEEL ........................................................... 5-7
REAR WHEEL .................................................................................................. 5-9
REMOVING THE REAR WHEEL ............................................................. 5-10
CHECKING THE REAR WHEEL.............................................................. 5-10
DISASSEMBLING THE REAR WHEEL ................................................... 5-10
CHECKING AND REPLACING THE REAR WHEEL SPROCKET .......... 5-10
ASSEMBLING THE REAR WHEEL ......................................................... 5-11
INSTALLING THE REAR WHEEL............................................................ 5-11
FRONT BRAKE .............................................................................................. 5-13
INTRODUCTION ...................................................................................... 5-17
CHECKING THE FRONT BR AKE DISC .................................................. 5-17
REMOVING THE FRONT BRAKE CALIPER ........................................... 5-17
DISASSEMBLING THE FRONT BR AKE CALIPER................................. 5-17
CHECKING THE FRONT BR AKE CALIPER ........................................... 5-18
ASSEMBLING THE FRONT BR AKE CALIPER ....................................... 5-18
INSTALLING THE BRAKE CALIPER PISTON ........................................ 5-18
INSTALLING THE FRONT BR AKE CALIPER ......................................... 5-19
REMOVING THE FRONT BRAKE MASTER CYLINDER ........................ 5-20
CHECKING THE FRONT BRAKE MASTER CYLINDER......................... 5-20
ASSEMBLING THE FRONT BRAKE M ASTER CYLINDER .................... 5-20
INSTALLING THE FRONT BRAKE MASTER CYLINDER....................... 5-21
REAR BRAKE ................................................................................................ 5-23
INTRODUCTION ...................................................................................... 5-27
CHECKING THE REAR BRAKE DISC............................. ........................ 5-27
REMOVING THE REAR BRAKE CALIPER ............................................. 5-28
DISASSEMBLING THE REAR BR AKE CALIPER ................................... 5-28
CHECKING THE REAR BRAKE CALIPER .............................................. 5-28
ASSEMBLING THE REAR BRAKE CALIPER ......................................... 5-28
INSTALLING THE BRAKE CALIPER PISTON ........................................ 5-29
INSTALLING THE REAR BRAKE CALIPER .................... ........................ 5-29
REMOVING THE REAR BRAKE MASTER CYLINDER .......................... 5-30
CHECKING THE REAR BRAKE MASTER CYLINDER ........................... 5-30
ASSEMBLING THE REAR BRAKE M ASTER CYLINDER....................... 5-30
INSTALLING THE REAR BRAKE MASTER CYLINDER ......................... 5-31
Page 156 of 426

FRONT WHEEL
5-4
EAS2GC1154
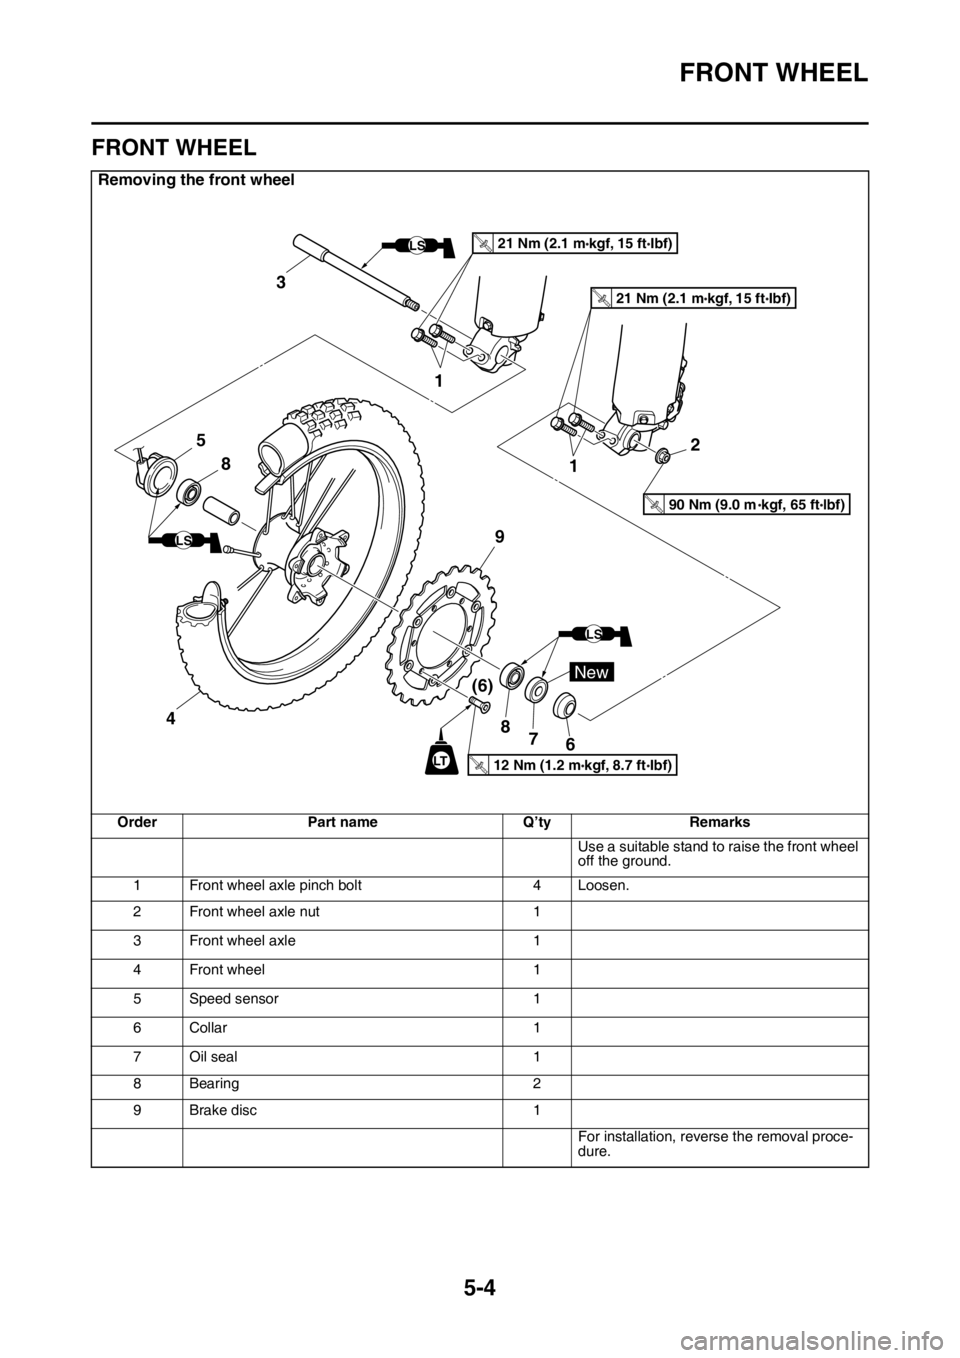
FRONT WHEEL
Removing the front wheel
OrderPart name Q’tyRemarks
Use a suitable stand to raise the front wheel
off the ground.
1 Front wheel axle pinch bolt 4 Loosen.
2 Front wheel axle nut 1
3 Front wheel axle 1
4 Front wheel 1
5 Speed sensor 1
6Collar 1
7 Oil seal 1
8 Bearing 2
9 Brake disc 1
For installation, reverse the removal proce-
dure.
12 Nm (1.2 m kgf, 8.7 ft Ibf)T.R.
New
LT
LS
LS
LS
8
7
8
(6)
9
1 2
1
3
21 Nm (2.1 m kgf, 15 ft Ibf)T.R.
21 Nm (2.1 m kgf, 15 ft Ibf)T.R.
4
90 Nm (9.0 m kgf, 65 ft lbf)T.R.
5
6
Page 158 of 426

FRONT WHEEL
5-6
EAS2GC1157DISASSEMBLING THE FRONT WHEEL
1. Remove:• Oil seals
• Bearings
▼▼▼▼▼▼▼▼▼▼▼▼▼▼▼▼▼▼▼▼▼▼▼▼▼▼▼▼▼▼▼▼
a. Clean the outside of the front wheel hub.
b. Remove the oil seals “1” with a flat-head screwdriver.
TIP
To prevent damaging the wheel, place a rag “2”
between the screwdriver and the wheel sur-
face.
c. Remove the bearings with a bearing puller.
▲▲▲▲▲▲▲▲▲▲▲▲▲▲▲▲▲▲▲▲▲▲▲▲▲▲▲▲▲▲▲▲
EAS2GC1158ASSEMBLING THE FRONT WHEEL
1. Install:• Bearing (left side) “1”
• Spacer “2”
• Bearing (right side) “3”
• Oil seal “4”
TIP
• Apply the lithium-soap-based grease to the bearing and the oil seal lip when installing.
• Left side of bearing shall be installed first.
• Install the oil seal with its manufacture’s
marks or numbers facing outward.
ECA
NOTICE
Install the bearing by pressing its outer race
parallel.
TIP
Use a socket “1” that matches the diameter of
the bearing outer race and that of the oil seal.
2. Install: • Brake disc “1”
• Brake disc bolt “2”
TIP
Tighten the bolts in stages and in a crisscross
pattern.
1 2
New
Brake disc bolt
12 Nm (1.2 m·kgf, 8.7 ft·lbf)
LOCTITE®
3
2
14
New
1
T R..
Page 159 of 426

FRONT WHEEL
5-7
3. Install:• Collar “1”
TIP
Apply the lithium-soap-based grease on the oil
seal lip.
4. Install:
• Speed sensor “1”
TIP
Apply the lithium-soap-based grease on the oil
seal lip of speed sensor.
Make sure the two projections “a” in the wheel
hub are meshed with the two slots “b” in the
speed sensor.
EAS2GC1159INSTALLING THE FRONT WHEEL
1. Install:• Front wheel
TIP
Install the brake disc “1” between the brake
pads “2” correctly. 2. Install:
• Front wheel axle “1”
TIP
Apply the lithium-soap-based grease to the
front wheel axle.
3. Tighten:
• Front wheel axle nut “1”
ECA
NOTICE
Before tightening the front wheel axle nut,
push down hard on the handlebar(s) several
times and check if the front fork rebounds
smoothly.
4. Tighten:• Front wheel axle pinch bolt “1”1
a b
LS
Front wheel axle nut
90 Nm (9.0 m·kgf, 65 ft·lbf)
Front wheel axle pinch bolt 21 Nm (2.1 m·kgf, 15 ft·lbf)
T R..
1
T R..
Page 161 of 426

REAR WHEEL
5-9
EAS2GC1160
REAR WHEEL
Removing the rear wheel
OrderPart name Q’tyRemarks
Use a suitable stand to raise the rear wheel
off the ground.
1 Nut (rear wheel axle) 1
2 Rear wheel axle 1
3 Drive chain puller 2
4 Rear wheel 1
5Collars 2
6 Rear wheel sprocket 1
7Oil seals 2
8 Circlip 1
9 Bearing 3
10 Brake disc 1
For installation, reverse the removal proce-
dure.
(6)
21 Nm (2.1 m kgf, 15 ft Ibf)T.R.
2
5
7
9
LS
LS(6)
4 6
1
(6)
3
LS
8
9
10
7
5
LT
14 Nm (1.4 m kgf, 10 ft Ibf)T.R.
3
21 Nm (2.1 m kgf, 15 ft Ibf)T.R.
50 Nm (5.0 m kgf, 36 ft Ibf)T.R.
125 Nm (12.5 m kgf, 90 ft lbf)T.R.
Page 162 of 426

REAR WHEEL
5-10
EAS2GC1161REMOVING THE REAR WHEEL
1. Use a suitable stand to raise the rear wheel off the ground.
EWA
WARNING
Securely support the vehicle so that there is
no danger of it falling over.
2. Remove:• Rear wheel axle nut “1”
3. Loosen:
• Locknut “2”
4. Tighten: • Adjusting bolt “3”
5. Remove: • Rear wheel axle
• Rear wheel
TIP
• Push the rear wheel forward and remove the drive chain from the rear wheel sprocket.
• Do not depress the brake pedal with the rear
wheel removed.
EAS2GC1162CHECKING THE REAR WHEEL
1. Check:
• Rear wheel axle
• Rear wheel
• Bearing
• Oil sealsRefer to “CHECKING THE FRONT WHEEL”
on page 5-5.
2. Check: •Tire(s)
• Rear wheelDamage/wear Replace.
Refer to “CHECKING THE TIRES” on page
3-36 and “CHECKING THE WHEELS” on
page 3-37.
3. Check: • Spokes
Refer to “CHECKING THE FRONT WHEEL”
on page 5-5. 4. Measure:
• Radial wheel runout
• Lateral wheel runoutRefer to “CHECKING THE FRONT WHEEL”
on page 5-5.
EAS2GC1163DISASSEMBLING THE REAR WHEEL
1. Remove:• Oil seals
• Bearing
Refer to “DISASSEMBLING THE FRONT
WHEEL” on page 5-6.
EAS2GC1164CHECKING AND REPLACING THE REAR
WHEEL SPROCKET
1. Check:• Rear wheel sprocketMore than 1/4 tooth wear “a” Replace the
rear wheel sprocket and the drive sprocket
as a set.
Bent tooth Replace the rear wheel
sprocket and the drive sprocket as a set.
2. Replace: • Rear wheel sprocket
▼▼▼▼▼▼▼▼▼▼▼▼▼▼▼▼▼▼▼▼▼▼▼▼▼▼▼▼▼▼▼▼
a. Remove the self-locking nuts and the rear wheel sprocket.
b. Clean the rear wheel drive hub with a clean
cloth, especially the surfaces that contact
the sprocket.
c. Install the new rear wheel sprocket.
3
1 2
Radial wheel runout limit
2.0 mm (0.08 in)
Lateral wheel runout limit 2.0 mm (0.08 in)
b. Correct
1. Drive chain roller
2. Rear wheel sprocket
Rear wheel sprocket self-locking
nut50 Nm (5.0 m·kgf, 36 ft·lbf)
T R..