2016 YAMAHA FJR1300AS key
[x] Cancel search: keyPage 25 of 126

Instrument and control functions
3-11
3
EAU55415
Multi-function meter unit
WARNING
EWA12423
Be sure to stop the vehicle before
makin g any settin g chan ges to the
multi-function meter unit. Chang ing
settin gs while ri din g can d istract the
operator an d increase the risk of an
acci dent.
TIP
The select switch “ / ” and the
menu switch “MENU” are located on
the left handlebar. These switches al-
low you to control or change the set-
tings of the multi-function meter unit.
The multi-function meter unit is
equipped with the following:
a speedometer
a tachometer
a clock
a fuel meter
an eco indicator
a transmission gear display
a drive mode display
a function display
an information display
a setting mode display
TIP
Be sure to turn the key to “ON” be-
fore attempting to use select
switch “ / ”, menu switch
“MENU”, “RESET” button or
“TCS” button.
To switch the meter displays be-
tween kilometers and miles, see
page 3-17.
Speed ometer
The speedometer shows the vehicle’s
traveling speed.
1. “RESET” button
2. “TCS” button
3. Tachometer
4. Drive mode display
5. Eco indicator “ECO”
6. Fuel meter
7. Speedometer
8. Clock
9. Transmission gear display
10.Function display
11.Information display
GEARN25A.TEMP ˚C
LoC.TEMP˚C
0:06TIME TRIP
1231145786910
1. Menu switch “MENU”
2. Select switch “ / ”
1
2
UB95E0E0.book Page 11 Friday, February 19, 2016 2:15 PM
Page 26 of 126

Instrument and control functions
3-12
3 Tachometer
The electric tachometer allows the rid-
er to monitor the engine speed and
keep it within the ideal power range.
When the key is turned to “ON”, the ta-
chometer needle sweeps across the
r/min range and then returns to zero
r/min in order to test the electrical cir-
cuit.
NOTICE
ECA10032
Do not operate the en
gine in the ta-
chometer red zone.
Re d zone: 9000 r/min an d a bove
Fuel meter
The fuel meter indicates the amount of
fuel in the fuel tank. The display seg-
ments of the fuel meter disappear from “F” (full) towards “E” (empty) as the fuel
level decreases. When the last seg-
ment starts flashing, refuel as soon as
possible.
When the key is turned to “ON”, all dis-
play segments come on once in order
to test the electrical circuit.
TIP
If a problem is detected in the fuel me-
ter electrical circuit, the fuel meter dis-
play segments will flash repeatedly.
Have a Yamaha dealer check the vehi-
cle.
Eco in
dicator
This indicator comes on when the vehi-
cle is being operated in an environ-
mentally friendly, fuel-efficient manner.
The indicator goes off when the vehicle
is stopped.
TIP
Consider the following tips to reduce
fuel consumption: Avoid high engine speeds during
acceleration.
Travel at a constant speed.
Select the transmission gear that
is appropriate for the vehicle
speed.
1. Tachometer
2. Tachometer red zone
1. Fuel meter
1 2
GEAR
NA.TEMP
C.TEMP
1
1. Eco indicator “ECO”
GEAR
NA.TEMP
C.TEMP
1
UB95E0E0.book Page 12 Friday, February 19, 2016 2:15 PM
Page 29 of 126

Instrument and control functions
3-15
3
The odometer shows the total distance
traveled by the vehicle.
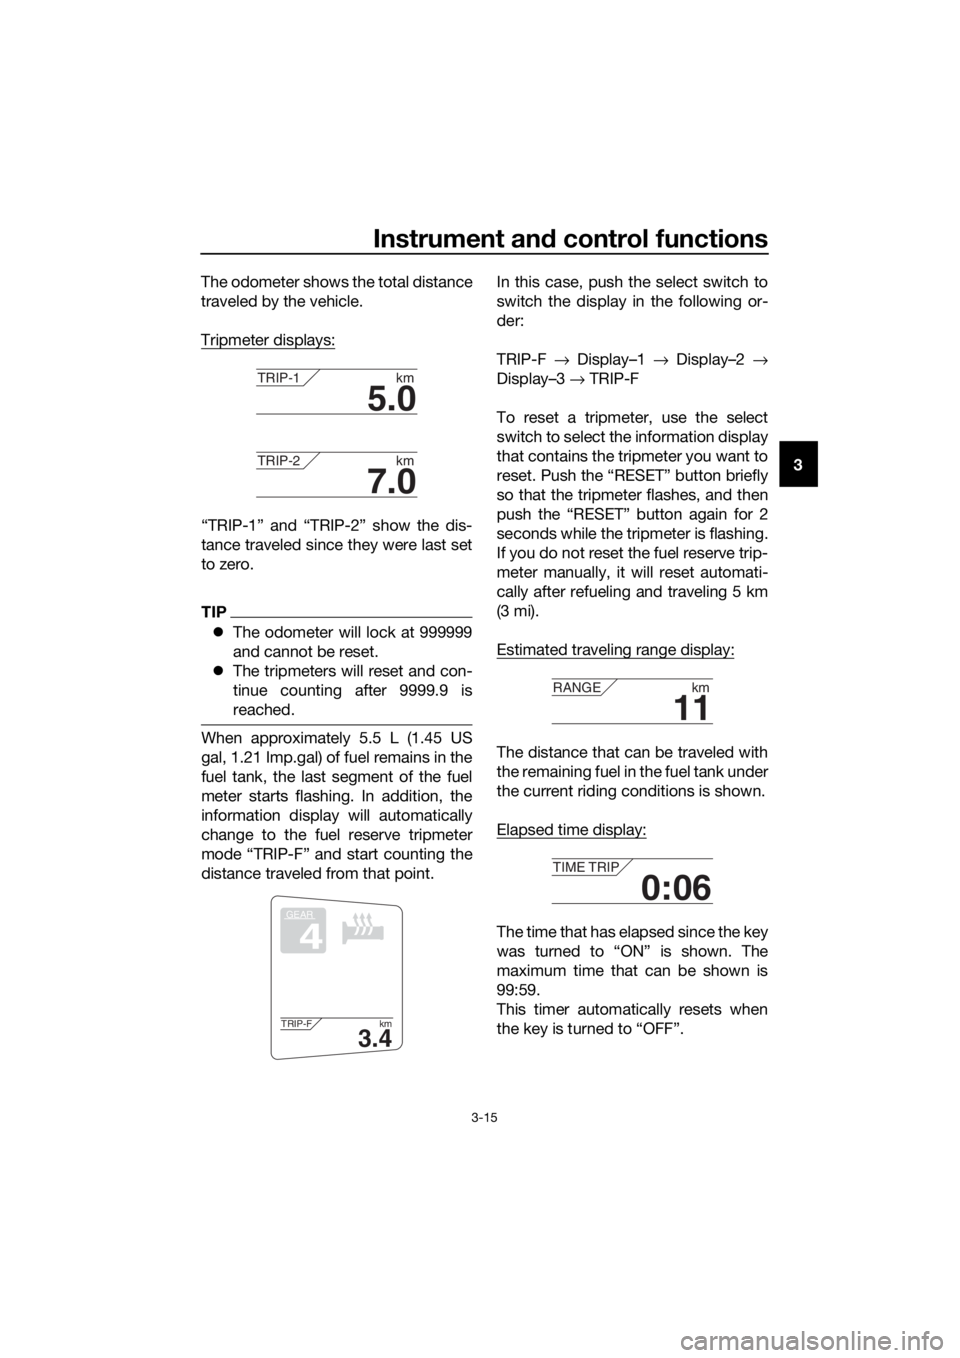
Tripmeter displays:
“TRIP-1” and “TRIP-2” show the dis-
tance traveled since they were last set
to zero.
TIP
The odometer will lock at 999999
and cannot be reset.
The tripmeters will reset and con-
tinue counting after 9999.9 is
reached.
When approximately 5.5 L (1.45 US
gal, 1.21 Imp.gal) of fuel remains in the
fuel tank, the last segment of the fuel
meter starts flashing. In addition, the
information display will automatically
change to the fuel reserve tripmeter
mode “TRIP-F” and start counting the
distance traveled from that point. In this case, push the select switch to
switch the display in the following or-
der:
TRIP-F
→ Display–1 → Display–2 →
Display–3 → TRIP-F
To reset a tripmeter, use the select
switch to select the information display
that contains the tripmeter you want to
reset. Push the “RESET” button briefly
so that the tripmeter flashes, and then
push the “RESET” button again for 2
seconds while the tripmeter is flashing.
If you do not reset the fuel reserve trip-
meter manually, it will reset automati-
cally after refueling and traveling 5 km
(3 mi).
Estimated traveling range display:The distance that can be traveled with
the remaining fuel in the fuel tank under
the current riding conditions is shown.
Elapsed time display:
The time that has elapsed since the key
was turned to “ON” is shown. The
maximum time that can be shown is
99:59.
This timer automatically resets when
the key is turned to “OFF”.
5.0
TRIP-1 km
7.0
TRIP-2km
GEAR
4
3.4
TRIP-F km
11
RANGEkm
0:06
TIME TRIP
UB95E0E0.book Page 15 Friday, February 19, 2016 2:15 PM
Page 31 of 126

Instrument and control functions
3-17
3
To reset the average fuel consumption
display, use the select switch to select
the information display that contains
the average fuel consumption display.
Push the “RESET” button briefly so
that the average fuel consumption dis-
play flashes, and then push the “RE-
SET” button again for 2 seconds while
the display is flashing.TIP
After resetting the average fuel con-
sumption display, “_ _._” will be shown
for that display until the vehicle has
traveled 1 km (0.6 mi).
NOTICE
ECA15474
If there is a malfunction, “– –.–” will
b
e continuously displaye d. Have a
Yamaha dealer check the vehicle.
Instantaneous fuel consumption dis-
play:
The instantaneous fuel consumption
display modes “km/L”, “L/100km” or
“MPG” show the fuel consumption un-
der the current riding conditions.
The “km/L” display shows the dis-
tance that can be traveled on 1.0 L
of fuel.
The “L/100km” display shows the
amount of fuel necessary to travel
100 km.
The “MPG” display shows the dis-
tance that can be traveled on
1.0 Imp.gal of fuel.
TIP
If traveling at speeds under 10 km/h (6
mi/h), “_ _._” will be displayed.
NOTICE
ECA15474
If there is a malfunction, “– –.–” will
be continuously displaye d. Have a
Yamaha dealer check the vehicle.
Adjusting the windshield position
To move the windshield up, push
the “ ” side of the select switch. To
move the windshield down, push
the “ ” side of the select switch.
Settin g mo de
TIP
The transmission must be in neu-
tral and the vehicle must be
stopped to change settings in this
mode.
Shifting the transmission into gear
and starting off, or turning the key
to “OFF”, saves all settings made,
then exits the setting mode.
Push and hold the menu switch
“MENU” for 2 seconds to enter the set-
ting mode. To exit the setting mode
12.3
CRNT FUEL km/L
1. Setting mode display
MENUGrip WarmerMaintenanceTime TripUnitDisplayBrightnessClock
1
UB95E0E0.book Page 17 Friday, February 19, 2016 2:15 PM
Page 32 of 126

Instrument and control functions
3-18
3 and return to the normal display, push
and hold the menu switch “MENU”
again for at least 2 seconds.
Adjusting the temperature levels of the
grip warmer settings
1. Use the select switch to highlight
“Grip Warmer”.
2. Push the “MENU” switch. The grip warmer setting display will be
shown and “High” will flash in the
display.
3. Push the “MENU” switch. The temperature level for the high set-
ting will start flashing.
Use the select switch to set the
temperature level, and then push
the “MENU” switch. “High” will
start flashing.
Display Description
This function allows you to
set the low, middle, and
high settings to 10 tem-
perature levels.
This function allows you to
check and reset the “OIL”
oil change interval (dis-
tance traveled), and the
“FREE-1” and “FREE-2”
maintenance intervals.
This function allows you to
check and reset the
“TIME–2” and “TIME–3”
functions. These time trips
show the total elapsed
time that the key has been
in the “ON” position. When
the key is turned to “OFF”,
the time trips stop count-
ing but are not reset. The
maximum time that can be
shown is 99:59.
When the time trips reach
99:59, they automatically
reset to 0:00 and continue
counting.
This function allows you to
switch the display units
between kilometers and
miles. When kilometers are
selected, the fuel con-
sumption units can be
switched between
“L/100km” and “km/L”.
This function allows you to
change the items shown in
3 information displays.
This function allows you to
adjust the brightness of
the multi-function meter
unit panel to suit the out-
side lighting conditions.
This function allows you to
set the clock.
This function allows you to
reset all items, except the
odometer and the clock.
Grip Warmer
Maintenance
Time Trip
Unit
Display
Brightness
Clock
All Reset
MENU
Grip Warmer
Maintenance
Time Trip
Unit
Display
Brightness
Clock
Grip Warmer
Hi g
h
10
Middle
5
Low
1
UB95E0E0.book Page 18 Friday, February 19, 2016 2:15 PM
Page 38 of 126

Instrument and control functions
3-24
3
EAU1234J
Han dle bar switches
Left
Ri ght
EAU73020Dimmer/Pass switch “ / /PASS”
Set this switch to “ ” for the high
beam and to “ ” for the low beam.
To flash the high beam, push the pass
side “PASS” of the switch while the
headlights are on low beam.
TIP
The inside cornering lights come on
with the high beam.
EAU12461Turn si gnal switch “ / ”
To signal a right-hand turn, push this
switch to “ ”. To signal a left-hand
turn, push this switch to “ ”. When
released, the switch returns to the cen-
ter position. To cancel the turn signal
lights, push the switch in after it has re-
turned to the center position.
EAU12501Horn switch “ ”
Press this switch to sound the horn.
EAU54212Stop/Run/Start switch “ / / ”
To crank the engine with the starter,
set this switch to “ ”, and then push
the switch down towards “ ”. See
page 5-2 for starting instructions prior
to starting the engine.
Set this switch to “ ” to stop the en-
gine in case of an emergency, such as
when the vehicle overturns or when the
throttle cable is stuck.
EAU12735Hazar d switch “ ”
With the key in the “ON” or “ ” posi-
tion, use this switch to turn on the haz-
ard lights (simultaneous flashing of all
turn signal lights).
The hazard lights are used in case of an
emergency or to warn other drivers
when your vehicle is stopped where it
might be a traffic hazard.
1. Menu switch “MENU”
2. Select switch “ / ”
3. Stop mode function switch “ ”
4. Cruise control switches
5. Horn switch “ ”
6. Turn signal switch “ / ”
7. Dimmer/Pass switch “ / /PASS”
1. Stop/Run/Start switch “ / / ”
2. Drive mode switch “MODE”
3. Hazard switch “ ”
1
7
6
5
2
4
3
STOP
MODE
RUNSTART
3
2
1
UB95E0E0.book Page 24 Friday, February 19, 2016 2:15 PM
Page 40 of 126

Instrument and control functions
3-26
3
EAU55491
YCC-S system
This vehicle features the YCC-S
(Yamaha Chip Controlled-Shift) sys-
tem.
The basic function of this system al-
lows the rider to shift gears without the
use of a clutch lever. Furthermore, a
hand shift lever is equipped on the
handlebar, allowing the rider to shift
gears with either the foot-operated
shift pedal or the hand-operated shift
lever. (See page 3-27.)
When the engine is started and the
shift pedal or the shift lever is moved, a
signal is sent to the MCU (Motor Con-
trol Unit) which disengages the clutch,
the ECU (Engine Control Unit) then ad-
justs the electronic throttle valve, the
gear shift is made and then the clutch
is re-engaged once the engine is run-
ning at the proper speed. Clutch en-
gagement is controlled optimally by
the MCU according to engine r/min,
engine requirements, and riding condi-
tions.
TIP
This is not an automatic transmission,
only the clutch system is automatic.
The gears must be shifted by the rider
except when stopping the vehicle
while the stop mode function is activat-
ed.
See “Stop mode function switch” (See
page 3-25.) and OPERATION AND IM-
PORTANT RIDING POINTS (See page
5-1.) for further explanation of this sys-
tem.
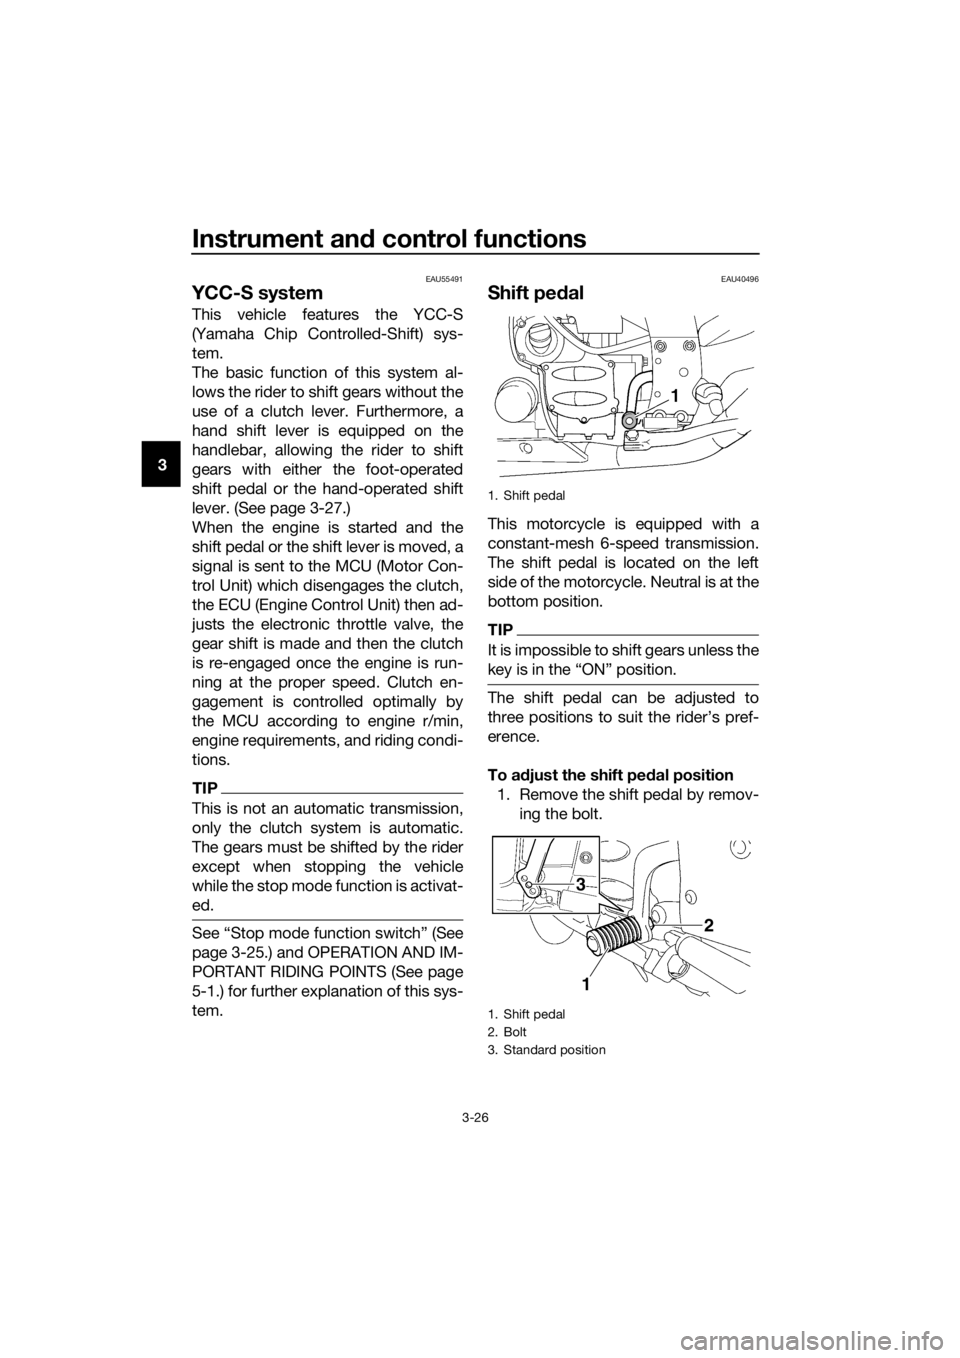
EAU40496
Shift pe dal
This motorcycle is equipped with a
constant-mesh 6-speed transmission.
The shift pedal is located on the left
side of the motorcycle. Neutral is at the
bottom position.
TIP
It is impossible to shift gears unless the
key is in the “ON” position.
The shift pedal can be adjusted to
three positions to suit the rider’s pref-
erence.
To a djust the shift ped al position
1. Remove the shift pedal by remov- ing the bolt.
1. Shift pedal
1. Shift pedal
2. Bolt
3. Standard position
3
1
2
UB95E0E0.book Page 26 Friday, February 19, 2016 2:15 PM
Page 43 of 126

Instrument and control functions
3-29
3
EAU73181
ABS
This model’s anti-lock brake system
(ABS) features a dual electronic control
system, which acts on the front and
rear brakes independently.
Operate the brakes with ABS as you
would conventional brakes. If the ABS
is activated, a pulsating sensation may
be felt at the brake lever or brake ped-
al. In this situation, continue to apply
the brakes and let the ABS work; do
not “pump” the brakes as this will re-
duce braking effectiveness.
WARNING
EWA16051
Always keep a sufficient d istance
from the vehicle ahead to match the
ri din g speed even with ABS.
The ABS performs b est with
lon g b rakin g d istances.
On certain surfaces, such as
rou gh or g ravel roa ds, the b rak-
in g d istance may be lon ger with
the ABS than without.
The ABS is monitored by an ECU,
which will revert the system to conven-
tional braking if a malfunction occurs.
TIP
The ABS performs a self-diagno-
sis test each time the vehicle first
starts off after the key is turned to
“ON” and the vehicle has traveled
at a speed of 10 km/h (6 mi/h) or
higher. During this test, a “click-
ing” noise may be heard from the
hydraulic control unit, and if the
brake lever or brake pedal is even
slightly applied, a vibration can be
felt at the lever and pedal, but this
does not indicate a malfunction.
This ABS has a test mode which
allows the owner to experience
the pulsation at the brake lever or
brake pedal when the ABS is op-
erating. However, special tools are
required, so please consult your
Yamaha dealer.
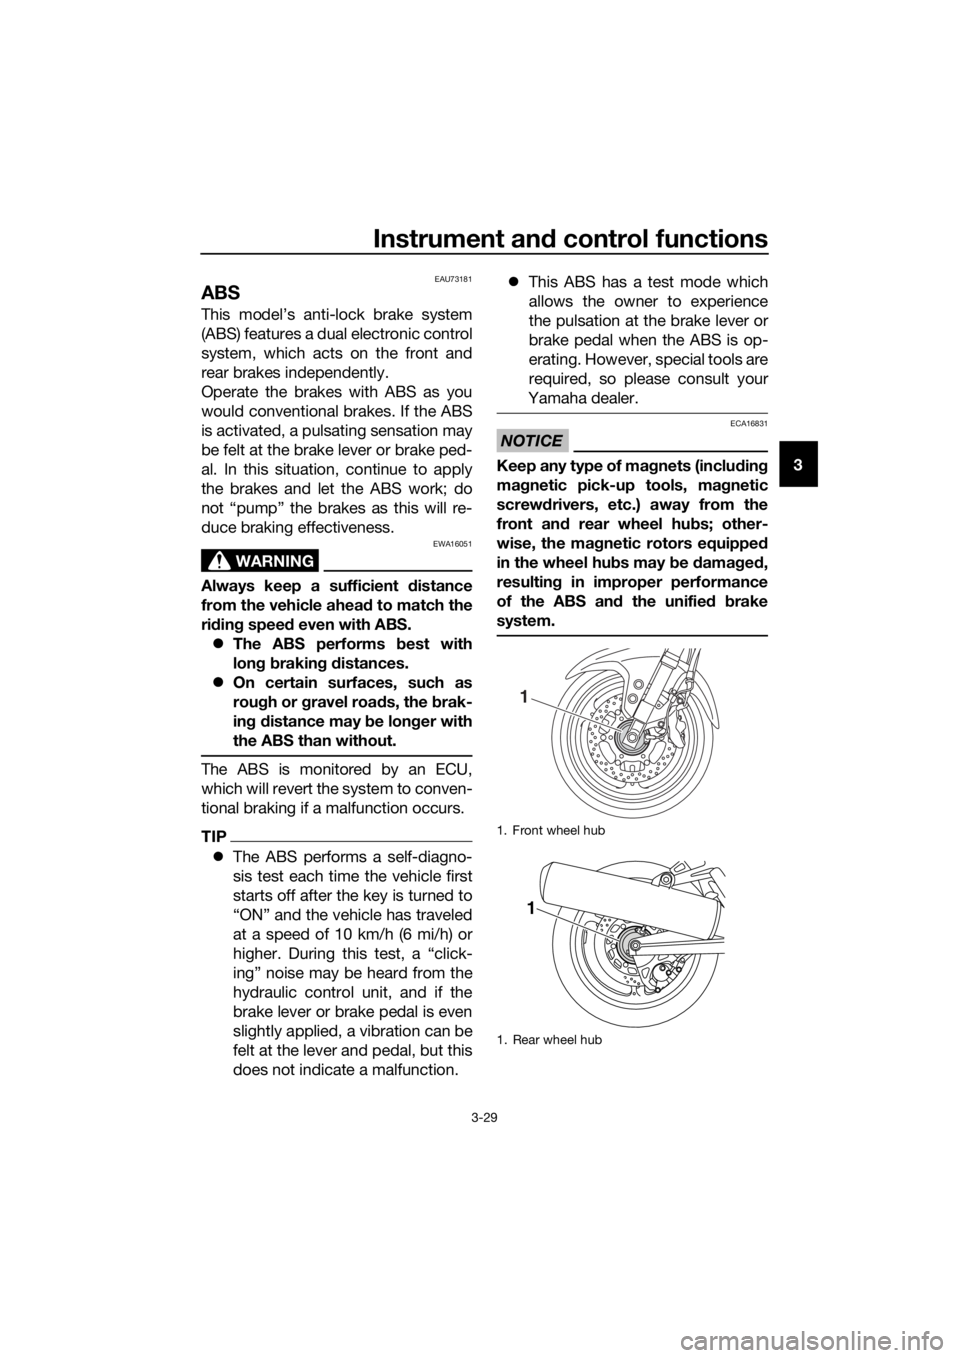
NOTICE
ECA16831
Keep any type of mag nets (including
ma gnetic pick-up tools, mag netic
screw drivers, etc.) away from the
front an d rear wheel hu bs; other-
wise, the ma gnetic rotors equippe d
in the wheel hu bs may b e damag ed ,
resultin g in improper performance
of the ABS an d the unifie d b rake
system.
1. Front wheel hub
1. Rear wheel hub
1
1
UB95E0E0.book Page 29 Friday, February 19, 2016 2:15 PM