2016 VOLVO XC90 T8 second row seats
[x] Cancel search: second row seatsPage 6 of 546

4
Approach lighting148
Home safe lighting 148
Passenger compartment lighting 148
Using turn signals 151
Messages in the instrument panel and center display 151
Handling messages in the instru-ment panel and center display 153
Handling messages stored from theinstrument panel and center display 154
Using the instrument panel App menu 156
Using the windshield wipers 156
Activating/deactivating the rain sensor 157
Windshield and headlight washers 158
Tailgate window wiper and washer 159
Steering wheel 160
Adjusting the steering wheel 161
Seats 161
Manually operated front seats 162
Power front seats *
163
Adjusting power front seats *
163
Adjusting the passenger's seat from the driver's seat * 164
Using the power seat memory function *
164
Multifunctional front seats *
165
Adjusting function settings in the multifunctional front seats *166
Rear seats 169
Easy access to and from the driver seat 169
Adjusting the second row head restraints 170
Adjusting the second row backrest tilt 171
Folding the second row backrests 172
Moving the second row seats for- ward/rearward 174
Getting into and out of the third rowof seats 174
Folding the third row backrests 175
CLIMATE
Climate control system178
Perceived temperature 178
Climate system sensors 179
Parking climate (preconditioning) 179
Activating/deactivating the parking climate timer 181
Activating/deactivating the climate comfort retaining function *181
Preconditioning timer 182
Setting the parking climate (precon- ditioning) timer 182
Starting and stopping preconditioning 184
Preconditioning symbols and messages 185
Air quality 186
Clean Zone Interior Package (CZIP) *
186
Interior Air Quality System (IAQS) *
186
Passenger compartment air filter 187
Automatic climate control 187
Climate system controls 188
Climate system controls in the centerdisplay 189
Rear climate system controls on thetunnel console 190
Setting the blower speed 191
Setting the temperature 192
Turning recirculation on and off 194
Page 81 of 546

SAFETY
79
Related information
•Top tether anchors (p. 80)Lower child seat attachment points 1
The vehicle is equipped with lower attachment points for child seats in the second row of seats.
The lower attachment points are intended for use with rear-facing child restraints. Always follow the child restraint manufacturer's installation instructions when attaching a childrestraint to these attachment points.
Location
Attachment points in the second row of seats
The attachment points in the second row of seats are in the rear section of the front seat's floorrails.
WARNING
A child seat should never be used in the front passenger seat of any vehicle with a frontpassenger airbag – not even if the "Passen-ger airbag off" symbol near the rear-view mir-ror is illuminated (on vehicles equipped withOccupant Weight Sensor). If the severity of anaccident were to cause the airbag to inflate,this could lead to serious injury or death to achild seated in this position.
Related information
• Child restraints (p. 70)
• ISOFIX/LATCH lower anchors (p. 78)
• Occupant weight sensor (p. 84)
1
Not available in all markets
Page 151 of 546
INSTRUMENTS AND CONTROLS
}}
* Option/accessory, for more information, see Introduction.149
Courtesy lighting (AUTO) switch
Passenger's side reading light
Front reading lights
Turn the reading lights on or off by pressing the respective buttons briefly. Adjust the brightnessby pressing and holding the button.
Courtesy lighting
Turn the footwell and overhead courtesy lighting on or off by pressing the button briefly.
Courtesy lighting switch
Activate the automatic function by briefly press- ing the AUTO button in the ceiling console. The
indicator light in the button will illuminate. WithAUTO activated, the courtesy lighting will switch
on and off as follows: The courtesy lighting: • comes on when the vehicle is unlocked and when the ignition is switched off
• goes off when the engine is started andwhen the vehicle is locked
• comes on or goes off when one of the sidedoors is opened or closed
• remains on for 2 minutes if a side door isopen
The courtesy lighting switches off when:
Rear interior lighting
Rear reading lights
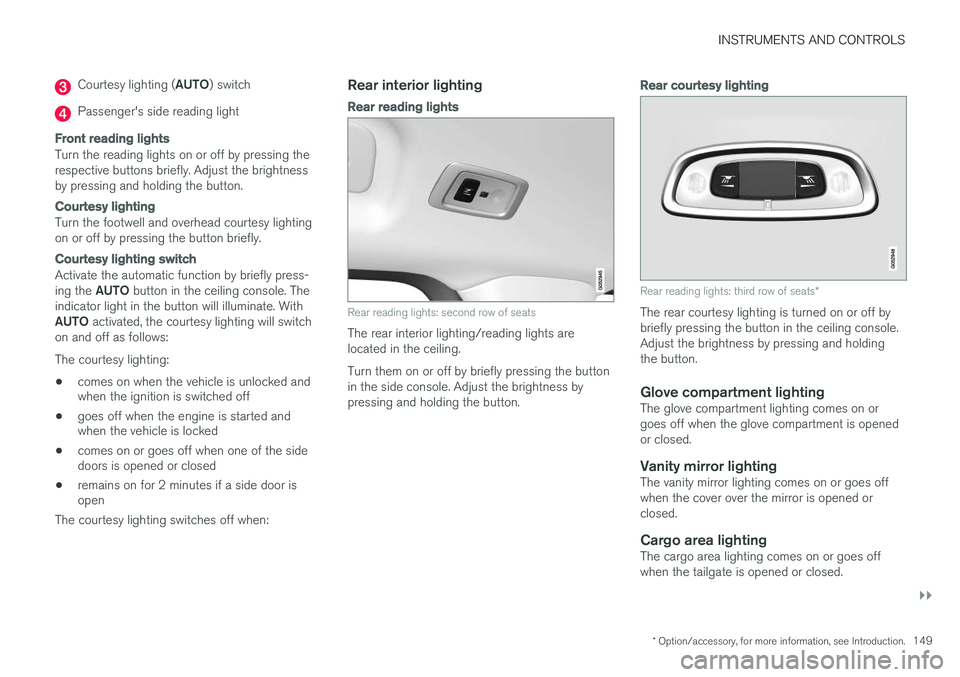
Rear reading lights: second row of seats
The rear interior lighting/reading lights are located in the ceiling. Turn them on or off by briefly pressing the button in the side console. Adjust the brightness bypressing and holding the button.
Rear courtesy lighting
Rear reading lights: third row of seats *
The rear courtesy lighting is turned on or off by briefly pressing the button in the ceiling console.Adjust the brightness by pressing and holdingthe button.
Glove compartment lightingThe glove compartment lighting comes on orgoes off when the glove compartment is openedor closed.
Vanity mirror lightingThe vanity mirror lighting comes on or goes offwhen the cover over the mirror is opened orclosed.
Cargo area lightingThe cargo area lighting comes on or goes offwhen the tailgate is opened or closed.
Page 163 of 546
INSTRUMENTS AND CONTROLS
}}
* Option/accessory, for more information, see Introduction.161
Adjusting the steering wheel
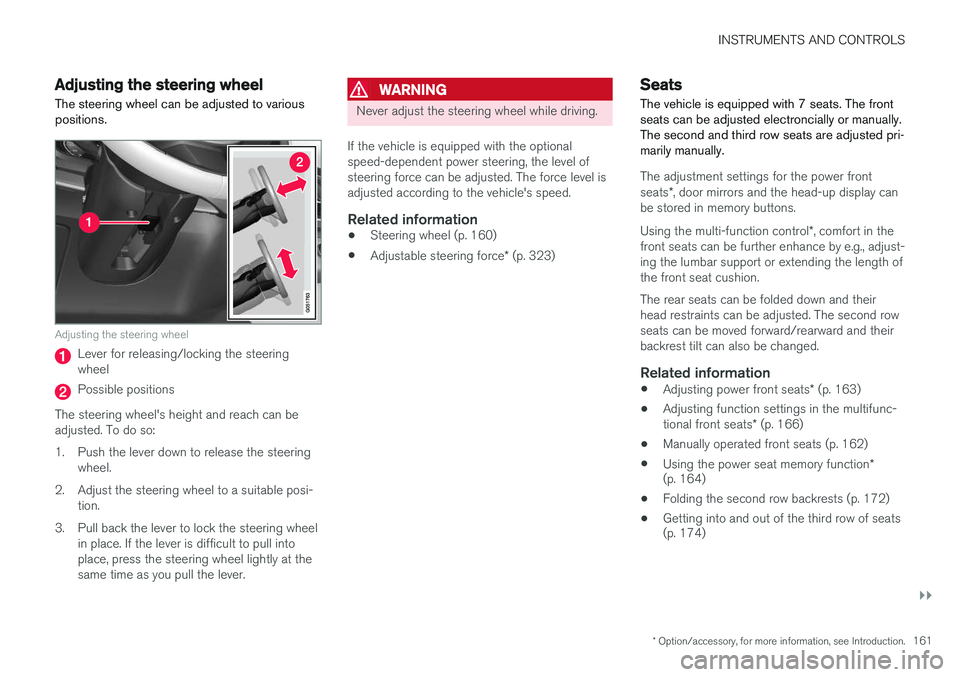
The steering wheel can be adjusted to various positions.
Adjusting the steering wheel
Lever for releasing/locking the steering wheel
Possible positions
The steering wheel's height and reach can be adjusted. To do so:
1. Push the lever down to release the steering wheel.
2. Adjust the steering wheel to a suitable posi- tion.
3. Pull back the lever to lock the steering wheel in place. If the lever is difficult to pull into place, press the steering wheel lightly at thesame time as you pull the lever.
WARNING
Never adjust the steering wheel while driving.
If the vehicle is equipped with the optional speed-dependent power steering, the level ofsteering force can be adjusted. The force level isadjusted according to the vehicle's speed.
Related information
• Steering wheel (p. 160)
• Adjustable steering force
* (p. 323)
Seats
The vehicle is equipped with 7 seats. The front seats can be adjusted electroncially or manually.The second and third row seats are adjusted pri-marily manually.
The adjustment settings for the power front seats *, door mirrors and the head-up display can
be stored in memory buttons. Using the multi-function control *, comfort in the
front seats can be further enhance by e.g., adjust- ing the lumbar support or extending the length ofthe front seat cushion. The rear seats can be folded down and their head restraints can be adjusted. The second rowseats can be moved forward/rearward and theirbackrest tilt can also be changed.
Related information
• Adjusting power front seats
* (p. 163)
• Adjusting function settings in the multifunc- tional front seats
* (p. 166)
• Manually operated front seats (p. 162)
• Using the power seat memory function
*
(p. 164)
• Folding the second row backrests (p. 172)
• Getting into and out of the third row of seats (p. 174)
Page 164 of 546
INSTRUMENTS AND CONTROLS
* Option/accessory, for more information, see Introduction.
162 •
Moving the second row seats forward/rear- ward (p. 174)
• Adjusting the second row backrest tilt(p. 171)
Manually operated front seats
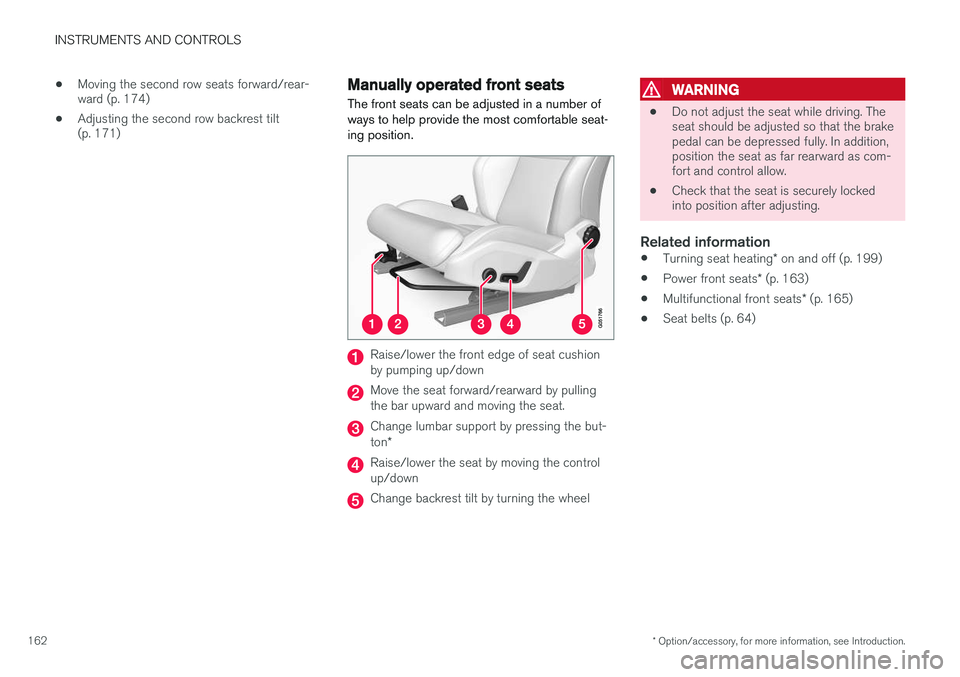
The front seats can be adjusted in a number of ways to help provide the most comfortable seat-ing position.
Raise/lower the front edge of seat cushion by pumping up/down
Move the seat forward/rearward by pulling the bar upward and moving the seat.
Change lumbar support by pressing the but- ton *
Raise/lower the seat by moving the control up/down
Change backrest tilt by turning the wheel
WARNING
• Do not adjust the seat while driving. The seat should be adjusted so that the brakepedal can be depressed fully. In addition,position the seat as far rearward as com-fort and control allow.
• Check that the seat is securely lockedinto position after adjusting.
Related information
•
Turning seat heating
* on and off (p. 199)
• Power front seats
* (p. 163)
• Multifunctional front seats
* (p. 165)
• Seat belts (p. 64)
Page 171 of 546
INSTRUMENTS AND CONTROLS
}}
* Option/accessory, for more information, see Introduction.169
Related information
•Multifunctional front seats
* (p. 165)
Rear seats
Your vehicle has three rows of seats. The sec- ond row of seats has three individual seatingpositions and the optional third row of seats hastwo individual seating positions.
Related information
• Adjusting the second row backrest tilt (p. 171)
• Adjusting the second row head restraints(p. 170)
• Folding the second row backrests (p. 172)
• Folding the third row backrests (p. 175)
• Getting into and out of the third row of seats(p. 174)
• Moving the second row seats forward/rear-ward (p. 174)
• Turning seat heating
* on and off (p. 199)
Easy access to and from the driver seat
The
Easy Ingress & Egress function can be
used to make getting into and out of the driver's seat easier.
Easy egressTo make getting out of the driver's seat easier, the seat is lowered, the side bolsters deflate andthe seat cushion retracts at the same time. The easy egress function must be activated in the center display. 1. Move the gear selector to the P position.
2. Switch off the engine.
3. Unbuckle the seat belt.
4. Open the driver's door. > The seat, side bolsters and seat cushionall move at the same time to a position that makes it easier to leave the seat.
Easy ingressThe seat remains in the easy egress positionwhen the driver leaves the vehicle. When thedriver returns to the vehicle, the seat is in a posi-tion to make sitting down easier. When the driveris seated, has buckled the seat belt and has put the ignition in at least mode 1, the seat will return
to the driver's preferred position.
Page 172 of 546

||
INSTRUMENTS AND CONTROLS
* Option/accessory, for more information, see Introduction.
170
Activating/deactivating the function1.
In the center display, select SettingsMy
Car
Seats.
2. Activate/deactivate the function by select- ing/deselecting the
Easy Ingress & Egressbox.
Related information
• Power front seats
* (p. 163)
• Ignition modes (p. 370)
Adjusting the second row head restraints
The center head restraint in the second row of seats can be adjusted to suit the height of theseat's occupant. The outboard head restraints can be folded down * for a better rear view.
Adjusting the center head restraint
Center head restraint button
The center head restraint should be adjusted up or down according to the passenger's height. Therestraint should be carefully adjusted to supportthe occupant's head. To lower the head restraint, press and hold the button (see the illustration) and push the headrestraint down carefully.
WARNING
The center rear seat head restraint should only be in its lowest position when this seat isNOT occupied. When the center position isoccupied, the head restraint should be cor-rectly adjusted to the passenger
Page 174 of 546
||
INSTRUMENTS AND CONTROLS
* Option/accessory, for more information, see Introduction.
172
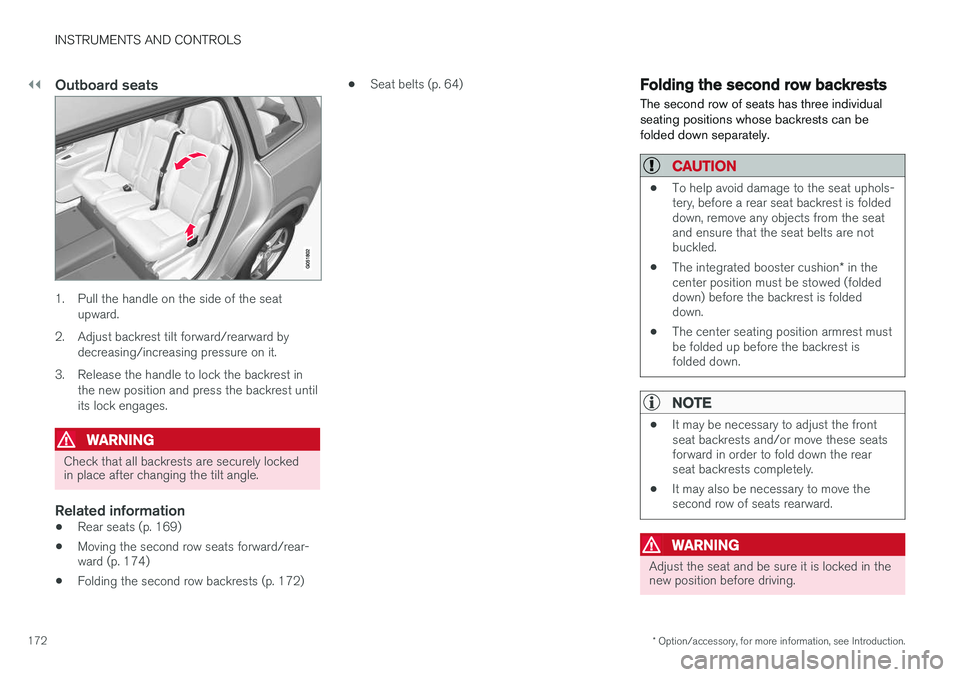
Outboard seats
1. Pull the handle on the side of the seat
upward.
2. Adjust backrest tilt forward/rearward by decreasing/increasing pressure on it.
3. Release the handle to lock the backrest in the new position and press the backrest until its lock engages.
WARNING
Check that all backrests are securely locked in place after changing the tilt angle.
Related information
• Rear seats (p. 169)
• Moving the second row seats forward/rear- ward (p. 174)
• Folding the second row backrests (p. 172) •
Seat belts (p. 64)
Folding the second row backrests
The second row of seats has three individual seating positions whose backrests can befolded down separately.
CAUTION
• To help avoid damage to the seat uphols- tery, before a rear seat backrest is foldeddown, remove any objects from the seatand ensure that the seat belts are notbuckled.
• The integrated booster cushion
* in the
center position must be stowed (foldeddown) before the backrest is foldeddown.
• The center seating position armrest mustbe folded up before the backrest isfolded down.
NOTE
•It may be necessary to adjust the front seat backrests and/or move these seatsforward in order to fold down the rearseat backrests completely.
• It may also be necessary to move thesecond row of seats rearward.
WARNING
Adjust the seat and be sure it is locked in the new position before driving.