2016 VOLVO XC90 T8 weight
[x] Cancel search: weightPage 217 of 546

LOADING AND STORAGE
}}
* Option/accessory, for more information, see Introduction.215
Loading
The load carrying capacity of your vehicle is determined by factors such as the number ofpassengers, the amount of cargo, the weight ofany accessories that may be installed, etc.
Tailgate opening button on the lighting panel
Open the tailgate by pressing the button on the lighting panel, pressing the
button on the
remote key or by using the optional foot move- ment sensor under the rear bumper.
Loading recommendations
• Load objects in the cargo compartment against the backrest whenever possible.
• If the backrests of the second row seats arefolded down, they should not be in contactwith the front seat backrests. This could impede the function of the WhiplashProtection System (WHIPS).
• Unstable loads can be secured to the loadanchoring eyelets with straps or web lash-ings to help keep them from shifting.
• Stop the engine and apply the parking brakewhen loading or unloading long objects. Thegear selector can be knocked out of positionby long loads, which could set the vehicle inmotion.
WARNING
•
Stop the engine, put the gear selector in P
, and apply the parking brake when
loading or unloading long objects.
• The vehicle's driving characteristics may change depending on the weight and dis-tribution of the load.
• A 44-pound (20 kg) object produces aforce of 2,200 pounds (1,000 kg) in ahead-on collision at 30 mph (50 km/h).
• The cargo area and rear seat should notbe loaded to a level higher than 2 in.(5 cm) below the upper edge of the rearside windows. Objects placed higher thanthis level could impede the function ofthe Inflatable Curtain.
WARNING
•
Cover sharp edges on long loads to help prevent injury to occupants. Secure theload to help prevent shifting during sud-den stops.
• Always secure large and heavy objectswith a seat belt or cargo retaining straps.
• Always secure the load to help prevent itfrom moving in the event of sudden stops.
• Switch off the engine, apply the parking brake and put the gear selector in
P
when loading and unloading the vehicle.
Raising/lowering the rear-end of the vehicle *
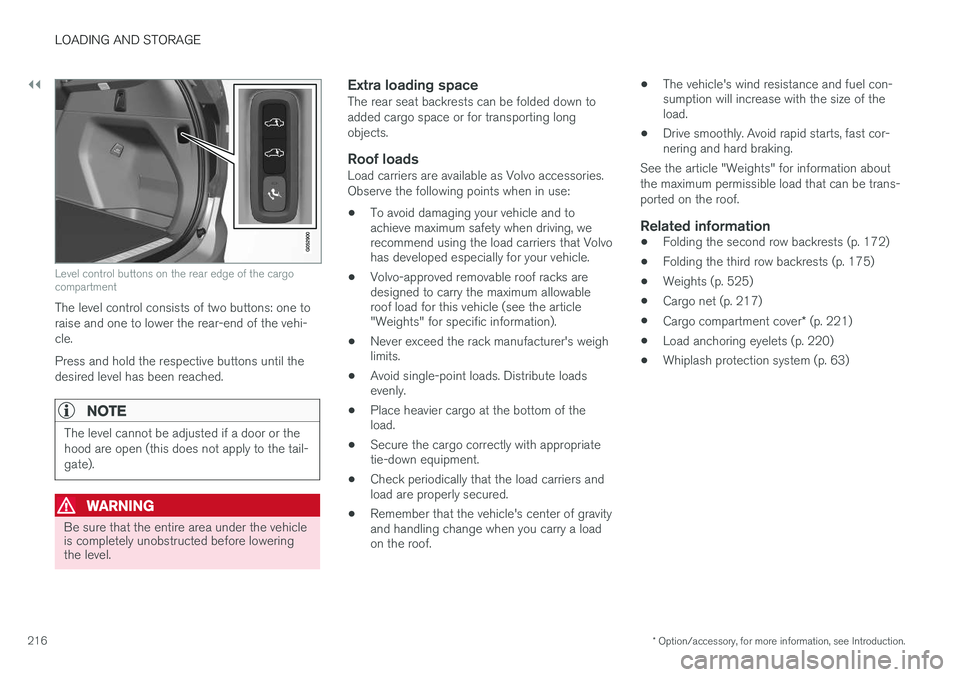
Using the buttons on the read edge of the cargo compartment, the rear-end of the vehicle (thelevel of the cargo compartment floor) can beraised or lowered for easier loading or to make attaching a trailer 2
simpler.
2 An accessory trailer hitch can be purchased from a Volvo retailer.
Page 218 of 546

||
LOADING AND STORAGE
* Option/accessory, for more information, see Introduction.
216
Level control buttons on the rear edge of the cargo compartment
The level control consists of two buttons: one to raise and one to lower the rear-end of the vehi-cle. Press and hold the respective buttons until the desired level has been reached.
NOTE
The level cannot be adjusted if a door or the hood are open (this does not apply to the tail-gate).
WARNING
Be sure that the entire area under the vehicle is completely unobstructed before loweringthe level.
Extra loading spaceThe rear seat backrests can be folded down to added cargo space or for transporting longobjects.
Roof loadsLoad carriers are available as Volvo accessories.Observe the following points when in use:
• To avoid damaging your vehicle and to achieve maximum safety when driving, werecommend using the load carriers that Volvohas developed especially for your vehicle.
• Volvo-approved removable roof racks aredesigned to carry the maximum allowableroof load for this vehicle (see the article"Weights" for specific information).
• Never exceed the rack manufacturer's weighlimits.
• Avoid single-point loads. Distribute loadsevenly.
• Place heavier cargo at the bottom of theload.
• Secure the cargo correctly with appropriatetie-down equipment.
• Check periodically that the load carriers andload are properly secured.
• Remember that the vehicle's center of gravityand handling change when you carry a loadon the roof. •
The vehicle's wind resistance and fuel con-sumption will increase with the size of theload.
• Drive smoothly. Avoid rapid starts, fast cor-nering and hard braking.
See the article "Weights" for information about the maximum permissible load that can be trans-ported on the roof.
Related information
• Folding the second row backrests (p. 172)
• Folding the third row backrests (p. 175)
• Weights (p. 525)
• Cargo net (p. 217)
• Cargo compartment cover
* (p. 221)
• Load anchoring eyelets (p. 220)
• Whiplash protection system (p. 63)
Page 219 of 546

LOADING AND STORAGE
}}
* Option/accessory, for more information, see Introduction.217
Grocery bag holder
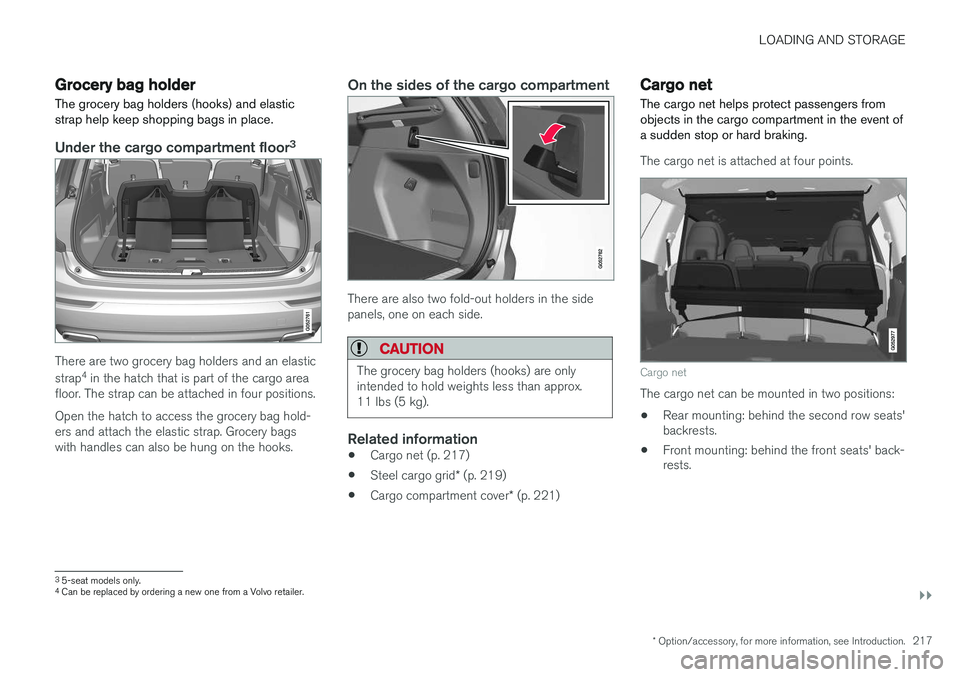
The grocery bag holders (hooks) and elastic strap help keep shopping bags in place.
Under the cargo compartment floor 3
There are two grocery bag holders and an elastic strap
4
in the hatch that is part of the cargo area
floor. The strap can be attached in four positions. Open the hatch to access the grocery bag hold- ers and attach the elastic strap. Grocery bagswith handles can also be hung on the hooks.
On the sides of the cargo compartment
There are also two fold-out holders in the side panels, one on each side.
CAUTION
The grocery bag holders (hooks) are only intended to hold weights less than approx.11 lbs (5 kg).
Related information
• Cargo net (p. 217)
• Steel cargo grid
* (p. 219)
• Cargo compartment cover
* (p. 221)
Cargo net
The cargo net helps protect passengers from objects in the cargo compartment in the event ofa sudden stop or hard braking.
The cargo net is attached at four points.
Cargo net
The cargo net can be mounted in two positions: • Rear mounting: behind the second row seats' backrests.
• Front mounting: behind the front seats' back-rests.
3
5-seat models only.4
Can be replaced by ordering a new one from a Volvo retailer.
Page 358 of 546

||
STARTING AND DRIVING
356
Preconditioning
•If possible, precondition the vehicle with the charging cable before driving.
• Avoid parking the vehicle so that the passen-ger compartment becomes too hot or cold.Park, if possible, in a climate controlled park-ing garage.
• For short drives after using the precondition-ing function, turn off the climate systemblower if possible.
• If preconditioning is not possible in coldweather, use the seat and steering wheelheating primarily. Avoid heating the entirepassenger compartment, which reduces thehybrid battery's charge level.
Driving
•
Choose the Pure drive mode to help mini-
mize electric power consumption.
• Maintain a constant speed and an adequate distance to the vehicle ahead to minimizeuse of the brakes.
• Brake as gently as possible; doing socharges the hybrid battery using the inte-grated regenerative braking function.
• Balance energy requirements using theaccelerator pedal and utilize the gauge onthe instrument panel to see the amount ofpower available from the electric motor. Thishelps avoid starting the gasoline engineunnecessarily. The electric motor is moreenergy-efficient than the gasoline engine,especially at lower speeds. •
In hilly terrain, put the gear selector in mode B
to utilize the electric motor's braking func-
tion when the accelerator pedal is released. This helps charge the hybrid battery.
• Higher speeds increase energy consumptionand the vehicle's wind resistance increasesalong with speed. Do not exceed postedspeed limits.
• Select the
Save drive mode for higher
speeds when driving farther than is possible using the electric motor only.
• Avoid carrying unnecessary items (extra load)in the vehicle.
• Maintain correct tire pressure. Check tirepressure regularly (when the tires are cold).
• Remove snow tires when threat of snow orice has ended.
• Note that roof racks, ski racks, etc, increaseair resistance and also energy consumption.
• Avoid driving with open windows.
Handling and roadholding
•
Vehicle load, tire design and inflation pres-sure all affect vehicle handling. Therefore,check that the tires are inflated to the rec-ommended pressure according to the vehicleload. Loads should be distributed so thatcapacity weight or maximum permissible axleloads are not exceeded.
• At the specified curb weight your vehicle hasa tendency to understeer, which means thatthe steering wheel has to be turned more than might seem appropriate for the curva-ture of a bend. This ensures good stabilityand reduces the risk of rear wheel skid.Remember that these properties can alterwith the vehicle load. The heavier the load inthe cargo compartment, the less the ten-dency to understeer.
Related information
•
Hybrid-related information in the instrumentpanel (p. 130)
• Parking climate (preconditioning) (p. 179)
Page 369 of 546

STARTING AND DRIVING
}}
367
•Do not smoke near the battery.
• Failure to follow the instructions for jump starting can lead to injury.
Related information
• Ignition modes (p. 370)
• Starting the engine (p. 372)
• Turning the engine off (p. 374)
• Start battery (p. 479)
• Opening and closing the hood (p. 504)
• Charging the hybrid battery (p. 383)
Driving with a trailer
When towing a trailer, always observe the legal requirements of the state/province.
• All Volvo models are equipped with energy- absorbing shock-mounted bumpers. Trailerhitch installation should not interfere with theproper operation of this bumper system.
Trailer towing does not normally present any par- ticular problems, but take into consideration:
• Increase tire pressure to recommended full pressure.
• When your vehicle is new, avoid towing heavytrailers during the first 620 miles (1,000 km).
• Maximum speed when towing a trailer:50 mph (80 km/h).
• Engine and transmission are subject toincreased loads. Therefore, engine coolanttemperature should be closely watched whendriving in hot climates or hilly terrain. Use alower gear and turn off the air conditioner ifthe temperature gauge needle enters the redrange.
• If the automatic transmission begins to over-heat, a message will be displayed in the textwindow.
• Avoid overload and other abusive operation.
• Hauling a trailer affects handling, durability,and economy.
• It is necessary to balance trailer brakes withthe towing vehicle brakes to provide a safe stop (check and observe state/local regula-tions).
• Do not connect the trailer's brake systemdirectly to the vehicle's brake system.
• More frequent vehicle maintenance isrequired.
• Remove the ball holder when the hitch is notbeing used.
NOTE
• When parking the vehicle with a trailer on a hill, apply the parking brake before put- ting the gear selector in
P. Always follow
the trailer manufacturer's recommenda- tions for wheel chocking.
• When starting on a hill, put the gear selector in
D before releasing the parking
brake.
• If you use the manual (Geartronic) shift positions while towing a trailer, make surethe gear you select does not put toomuch strain on the engine (using toohigh a gear).
• The drawbar assembly/trailer hitch maybe rated for trailers heavier than the vehi-cle is designed to tow. Please adhere toVolvo's recommended trailer weights.
• Avoid driving with a trailer on inclines ofmore than 15%.
Page 370 of 546

||
STARTING AND DRIVING
368
CAUTION
The maximum trailer weights listed are only applicable for altitudes up to 3,280 ft(1000 m) above sea level. With increasingaltitude the engine power and therefore thecar's climbing ability are impaired because ofthe reduced air density, so the maximumtrailer weight has to be reduced accordingly.The weight of the vehicle and trailer must bereduced by 10% for every further 3,280 ft(1,000 m) (or part thereof). When towing5,000 lbs (2,250 kg) hill inclination is restric-ted to 14%.
WARNING
•Bumper-attached trailer hitches must not be used on Volvos, nor should safetychains be attached to the bumper.
• Trailer hitches attaching to the vehiclerear axle must not be used.
• Never connect a trailer's hydraulic brakesystem directly to the vehicle brake sys-tem, nor a trailer's lighting system directlyto the vehicle lighting system. Consultyour nearest authorized Volvo retailer forcorrect installation.
• When towing a trailer, the trailer's safetychains or wire must be correctly fastenedto the attachment points provided in thetrailer hitch on the vehicle. The safetychain or wire must never be fastened toor wound around the towing ball.
Trailer cable
An adapter is required if the vehicle's trailer hitch has a 13-pin connector and the trailer has 7 pins.Use an adapter cable approved by Volvo. Makesure the cable does not drag on the ground.
Related information
•
Detachable trailer hitch (p. 368)
• Trailer Stability Assist (TSA) (p. 369)
• Weights (p. 525)
Detachable trailer hitch
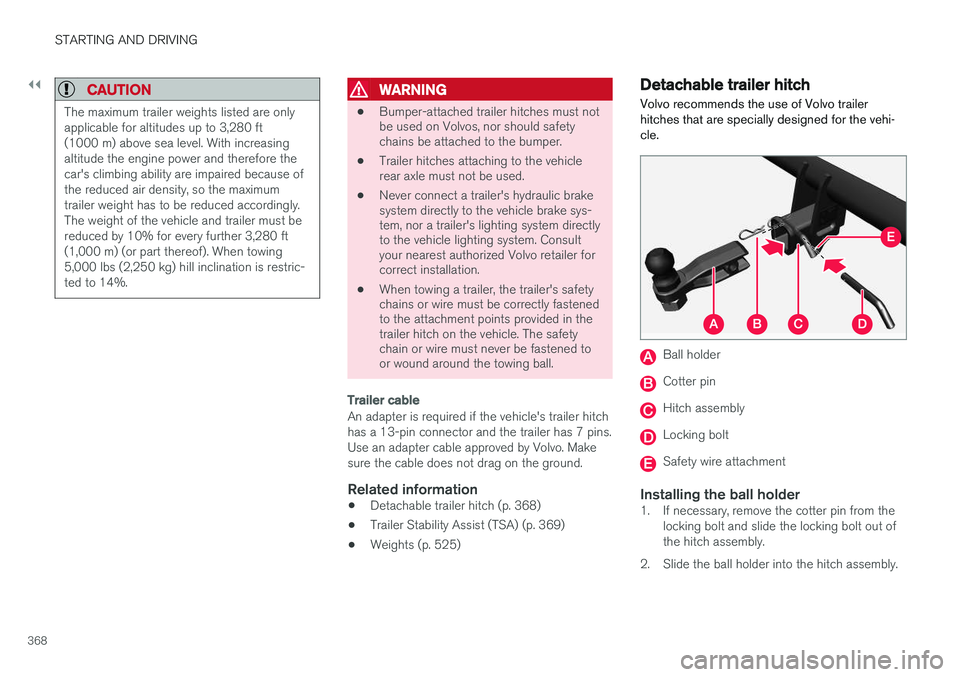
Volvo recommends the use of Volvo trailer hitches that are specially designed for the vehi-cle.
Ball holder
Cotter pin
Hitch assembly
Locking bolt
Safety wire attachment
Installing the ball holder1. If necessary, remove the cotter pin from the locking bolt and slide the locking bolt out of the hitch assembly.
2. Slide the ball holder into the hitch assembly.
Page 449 of 546

WHEELS AND TIRES
}}
447
Speed Symbol
M81 mph (130 km/h)
Q100 mph (160 km/h)
T118 mph (190 km/h)
H130 mph (210 km/h)
V149 mph (240 km/h)
W168 mph (270 km/h)
Y186 mph (300 km/h)
WARNING
•The wheel and tire sizes for your Volvo are specified to meet stringent stabilityand handling requirements. Unapprovedwheel/tire size combinations can nega-tively affect your vehicle's stability andhandling.
• Any damage caused by installation ofunapproved wheel/tire size combinationswill not be covered by your new vehiclewarranty. Volvo assumes no responsibilityfor death, injury, or expenses that mayresult from such installations.
Wheel (rim) designations Wheel and rim dimensions are shown in the fol- lowing table.
The vehicle has been certified with certain combi- nations of wheels and tires. The following table shows an
example of wheel
dimensions: 8Jx18x42.5. This wheel may not be available on your vehicle.
8Wheel width in inches
JRim flange profile
18Wheel diameter in inches
42.5Offset in mm (distance from the center of the wheel to the wheel's contact sur-face on the hub)
Related information
• Tire sidewall designations (p. 445)
Tire terminology The following is a glossary of tire-related terms.
The tire suppliers may have additional markings, notes or warnings such as standard load, radialtubeless, etc.
• Tire information placard
: A placard show-
ing the OE (Original Equipment) tire sizes, recommended inflation pressure, and themaximum weight the vehicle can carry.
• Tire Identification Number (TIN)
: A number
on the sidewall of each tire providing infor-mation about the tire brand and manufactur-ing plant, tire size and date of manufacturer.
• Inflation pressure
: A measure of the
amount of air in a tire.
• Standard load
: A class of P-metric or Metric
tires designed to carry a maximum load at35 psi [37 psi (2.5 bar) for Metric tires].Increasing the inflation pressure beyond thispressure will not increase the tires load car-rying capability.
• Extra load
: A class of P-metric or Metric
tires designed to carry a heavier maximumload at 41 psi [43 psi (2.9 bar) for Metrictires]. Increasing the inflation pressurebeyond this pressure will not increase thetire's load carrying capability.
• kPa
: Kilopascal, a metric unit of air pressure.
• PSI
: Pounds per square inch, a standard unit
of air pressure.
Page 451 of 546

WHEELS AND TIRES
}}
449
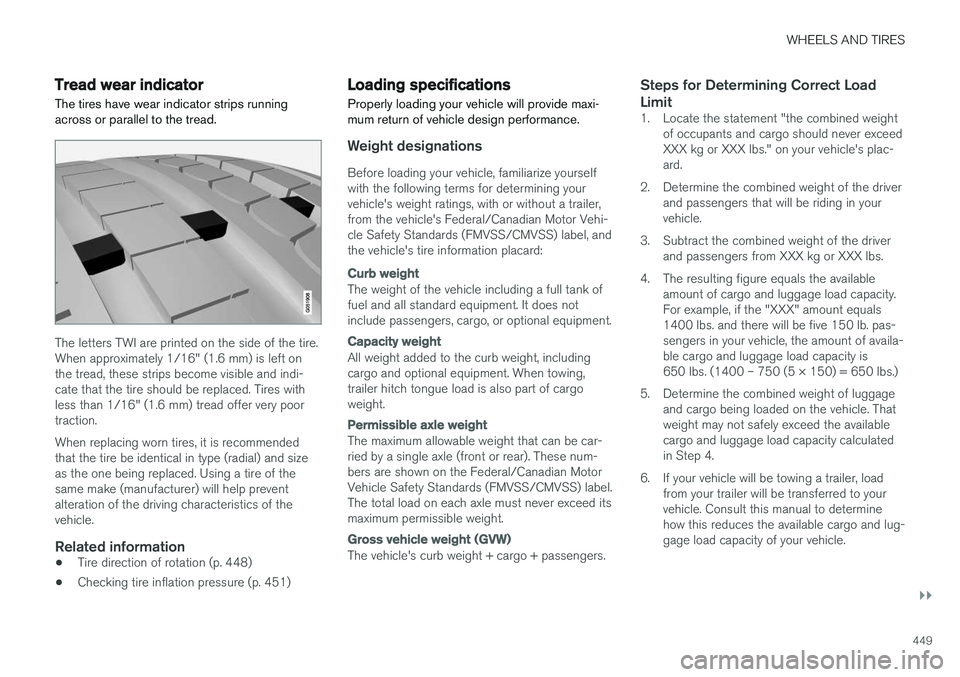
Tread wear indicatorThe tires have wear indicator strips running across or parallel to the tread.
The letters TWI are printed on the side of the tire. When approximately 1/16" (1.6 mm) is left onthe tread, these strips become visible and indi-cate that the tire should be replaced. Tires withless than 1/16" (1.6 mm) tread offer very poortraction. When replacing worn tires, it is recommended that the tire be identical in type (radial) and sizeas the one being replaced. Using a tire of thesame make (manufacturer) will help preventalteration of the driving characteristics of thevehicle.
Related information
• Tire direction of rotation (p. 448)
• Checking tire inflation pressure (p. 451)
Loading specifications Properly loading your vehicle will provide maxi- mum return of vehicle design performance.
Weight designations
Before loading your vehicle, familiarize yourself with the following terms for determining yourvehicle's weight ratings, with or without a trailer,from the vehicle's Federal/Canadian Motor Vehi-cle Safety Standards (FMVSS/CMVSS) label, andthe vehicle's tire information placard:
Curb weight
The weight of the vehicle including a full tank of fuel and all standard equipment. It does notinclude passengers, cargo, or optional equipment.
Capacity weight
All weight added to the curb weight, including cargo and optional equipment. When towing,trailer hitch tongue load is also part of cargoweight.
Permissible axle weight
The maximum allowable weight that can be car- ried by a single axle (front or rear). These num-bers are shown on the Federal/Canadian MotorVehicle Safety Standards (FMVSS/CMVSS) label.The total load on each axle must never exceed itsmaximum permissible weight.
Gross vehicle weight (GVW)
The vehicle's curb weight + cargo + passengers.
Steps for Determining Correct Load Limit
1. Locate the statement "the combined weight
of occupants and cargo should never exceed XXX kg or XXX lbs." on your vehicle's plac-ard.
2. Determine the combined weight of the driver and passengers that will be riding in yourvehicle.
3. Subtract the combined weight of the driver and passengers from XXX kg or XXX lbs.
4. The resulting figure equals the available amount of cargo and luggage load capacity.For example, if the "XXX" amount equals1400 lbs. and there will be five 150 lb. pas-sengers in your vehicle, the amount of availa-ble cargo and luggage load capacity is650 lbs. (1400 – 750 (5 × 150) = 650 lbs.)
5. Determine the combined weight of luggage and cargo being loaded on the vehicle. Thatweight may not safely exceed the availablecargo and luggage load capacity calculatedin Step 4.
6. If your vehicle will be towing a trailer, load from your trailer will be transferred to yourvehicle. Consult this manual to determinehow this reduces the available cargo and lug-gage load capacity of your vehicle.