2016 VOLVO XC90 T8 key
[x] Cancel search: keyPage 39 of 546

INTRODUCTION
}}
37
Several buttons (depending on the context for which the keyboard is being used) will bedisplayed here. In certain cases, it can be used to enter @, .com or to start a new line.
Press to hide the keyboard. In cases where this is not possible, the button will not be dis-played.
Tap once to enter one uppercase letter.
Double-tap for Caps lock (tap again to
return to lowercase letters). Letters entered after the !, . and ? characters will automati-cally be uppercase. The first letter in the textfield or in text fields intended for names,addresses or company names will also auto-matically be uppercase. The first letter in textfields intended for passwords, webaddresses or email addresses will automati-cally be lowercase unless upper case ischosen.
Press to display the numbers that can be entered. When numbers are displayed, tap
to resume entering text or to
enter special characters.
Tap to change the keyboard language (in this example, UK English is the selected lan-guage). The characters available will changeaccording to the selected language (2). Thisbutton will only be displayed if several key-board languages have been selected (seethe section "Changing keyboard languages" below). Tap to display a list of possible lan-guages and tap a language to use it.
Tap to enter blank spaces.
Tap to erase one character at a time.
Tap to enable handwriting. See the section "Handwritten text" below.
Entering text and performing searches using thekeyboard are done somewhat differently in thenavigation system. See the section "Filtering des-tination search results" below. Tap the button above the keyboard to confirm the text that has been entered (not shown in theillustration). This button's appearance differsdepending on the context.
Changing keyboard languagesIn order to change keyboard languages, they must first be selected under Settings.
The keyboard language can be changed without changing the language used for the other sys-tems/menus in the vehicle.
1. Pull down the center display's Top view and tap
Settings.
2. Tap
SystemKeyboard Layouts. 3. Select and one or more of the languages in
the list.
> The makes it possible to change the key-board layout and characters available depending on the language(s) selected.
When more than one languagehas been selected, this button (7)3
will appear on the key-
board.
To shift between keyboard languages:
1. Press and hold the button (7).
> A list will be displayed.
2. Tap the desired language. If more than four languages have been selected in
Settings,
scroll in the list.
> The keyboard layout and characters avail- able will change to the selected language.
3In the example illustration, the button shows "UK".
Page 40 of 546
||
INTRODUCTION
38
Special characters
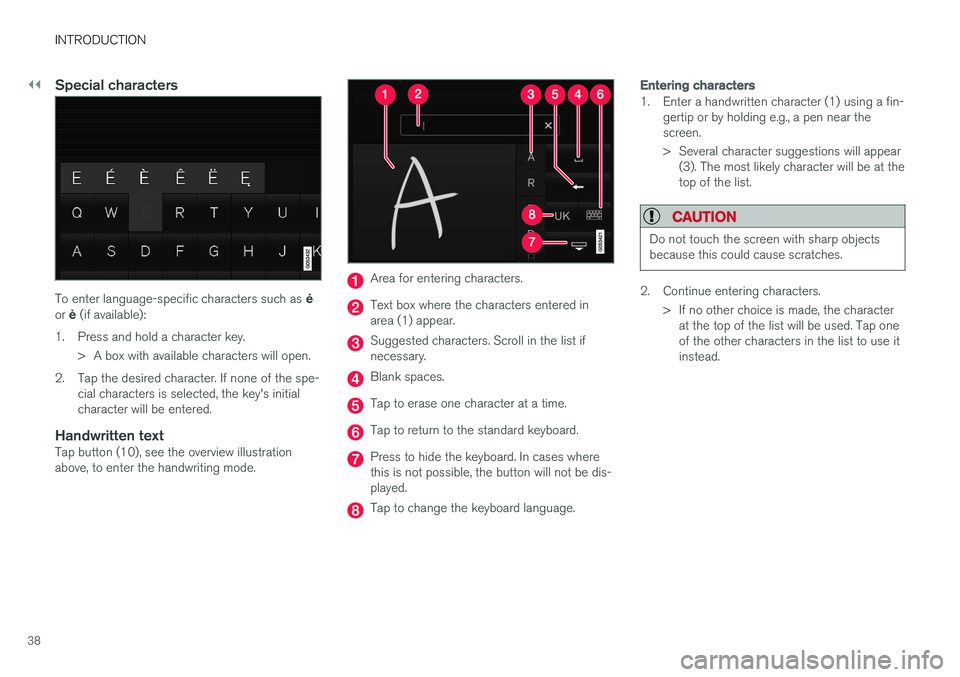
To enter language-specific characters such as é
or è (if available):
1. Press and hold a character key. > A box with available characters will open.
2. Tap the desired character. If none of the spe- cial characters is selected, the key's initial character will be entered.
Handwritten textTap button (10), see the overview illustrationabove, to enter the handwriting mode.
Area for entering characters.
Text box where the characters entered in area (1) appear.
Suggested characters. Scroll in the list if necessary.
Blank spaces.
Tap to erase one character at a time.
Tap to return to the standard keyboard.
Press to hide the keyboard. In cases where this is not possible, the button will not be dis-played.
Tap to change the keyboard language.
Entering characters
1. Enter a handwritten character (1) using a fin-gertip or by holding e.g., a pen near the screen.
> Several character suggestions will appear(3). The most likely character will be at the top of the list.
CAUTION
Do not touch the screen with sharp objects because this could cause scratches.
2. Continue entering characters.
> If no other choice is made, the characterat the top of the list will be used. Tap one of the other characters in the list to use itinstead.
Page 54 of 546
||
INTRODUCTION
52•
Downloading, updating and uninstalling apps (p. 434)
• Using the center display keyboard (p. 35)
Page 59 of 546

INTRODUCTION
* Option/accessory, for more information, see Introduction.57
Saving/deleting favorites
Save an article as a favorite by tapping the star (
) at the upper right when an article is open.
The star symbol will be filled in (
) when its arti-
cle has been saved as a favorite. To delete a favorite, tap its star again.
Using the search function1. Tap the magnifying glass icon () in the
owner's manual's upper menu. A keyboard will appear at the bottom of the screen.
2. Enter a word, e.g., "seat belt." > Suggested articles will be displayed asmore characters are entered.
3. Confirm by tapping the article. To leave search mode tap the up-arrow next to thesearch box.
Related information
• On-board digital owner's manual (p. 55)
• Using the center display keyboard (p. 35)
Glass
Laminated glass
The windshield and panoramic roof
* are made of
laminated glass, which is reinforced to help pre- vent break-ins and to provide additional sound-proofing. Laminated glass is optional for theother side windows.
Laminated glass symbol 5
Related information
•
Laminated panoramic roof
* (p. 106)
• Power windows (p. 109)
• Defrosting windows and mirrors (p. 195)
• Using sun shades (p. 111)
• Rearview mirror (p. 110)
• Power windows (p. 109)
• Head-up display (HUD)
* (p. 117)
• Activating/deactivating the rain sensor (p. 157)
• Windshield and headlight washers (p. 158)
• Tailgate window wiper and washer (p. 159)
Technician certification
In addition to Volvo factory training, Volvo sup- ports certification by the National Institute forAutomotive Service Excellence (A.S.E.).
Certified technicians have demonstrated a high degree of competence in specific areas. Besidespassing exams, each technician must also haveworked in the field for two or more years before acertificate is issued. These professional techni-cians are best able to analyze vehicle problemsand perform the necessary maintenance proce-dures to keep your Volvo at peak operating con-dition.
XC90 T8 Twin Engine Plug-in Hybrid
Technicians performing work on a vehicle with electrification should also have the necessarytraining and specialized certification required forperforming repairs and/or maintenance on avehicle with electrification.
WARNING
A number of electrical components in the XC90 T8 Twin Engine Plug-in Hybrid usehigh-voltage current and can be extremelydangerous if handled incorrectly. These com-ponents and any orange wiring in the vehiclemay only be handled by trained and qualifiedVolvo service technicians.
5 This symbol is not shown on the windshield or panoramic roof.
Page 69 of 546
SAFETY
}}
67
4. Tighten the lap section of the seat belt by
pulling the diagonal section upward toward the shoulder.
The lap section of the belt must be positioned low on the hips (not pressing against the abdomen)
Make sure that the shoulder belt is rolled up into its retractor and that the shoulder andlap belts are taut.
WARNING
Never use a seat belt for more than one occupant. Never wear the shoulder portion ofthe belt under the arm, behind the back orotherwise out of position. Such use couldcause injury in the event of an accident. Asseat belts lose much of their strength whenexposed to violent stretching, they should bereplaced after any collision, even if theyappear to be undamaged.
Unbuckling the seat beltTo remove the seat belt, press the red section on the seat belt receptacle. Before exiting the vehi-cle, check that the seat belt retracts fully afterbeing unbuckled. If necessary, guide the beltback into the retractor slot.
Related information
• Door and seat belt reminders (p. 67)
• Seat belts (p. 64)
Door and seat belt reminders
The door and seat belt reminders are intended to alert all occupants of the vehicle that theirseat belts should be buckled before the vehiclebegins to move or if a door, the hood, tailgate orfuel filler door have not been closed properly.
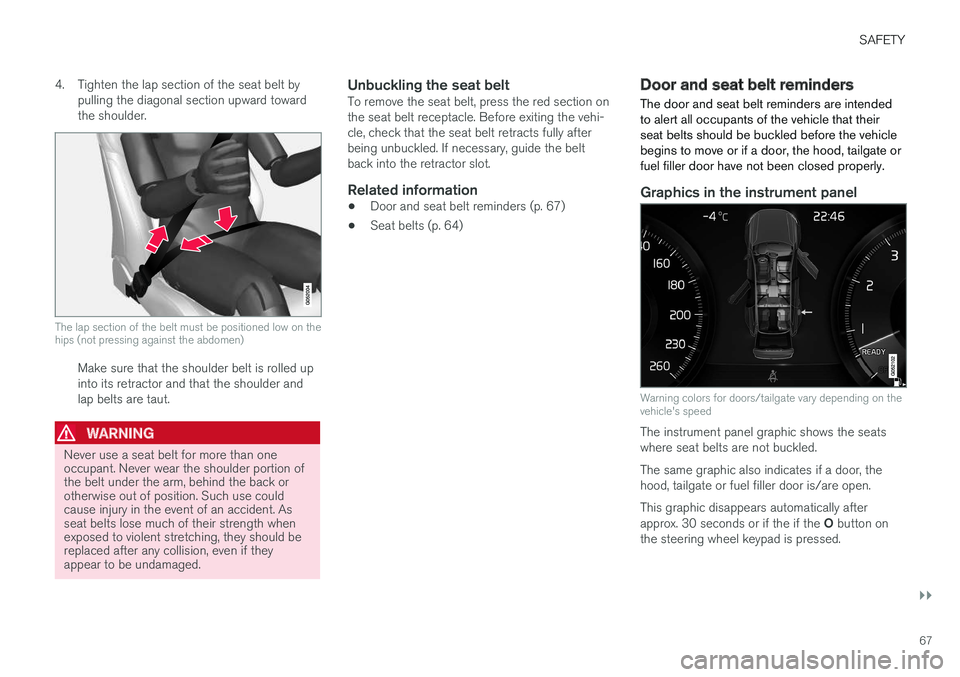
Graphics in the instrument panel
Warning colors for doors/tailgate vary depending on the vehicle's speed
The instrument panel graphic shows the seats where seat belts are not buckled. The same graphic also indicates if a door, the hood, tailgate or fuel filler door is/are open. This graphic disappears automatically after approx. 30 seconds or if the if the O button on
the steering wheel keypad is pressed.
Page 70 of 546

||
SAFETY
68
Seat belt reminder
Seat belt reminder light in ceiling console
The seat belt reminder consists of an audible signal, an indicator light nearthe rearview mirror and a symbol in theinstrument panel that alert all occu-
pants of the vehicle to buckle their seat belts.
The audible signal is speed-dependent and will sound for several seconds. If the driver's or a passenger's seat belt is not buckled, this will be indicated in the instrumentpanel. Child seats are not included in the seat belt reminder system.
Front seats
An audible signal and an indicator light will remind the driver and front seat passenger tobuckle their seat belts.
Rear seats
The rear seat belt reminder has two functions.
• It indicates which seat belts are buckled in the rear seats. This will also be displayed inan instrument panel graphic.
• It also provides audio and visual reminders ifa rear seat belt is unbuckled while the vehi-cle is in motion. The reminders will disappearwhen the seat belt has been buckled again or can be erased by pressing the
O button
on the steering wheel keypad.
Door/hood/tailgate/fuel filler door
reminder
If a door, the hood, tailgate or fuel filler door is/are not properly closed, this will be indicated ina graphic in the instrument panel. Stop the vehi-cle safely and close the source of the reminder.
If the vehicle is moving at a speedunder approx.6 mph (10 km/h), theinformation symbol will illuminate in theinstrument panel.
At speeds above approx. 6 mph (10 km/h), the warning symbol will illu-minate in the instrument panel.
Related information
•Seat belts (p. 64)
• Buckling and unbuckling seat belts (p. 65)
Child safety
Children should always be seated safely when traveling in the vehicle.
General informationVolvo recommends the proper use of restraint systems for all occupants including children.Remember that, regardless of age and size, achild should always be properly restrained in avehicle. Your vehicle is also equipped with ISOFIX/ LATCH attachments, which make it more conven-ient to install child seats. Some restraint systems for children are designed to be secured in the vehicle by lap belts or thelap portion of a lap-shoulder belt. Such childrestraint systems can help protect children invehicles in the event of an accident only if theyare used properly. However, children could beendangered in a crash if the child restraints arenot properly secured in the vehicle. Failure to fol-low the installation instructions for your childrestraint can result in your child striking the vehi-cle's interior in a sudden stop. Holding a child in your arms is NOT a suitable substitute for a child restraint system. In an acci-dent, a child held in a person's arms can becrushed between the vehicle's interior and anunrestrained person. The child could also beinjured by striking the interior, or by being ejectedfrom the vehicle during a sudden maneuver or
Page 99 of 546
INSTRUMENTS AND CONTROLS
}}
97
Tourist (alternative speedometer)This is an alternative digital speedometer can be used when driving in areas in which the speedlimit is listed in a different unit of measure. If the speedometer is in mph, this gauge will show the
vehicle's speed in km/h and vice versa.
Related information
•Displaying trip computer information (p. 97)
• Displaying trip statistics (p. 98)
Displaying trip computer information
The trip computer registers and calculates infor- mation such as distance driven, fuel consump-tion and average speed. This information is dis-played in the instrument panel.
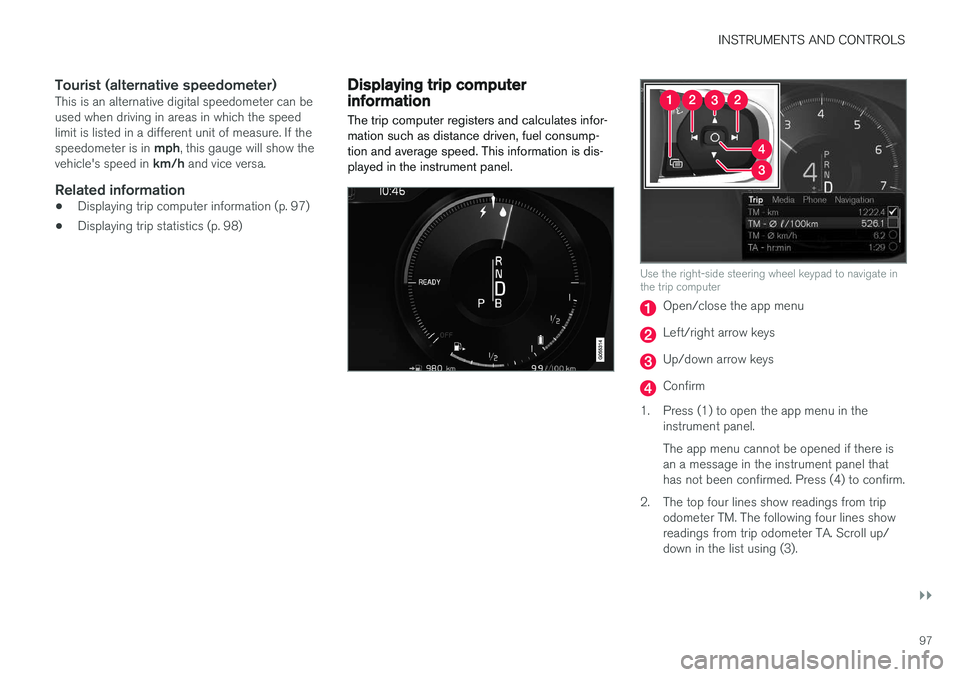
Use the right-side steering wheel keypad to navigate in the trip computer
Open/close the app menu
Left/right arrow keys
Up/down arrow keys
Confirm
1. Press (1) to open the app menu in the instrument panel. The app menu cannot be opened if there is an a message in the instrument panel thathas not been confirmed. Press (4) to confirm.
2. The top four lines show readings from trip odometer TM. The following four lines showreadings from trip odometer TA. Scroll up/down in the list using (3).
Page 107 of 546
INSTRUMENTS AND CONTROLS
}}
* Option/accessory, for more information, see Introduction.105
Adjusting the power door mirrors
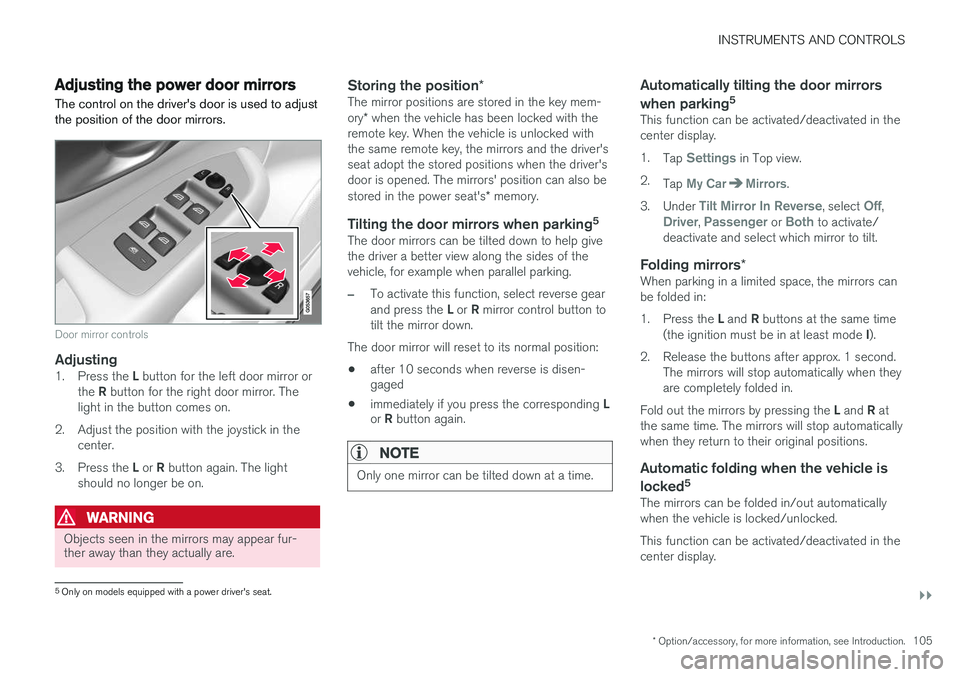
The control on the driver's door is used to adjust the position of the door mirrors.
Door mirror controls
Adjusting1. Press the L button for the left door mirror or
the R button for the right door mirror. The
light in the button comes on.
2. Adjust the position with the joystick in the center.
3. Press the L or R button again. The light
should no longer be on.
WARNING
Objects seen in the mirrors may appear fur- ther away than they actually are.
Storing the position *The mirror positions are stored in the key mem- ory* when the vehicle has been locked with the
remote key. When the vehicle is unlocked with the same remote key, the mirrors and the driver'sseat adopt the stored positions when the driver'sdoor is opened. The mirrors' position can also be stored in the power seat's * memory.
Tilting the door mirrors when parking 5The door mirrors can be tilted down to help give the driver a better view along the sides of thevehicle, for example when parallel parking.
–To activate this function, select reverse gear and press the
L or R mirror control button to
tilt the mirror down.
The door mirror will reset to its normal position:
• after 10 seconds when reverse is disen- gaged
• immediately if you press the corresponding
L
or R button again.
NOTE
Only one mirror can be tilted down at a time.
Automatically tilting the door mirrors when parking 5
This function can be activated/deactivated in the center display. 1.
Tap
Settings in Top view.
2. Tap
My CarMirrors.
3. Under
Tilt Mirror In Reverse, select Off,Driver, Passenger or Both to activate/
deactivate and select which mirror to tilt.
Folding mirrors *When parking in a limited space, the mirrors can be folded in: 1.
Press the L and R buttons at the same time
(the ignition must be in at least mode I).
2. Release the buttons after approx. 1 second. The mirrors will stop automatically when they are completely folded in.
Fold out the mirrors by pressing the L and R at
the same time. The mirrors will stop automaticallywhen they return to their original positions.
Automatic folding when the vehicle is
locked 5
The mirrors can be folded in/out automaticallywhen the vehicle is locked/unlocked. This function can be activated/deactivated in the center display.
5
Only on models equipped with a power driver's seat.