2016 VOLVO V60 CROSS COUNTRY wheel
[x] Cancel search: wheelPage 246 of 402

||
07 Driver support
07
244
WARNING
Keep in mind that the image on the screen only shows the area behind the vehicle.The driver must always watch for people,animals, other vehicles, etc., near the sidesof the vehicle when turning while backingup.
Marker lines
The PAC system's lines
The unobstructed area behind the vehicle
"Wheel tracks"
The dashed line (1) indicates the clear zone of approximately 5 feet (1.5 m) behind thebumper. These lines also indicate the outer-most limits that any object (door mirrors, cor-ners of the body, etc.) extends out from thevehicle, even when it turns. The "wheel tracks" (2) show where the wheelswill roll and can extend up to approximately10.5 ft (3.2 m) behind the bumper if there areno objects in the way.
Vehicles equipped with Park Assist
Colored markers (one for each sensor) indicate distance If the vehicle is equipped with the optional Park Assist system (see Park assist – intro-duction (p. 232)), the distance to an objectwill be indicated more exactly and coloredmarkers in the display indicate which of thesensor(s) has detected the object.
ColorDistance to object
Pale yellow2.3–5 ft (0.7–1.5 m )
Yellow1.6–2.3 ft (0.5–0.7 m)
ColorDistance to object
Orange1–1.6 ft (0.3–0.5 m)
Red0–1 ft (0–0.3 m)
Related information
•
Rear Park Assist Camera (PAC) – opera- tion (p. 242)
• Rear Park Assist Camera (PAC) – limita-tions (p. 245)
Page 249 of 402
07 Driver support
07
}}
* Option/accessory, for more information, see Introduction.247
BLIS* – operation
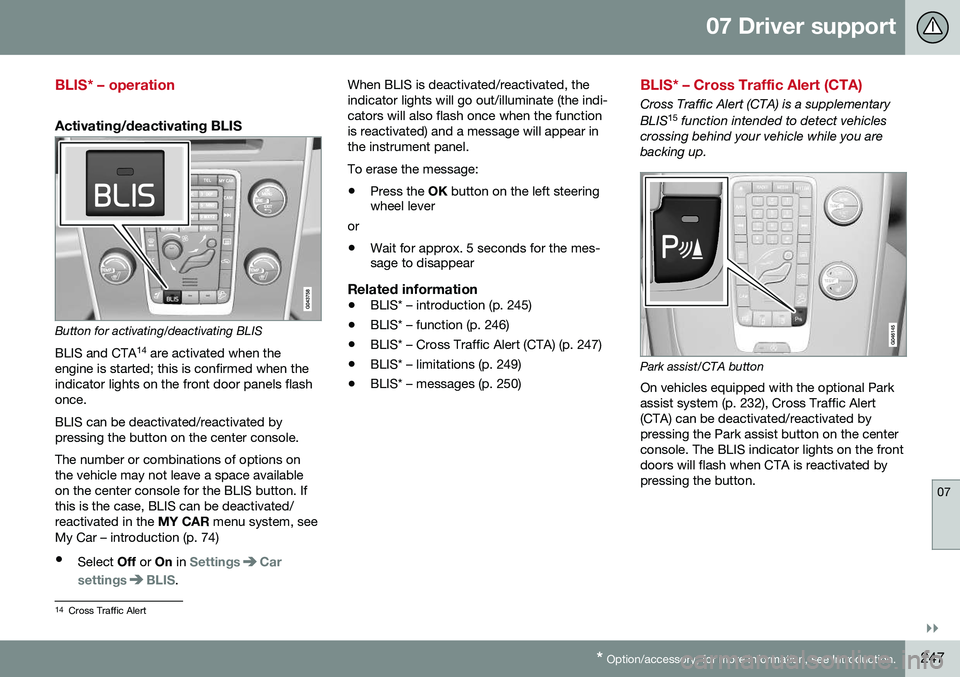
Activating/deactivating BLIS
Button for activating/deactivating BLIS BLIS and CTA 14
are activated when the
engine is started; this is confirmed when the indicator lights on the front door panels flashonce. BLIS can be deactivated/reactivated by pressing the button on the center console. The number or combinations of options on the vehicle may not leave a space availableon the center console for the BLIS button. Ifthis is the case, BLIS can be deactivated/reactivated in the MY CAR menu system, see
My Car – introduction (p. 74)
• Select Off or On in
SettingsCar
settings
BLIS. When BLIS is deactivated/reactivated, the indicator lights will go out/illuminate (the indi-cators will also flash once when the functionis reactivated) and a message will appear inthe instrument panel. To erase the message: •
Press the
OK button on the left steering
wheel lever
or
• Wait for approx. 5 seconds for the mes- sage to disappear
Related information
•BLIS* – introduction (p. 245)
• BLIS* – function (p. 246)
• BLIS* – Cross Traffic Alert (CTA) (p. 247)
• BLIS* – limitations (p. 249)
• BLIS* – messages (p. 250)
BLIS* – Cross Traffic Alert (CTA)
Cross Traffic Alert (CTA) is a supplementary BLIS 15
function intended to detect vehicles
crossing behind your vehicle while you are backing up.
Park assist/CTA button On vehicles equipped with the optional Park assist system (p. 232), Cross Traffic Alert(CTA) can be deactivated/reactivated bypressing the Park assist button on the centerconsole. The BLIS indicator lights on the frontdoors will flash when CTA is reactivated bypressing the button.
14 Cross Traffic Alert
Page 252 of 402
07 Driver support
07
250* Option/accessory, for more information, see Introduction.
BLIS* – messages
If BLIS/CTA 18
are not functioning normally, a
symbol will illuminate in the instrument panel and a text message will be displayed. Followany instructions that may be provided. These messages include:
MessageSystem status
CTA OFFCTA has been switched off manually. BLIS remainsactive.
BLIS and CTA OFFTrailerattachedBLIS and CTA are tempo- rarily deactivated becausea trailer's wiring has beenconnected to the vehicle'selectrical system.
BLIS and CTA Serv-ice requiredBLIS and CTA are not functioning normally.
• If this message recurs, the systems should beinspected by a trainedand qualified Volvoservice technician.
Messages can be erased by pressing the
OK
button on the left steering wheel lever.
Related information
• BLIS* – introduction (p. 245)
• BLIS* – function (p. 246)
• BLIS* – operation (p. 247)
• BLIS* – Cross Traffic Alert (CTA) (p. 247)
• BLIS* – limitations (p. 249)
18
Cross Traffic Alert
Page 254 of 402

08 Starting and driving
08
252* Option/accessory, for more information, see Introduction.
Starting the engine
The engine can be started/switched off using the remote key and the START/STOP
ENGINE button.
Ignition slot with remote key inserted (see Igni- tion modes (p. 77) for more information on igni-tion modes)
WARNING
Before starting the engine:
• Fasten the seat belt.
• Check that the seat, steering wheel and mirrors are adjusted properly.
• Make sure the brake pedal can bedepressed completely. Adjust the seatif necessary.
WARNING
•Never use more than one floor mat at a time on the driver's floor. Beforedriving, remove the original mat fromthe driver's seat floor before using anyother type of floor mat. Any mat usedin this position should be securely andproperly anchored in the attachingpins. An extra mat on the driver's floorcan cause the accelerator and/orbrake pedal to catch. Check that themovement of these pedals is not impe-ded.
• Volvo's floor mats are specially manu-factured for your car. They must befirmly secured in the clips on the floorso that they cannot slide and becometrapped under the pedals on the driv-er's side.
1. Press the remote key into the ignition slot
as far as possible, with the metallic key blade pointing outward (not inserted into the slot) 1
.
2. Depress the brake pedal 2
. 3. Press and release the
START/STOP
ENGINE button. The autostart function
will operate the starter motor until the engine starts or until its overheating func-tion stops it. The starter motor operates for a maxi- mum of 10 seconds. If the engine has notstarted, repeat the procedure.
CAUTION
If the engine does not start after the third try, wait for approximately 3 minutesbefore trying to start it again to give thebattery time to recover its startingcapacity.
NOTE
Keyless drive *
To start a vehicle equipped with the key- less drive feature, one of the remote keysmust be in the passenger compartment.Follow the instructions in steps 2 and 3 tostart the vehicle.
1 On vehicles with the optional keyless drive, it is only necessary to have a remote key in the passenger’s compartment.
2 If the vehicle is moving, it is only necessary to press the START/STOP ENGINE button to start the vehicle.
Page 259 of 402
08 Starting and driving
08
}}
257
Transmission – general information
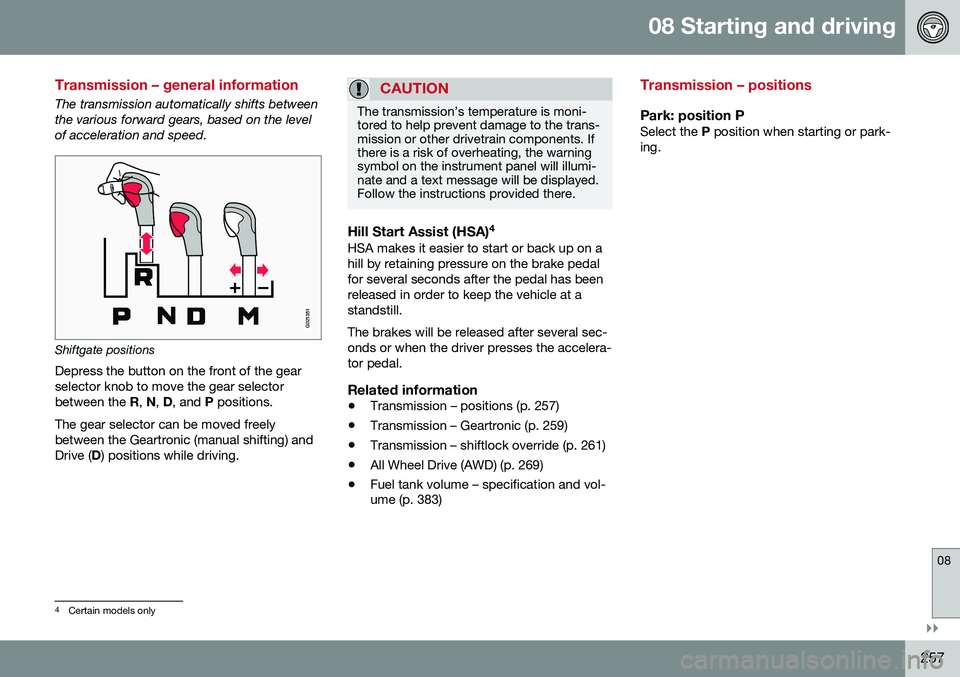
The transmission automatically shifts between the various forward gears, based on the levelof acceleration and speed.
G021351
Shiftgate positions
Depress the button on the front of the gear selector knob to move the gear selectorbetween the R, N , D , and P positions.
The gear selector can be moved freelybetween the Geartronic (manual shifting) andDrive ( D) positions while driving.
CAUTION
The transmission’s temperature is moni- tored to help prevent damage to the trans-mission or other drivetrain components. Ifthere is a risk of overheating, the warningsymbol on the instrument panel will illumi-nate and a text message will be displayed.Follow the instructions provided there.
Hill Start Assist (HSA) 4HSA makes it easier to start or back up on a hill by retaining pressure on the brake pedalfor several seconds after the pedal has beenreleased in order to keep the vehicle at astandstill. The brakes will be released after several sec- onds or when the driver presses the accelera-tor pedal.
Related information
•
Transmission – positions (p. 257)
• Transmission – Geartronic (p. 259)
• Transmission – shiftlock override (p. 261)
• All Wheel Drive (AWD) (p. 269)
• Fuel tank volume – specification and vol- ume (p. 383)
Transmission – positions
Park: position PSelect the
P position when starting or park-
ing.
4 Certain models only
Page 262 of 402
||
08 Starting and driving
08
260* Option/accessory, for more information, see Introduction.
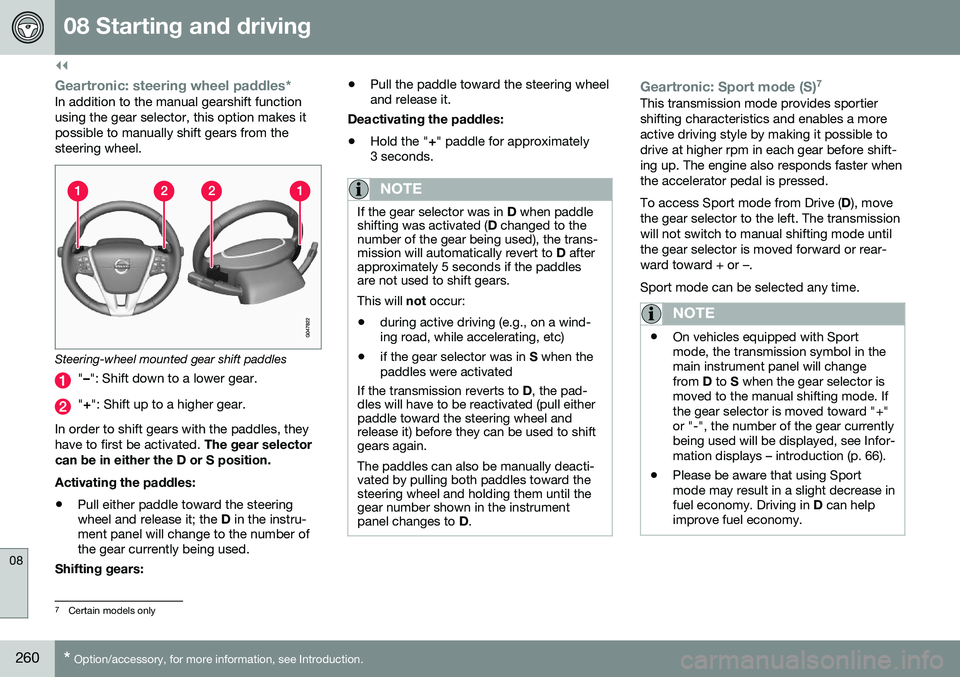
Geartronic: steering wheel paddles*In addition to the manual gearshift function using the gear selector, this option makes itpossible to manually shift gears from thesteering wheel.
Steering-wheel mounted gear shift paddles
" – ": Shift down to a lower gear.
"+ ": Shift up to a higher gear.
In order to shift gears with the paddles, they have to first be activated. The gear selector
can be in either the D or S position. Activating the paddles:
• Pull either paddle toward the steering wheel and release it; the
D in the instru-
ment panel will change to the number ofthe gear currently being used.
Shifting gears: •
Pull the paddle toward the steering wheeland release it.
Deactivating the paddles: • Hold the "
+" paddle for approximately
3 seconds.
NOTE
If the gear selector was in D when paddle
shifting was activated ( D changed to the
number of the gear being used), the trans- mission will automatically revert to D after
approximately 5 seconds if the paddlesare not used to shift gears. This will not occur:
• during active driving (e.g., on a wind- ing road, while accelerating, etc)
• if the gear selector was in
S when the
paddles were activated
If the transmission reverts to D, the pad-
dles will have to be reactivated (pull either paddle toward the steering wheel andrelease it) before they can be used to shiftgears again. The paddles can also be manually deacti- vated by pulling both paddles toward thesteering wheel and holding them until thegear number shown in the instrumentpanel changes to D.
Geartronic: Sport mode (S) 7This transmission mode provides sportier shifting characteristics and enables a moreactive driving style by making it possible todrive at higher rpm in each gear before shift-ing up. The engine also responds faster whenthe accelerator pedal is pressed. To access Sport mode from Drive (
D), move
the gear selector to the left. The transmission will not switch to manual shifting mode untilthe gear selector is moved forward or rear-ward toward + or –. Sport mode can be selected any time.
NOTE
• On vehicles equipped with Sport mode, the transmission symbol in themain instrument panel will changefrom
D to S when the gear selector is
moved to the manual shifting mode. Ifthe gear selector is moved toward "+"or "-", the number of the gear currentlybeing used will be displayed, see Infor-mation displays – introduction (p. 66).
• Please be aware that using Sportmode may result in a slight decrease infuel economy. Driving in
D can help
improve fuel economy.
7 Certain models only
Page 263 of 402
08 Starting and driving
08
261
Geartronic: starting on slippery surfaces
Selecting 3rd gear in Geartronic’s manual shifting mode can help provide better tractionwhen starting off on slippery surfaces. To doso:
1. Depress the brake pedal and move thegear selector to the side from D toward
+S– .
2. Press the gear selector forward and release it (this selects 2nd gear). Press the selector forward again and release itto select 3rd gear. The optional steeringwheel paddles can also be used; see theprevious section "Geartronic: steeringwheel paddles."
3. Release the brake pedal and press gently on the accelerator pedal.
Related information
• Transmission – general information (p. 257)
• Transmission – positions (p. 257)
• Transmission – shiftlock override (p. 261)
• Fuel tank volume – specification and vol-ume (p. 383)
Transmission – shiftlock override
If the vehicle cannot be driven, for example because of a dead battery, the gear selectormust be moved from the
P position before the
vehicle can be moved 8
.
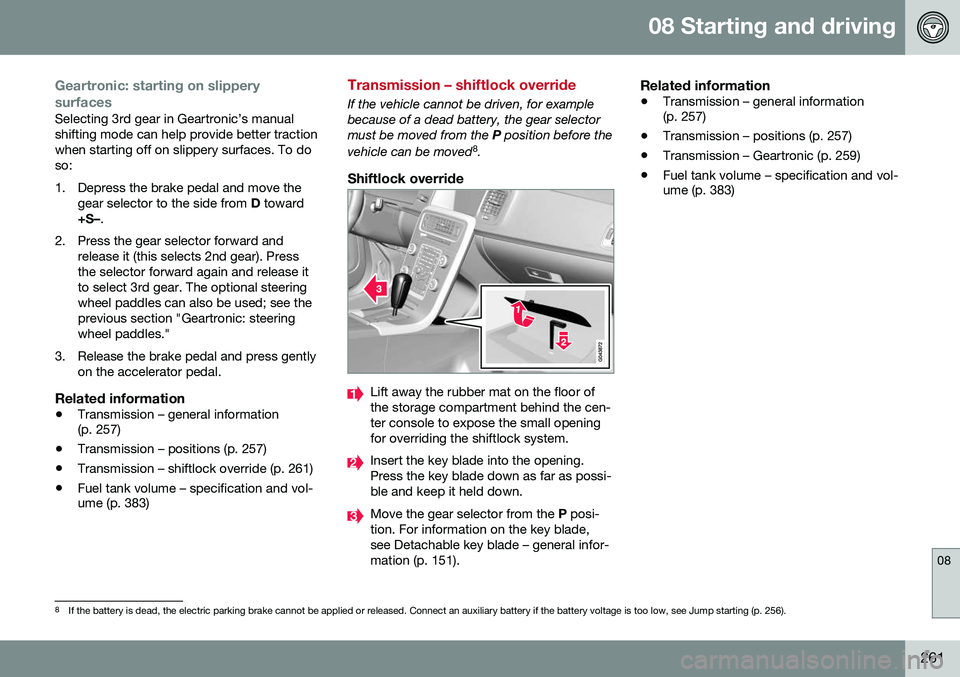
Shiftlock override
Lift away the rubber mat on the floor of the storage compartment behind the cen-ter console to expose the small openingfor overriding the shiftlock system.
Insert the key blade into the opening. Press the key blade down as far as possi-ble and keep it held down.
Move the gear selector from the P posi-
tion. For information on the key blade, see Detachable key blade – general infor-mation (p. 151).
Related information
• Transmission – general information (p. 257)
• Transmission – positions (p. 257)
• Transmission – Geartronic (p. 259)
• Fuel tank volume – specification and vol-ume (p. 383)
8
If the battery is dead, the electric parking brake cannot be applied or released. Connect an auxiliary battery if the battery voltage is too low, see Jump starting (p. 256).
Page 266 of 402
||
08 Starting and driving
08
264* Option/accessory, for more information, see Introduction.
Condition/situation
The driver is turning the steering wheel hard.
The road's incline is very steep.
A trailer's electrical system is connected to the vehicle.
The hood has been opened A
.
The transmission has not reached its nor- mal operating temperature.
Atmospheric pressure is below a level equivalent to an altitude of approx. 4,900–8,200 ft (1500–2500 m) above sea level.The actual pressure is also affected by cur-rent weather conditions.
The Adaptive Cruise Control's* Queue Assist feature is activated.
The gear selector is in the SB
or " +/–" posi-
tion.
A Certain engines only
B Sport mode (where applicable)
Related information
• Start/Stop – introduction (p. 262)
• Start/Stop – function (p. 262)
• Start/Stop – settings (p. 265)
• Start/Stop – Auto-start exceptions (p. 264) •
Start/Stop – Hill Start Assist (HSA)(p. 262)
• Start/Stop – symbols and messages(p. 266)
Start/Stop – Auto-start exceptions
In certain situations or conditions, the engine may auto-start
even though the driver is still
pressing the brake pedal, such as if:
Condition/situation
Condensation forms on the windows.
The climate system cannot keep the desired settings in the passenger compart-ment.
Electrical current consumption is tempo- rarily high or the main battery's charge isbelow the minimum level.
The brake pedal is pumped repeatedly.
The hood has been opened A
.
The vehicle begins to move or increases speed slightly (if the engine auto-stoppedbefore the vehicle was at a standstill (seeECO* (p. 267))).
The driver unbuckles his/her seat belt while the gear selector is in the D or N positions.
The steering wheel is turned A
.