2016 VOLVO V60 CROSS COUNTRY ignition
[x] Cancel search: ignitionPage 291 of 402

08 Starting and driving
08
}}
289
be switched off (but will be on again the next time the engine is started)
• TSA may not intervene when the vehicleand trailer begin to sway if the driver triesto compensate for the swaying motion bymoving the steering wheel rapidly
How TSA worksOnce swaying has begun, it can be very diffi- cult to stop, which makes it difficult to controlthe vehicle and trailer. The TSA system continuously monitors the vehicle's movements, particularly lateralmovement. If the system detects a tendencyto sway, the brakes are applied individuallyon the front wheels, which has a stabilizingeffect on the vehicle and trailer. This is oftenenough to enable the driver to regain controlof the vehicle. If this is not adequate to stop the swaying motion, the brakes are applied to all of thewheels on the vehicle and on the trailer if it isequipped with brakes, and engine power istemporarily reduced. As the swaying motionbegins to decrease and the vehicle-trailerhave once again become stable, TSA will nowstop regulating the brakes/engine power andthe driver regains control of the vehicle.
Related information
• Towing a trailer (p. 287)
• Loading – general (p. 139)
Towing the vehicle
Always check with state and local authorities before attempting to tow another vehiclebecause this type of towing is subject to reg-ulations regarding maximum towing speed,length and type of towing device, lighting, etc.
1. With the remote key fully pressed into the
ignition slot 20
, press START/STOP
ENGINE for approximately 2 seconds to
activate ignition mode II. 2. The remote key must remain in the igni-
tion slot 21
for the entire time that the vehi-
cle is being towed.
3. Keep the tow rope taut when the towing vehicle slows down by applying light pressure on the brake pedal. This willhelp prevent jarring movements of thevehicle being towed.
4. Be prepared to apply the brakes to stop the vehicle being towed.
20Not necessary in vehicles with the optional keyless drive.
Page 293 of 402

08 Starting and driving
08
* Option/accessory, for more information, see Introduction.291
WARNING
• When the vehicle is being towed, the ignition should be in mode
II (in mode
I , all of the vehicle's airbags are deac-
tivated). For more information, seeIgnition modes (p. 77)
• Never remove the remote key from theignition slot when the vehicle is beingtowed. For vehicles with keyless drive,the remote key must remain inside thevehicle.
• The power brakes and power steeringwill not function when the engine is notrunning. Approximately 5 times morepressure will be required on the brakepedal and the steering wheel will beconsiderably harder to turn.
• The towing eyelets must not be usedfor pulling the vehicle out of a ditch orfor any similar purpose involvingsevere strain.
Related information
•
Towing the vehicle (p. 289)
• Towing by tow truck (p. 291)
Towing by tow truck
When necessary, call for professional help from an authorized towing company. Volvorecommends the use of flat bed equipment.
CAUTION
In certain conditions, the towing eyelet may be used to pull the vehicle onto aflatbed tow truck.
• The vehicle's position and ground clearance determine if it can be pulledup onto a flatbed tow truck using thetowing eyelet.
• If the angle of the tow truck’s ramp istoo steep or the ground clearanceunder the vehicle is insufficient, dam-age could occur by attempting to pullthe vehicle using the towing eyelet.
• If necessary, lift the vehicle using thetow truck’s lifting device.
WARNING
No person or object should be behind the tow truck while the vehicle is being pulledup onto the flatbed.
CAUTION
• The vehicle should always be towed in the forward direction.
• Vehicles with All Wheel Drive (AWD)*that are being towed with the frontwheels off the ground should not betowed at a speed above approx.45 mph (70 km/h) and should not betowed farther than 30 miles (50 km).
Related information
•
Towing eyelet (p. 290)
Page 314 of 402

||
09 Wheels and tires
09
312
NOTE
If a malfunction occurs in the system, the tire pressure warning light will flash forapproximately 1 minute and then remain illuminated.
Tire press. syst Service
required will be displayed.
Related information
• Tire Pressure Monitoring System (TPMS) – recalibrating (p. 313)
• Tire Pressure Monitoring System (TPMS)– messages (p. 314)
• Tire Pressure Monitoring System (TPMS)– activating/deactivating (p. 314)
• Tire Pressure Monitoring System (TPMS)– changing wheels (p. 312)
Tire Pressure Monitoring System (TPMS) – changing wheels
Please keep the following in mind when changing or replacing the factory installedTPMS wheels/tires on the vehicle: •
Not all aftermarket wheels are equipped with TPMS sensors in the valves.
• If the vehicle is equipped with a tempo-rary spare tire, this tire does not have aTPMS sensor.
• If wheels without TPMS sensors aremounted on the vehicle, a text messagewill displayed in the instrument paneleach time the vehicle is driven above20 mph (30 km/h) for 10 minutes or more.
• Once TPMS sensors are properly instal-led, the warning message should notreappear. If the message is still displayed,drive the vehicle for several minutes at aspeed of 20 mph (30 km/h) or faster toerase the message.
• Volvo recommends that TPMS sensorsbe fitted on all wheels used on the vehi-cle, including winter tires. Volvo does notrecommend moving sensors back andforth between sets of wheels.
CAUTION
When inflating tires with TPMS sensors, press the pump's mouthpiece straightonto the valve to help avoid bending orotherwise damaging the valve.
CAUTION
• After inflating the tires, always reinstall the valve cap to help avoid damage tothe valve from dirt, gravel, etc.
• Use plastic valve caps only. Metalcaps could corrode and become diffi-cult to remove.
NOTE
•
If you change to tires with a different dimension than the factory-installedones, the TPMS system must bereconfigured for these tires. This mustbe done by a trained and qualifiedVolvo service technician.
• If a tire is changed, or if the TPMS sen-sor is moved to another wheel, thesensor's seal, nut, and valve coreshould be replaced.
• When installing TPMS sensors, thevehicle must be parked for at least15 minutes with the ignition off. If thevehicle is driven within 15 minutes, aTPMS error message will be displayed.
Page 315 of 402

09 Wheels and tires
09
* Option/accessory, for more information, see Introduction.313
Related information
• Tire Pressure Monitoring System (TPMS) – general information (p. 311)
• Tire Pressure Monitoring System (TPMS)– recalibrating (p. 313)
• Tire Pressure Monitoring System (TPMS)– messages (p. 314)
• Tire Pressure Monitoring System (TPMS)– activating/deactivating (p. 314)
Tire Pressure Monitoring System (TPMS) – recalibrating
In certain cases, it may be necessary to recali- brate TPMS to conform to Volvo's recom-mended tire inflation pressures (see the infla-tion pressure table in Tire inflation – pressuretable (p. 305)), for example, if higher inflationpressure is necessary when transportingheavy loads, etc.
Recalibrating TPMS (Canadian models only)*
This is done in the vehicle's menu system. To recalibrate:
1. Switch off the engine.
2. Inflate the tires to the desired pressure
and put the ignition in mode I or II (see
Ignition modes (p. 77) for additional infor- mation).
3. Press the MY CAR key in the center con-
sole control panel and select
Settings
Car settingsTire pressure.
4. Press OK/MENU , select
Calibrate tire
pressure and press OK/MENU again. 5. Drive the vehicle at a speed above
20 mph (30 km/h) continuously for at least 10 minutes.
> Calibration is done automatically onceinitiated by the driver and the system does not give any confirmation whencalibration is finished.
The new pressures are used until step 1-5above are repeated.
Related information
• Tire Pressure Monitoring System (TPMS) – general information (p. 311)
• Tire Pressure Monitoring System (TPMS)– messages (p. 314)
• Tire Pressure Monitoring System (TPMS)– activating/deactivating (p. 314)
• Tire Pressure Monitoring System (TPMS)– changing wheels (p. 312)
• My Car – introduction (p. 74)
Page 316 of 402

09 Wheels and tires
09
314
Tire Pressure Monitoring System (TPMS) – activating/deactivating
Activating/deactivating TPMS
(Canadian models only)
1. Switch off the engine.
2. Put the ignition in mode I or II (see Igni-
tion modes (p. 77) for additional informa- tion).
3. Press the MY CAR key in the center con-
sole control panel and select
Settings
Car settingsTire pressure
4. Select Tire monitoring and press OK/
MENU to turn the system on or off.
Related information
•Tire Pressure Monitoring System (TPMS) – general information (p. 311)
Tire Pressure Monitoring System (TPMS) – messages
Erasing warning messagesWhen a low tire pressure warning message has been displayed and the tire pressure warning light in the instrument panell (
)
has come on:
1. Use a tire pressure gauge to check the inflation pressure of all four tires.
2. Re-inflate the tire(s) to the correct pres- sure (consult the tire pressure placard located on the driver's side B-pillar (thestructural member at the side of the vehi-cle, at the rear of the driver's door open-ing) or the inflation pressure table, seeTire inflation – pressure table (p. 305).
3. In certain cases, it may be necessary to drive the vehicle for several minutes at aspeed of 20 mph (30 km/h) or faster. Thiswill erase the warning text and the telltalewill go out.
NOTE
•Tire monitoring systems use a tem- perature compensated pressure value.This pressure value is dependent ontire temperature and ambient tempera-ture, which can differ from the recom-mended cold tire pressure in the tireinflation table and on the tire pressureplacard located on the driver's side B-pillar (the structural member at theside of the vehicle, at the rear of thedriver's door opening). This meansthat it may sometimes be necessary toinflate them slightly above the recom-mended cold pressure value(approx. 3-4 psi or 0.2-0.3 bar) in orderto reset a low tire pressure warning.
• To help avoid incorrect tire inflationpressure, if possible only inflate thetires when they are cold. The tires areconsidered to be cold when they havethe same temperature as the sur-rounding (ambient) air. This tempera-ture is normally reached after the vehi-cle has been parked for at least3 hours. After driving a distance ofapproximately 1 mile (1.6 km), the tiresare considered to be hot.
Page 318 of 402

09 Wheels and tires
09
316
Calibrating Tire Monitor
In order for Tire Monitor to work correctly, tire pressure reference values must be set. Thismust be done each time wheels or tire pres-sures are changed.
Calibration1. Switch off the engine.
2. Inflate the tires to the desired pressure(consult tire pressure placard located on the driver's side B-pillar (the structuralmember at the side of the vehicle) andput the ignition in mode II, see Ignition
modes (p. 77).
3. Press the MY CAR button on the center
console control panel and select
Settings
Car settingsTire monitoring.
4. Press OK/MENU , select
Calibrate tire
pressure and press OK/MENU again.
5. Drive away. > The calibration process will be comple-ted while driving and will be interrupted if the vehicle is parked and the engineis switched off. Calibration continuesautomatically when driving resumes.The system will not give any confirma-tion when calibration is finishedalthough it will state if calibration fails.
The new reference values will be used untilsteps 1-5 stated above are repeated.
NOTE
Always remember to calibrate Tire Monitor when the wheels have been changed orthe tire pressure has been correctedaccording to tire pressure placard or tirepressure table. If correct reference valueshave not been set, the system cannotissue low tire pressure alerts correctly.
Tire Monitor status information
The current status of the system and the tires is indicated by color-coded graphics. This status can be displayed by pressing the MY CAR button on the center console and
going to
SettingsCar settingsTire
monitoring.
The following color-coded graphics indicate:
• All green
: the system is operational and
all tire pressures are at or above the rec- ommended levels.
• One yellow wheel
: the tire indicated is
under-inflated.
• All wheels yellow
: two or more tires are
under-inflated
• All wheels gray
: the system is currently
unavailable. It might be necessary todrive at a speed of at least 20 mph(30 km/h) for several minutes for the sys-tem to become operational.
• All wheels gray in combination with the message
Tire press. syst Service
required and the telltale in the instru-
ment panel (
) is illuminated : the
system is not functioning correctly. Have it checked by a trained and qualifiedVolvo service technician.
• All wheels gray in combination with the message
Tire press. syst currently
unavailable and the telltale in the
instrument panel (
) is illuminated :
Page 335 of 402

10 Maintenance and servicing
10
}}
333
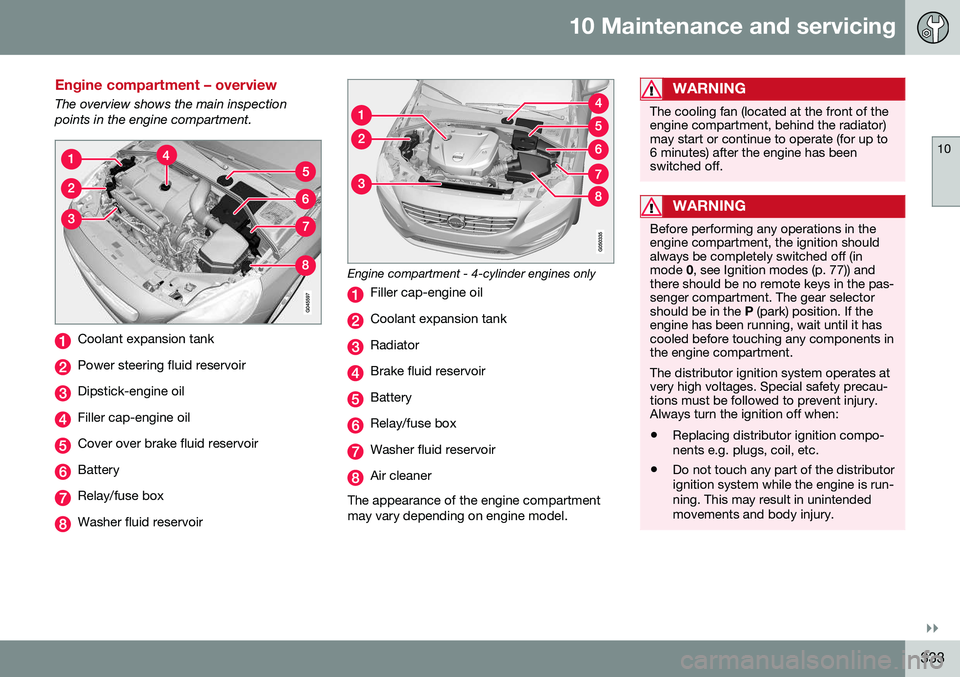
Engine compartment – overview
The overview shows the main inspection points in the engine compartment.
Coolant expansion tank
Power steering fluid reservoir
Dipstick-engine oil
Filler cap-engine oil
Cover over brake fluid reservoir
Battery
Relay/fuse box
Washer fluid reservoir
Engine compartment - 4-cylinder engines only
Filler cap-engine oil
Coolant expansion tank
Radiator
Brake fluid reservoir
Battery
Relay/fuse box
Washer fluid reservoir
Air cleaner
The appearance of the engine compartment may vary depending on engine model.
WARNING
The cooling fan (located at the front of the engine compartment, behind the radiator)may start or continue to operate (for up to6 minutes) after the engine has beenswitched off.
WARNING
Before performing any operations in the engine compartment, the ignition shouldalways be completely switched off (inmode 0, see Ignition modes (p. 77)) and
there should be no remote keys in the pas-senger compartment. The gear selectorshould be in the P (park) position. If the
engine has been running, wait until it hascooled before touching any components inthe engine compartment. The distributor ignition system operates at very high voltages. Special safety precau-tions must be followed to prevent injury.Always turn the ignition off when:
• Replacing distributor ignition compo- nents e.g. plugs, coil, etc.
• Do not touch any part of the distributorignition system while the engine is run-ning. This may result in unintendedmovements and body injury.
Page 338 of 402

||
10 Maintenance and servicing
10
336* Option/accessory, for more information, see Introduction.
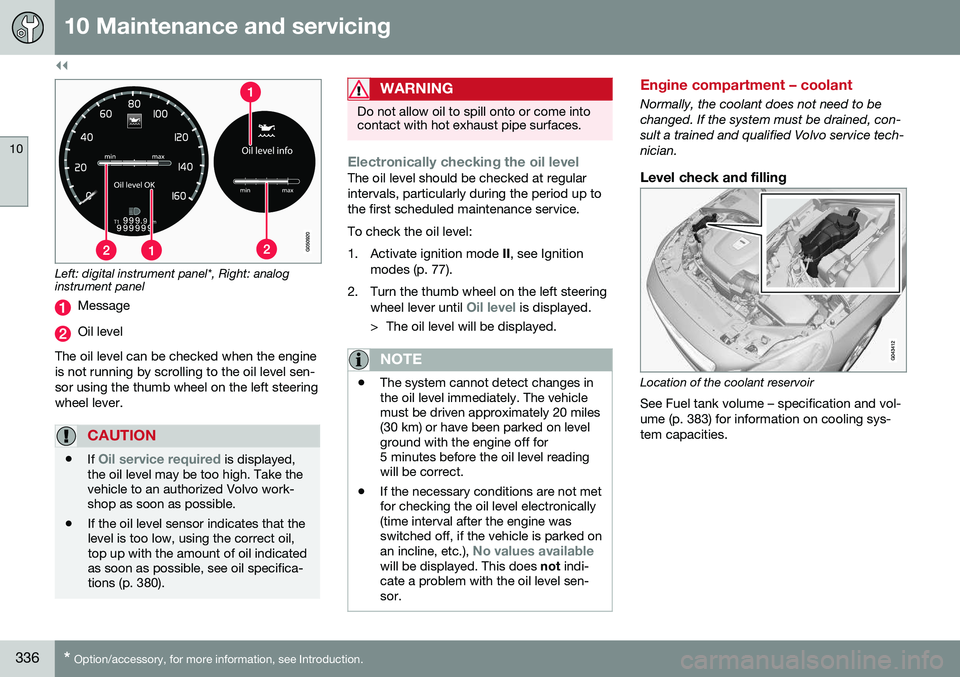
Left: digital instrument panel*, Right: analog instrument panel
Message
Oil level
The oil level can be checked when the engine is not running by scrolling to the oil level sen-sor using the thumb wheel on the left steeringwheel lever.
CAUTION
• If Oil service required is displayed,
the oil level may be too high. Take the vehicle to an authorized Volvo work-shop as soon as possible.
• If the oil level sensor indicates that thelevel is too low, using the correct oil,top up with the amount of oil indicatedas soon as possible, see oil specifica-tions (p. 380).
WARNING
Do not allow oil to spill onto or come into contact with hot exhaust pipe surfaces.
Electronically checking the oil levelThe oil level should be checked at regular intervals, particularly during the period up tothe first scheduled maintenance service. To check the oil level:
1. Activate ignition mode
II, see Ignition
modes (p. 77).
2. Turn the thumb wheel on the left steering wheel lever until
Oil level is displayed.
> The oil level will be displayed.
NOTE
• The system cannot detect changes in the oil level immediately. The vehiclemust be driven approximately 20 miles(30 km) or have been parked on levelground with the engine off for5 minutes before the oil level readingwill be correct.
• If the necessary conditions are not metfor checking the oil level electronically(time interval after the engine wasswitched off, if the vehicle is parked on an incline, etc.),
No values availablewill be displayed. This does
not indi-
cate a problem with the oil level sen- sor.
Engine compartment – coolant
Normally, the coolant does not need to be changed. If the system must be drained, con-sult a trained and qualified Volvo service tech-nician.
Level check and filling
Location of the coolant reservoir
See Fuel tank volume – specification and vol- ume (p. 383) for information on cooling sys-tem capacities.