2016 VOLVO V60 CROSS COUNTRY belt
[x] Cancel search: beltPage 61 of 402
02 Safety
02
59
Integrated booster cushion – using
The Integrated booster cushion (p. 57) in the rear seat can be folded up in two stages,depending on the child's height and weight.
Stage 1
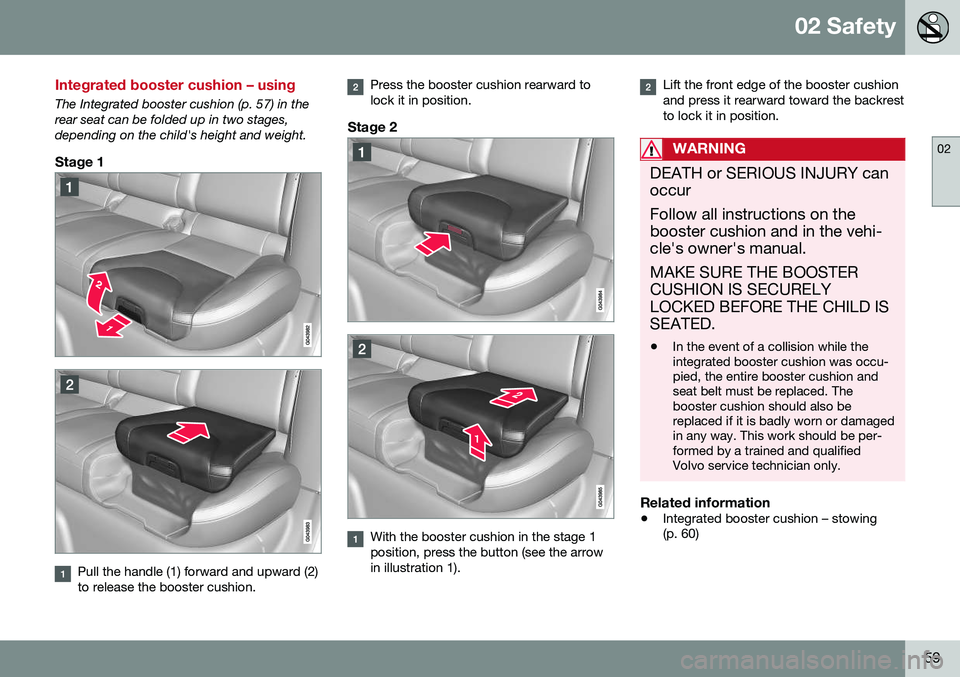
Pull the handle (1) forward and upward (2) to release the booster cushion.
Press the booster cushion rearward to lock it in position.
Stage 2
With the booster cushion in the stage 1 position, press the button (see the arrowin illustration 1).
Lift the front edge of the booster cushion and press it rearward toward the backrestto lock it in position.
WARNING
DEATH or SERIOUS INJURY can occur Follow all instructions on the booster cushion and in the vehi-cle's owner's manual. MAKE SURE THE BOOSTER CUSHION IS SECURELYLOCKED BEFORE THE CHILD ISSEATED. •In the event of a collision while the integrated booster cushion was occu-pied, the entire booster cushion andseat belt must be replaced. Thebooster cushion should also bereplaced if it is badly worn or damagedin any way. This work should be per-formed by a trained and qualifiedVolvo service technician only.
Related information
•
Integrated booster cushion – stowing (p. 60)
Page 62 of 402
02 Safety
02
60
Integrated booster cushion – stowing
The integrated booster cushion (p. 57) can be folded down completely (stowed) from eitherthe stage 1 or stage 2 positions.NOTE
The booster cushion cannot be moved from the stage 2 (upper) position to thestage 1 (lower) position. It must first befolded down completely to the stowedposition, and then adjusted to stage 1.
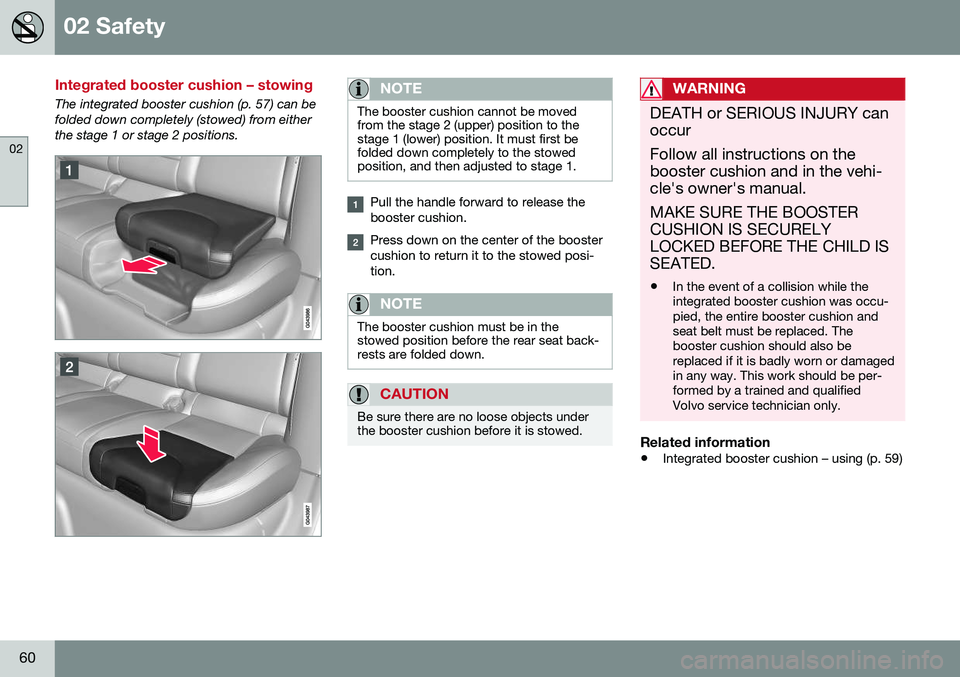
Pull the handle forward to release the booster cushion.
Press down on the center of the booster cushion to return it to the stowed posi-tion.
NOTE
The booster cushion must be in the stowed position before the rear seat back-rests are folded down.
CAUTION
Be sure there are no loose objects under the booster cushion before it is stowed.
WARNING
DEATH or SERIOUS INJURY can occur Follow all instructions on the booster cushion and in the vehi-cle's owner's manual. MAKE SURE THE BOOSTER CUSHION IS SECURELYLOCKED BEFORE THE CHILD ISSEATED. •In the event of a collision while the integrated booster cushion was occu-pied, the entire booster cushion andseat belt must be replaced. Thebooster cushion should also bereplaced if it is badly worn or damagedin any way. This work should be per-formed by a trained and qualifiedVolvo service technician only.
Related information
•
Integrated booster cushion – using (p. 59)
Page 74 of 402

||
03 Instruments and controls
03
72* Option/accessory, for more information, see Introduction.
Start/stop*The symbol illuminates when the engine has auto-stopped.
Related information
• Information displays – introduction (p. 66)
• Information displays – warning symbols (p. 72)
Information displays – warning symbols
The warning lights alert the driver that an important function is activated or that a seri-ous fault has occurred.
SymbolDescription
Low oil pressure A
Parking brake applied B
SRS airbags
Seat belt reminder
Generator not charging
Fault in the brake system
Warning symbol, read the text displayed in the instrumentpanel
A
Certain engines do not use this symbol to indicate low oil pressure. On these models, a text message will be dis-played on the instrument panel instead, see Engine com-partment – engine oil (p. 334).
B The symbol is Park only on models with the optional digital
instrument panel.
Low oil pressureIf the light comes on while driving, stop the vehicle, stop the engine immediately, andcheck the engine oil level. Add oil if neces- sary. If the oil level is normal and the lightstays on after restart, have the vehicle towedto the nearest trained and qualified Volvoservice technician.
Parking brake appliedThis symbol flashes while the brake is being applied and then glows steadily when theparking brake has been set. See Parking brake – general information (p. 274) for more information about using theparking brake.
Airbags – SRSIf this light comes on while the vehicle is being driven, or remains on for longer thanapproximately 10 seconds after the vehiclehas been started, the SRS system's diagnos-tic functions have detected a fault in a seatbelt lock or pretensioner, a front airbag, sideimpact airbag, and/or an inflatable curtain.Have the system(s) inspected by a trainedand qualified Volvo service technician assoon as possible. See Supplemental Restraint System (SRS) (p. 31) for more information about the airbagsystem.
Seat belt reminderThis symbol comes on for approximately 6 seconds if the driver has not fastened his orher seat belt.
Page 86 of 402
||
03 Instruments and controls
03
84
NOTE
•The head restraint must be returned to the upright position manually.
• The outboard head restraints cannotbe folded down on models that are notequipped with this button.
CAUTION
The rear head restraints should not be kept folded down for prolonged periods.This could result in pressure marks inleather upholstery.
WARNING
For safety reasons, no one should be allowed to sit in the outboard rear seatpositions if the head restraints are foldeddown. If these positions are occupied, thehead restraints should be in the upright(fixed) position.
Related information
•
Front seats (p. 78)
• Front seats – power seat (p. 79)
• Rear seats – head restraints (p. 82)
Rear seats – folding backrest
The rear seat head restraints and backrests can be folded down. The center headrestraint can be raised/lowered according tothe passenger's height.
Folding down the rear seat backrestsThe three sections of the rear seat backrestcan be folded down in different combinationsto make it easier to transport long objects.
• The left (driver's side) section can be folded down separately.
• The center section can be folded downseparately.
• The right (passenger's side) section canonly be folded down together with thecenter section.
• All three sections can be folded downtogether.
CAUTION
To help avoid damage to the upholstery, there should be no objects on the rear seatand the seat belt should not be buckledwhen the backrest is folded down.
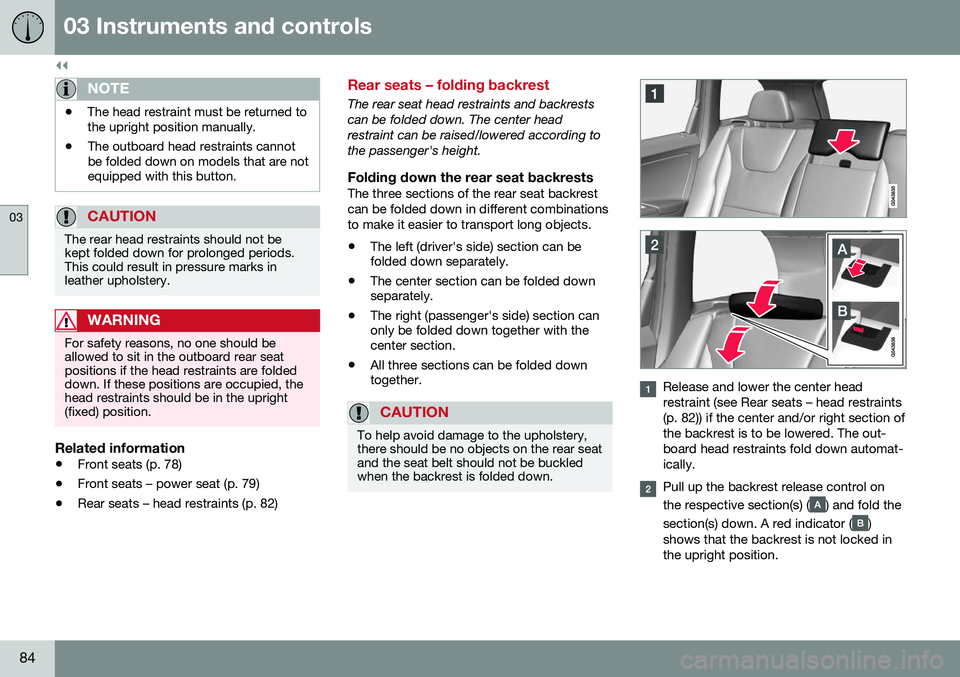
Release and lower the center head restraint (see Rear seats – head restraints(p. 82)) if the center and/or right section ofthe backrest is to be lowered. The out-board head restraints fold down automat-ically.
Pull up the backrest release control on the respective section(s) (
) and fold the
section(s) down. A red indicator (
)
shows that the backrest is not locked in the upright position.
Page 142 of 402
||
05 Loading and storage
05
140
•The vehicle's wind resistance and fuel consumption will increase with the size ofthe load.
• Drive smoothly. Avoid rapid starts, fastcornering and hard braking.
Related information
• Loading – general (p. 139)
• Load anchoring eyelets (p. 140)
Load anchoring eyelets
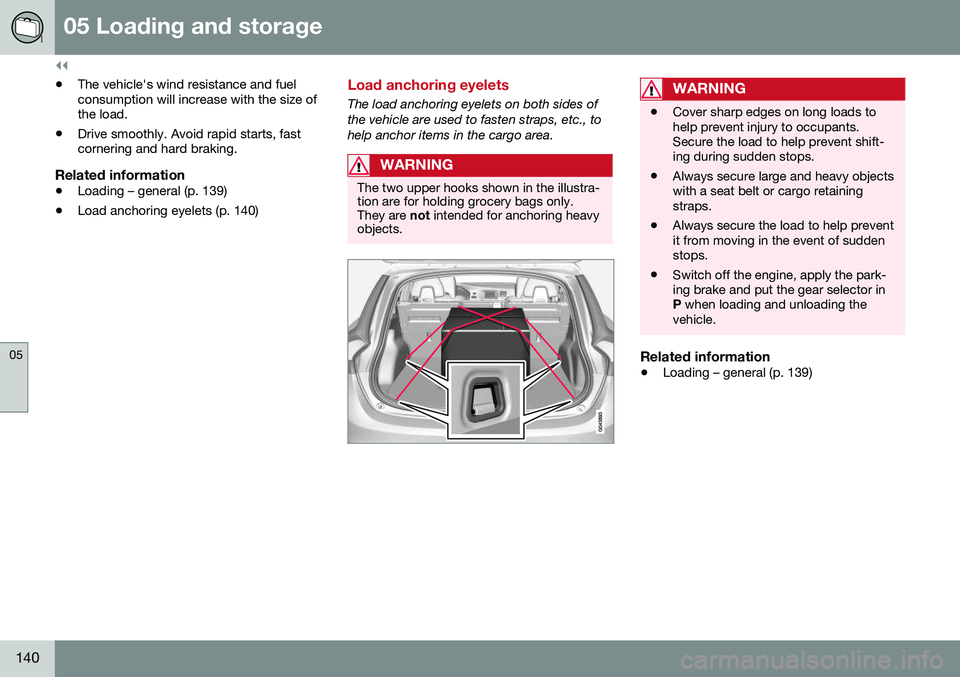
The load anchoring eyelets on both sides of the vehicle are used to fasten straps, etc., tohelp anchor items in the cargo area.
WARNING
The two upper hooks shown in the illustra- tion are for holding grocery bags only.They are
not intended for anchoring heavy
objects.
WARNING
• Cover sharp edges on long loads to help prevent injury to occupants.Secure the load to help prevent shift-ing during sudden stops.
• Always secure large and heavy objectswith a seat belt or cargo retainingstraps.
• Always secure the load to help preventit from moving in the event of suddenstops.
• Switch off the engine, apply the park-ing brake and put the gear selector inP
when loading and unloading the
vehicle.
Related information
• Loading – general (p. 139)
Page 184 of 402

||
07 Driver support
07
182
WARNING
Adaptive Cruise Control only warns of vehicles detected by the radar sensor, seeAdaptive Cruise Control – limitations(p. 188). In some cases there may be nowarning or the warning may be delayed.The driver should always apply the brakeswhen necessary.
Steep inclines and/or heavy loadsACC is primarily intended for use on fairly level roads. The system may have difficultymaintaining the correct distance to a vehicleahead on steep inclines, if the vehicle is car-rying a heavy load or is towing a trailer. Inthese situations, the driver should always beprepared to apply the brakes if necessary.
Related information
•Adaptive Cruise Control – introduction (p. 179)
Adaptive Cruise Control – engaging
Putting ACC in standby modeBefore ACC can be used to regulate speed and/or the distance to a vehicle ahead, itmust first be put in standby mode. To do so:
Controls and display
Off/On/Standby mode
• Press
(2).
> The same symbol (7) appears (in white) in
the instrument panel to indicate that ACC is in standby mode.
NOTE
The driver's door must be closed and the driver's seat belt must be fastened beforeACC can be put in active mode. If the driv-er's seat belt is taken off or if the driver'sdoor is opened, ACC will return to standbymode.
Related information
• Adaptive Cruise Control – introduction (p. 179)
Page 187 of 402

07 Driver support
07
185
WARNING
The vehicle may accelerate quickly after
has been pressed if its current speed is
considerably lower than the set speed.
Standby mode due to action by the driver
ACC is temporarily deactivated and put in standby mode:
• if the brakes are applied
• if the gear selector is moved to
N
• if the driver drives faster than the set speed for more than
1 minute.
In this happens, the driver will have to regu- late the vehicle's speed.
NOTE
If the accelerator pedal is only depressed for a short time, such as when passinganother vehicle, ACC is deactivated tem-porarily and is reactivated when the pedalis released.
Automatic standby modeACC is linked to other systems such as the stability system. If this system is not function-ing properly, ACC will switch off automati-cally. In the event of automatic deactivation, an audible signal will sound and the message
Cruise control Cancelled is shown in the
instrument panel. The driver must then inter- vene and adapt the vehicle's speed to thesurrounding traffic and regulate the distanceto the vehicle ahead. An automatic switch to standby mode may be caused if:
• engine speed (rpm) is too high/low
• The driver's door is opened
• The driver unbuckles his/her seat belt
• the vehicle's speed goes below 18 mph (30 km/h)
• the wheels lose traction
• brake temperature is high
• the radar sensor is obstructed by, forexample, wet snow or rain.
Resuming the set speedIf ACC is in standby mode, it can be reactiva- ted by pressing the
button on the steering
wheel keypad. The vehicle will return to the most recently set speed.
WARNING
The vehicle may accelerate quickly after
has been pressed if its current speed is
considerably lower than the set speed.
Turning ACC off completely
Controls and display
Resume previous settings.
Off/On/Standby mode
• From standby mode, press (2)
once.
• From active mode, press (2)
twice.
The set speed and time interval are then cleared from the system's memory and can- not be resumed by pressing (1)
.
Related information
• Adaptive Cruise Control – introduction (p. 179)
Page 188 of 402
07 Driver support
07
186
Adaptive Cruise Control – passing another vehicle
Passing another vehicleIf your vehicle’s speed is being regulated by ACC and the driver indicates that he/shewould like to pass the vehicle ahead by usingthe left turn signal, ACC can assist by accel-
erating briefly. This function is active at speeds above approximately 45 mph (70 km/h).
WARNING
Please be aware that this function will also cause the vehicle to accelerate briefly incertain situations other than passinganother vehicle, for example using the leftturn signal to indicate a lane change or aturn toward a highway exit at speedsabove approximately 45 mph (70 km/h).
Related information
• Adaptive Cruise Control – introduction (p. 179)
Adaptive Cruise Control (ACC) – Queue Assist
Queue Assist is an added ACC feature that is linked to your vehicle's automatic transmis-sion.
IntroductionQueue Assist is an added ACC feature that islinked to your vehicle's automatic transmis-sion. Queue Assist consists of the following func- tions: •Enhanced speed interval (including when the vehicle is at a complete stop or ismoving at speed below 18 mph(30 km/h))
• Automatic standby mode when ACCchanges target vehicles
• No automatic braking when at a standstill
• The parking brake is applied automati-cally
Please note that the lowest speed that can be set is 18 mph (30 km/h), although ACC canmaintain a set speed/distance to a vehicleahead down to a standstill. Queue Assistconsists of the following features:
Enhanced speed interval
NOTE
The driver's door must be closed and the driver's seat belt must be fastened beforeACC can be put in active mode. If the driv-er's seat belt is taken off or if the driver'sdoor is opened, ACC will return to standbymode.
Your vehicle can maintain the set time interval to the vehicle ahead at any permissiblespeed, including a complete stop. In order to activate ACC at speeds below 18 mph (30 km/h):
• The vehicle ahead must be within a rea- sonable distance (not farther away thanapprox. 100 ft/30 meters)
• The lowest speed that can be selected is18 mph (30 km/h), although ACC will alsohelp maintain the set time interval to thevehicle ahead at lower speeds, includinga complete stop.
During short stops (less than approximately 3 seconds) in slow-moving traffic, your vehi-cle will begin moving again automatically assoon as the vehicle ahead begins to move. If it takes more than 3 seconds for the vehicle ahead to begin moving, ACC will be automat-ically go into standby mode.