2016 VOLVO V60 CROSS COUNTRY wheel
[x] Cancel search: wheelPage 340 of 402
||
10 Maintenance and servicing
10
338
Checking the levelThe fluid reservoir is concealed under the round cover at the rear of the engine com-partment. The round cover must be removedfirst before the reservoir cap can beaccessed. Check, without removing the cap, that there is sufficient fluid in the reservoir. Fluid type: DOT 4 boiling point >536 °F
(>280 °C).Replace : The fluid should be replaced
according to the intervals specified in the Warranty and Service Records Informationbooklet. When driving under extremely hard condi- tions (mountain driving, etc), it may be neces-sary to replace the fluid more often. Consult atrained and qualified Volvo service technician. Always entrust brake fluid changing to a trained and qualified Volvo service technician.
WARNING
• If the fluid level is below the
MIN mark
in the reservoir or if a brake-related message is shown in the informationdisplay: DO NOT DRIVE . Have the car
towed to a trained and qualified Volvoservice technician and have the brakesystem inspected.
• Dot 4 should never be mixed with anyother type of brake fluid.
Filling1. Turn and open the cover.
2. Unscrew the reservoir cap and fill the
fluid. The level must be between the MIN
and MAX marks.
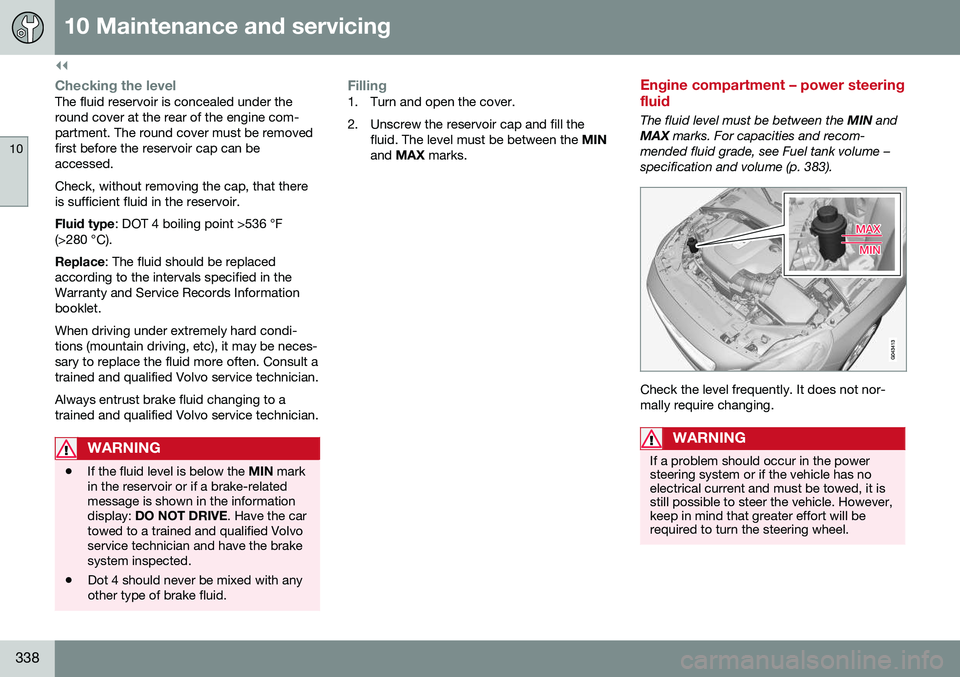
Engine compartment – power steering fluid
The fluid level must be between the MIN and
MAX marks. For capacities and recom-
mended fluid grade, see Fuel tank volume – specification and volume (p. 383).
Check the level frequently. It does not nor- mally require changing.
WARNING
If a problem should occur in the power steering system or if the vehicle has noelectrical current and must be towed, it isstill possible to steer the vehicle. However,keep in mind that greater effort will berequired to turn the steering wheel.
Page 349 of 402
10 Maintenance and servicing
10
347
Wiper blades – service position
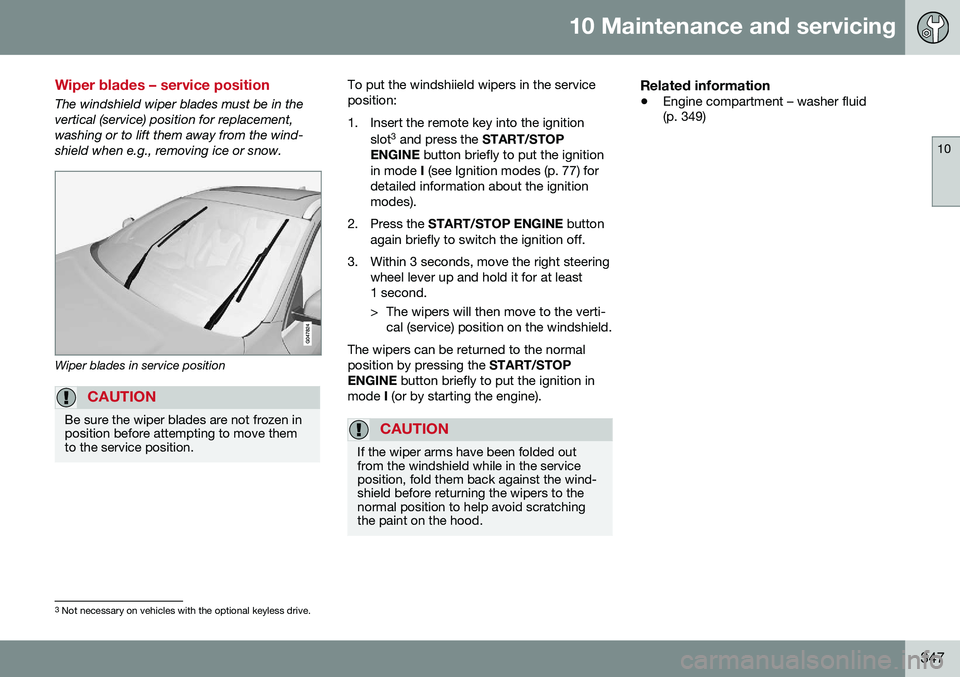
The windshield wiper blades must be in the vertical (service) position for replacement,washing or to lift them away from the wind-shield when e.g., removing ice or snow.
Wiper blades in service position
CAUTION
Be sure the wiper blades are not frozen in position before attempting to move themto the service position.
To put the windshiield wipers in the service position:
1. Insert the remote key into the ignitionslot3
and press the START/STOP
ENGINE button briefly to put the ignition
in mode I (see Ignition modes (p. 77) for
detailed information about the ignition modes).
2. Press the START/STOP ENGINE button
again briefly to switch the ignition off.
3. Within 3 seconds, move the right steering wheel lever up and hold it for at least1 second.
> The wipers will then move to the verti-cal (service) position on the windshield.
The wipers can be returned to the normal position by pressing the START/STOP
ENGINE button briefly to put the ignition in
mode I (or by starting the engine).
CAUTION
If the wiper arms have been folded out from the windshield while in the serviceposition, fold them back against the wind-shield before returning the wipers to thenormal position to help avoid scratchingthe paint on the hood.
Related information
• Engine compartment – washer fluid (p. 349)
3
Not necessary on vehicles with the optional keyless drive.
Page 361 of 402

10 Maintenance and servicing
10
}}
* Option/accessory, for more information, see Introduction.359
PosFunctionA
Controls in left rear passeng- er's door20
Keyless drive*7.5
Power driver's seat*20
Power front passenger's seat*20
-
Infotainment system display5
Infotainment system: ampli- fier, SiriusXM ™ satellite radio*10
Sensus control module15
Bluetooth hands-free system5
-
Power moonroof* Courtesy lighting, climate sys- tem sensor5
12-volt sockets in tunnel con- sole15
Heated rear seat* (passeng- er's side)15
Heated rear seat* (driver's side)15
PosFunctionA
-
Heated front passenger's seat*15
Heated driver's seat*15
Park assist* Blind Spot Information Sys- tem (BLIS)*, park assist cam-era*5
All Wheel Drive* control mod- ule15
Active chassis system*10
Positions: fusebox B
PosFunctionA
Tailgate wiper15
-
Front courtesy lighting, driv- er's door power window con-trols, power seat(s)*,7.5
Instrument panel5
Adaptive cruise control/colli- sion warning*10
PosFunctionA
Courtesy lighting, rain sen- sor*, HomeLInk ®
Wireless
Control System*7.5
Steering wheel module7.5
Cental locking: fuel filler door10
Electrically heated steering wheel*15
Electrically heated windshield*15
Tailgate unlock10
Electrical folding rear seat outboard head restraints*10
Fuel pump20
Climate system control panel5
-
Alarm, On-board diagnostic system5
Satellite radio *, audio system amplifier10
Airbag system, occupant weight sensor10
Collision warning system*5
Page 366 of 402
10 Maintenance and servicing
10
364
Washing the car
The vehicle should be washed at regular inter- vals since dirt, dust, insects and tar spotsadhere to the paint and may cause damage.To help prevent corrosion, it is particularlyimportant to wash the car frequently in thewintertime. The following points should be kept in mind when washing and cleaning the car: •Avoid washing your car in direct sunlight. Doing so may cause detergents and waxto dry out and become abrasive. To avoidscratching, use lukewarm water to softenthe dirt before you wash with a softsponge, and plenty of sudsy water.
• Bird droppings
: Remove from paintwork
as soon as possible. Otherwise the finishmay be permanently damaged.
• A detergent can be used to facilitate thesoftening of dirt and oil.
• Dry the car with a clean chamois andremember to clean the drain holes in thedoors and rocker panels.
• Tar spots can be removed with tarremover after the car has been washed.
• A stiff-bristle brush and lukewarm soapywater can be used to clean the wiperblades. Frequent cleaning of the wind-shield and wiper blades improves visibilityconsiderably and also helps prolong theservice life of the wiper blades. •
Wash off the dirt from the underside(wheel housings, fenders, etc).
• In areas of high industrial fallout, morefrequent washing is recommended.
NOTE
When washing the car, remember to remove dirt from the drain holes in thedoors and sills.
CAUTION
• During high pressure washing, the spray mouthpiece must never becloser to the vehicle than 13" (30 cm).Do not spray into the locks.
• Dirt, snow, etc., on the headlights canreduce lighting capacity considerably.Clean the headlights regularly, forexample when refueling.
Special moonroof cautions:
• Always close the moonroof and sunshade before washing your vehicle.
• Never use abrasive cleaning agents onthe moonroof.
• Never use wax on the rubber sealsaround the moonroof.
Exterior componentsVolvo recommends the use of special clean- ing products, available at your Volvo retailer, for cleaning colored plastic, rubber, or orna-mental components such as chromed stripson the exterior of your vehicle. The instruc-tions for using these products should be fol-lowed carefully. Solvents or stain removersshould not be used.
CAUTION
•
Avoid waxing or polishing plastic or rubber components
• Polishing chromed strips can wearaway or damage the surface
• Polishes containing abrasive sub-stances should not be used
Related information
•
Polishing and waxing (p. 365)
• Cleaning the interior (p. 366)
Page 367 of 402

10 Maintenance and servicing
10
}}
365
Automatic car wash
The vehicle should be washed at regular inter- vals since dirt, dust, insects and tar spotsadhere to the paint and may cause damage.To help prevent corrosion, it is particularlyimportant to wash the car frequently in thewintertime.• We do NOT recommend washing your car in an automatic wash during the firstfew months (because the paint will nothave hardened sufficiently).
• An automatic wash is a simple and quickway to clean your car, but it is worthremembering that it may not be as thor-ough as when you yourself go over thecar with sponge and water. Keeping theunderbody clean is most important, espe-cially in the winter. Some automaticwashers do not have facilities for washingthe underbody.
NOTE
Condensation may form temporarily on the inside of the lenses of exterior lights suchas headlights, fog lights, or taillights. Thisis normal and the lights are designed towithstand moisture. Normally, condensa-tion will dissipate after the lights have beenon for a short time.
CAUTION
• Before driving into an automatic car wash, turn off the optional rain sensorto avoid damaging the windshield wip-ers.
• Make sure that side view mirrors, aux-iliary lamps, etc, are secure, and thatany antenna(s) are retracted orremoved. Otherwise there is risk of themachine dislodging them.
• Chromed wheels:
Clean chrome-
plated wheels using the same deter-gents used for the body of the vehicle.Aggressive wheel-cleaning agents canpermanently stain chrome-platedwheels.
WARNING
• When the vehicle is driven immediately after being washed, apply the brakes,including the parking brake, severaltimes in order to remove any moisturefrom the brake linings.
• Engine cleaning agents should not beused when the engine is warm. Thisconstitutes a fire risk.
Related information
•
Polishing and waxing (p. 365)
• Cleaning the interior (p. 366)
• Washing the car (p. 364)
Polishing and waxing
Normally, polishing is not required during the first year after delivery, however, waxing maybe beneficial.
• Before applying polish or wax the vehicle must be washed and dried. Tar spots canbe removed with kerosene or tar remover.Difficult spots may require a fine rubbingcompound.
• After polishing use liquid or paste wax.
• Several commercially available productscontain both polish and wax.
• Waxing alone does not substitute for pol-ishing a dull surface.
• A wide range of polymer-based waxescan be purchased today. These waxesare easy to use and produce a long-last-ing, high-gloss finish that protects thebodywork against oxidation, road dirt andfading.
• Do not polish or wax your vehicle in directsunlight (the surface of the vehicle shouldnot be warmer than 113 °F (45 °C).
Page 369 of 402
10 Maintenance and servicing
10
}}
367
Protecting leather upholstery1. Put a small amount of protectant creamon a cloth and apply a thin coating of cream to the upholstery with light circularmovements.
2. Allow the leather to dry for 20 minutes. This will help the leather resist staining and protect against sunlight's harmful UV rays.
CAUTION
• Under no circumstances should gaso- line, naphtha or similar cleaning agentsbe used on the plastic or the leathersince these can cause damage.
• Take extra care when removing stainssuch as ink or lipstick since the color-ing can spread.
• Use solvents sparingly. Too much sol-vent can damage the seat padding.
• Start from the outside of the stain andwork toward the center.
• Sharp objects (e.g. pencils or pens in apocket) or Velcro fasteners on clothingmay damage the textile upholstery.
• Clothing that is not colorfast, such asnew jeans or suede garments, maystain the upholstery.
Cleaning a leather-covered steering wheel
•
Remove soil, dust, etc., with a damp sponge and a neutral soap solution.
• Leather should be allowed to breath.Never cover the steering wheel with aplastic protector.
• Volvo recommends cleaning, protectingand conditioning the steering wheel withVolvo's Leather Care Kit 951 0251 andLeather Softener 943 7429.
If there are stains on the steering wheel: Type 1 (ink, wine, coffee, milk, sweat or
blood)
–Use a soft cloth or sponge. Wipe the wheel with a solution with 5% ammonia.For blood stains, mix approx. 1 cup (2 dl)of water and one ounce (25g) of salt andwipe the stain.
Type 2 (fat, oil, sauces, or chocolate)
1. Same procedure as for type I stains.
2. Finish by rubbing the wheel with absorb- ent paper or a towel.
Type 3 (dry soil or dust)
1. Remove the soil/dust with a soft brush.
2. Same procedure as for type I stains.
CAUTION
Sharp objects, such as rings, could dam- age the leather on the steering wheel.
Cleaning the seat beltsClean only with lukewarm water and a mild soap solution.
Cleaning floor matsThe floor mats should be vacuumed orbrushed clean regularly, especially duringwinter when they should be taken out for dry-ing. Spots on textile mats can be removedwith a mild detergent. For best protection inwinter, Volvo recommends the use of Volvorubber floor mats. Consult your Volvo retailer.
Spots on interior plastic, metal, or wood surfaces
Cleaning interior plastic components should be done with a cleaning agent speciallydesigned for this purpose. Consult your Volvoretailer.
Page 378 of 402
||
11 Specifications
11
376
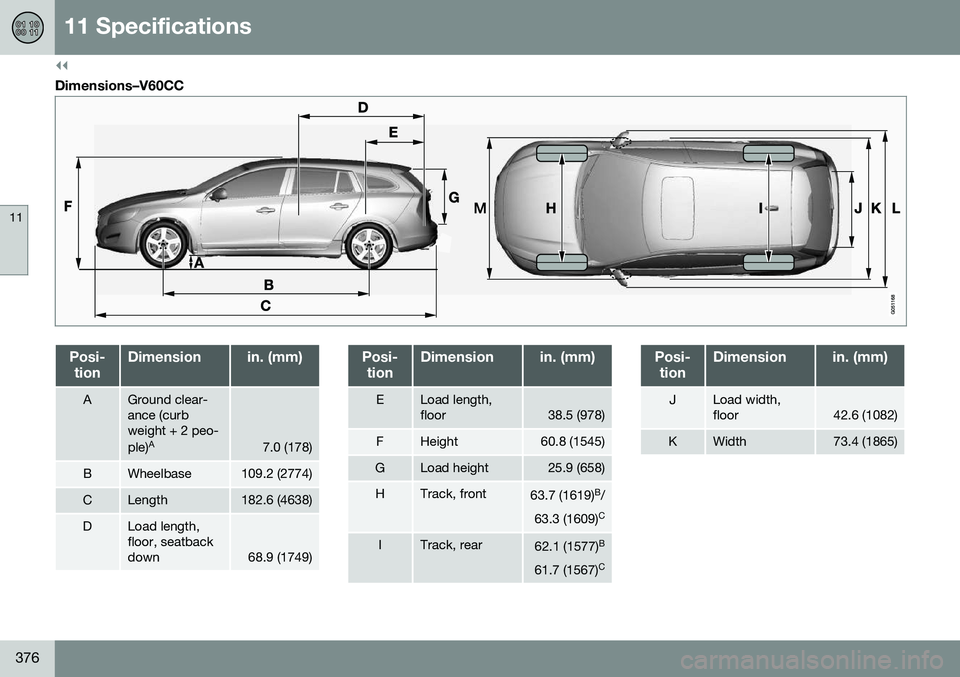
Dimensions–V60CC
Posi-tionDimensionin. (mm)
AGround clear- ance (curbweight + 2 peo- ple) A
7.0 (178)
BWheelbase109.2 (2774)
CLength182.6 (4638)
DLoad length, floor, seatbackdown
68.9 (1749)
Posi-
tionDimensionin. (mm)
ELoad length, floor38.5 (978)
FHeight60.8 (1545)
GLoad height25.9 (658)
HTrack, front63.7 (1619) B
/
63.3 (1609) C
ITrack, rear62.1 (1577)
B
61.7 (1567) C
Posi-
tionDimensionin. (mm)
JLoad width, floor42.6 (1082)
KWidth73.4 (1865)
Page 380 of 402
11 Specifications
11
378
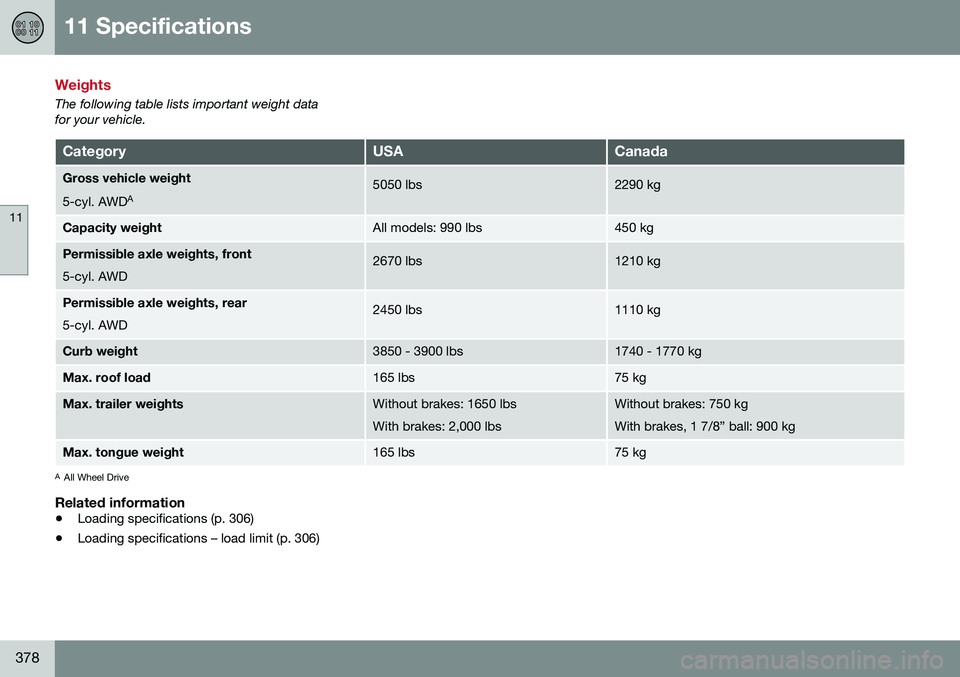
Weights
The following table lists important weight data for your vehicle.
CategoryUSACanada
Gross vehicle weight 5-cyl. AWDA5050 lbs2290 kg
Capacity weightAll models: 990 lbs450 kg
Permissible axle weights, front 5-cyl. AWD2670 lbs1210 kg
Permissible axle weights, rear 5-cyl. AWD2450 lbs1110 kg
Curb weight3850 - 3900 lbs1740 - 1770 kg
Max. roof load165 lbs75 kg
Max. trailer weightsWithout brakes: 1650 lbs With brakes: 2,000 lbsWithout brakes: 750 kg With brakes, 1 7/8” ball: 900 kg
Max. tongue weight165 lbs75 kg
A
All Wheel Drive
Related information
• Loading specifications (p. 306)
• Loading specifications – load limit (p. 306)