2016 VOLVO S80 fold seats
[x] Cancel search: fold seatsPage 5 of 380

Contents
* Option/accessory, for more information, see Introduction.3
03
03 Instruments and controls
Instrument overview ................................. 59
Information displays – introduction........... 62
Eco Guide* and Power Meter*.................. 65
Information displays – indicator symbols. 66
Information displays – warning symbols... 68
My Car – introduction............................... 70Information displays – ambient tempera-
ture sensor................................................ 71 Information displays – trip odometer and
clock......................................................... 72
Inserting/removing remote key................. 72
Ignition modes.......................................... 73
Front seats................................................ 74
Front seats – folding backrest*................. 75
Front seats – power seat.......................... 75Key memory – power driver's seat* and
door mirrors.............................................. 77
Rear seats – head restraints..................... 78
Rear seats – folding backrest................... 80
Steering wheel.......................................... 81
Electrically heated* steering wheel........... 82
Lighting panel........................................... 82
High/low beam headlights........................ 83
Active high beams (AHB)*......................... 84
03
Tunnel detection (models with the rain
sensor* only)............................................. 85
Active Bending Lights (ABL)*.................... 85
Auxiliary lights*.......................................... 86
Instrument and "theater" lighting.............. 86
Parking lights............................................ 87
Rear fog lights........................................... 87
Hazard warning flashers........................... 88
Turn signals............................................... 88
Front interior lighting................................. 89
Rear interior lighting.................................. 90
Home safe lighting.................................... 90
Approach lighting...................................... 91
Windshield wipers..................................... 91
Rain sensor*.............................................. 92
Windshield washer.................................... 92
Tailgate wiper/washer............................... 93
Power windows......................................... 94
Sun shades*.............................................. 95
Power door mirrors................................... 96Power door mirrors – automatic tilting/
retraction................................................... 97 Heated windshield*, rear window and
door mirror defrosters............................... 98
03
Interior rearview mirror.............................. 98
Digital compass*....................................... 99
Power moonroof – introduction.............. 100
Power moonroof – operation.................. 101 HomeLink ®
Wireless Control System* –
introduction............................................. 102HomeLink ®
Wireless Control System* –
programming........................................... 103
Volvo Sensus.......................................... 105
Information display – menu controls....... 106
Information display – menu overview..... 107
Information display – messages............. 107
Trip computer – introduction ................. 109Trip computer – functions, analog instru-
ment panel.............................................. 110 Trip computer – functions, digital instru-
ment panel.............................................. 113 Trip computer – Supplementary informa-
tion.......................................................... 115
Trip computer – Trip statistics................ 116
Page 35 of 380

02 Safety
02
}}
33
Location of the passenger's side front airbagAs the movement of the seats' occupants compresses the airbags, some of the gas isexpelled at a controlled rate to provide bettercushioning. Both seat belt pretensioners alsodeploy, minimizing seat belt slack. The entireprocess, including inflation and deflation ofthe airbags, takes approximately one fifth of asecond. The location of the front airbags is indicated by SRS AIRBAG embossed on the steering
wheel pad and above the glove compartment,and by decals on both sun visors and on thefront and far right side of the dash. The driver's side front airbag is folded and located in the steering wheel hub. The passenger's side front airbag is folded behind a panel located above the glove com-partment.
WARNING
• The airbags in the vehicle are designed to be a SUPPLEMENT to–not areplacement for–the three-point seatbelts. For maximum protection, wearseat belts at all times. Be aware thatno system can prevent all possibleinjuries that may occur in an accident.
• Never drive with your hands on thesteering wheel pad/airbag housing.
• The front airbags are designed to helpprevent serious injury. Deploymentoccurs very quickly and with consider-able force. During normal deploymentand depending on variables such asseating position, one may experienceabrasions, bruises, swellings, or otherinjuries as a result from deployment ofone or both of the airbags.
• When installing any accessory equip-ment, make sure that the front airbagsystem is not damaged. Any interfer-ence in the system could cause mal-function.
Front airbag deployment
•
The front airbags are designed to deploy during certain frontal or front-angular col-lisions, impacts, or decelerations,depending on the crash severity, angle,speed and object impacted. The airbagsmay also deploy in certain non-frontal collisions where rapid decelerationoccurs.
• The SRS (p. 31) sensors, which triggerthe front airbags, are designed to react toboth the impact of the collision and theinertial forces generated by it, and todetermine if the intensity of the collision issufficient for the seat belt pretensionersand/or airbags to be deployed.
However, not all frontal collisions activate the front airbags.
• If the collision involves a nonrigid object (e.g., a snow drift or bush), or a rigid,fixed object at a low speed, the front air-bags will not necessarily deploy.
• Front airbags do not normally deploy in aside impact collision, in a collision fromthe rear or in a rollover situation.
• The amount of damage to the bodyworkdoes not reliably indicate if the airbagsshould have deployed or not.
WARNING
If any of the airbags have deployed:
• Do not attempt to drive the vehicle. Have it towed to a qualified repairfacility.
• If necessary seek medical attentIon.
Page 45 of 380
02 Safety
02
43
WARNING
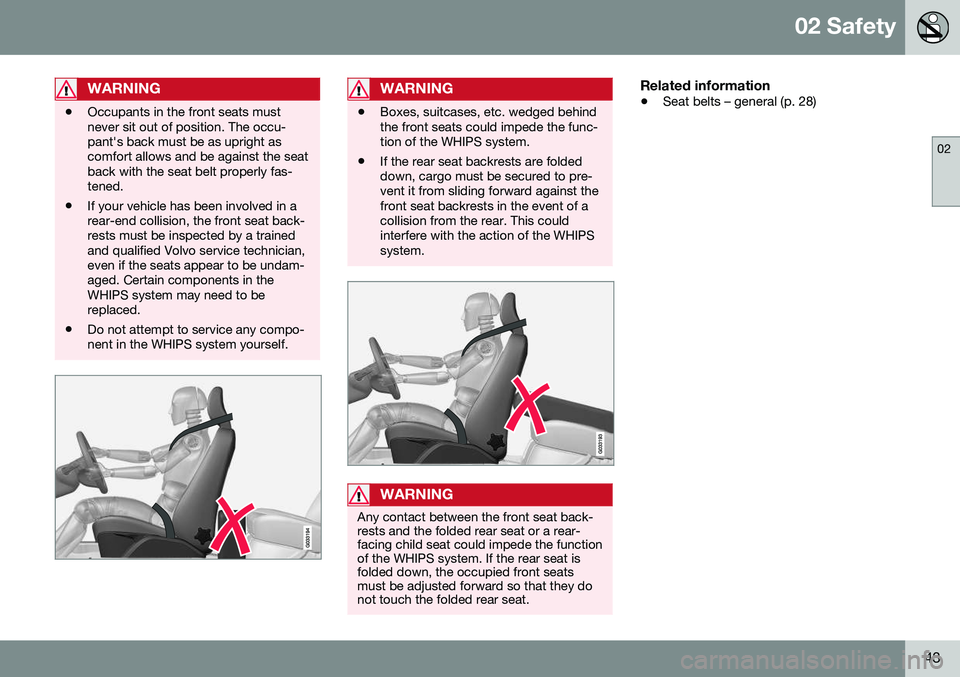
•Occupants in the front seats must never sit out of position. The occu-pant's back must be as upright ascomfort allows and be against the seatback with the seat belt properly fas-tened.
• If your vehicle has been involved in arear-end collision, the front seat back-rests must be inspected by a trainedand qualified Volvo service technician,even if the seats appear to be undam-aged. Certain components in theWHIPS system may need to bereplaced.
• Do not attempt to service any compo-nent in the WHIPS system yourself.
WARNING
•Boxes, suitcases, etc. wedged behind the front seats could impede the func-tion of the WHIPS system.
• If the rear seat backrests are foldeddown, cargo must be secured to pre-vent it from sliding forward against thefront seat backrests in the event of acollision from the rear. This couldinterfere with the action of the WHIPSsystem.
WARNING
Any contact between the front seat back- rests and the folded rear seat or a rear-facing child seat could impede the functionof the WHIPS system. If the rear seat isfolded down, the occupied front seatsmust be adjusted forward so that they donot touch the folded rear seat.
Related information
•
Seat belts – general (p. 28)
Page 76 of 380

||
03 Instruments and controls
03
74* Option/accessory, for more information, see Introduction.
Ignition mode I–With the remote key fully pressed into the ignition slot 8
, press START/STOP
ENGINE briefly.
Ignition mode II–With the remote key fully pressed into the ignition slot 8
, press START/STOP
ENGINE for approximately 2 seconds.
Returning to mode 0To return to mode 0 from mode II or I, press
START/STOP ENGINE briefly.
Starting and stopping the engineSee Starting the engine (p. 233) and Switch- ing off the engine (p. 235) for information onstarting the engine and switching it off.
Emergency towingSee Towing the vehicle (p. 269) for importantinformation about the remote key when thevehicle is being towed.
Related information
•Inserting/removing remote key (p. 72)
Front seats
The front seats can be adjusted in a number of ways to help provide the most comfortableseating position.
Raise/lower the seat, pump up/down.
Front-rear adjustment: lift the bar and move the seat to the position of yourchoice.
Raise/lower front edge of seat cushion, pump up/down.
Backrest tilt: turn the control to adjust the angle of the backrest.
Electronic lumbar support*. Press the button to adjust.
Control panel for power seat*, see Front seats – power seat (p. 75).
WARNING
•Do not adjust the seat while driving. The seat should be adjusted so thatthe brake pedal can be depressedfully. In addition, position the seat asfar rearward as comfort and controlallow.
• Check that the seat is securely lockedinto position after adjusting.
Related information
•
Front seats – power seat (p. 75)
• Rear seats – folding backrest (p. 80)
• Rear seats – head restraints (p. 78)
8
Not necessary in vehicles with the optional keyless drive.
Page 77 of 380
03 Instruments and controls
03
}}
* Option/accessory, for more information, see Introduction.75
Front seats – folding backrest*
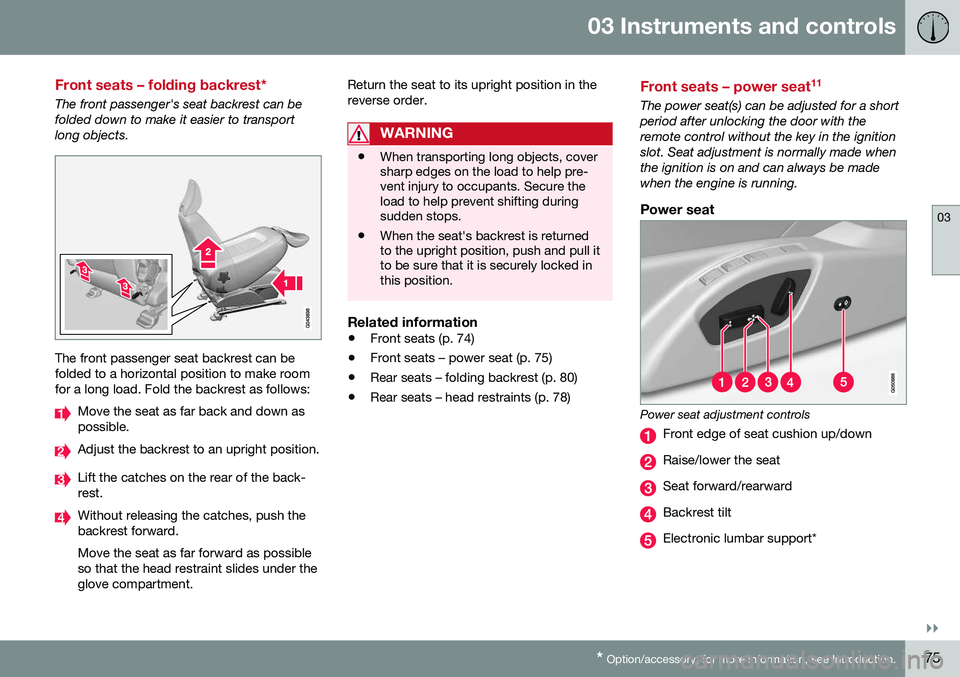
The front passenger's seat backrest can be folded down to make it easier to transportlong objects.
The front passenger seat backrest can be folded to a horizontal position to make roomfor a long load. Fold the backrest as follows:
Move the seat as far back and down as possible.
Adjust the backrest to an upright position.
Lift the catches on the rear of the back- rest.
Without releasing the catches, push the backrest forward. Move the seat as far forward as possible so that the head restraint slides under theglove compartment. Return the seat to its upright position in thereverse order.
WARNING
•
When transporting long objects, cover sharp edges on the load to help pre-vent injury to occupants. Secure theload to help prevent shifting duringsudden stops.
• When the seat's backrest is returnedto the upright position, push and pull itto be sure that it is securely locked inthis position.
Related information
•
Front seats (p. 74)
• Front seats – power seat (p. 75)
• Rear seats – folding backrest (p. 80)
• Rear seats – head restraints (p. 78)
Front seats – power seat 11
The power seat(s) can be adjusted for a short period after unlocking the door with theremote control without the key in the ignitionslot. Seat adjustment is normally made whenthe ignition is on and can always be madewhen the engine is running.
Power seat
Power seat adjustment controls
Front edge of seat cushion up/down
Raise/lower the seat
Seat forward/rearward
Backrest tilt
Electronic lumbar support*
Page 78 of 380
||
03 Instruments and controls
03
76* Option/accessory, for more information, see Introduction.
Operation
NOTE
• Only one of the power seat's controls can be used at the same time.
• The power seats have an overloadprotector that activates if a seat isblocked by any object. If this occurs,switch off the ignition (key in posi-tion
0) and wait for a short period
before operating the seat again.
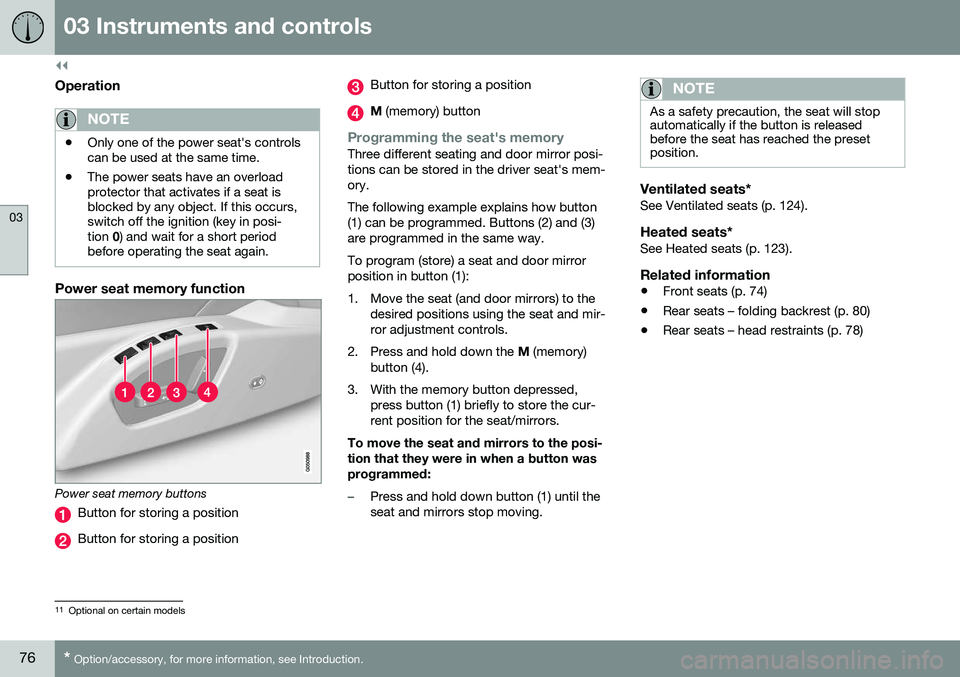
Power seat memory function
Power seat memory buttons
Button for storing a position
Button for storing a position
Button for storing a position
M (memory) button
Programming the seat's memoryThree different seating and door mirror posi- tions can be stored in the driver seat's mem-ory. The following example explains how button (1) can be programmed. Buttons (2) and (3)are programmed in the same way. To program (store) a seat and door mirror position in button (1):
1. Move the seat (and door mirrors) to the
desired positions using the seat and mir- ror adjustment controls.
2. Press and hold down the M (memory)
button (4).
3. With the memory button depressed, press button (1) briefly to store the cur-rent position for the seat/mirrors.
To move the seat and mirrors to the posi-tion that they were in when a button wasprogrammed:
–Press and hold down button (1) until the seat and mirrors stop moving.
NOTE
As a safety precaution, the seat will stop automatically if the button is releasedbefore the seat has reached the presetposition.
Ventilated seats*See Ventilated seats (p. 124).
Heated seats*See Heated seats (p. 123).
Related information
• Front seats (p. 74)
• Rear seats – folding backrest (p. 80)
• Rear seats – head restraints (p. 78)
11
Optional on certain models
Page 80 of 380
||
03 Instruments and controls
03
78
Returning the seat/mirrors to the storedpositions
To move the seat and door mirrors to the position stored in the remote key:
1. Unlock the driver's door with the same
remote key (the one used to lock the doors). For models equipped with theoptional keyless drive, you must have thesame remote key in your possession.
2. Open the driver's door within 2 minutes. The driver's seat and door mirrors will auto- matically move to the position in which youleft them (if the vehicle has been unlockedwith one of the other keys and new seat/mirror adjustments have been made).
NOTE
• The seat will move to this position even if someone else has moved it to adifferent position and locked the vehi-cle with a
different remote key.
• This feature will work in the same waywith all of the remote keys that youuse with your vehicle.
Emergency stop
WARNING
•
Because the driver's seat can be adjusted with the ignition off, childrenshould never be left unattended in thevehicle.
• Movement of the seat can be STOP-PED at any time by pressing any but-ton on the power seat control panel.
• Do not adjust the seat while driving.The seat should be adjusted so thatthe brake pedal can be depressedfully. In addition, position the seat asfar rearward as comfort and controlallow.
• The seat rails on the floor must not beobstructed in any way when the seat isin motion.
Related information
•
Remote key – functions (p. 143)
Rear seats – head restraints
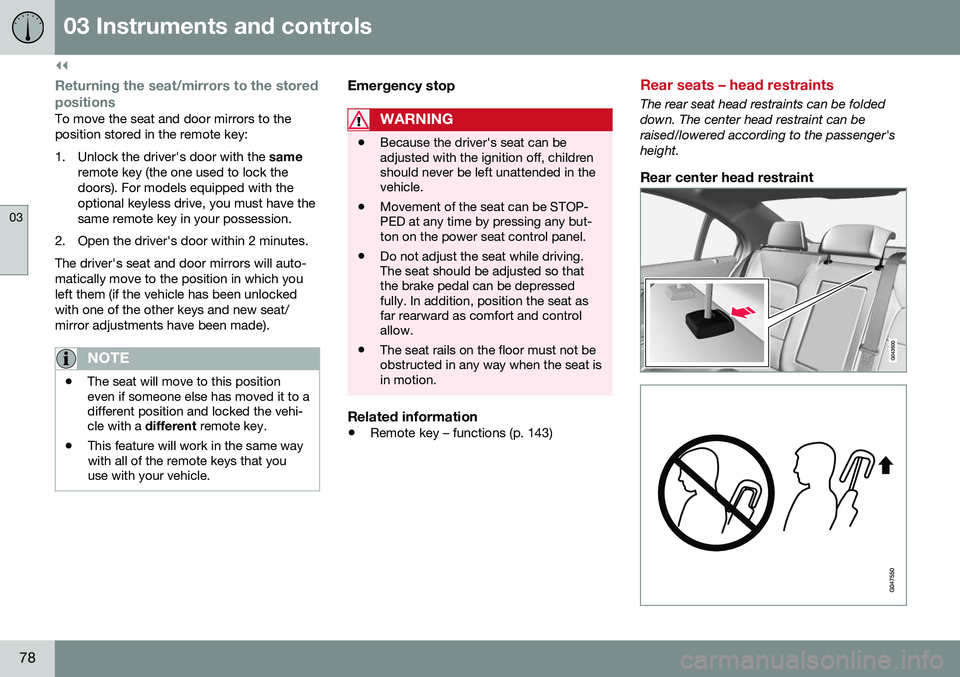
The rear seat head restraints can be folded down. The center head restraint can beraised/lowered according to the passenger'sheight.
Rear center head restraint
Page 81 of 380
03 Instruments and controls
03
79
The center head restraint should be adjusted according to the passenger's height. Therestraint should be carefully adjusted to sup-port the occupant's head.
• Pull the head restraint up as required.
• To lower, press the button at the base of the head restraint’s left support whilepressing the head restrain down carefully.
WARNING
The center rear seat head restraint should only be in its lowest position when thisseat is NOT occupied. When the centerposition is occupied, the head restraintshould be correctly adjusted to the pas-senger’s height. The upper edge of thehead restraint should be at least on a levelwith the upper-most point of the seatoccupant's ear.
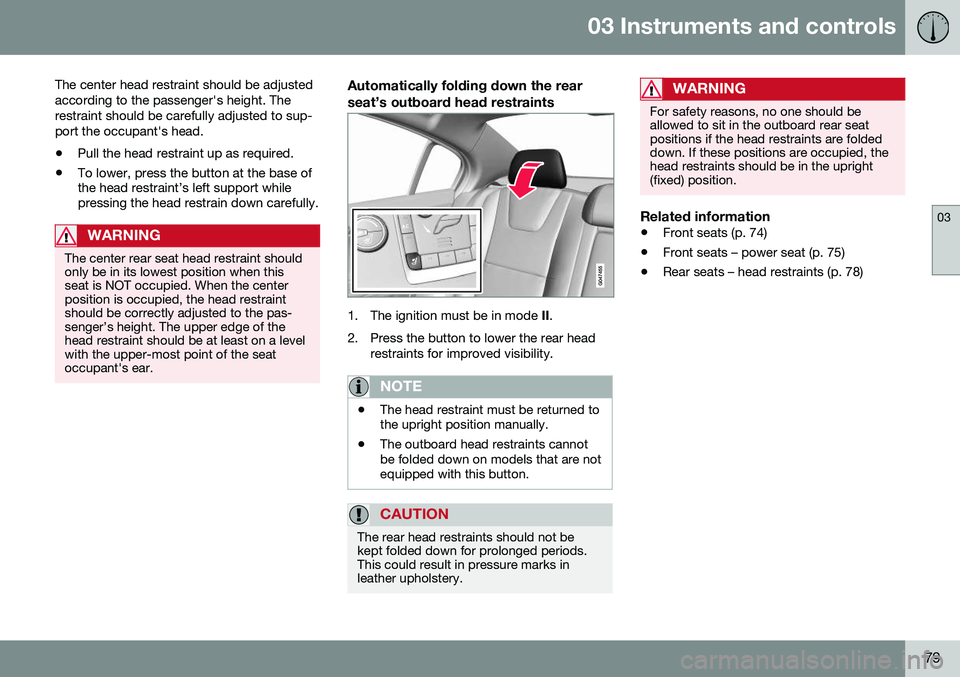
Automatically folding down the rear seat’s outboard head restraints
1. The ignition must be in mode
II.
2. Press the button to lower the rear head restraints for improved visibility.
NOTE
•The head restraint must be returned to the upright position manually.
• The outboard head restraints cannotbe folded down on models that are notequipped with this button.
CAUTION
The rear head restraints should not be kept folded down for prolonged periods.This could result in pressure marks inleather upholstery.
WARNING
For safety reasons, no one should be allowed to sit in the outboard rear seatpositions if the head restraints are foldeddown. If these positions are occupied, thehead restraints should be in the upright(fixed) position.
Related information
•
Front seats (p. 74)
• Front seats – power seat (p. 75)
• Rear seats – head restraints (p. 78)