2016 VOLVO S80 trailer
[x] Cancel search: trailerPage 9 of 380

Contents
* Option/accessory, for more information, see Introduction.7
08
Anti-lock braking system (ABS).............. 252
Brake lights............................................. 253
Emergency Brake Assistance (EBA)....... 253
Parking brake – general information....... 254
Parking brake – applying........................ 254
Parking brake – releasing........................ 255
Parking brake – symbols and messages 257
Driving through water.............................. 258
Engine and cooling system..................... 259
Conserving electrical current.................. 259
Before a long distance trip...................... 259
Driving in cold weather........................... 260
Refueling – fuel requirements................. 261
Refueling – octane rating........................ 262Refueling – opening/closing fuel filler
door......................................................... 263
Refueling – opening/closing fuel cap...... 264
Emission controls.................................... 265
Economical driving.................................. 265
Towing a trailer....................................... 267
Trailer Stability Assist (TSA).................... 268
Towing the vehicle.................................. 269
Towing eyelet.......................................... 270
Towing by tow truck............................... 271
09
09 Wheels and tires
Tires – general information...................... 273
Tires – storage and age.......................... 274
Tires – tread wear indicator.................... 275
Tires – tire economy................................ 275
Changing a wheel – direction of rotation 276
Changing a wheel – removing wheel...... 276
Changing a wheel – spare wheel............ 279Changing a wheel – accessing the spare
wheel....................................................... 280
Changing a wheel – installing a wheel.... 280
Tire inflation – general information.......... 281
Tire inflation – checking pressure........... 282
Tire specifications................................... 283
Tire inflation – pressure table.................. 285
Loading specifications............................ 286
Loading specifications – load limit.......... 286
Tire specifications – terminology............ 287Tire specifications – Uniform Tire Quality
Grading................................................... 288
Snow chains............................................ 289
Snow tires/studded tires......................... 290
Tire pressure monitoring - introduction.. 290Tire Pressure Monitoring System (TPMS)
– general information.............................. 291
09
Tire Pressure Monitoring System (TPMS)
– changing wheels.................................. 292 Tire Pressure Monitoring System (TPMS)
– recalibrating......................................... 293 Tire Pressure Monitoring System (TPMS)
– activating/deactivating......................... 293 Tire Pressure Monitoring System (TPMS)
– messages............................................. 294
Tire Monitor - introduction...................... 295
Calibrating Tire Monitor.......................... 295
Tire Monitor status information............... 296
Tire Monitor – messages......................... 297
Self-supporting run flat tires (SST).......... 298Tire sealing system* – general informa-
tion.......................................................... 298
Tire sealing system* – overview.............. 300
Tire sealing system* – sealing hole......... 301Tire sealing system – checking inflation
pressure.................................................. 303
Tire sealing system* – inflating tires........ 304Tire sealing system* – sealing compound
container................................................. 305
Page 120 of 380

04 Climate
04
118
Climate – general information
The vehicle is equipped with Electronic Cli- mate Control (ECC) (p. 122) that cools, heatsor dehumidifies the air in the passenger com-partment.
Air conditioning
NOTE
•The air conditioning can be switched off, but to ensure the best possible cli-mate comfort in the passenger com-partment and to prevent the windowsfrom misting, it should always be on.
• In warm weather, a small amount ofwater may accumulate under the carwhen it has been parked. This water iscondensation from the A/C systemand is normal.
Side windows and moonroofTo ensure that the air conditioning works optimally, the side windows, and the optionalmoonroof should be closed.
Fog on the inside of the windowsThe defroster function (p. 126) should beused to remove fog or mist from the inside ofthe windows. Keeping the windows cleanwith a commercially available window wash-ing spray will also help prevent fogging ormisting.
Vents in the parcel shelf
NOTE
The air vents at the rear of the parcel shelf should never be obstructed.
Temporary shut-off of the air conditioning
The air conditioning (p. 125) is momentarily disengaged during full acceleration or whendriving uphill with a trailer. This may result ina temporary increase in cabin temperature.
Ice and snowAlways keep the air intake grille at the base ofthe windshield free of snow.
Climate system maintenanceSpecial tools and equipment are required tomaintain and carry out repairs on the climatesystem. Work of this type should only bedone by a trained and qualified Volvo servicetechnician.
RefrigerantVolvo cares about the environment. The airconditioning system in your car contains aCFC-free refrigerant – R134a. This substancewill not deplete the ozone layer. The air con-ditioning system contains 1.76 lbs (800 g) ofR134a. The systems uses PAG oil.
Related information
•
Climate – sensors (p. 119)
• Climate – menu settings (p. 120)
Page 165 of 380

07 Driver support
07
163
Spin Control (SC)The SC function is designed to help prevent the drive wheels from spinning while the vehi-cle is accelerating.
Active Yaw Control (AYC)This function helps maintain directional stabil- ity, for example when cornering, by brakingone or more of the wheels if the vehicleshows a tendency to skid or slide laterally.
Trailer Stability Assist (TSA)The TSA helps stabilize a vehicle that is tow- ing a trailer when the vehicle and trailer havebegun to sway. See Trailer Stability Assist(TSA) (p. 268) for more information. This system is automatically deactivated if the driver selects Sport mode.
Related information
•Stability system – operation (p. 163)
• Stability system – symbols and messages (p. 164)
• Trailer Stability Assist (TSA) (p. 268)
Stability system – operation
Operation
Sport modeThe stability system is always activated and cannot be switched off.
However, the driver canselect Sport mode, which
offers more active drivingcharacteristics. Sport mode can be selected
in the MY CAR menus, see
My Car – introduction (p. 70).
In Sport mode, the engine management sys-
tem monitors movement of the accelerator pedal and steering wheel for sportier drivingby allowing more lateral movement of the rearwheels before ESC is activated. Under certain circumstances, such as when driving with snow chains, or driving in deepsnow or loose sand, it may be advisable totemporarily use Sport mode for maximum
tractive force. If the driver releases pressure on the acceler- ator pedal, ETC will also activate to help sta-bilize the vehicle. To switch to Sport mode:
Sport mode remains active until the driver
switches it off in the menu or until the engine is switched off. ETC will return to normalmode when the engine is restarted.
Related information
• Stability system – introduction (p. 162)
• Stability system – symbols and messages (p. 164)
Page 176 of 380

||
07 Driver support
07
174
WARNING
Adaptive Cruise Control only warns of vehicles detected by the radar sensor, seeAdaptive Cruise Control – limitations(p. 180). In some cases there may be nowarning or the warning may be delayed.The driver should always apply the brakeswhen necessary.
Steep inclines and/or heavy loadsACC is primarily intended for use on fairly level roads. The system may have difficultymaintaining the correct distance to a vehicleahead on steep inclines, if the vehicle is car-rying a heavy load or is towing a trailer. Inthese situations, the driver should always beprepared to apply the brakes if necessary.
Related information
•Adaptive Cruise Control – introduction (p. 171)
Adaptive Cruise Control – engaging
Putting ACC in standby modeBefore ACC can be used to regulate speed and/or the distance to a vehicle ahead, itmust first be put in standby mode. To do so:
Controls and display
Off/On/Standby mode
• Press
(2).
> The same symbol (7) appears (in white) in
the instrument panel to indicate that ACC is in standby mode.
NOTE
The driver's door must be closed and the driver's seat belt must be fastened beforeACC can be put in active mode. If the driv-er's seat belt is taken off or if the driver'sdoor is opened, ACC will return to standbymode.
Related information
• Adaptive Cruise Control – introduction (p. 171)
Page 221 of 380

07 Driver support
07
}}
219
Park assist – introduction
The park assist system is designed to assist you when driving into parking spaces,garages, etc. An audible signal and symbolsin the audio system’s display indicate the dis-tance to the object. The park assist system utilizes ultrasound sensors in the front bumper and rearbumper(s) to measure the distance to a vehi-cle or an object that may be close to the frontor rear of your vehicle.
NOTE
A trailer hitch whose wiring is integrated with the vehicle's electrical system will beincluded in the measurement of the availa-ble space behind the vehicle.
WARNING
Park Assist is an information system, NOT a safety system. This system is designedto be a supplementary aid when parkingthe vehicle. It is not, however, intended toreplace the driver's attention and judge-ment.
Related information
•Park assist – limitations (p. 222)
• Park assist – function (p. 219)
• Park assist – operation (p. 221)
• Park assist – troubleshooting (p. 223) •
Rear Park Assist Camera (PAC) – function (p. 224)
Park assist – function
Signals from the park assist system
View in the display (warning for objects front left/ right rear)
Visual indicatorThe audio system’s display gives an overview of the vehicle’s position in relation to adetected object. The marked sectors in the display indicate that one or more of the sensors has detectedan object. The closer the car symbol comesto a sector, the closer the vehicle is to theobject. If the infotainment system is switched off, the park assist system will not be able to providea visual indicator. An audible signal will stillbe provided.
Page 222 of 380

||
07 Driver support
07
220
Audible signalThe Park Assist system uses an intermittent tone that pulses faster as you come close toan object, and becomes constant when youare within approximately 1 ft (30 cm) of anobject in front of or behind the vehicle. Ifthere are objects within this distance bothbehind and in front of the vehicle, the tonealternates between front and rear speakers.
NOTE
The level of the audible signal can be low- ered/raised with the infotainment volumecontrol. The level can also be set in the MYCAR menu system. See My Car – introduc-tion (p. 70) for a description of the menusystem.
If the volume of another source from the audio system is high, this will be automati-cally lowered.
Rear park assist
G021423
The distance monitored behind the vehicle is approximately 5 ft (1.5 m). The audible signalcomes from the rear speakers. The system must be deactivated when towing a trailer, carrying bicycles in a rear-mountedcarrier, etc, which could trigger the rear parkassist system's sensors.
NOTE
•Rear park assist is deactivated auto- matically when towing a trailer if Volvogenuine trailer wiring is used. If a non-Volvo trailer hitch is being used, it maybe necessary to switch off the systemmanually, see Park assist – operation(p. 221).
• The system will not detect highobjects, such as a loading dock, etc.
• Objects such as chains, thin shinypoles or low objects may temporarilynot be detected by the system. Thismay result in the pulsing tone unex-pectedly stopping instead of changingto a constant tone as the vehicleapproaches the object. In such cases,use caution when backing up or stopthe vehicle to help avoid damage.
Page 225 of 380

07 Driver support
07
223
Park assist – troubleshooting
Faults in the systemIf the information symbol illuminates andPark assist syst Service required is shown
on the information display, this indicates that the system is not functioning properly andhas been disengaged. Consult a trained andqualified Volvo service technician.
CAUTION
In certain circumstances, the park assist system may give unexpected warning sig-nals that can be caused by external soundsources that use the same ultrasound fre-quencies as the system. This may includesuch things as the horns of other vehicles,wet tires on asphalt, pneumatic brakes,motorcycle exhaust pipes, etc. This doesnot indicate a fault in the system.
Related information
• Park assist – introduction (p. 219)
• Park assist – limitations (p. 222)
• Park assist – function (p. 219)
• Park assist – operation (p. 221)
• Rear Park Assist Camera (PAC) – function (p. 224)
Rear Park Assist Camera (PAC) – introduction
The Park Assist Camera is designed to pro- vide the driver with a view of the area behindthe vehicle when backing up.
IntroductionPAC uses the display in the center console toshow the area behind the car while you arebacking up. PAC also shows guiding lines in the on- screen image to indicate the direction that thevehicle will take as it moves rearward, whichhelps simplify parallel parking, backing into atight space or when attaching a trailer to thevehicle. The images of vehicles in this section are generic and may not depict your specificmodel.
NOTE
A trailer hitch whose wiring is integrated with the vehicle's electrical system will beincluded in the measurement of the availa-ble space behind the vehicle.
WARNING
• PAC is designed to be a supplemen- tary aid when parking the vehicle. It isnot, however, intended to replace thedriver’s attention and judgment.
• The camera has blind spots where itcannot detect objects or peoplebehind the vehicle.
• Pay particular attention to people oranimals that are close to the vehicle.
• Objects seen on the screen may becloser than they appear to be.
Related information
•
Rear Park Assist Camera (PAC) – opera- tion (p. 224)
• Rear Park Assist Camera (PAC) – limita-tions (p. 227)
Page 227 of 380

07 Driver support
07
}}
* Option/accessory, for more information, see Introduction.225
5 seconds after the gear selector has been moved from
R or until the vehicle's forward
speed exceeds 6 mph/10 km/h(21 mph/35 km/h in reverse). The screen willthen revert to the view that was displayedbefore R was selected.
NOTE
If any button on the center console control panel is pressed, the camera image willdisappear from the display. Pressing CAM
will return the camera image to the display.
SettingsBy default, PAC is set to activate when the gear selector is moved to R
To change PAC settings when a camera viewis displayed:
1. Press OK/MENU when a camera view is
on the screen. A menu will be displayed.
2. Turn TUNE to scroll to the desired set-
ting.
3. Press OK/MENU to make the setting and
exit the menu by pressing EXIT.
Summary
•Pressing
CAM will activate the camera
even if the gear selector is not in Reverse.
• If there are two cameras installed on the vehicle*, turn
TUNE or press CAM to tog-
gle between the cameras.
Related information
• Park assist – introduction (p. 219)
• Park assist – function (p. 219)
• Park assist – troubleshooting (p. 223)
• Park assist – limitations (p. 222)
• Rear Park Assist Camera (PAC) – intro-duction (p. 223)
Rear Park Assist Camera (PAC) – guiding and marker lines
Guiding lines
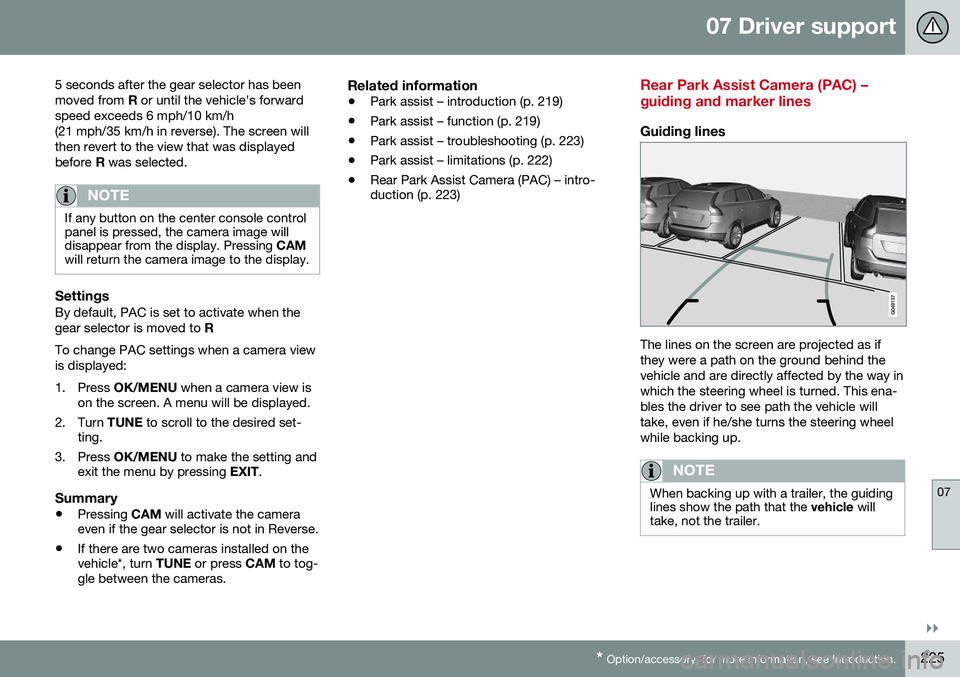
The lines on the screen are projected as if they were a path on the ground behind thevehicle and are directly affected by the way inwhich the steering wheel is turned. This ena-bles the driver to see path the vehicle willtake, even if he/she turns the steering wheelwhile backing up.
NOTE
When backing up with a trailer, the guiding lines show the path that the
vehicle will
take, not the trailer.