2016 VOLVO S80 fog light
[x] Cancel search: fog lightPage 5 of 380

Contents
* Option/accessory, for more information, see Introduction.3
03
03 Instruments and controls
Instrument overview ................................. 59
Information displays – introduction........... 62
Eco Guide* and Power Meter*.................. 65
Information displays – indicator symbols. 66
Information displays – warning symbols... 68
My Car – introduction............................... 70Information displays – ambient tempera-
ture sensor................................................ 71 Information displays – trip odometer and
clock......................................................... 72
Inserting/removing remote key................. 72
Ignition modes.......................................... 73
Front seats................................................ 74
Front seats – folding backrest*................. 75
Front seats – power seat.......................... 75Key memory – power driver's seat* and
door mirrors.............................................. 77
Rear seats – head restraints..................... 78
Rear seats – folding backrest................... 80
Steering wheel.......................................... 81
Electrically heated* steering wheel........... 82
Lighting panel........................................... 82
High/low beam headlights........................ 83
Active high beams (AHB)*......................... 84
03
Tunnel detection (models with the rain
sensor* only)............................................. 85
Active Bending Lights (ABL)*.................... 85
Auxiliary lights*.......................................... 86
Instrument and "theater" lighting.............. 86
Parking lights............................................ 87
Rear fog lights........................................... 87
Hazard warning flashers........................... 88
Turn signals............................................... 88
Front interior lighting................................. 89
Rear interior lighting.................................. 90
Home safe lighting.................................... 90
Approach lighting...................................... 91
Windshield wipers..................................... 91
Rain sensor*.............................................. 92
Windshield washer.................................... 92
Tailgate wiper/washer............................... 93
Power windows......................................... 94
Sun shades*.............................................. 95
Power door mirrors................................... 96Power door mirrors – automatic tilting/
retraction................................................... 97 Heated windshield*, rear window and
door mirror defrosters............................... 98
03
Interior rearview mirror.............................. 98
Digital compass*....................................... 99
Power moonroof – introduction.............. 100
Power moonroof – operation.................. 101 HomeLink ®
Wireless Control System* –
introduction............................................. 102HomeLink ®
Wireless Control System* –
programming........................................... 103
Volvo Sensus.......................................... 105
Information display – menu controls....... 106
Information display – menu overview..... 107
Information display – messages............. 107
Trip computer – introduction ................. 109Trip computer – functions, analog instru-
ment panel.............................................. 110 Trip computer – functions, digital instru-
ment panel.............................................. 113 Trip computer – Supplementary informa-
tion.......................................................... 115
Trip computer – Trip statistics................ 116
Page 68 of 380

||
03 Instruments and controls
03
66* Option/accessory, for more information, see Introduction.
Available powerThe smaller, upper indicator shows the engine's available power 2
. The higher the
reading on the scale, the greater the amount of power remaining in the current gear.
Utilized powerThe larger, lower indicator shows the amount of engine power that has been utilized 2
. The
higher the reading on the scale, the greater the amount of power that is being utilized. The larger the gap between the two indica- tors, the greater the amount of power remain-ing.
Information displays – indicator symbols
The indicator symbols alert the driver when certain functions are activated, that a systemis actively working or that a fault may haveoccurred in a system or function.
SymbolDescription
Fault in the Active Bending Light (ABL)*system
Malfunction indicator light
Anti-lock brake system (ABS)
Rear fog lights on
Stability system
The stability system's Sport mode is activated
Low fuel level
Information symbol, read the text displayed in the instrumentpanel
High beam indicator
SymbolDescription
Left turn signal indicator
Right turn signal indicator
Tire pressure monitoring sensor (TPMS) A
The Eco function is on.
TheStart/Stop function is active (the engine has auto-stopped)
A
Option in Canada
Fault in the Active Bending Light (ABL)
system
This symbol will illuminate if there is a fault in the ABL system. See Active Bending Lights(ABL)* (p. 85) for more information aboutthis system.
2 Depending on rpm
Page 69 of 380

03 Instruments and controls
03
}}
* Option/accessory, for more information, see Introduction.67
Malfunction Indicator LightAs you drive, a computer called On-Board Diagnostics II (OBDII) monitors your vehicle'sengine, transmission, electrical and emissionsystems. The malfunction indicator light will illuminate if the computer senses a condition that poten-tially may need correcting. When this hap-pens, please have your vehicle checked by atrained and qualified Volvo service technicianas soon as possible. A malfunction indicator light may have many causes. Sometimes, you may not notice achange in your car's behavior. Even so, anuncorrected condition could hurt fuel econ-omy, emission controls, and drivability.Extended driving without correcting the causecould even damage other components inyour vehicle. This light may illuminate if the fuel filler cap is not closed tightly or if the engine was runningwhile the vehicle was refueled.
Anti-lock Brake System (ABS)If the warning light comes on, there may be a malfunction in the ABS system (the standardbraking system will still function). Check thesystem by:
1. Stopping in a safe place and switching off
the ignition.
2. Restart the engine. 3. If the warning light goes off, no further
action is required.
If the indicator light remains on, the vehicle should be driven to a trained and qualifiedVolvo service technician for inspection, seeBrakes – general (p. 250) for additional infor-mation.
Rear fog lightsThis symbol indicates that the rear fog lights are on.
Stability systemThis indicator symbol flashes when the stabil- ity system is actively working to stabilize thevehicle, see Stability system – introduction(p. 162) for more detailed information.
Stability system - Sport modeThis symbol illuminates to indicate that the stability system's Sport mode has been acti-
vated to help provide maximum tractive force,for example when driving with snow chains,or driving in deep snow or loose sand.
Low fuel levelWhen this light comes on, the vehicle should be refueled as soon as possible. See Refuel-ing – fuel requirements (p. 261) for informa-tion about fuel and refueling.
Information symbolThe information symbol lights up and a text message is displayed to provide the driverwith necessary information about one of thevehicle's systems. The message can beerased and the symbol can be turned off by pressing the
OK button (see Information dis-
play – menu controls (p. 106) for information)or this will take place automatically after ashort time (the length of time varies, depend-ing on the function affected). The information symbol may also illuminate together with other symbols.
High beam indicatorThis symbol illuminates when the high beam headlights are on, or if the high beam flashfunction is used.
Left turn signal indicator
Right turn signal indicator
NOTE
• Both turn signal indicators will flash when the hazard warning flashers areused.
• If either of these indicators flash fasterthan normal, the direction indicatorsare not functioning properly.
Tire pressure monitoring system (TPMS)*
This symbol illuminates to indicate that tire pressure in one or more tires is low, see TirePressure Monitoring System (TPMS) – generalinformation (p. 291) for detailed information.
Eco* function onThe symbol will illuminate when the Eco func- tion is activated.
Page 84 of 380

03 Instruments and controls
03
82* Option/accessory, for more information, see Introduction.
Electrically heated* steering wheel
The steering wheel can be heated electrically.
Button for steering wheel heating
With the engine running, press this button once to begin warming the steering wheel(press again to switch off). The indicator lightin the button will illuminate when the functionis active. This function can also be started automati- cally (the setting can be activated/deactivatedin the MY CAR menu) if the vehicle is coldand the ambient temperature is belowapproximately 50° F (10° C).
Lighting panel
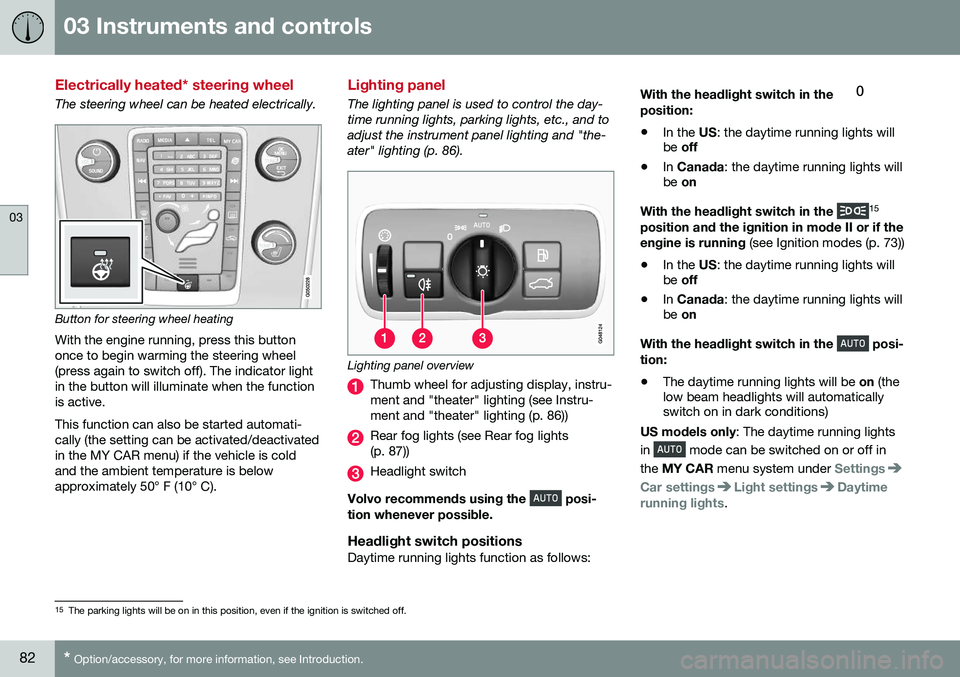
The lighting panel is used to control the day- time running lights, parking lights, etc., and toadjust the instrument panel lighting and "the-ater" lighting (p. 86).
Lighting panel overview
Thumb wheel for adjusting display, instru- ment and "theater" lighting (see Instru-ment and "theater" lighting (p. 86))
Rear fog lights (see Rear fog lights (p. 87))
Headlight switch
Volvo recommends using the
posi-
tion whenever possible.
Headlight switch positionsDaytime running lights function as follows: With the headlight switch in the
position:
• In the
US: the daytime running lights will
be off
• In
Canada : the daytime running lights will
be on
With the headlight switch in the
15
position and the ignition in mode II or if the engine is running (see Ignition modes (p. 73))
• In the
US: the daytime running lights will
be off
• In
Canada : the daytime running lights will
be on
With the headlight switch in the
posi-
tion:
• The daytime running lights will be
on (the
low beam headlights will automatically switch on in dark conditions)
US models only : The daytime running lights
in
mode can be switched on or off in
the MY CAR menu system under
Settings
Car settingsLight settingsDaytime
running lights.
15 The parking lights will be on in this position, even if the ignition is switched off.
Page 86 of 380

03 Instruments and controls
03
84* Option/accessory, for more information, see Introduction.
Active high beams (AHB)*
AHB uses a camera at the upper edge of the windshield to detect the headlights of oncom-ing vehicles or the taillights of a vehicledirectly ahead. When this happens, the head-lights will automatically switch from highbeams to low beams. When the camera nolonger detects the headlights/taillights ofother vehicles, your headlights will switchback to high beams after several seconds. To activate AHB:
• Turn the headlight control to the
position.
The feature will begin functioning if the engine has been running for at least 20 seconds andthe vehicle's speed is at least 12 mph(20 km/h).
Headlight switch in the AUTO position Switch AHB on or off by pulling the left steer- ing wheel lever rearward (toward the steeringwheel) as far as possible and releasing it. IfAHB is switched off while the high beams areon, the headlights will change to low beams.
Models with an analog instrument panel
When AHB is activated, the symbol will
illuminate in the instrument panel. The high beam indicator (
) in the instrument panel
will also illuminate when the high beams are on.
Models with a digital instrument panel
When AHB is activated, will illuminate
as a white symbol in the instrument panel.
When the high beams are on, the symbol will change to blue.
NOTE
•Keep the windshield in front of the camera free of ice, snow, dirt, etc.
• Do not mount or in any way attachanything on the windshield that couldobstruct the camera.
If Active high beam Temporary
unavailable Switch manually is displayed in
the instrument panel, switching between high and low beams will have to be done man-ually. However, the light switch can remain in the
position. The same applies if
Windscreen Sensors blocked is displayed
and the
symbol is displayed. The symbol will go out when these messages are displayed. AHB may be temporarily unavailable (e.g., in heavy fog or rain). When AHB becomes activeagain or if the sensors in the windshield areno longer obscured, the messages will disap- pear and the
symbol will illuminate.
CAUTION
In the following situations, it may be nec- essary to switch between high and lowbeams manually:
• In heavy fog or rain
• In blowing snow or slush
• In bright moonlight
Page 89 of 380

03 Instruments and controls
03
87
Parking lights
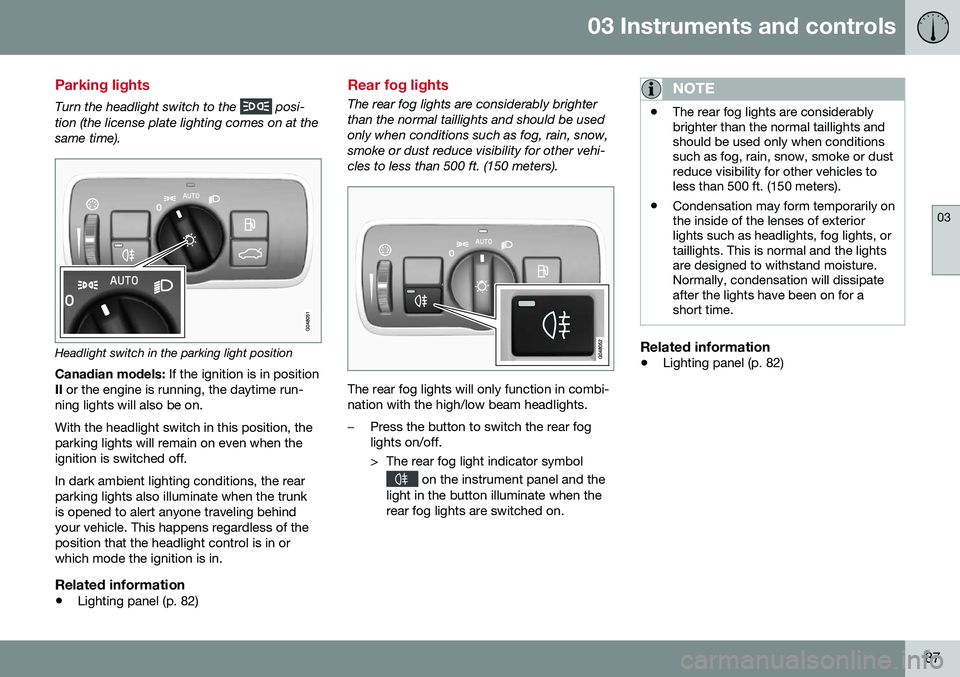
Turn the headlight switch to the posi-
tion (the license plate lighting comes on at the same time).
Headlight switch in the parking light position
Canadian models: If the ignition is in position
II or the engine is running, the daytime run-
ning lights will also be on. With the headlight switch in this position, the parking lights will remain on even when theignition is switched off. In dark ambient lighting conditions, the rear parking lights also illuminate when the trunkis opened to alert anyone traveling behindyour vehicle. This happens regardless of theposition that the headlight control is in orwhich mode the ignition is in.
Related information
• Lighting panel (p. 82)
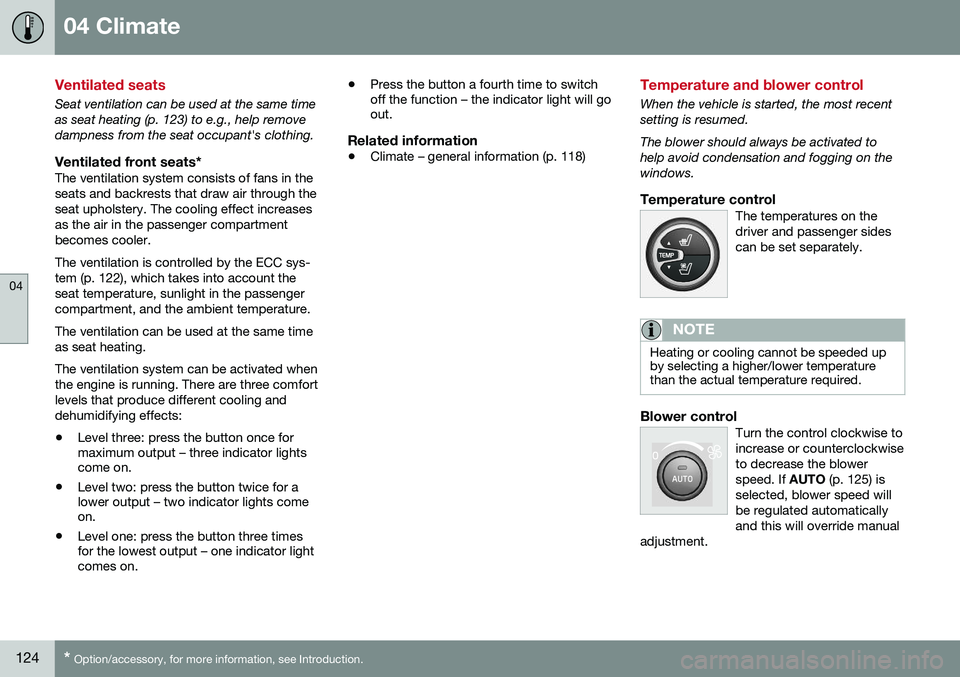
Rear fog lights
The rear fog lights are considerably brighter than the normal taillights and should be usedonly when conditions such as fog, rain, snow,smoke or dust reduce visibility for other vehi-cles to less than 500 ft. (150 meters).
The rear fog lights will only function in combi- nation with the high/low beam headlights.
–Press the button to switch the rear fog lights on/off.
> The rear fog light indicator symbol
on the instrument panel and the
light in the button illuminate when the rear fog lights are switched on.
NOTE
• The rear fog lights are considerably brighter than the normal taillights andshould be used only when conditionssuch as fog, rain, snow, smoke or dustreduce visibility for other vehicles toless than 500 ft. (150 meters).
• Condensation may form temporarily onthe inside of the lenses of exteriorlights such as headlights, fog lights, ortaillights. This is normal and the lightsare designed to withstand moisture.Normally, condensation will dissipateafter the lights have been on for ashort time.
Related information
•
Lighting panel (p. 82)
Page 100 of 380

03 Instruments and controls
03
98* Option/accessory, for more information, see Introduction.
Heated windshield*, rear window and door mirror defrosters
The heating function is used to defrost/de-ice the windshield and/or the rear window anddoor mirrors.
Max. defroster/heated windshield (1), rear win- dow and door mirror defroster (2)
Press button (1) to defrost/de-ice the wind- shield and/or button (2) to defrost the rearwindow and door mirrors. The indicator lightsin the respective buttons indicate that thefunction is active. Switch the function offwhen then windshield/rear window/mirrorshave cleared to help avoid battery drain. Theheating function will also switch off automati-cally after a certain amount of time. The rear window is then defogged/de-iced (the function will switch on and off automati-cally until the ignition is switched off) if the ambient temperature remains below 45 °F(7 °C). Auto-defrosting for the rear window and door mirrors (if the vehicle is started when theambient temperature is below 45 °F (7 °C)can be selected in
MY CAR under
Settings
Climate settingsAutomatic rear
defroster. See My Car – introduction (p. 70)
for a description of the menu system.
Interior rearview mirror
The interior rearview mirror has an auto-dim function that helps reduce glare from follow-ing vehicle's headlights.
Auto-dim functionThe interior rearview mirror’s auto-dim func-tion is controlled by two sensors: one point-ing forward (located on the forward-facingside of the mirror, which monitors the amountof ambient light) and one pointing rearward(located on the side of the mirror facing thedriver at the upper edge, which senses thestrength of following vehicles' headlights),and work together to help eliminate glare.
NOTE
Obstructing the forward sensor with e.g., parking stickers, transponders, etc., or therear sensor by placing objects on the par-cel shelf or the rear seat in such a way thatlight is prevented from reaching the sensorwill reduce the auto-dim function in therearview mirror.
Related information
• Power door mirrors (p. 96)
Page 126 of 380

04 Climate
04
124* Option/accessory, for more information, see Introduction.
Ventilated seats
Seat ventilation can be used at the same time as seat heating (p. 123) to e.g., help remove
dampness from the seat occupant's clothing.
Ventilated front seats*The ventilation system consists of fans in theseats and backrests that draw air through theseat upholstery. The cooling effect increasesas the air in the passenger compartmentbecomes cooler. The ventilation is controlled by the ECC sys- tem (p. 122), which takes into account theseat temperature, sunlight in the passengercompartment, and the ambient temperature. The ventilation can be used at the same time as seat heating. The ventilation system can be activated when the engine is running. There are three comfortlevels that produce different cooling anddehumidifying effects:
• Level three: press the button once for maximum output – three indicator lightscome on.
• Level two: press the button twice for alower output – two indicator lights comeon.
• Level one: press the button three timesfor the lowest output – one indicator lightcomes on. •
Press the button a fourth time to switchoff the function – the indicator light will goout.
Related information
•Climate – general information (p. 118)
Temperature and blower control
When the vehicle is started, the most recent setting is resumed. The blower should always be activated to help avoid condensation and fogging on thewindows.
Temperature controlThe temperatures on thedriver and passenger sidescan be set separately.
NOTE
Heating or cooling cannot be speeded up by selecting a higher/lower temperaturethan the actual temperature required.
Blower controlTurn the control clockwise to increase or counterclockwiseto decrease the blowerspeed. If
AUTO (p. 125) is
selected, blower speed willbe regulated automaticallyand this will override manual
adjustment.