2016 VOLVO S80 ECO mode
[x] Cancel search: ECO modePage 287 of 380

09 Wheels and tires
09
285
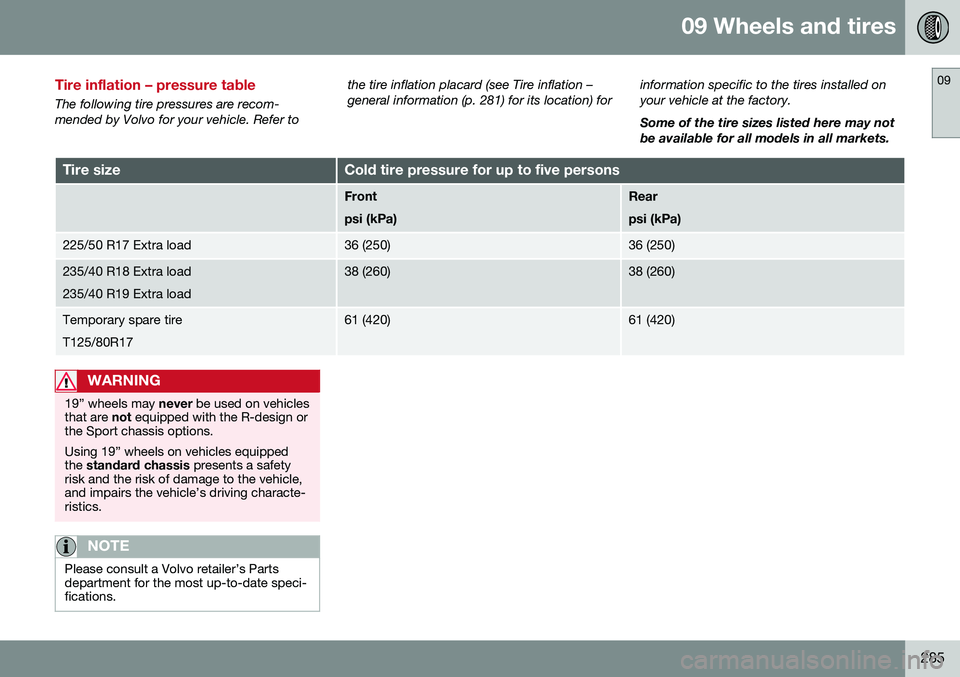
Tire inflation – pressure table
The following tire pressures are recom- mended by Volvo for your vehicle. Refer tothe tire inflation placard (see Tire inflation –general information (p. 281) for its location) for
information specific to the tires installed onyour vehicle at the factory. Some of the tire sizes listed here may not be available for all models in all markets.
Tire sizeCold tire pressure for up to five persons
Front psi (kPa)Rear psi (kPa)
225/50 R17 Extra load36 (250)36 (250)
235/40 R18 Extra load 235/40 R19 Extra load38 (260)38 (260)
Temporary spare tire T125/80R1761 (420)61 (420)
WARNING
19” wheels may
never be used on vehicles
that are not equipped with the R-design or
the Sport chassis options. Using 19” wheels on vehicles equipped the standard chassis presents a safety
risk and the risk of damage to the vehicle,and impairs the vehicle’s driving characte-ristics.
NOTE
Please consult a Volvo retailer’s Parts department for the most up-to-date speci-fications.
Page 295 of 380

09 Wheels and tires
09
* Option/accessory, for more information, see Introduction.293
Tire Pressure Monitoring System (TPMS) – recalibrating
In certain cases, it may be necessary to recali- brate TPMS to conform to Volvo's recom-mended tire inflation pressures (see the infla-tion pressure table in Tire inflation – pressuretable (p. 285)), for example, if higher inflationpressure is necessary when transportingheavy loads, etc.
Recalibrating TPMS (Canadian models
only)*
This is done in the vehicle's menu system. To recalibrate:
1. Switch off the engine.
2. Inflate the tires to the desired pressure and put the ignition in mode I or II (see
Ignition modes (p. 73) for additional infor- mation).
3. Press the MY CAR key in the center con-
sole control panel and select
Settings
Car settingsTire pressure.
4. Press OK/MENU , select
Calibrate tire
pressure and press OK/MENU again. 5. Drive the vehicle at a speed above
20 mph (30 km/h) continuously for at least 10 minutes.
> Calibration is done automatically onceinitiated by the driver and the system does not give any confirmation whencalibration is finished.
The new pressures are used until step 1-5above are repeated.
Related information
• Tire Pressure Monitoring System (TPMS) – general information (p. 291)
• Tire Pressure Monitoring System (TPMS)– messages (p. 294)
• Tire Pressure Monitoring System (TPMS)– activating/deactivating (p. 293)
• Tire Pressure Monitoring System (TPMS)– changing wheels (p. 292)
• My Car – introduction (p. 70)
Tire Pressure Monitoring System (TPMS) – activating/deactivating
Activating/deactivating TPMS
(Canadian models only)
1. Switch off the engine.
2. Put the ignition in mode I or II (see Igni-
tion modes (p. 73) for additional informa- tion).
3. Press the MY CAR key in the center con-
sole control panel and select
Settings
Car settingsTire pressure
4. Select Tire monitoring and press OK/
MENU to turn the system on or off.
Related information
•Tire Pressure Monitoring System (TPMS) – general information (p. 291)
Page 312 of 380

10 Maintenance and servicing
10
310* Option/accessory, for more information, see Introduction.
Onboard Diagnostic System
OBD II is part of your vehicle's computerized engine management system. It stores diag-nostic information about your vehicle's emis-sion controls. It can light the Check Enginelight (MIL) if it detects an emission control"fault." A "fault" is a component or systemthat is not performing within an expectedrange. A fault may be permanent or tempo-rary. OBD II will store a message about anyfault.
Emission inspection readiness
How do states use OBD II for emission inspections?
Many states connect a computer directly to a vehicle's OBD II system. The inspector canthen read "faults." In some states, this type ofinspection has replaced the tailpipe emissiontest.
How can my vehicle fail OBD II emission
inspection?
Your vehicle can fail OBD II emission inspec- tion for any of the following reasons.
• If your Check Engine (MIL) light is lit, your vehicle may fail inspection.
• If your vehicle's Check Engine light waslit, but went out without any action onyour part, OBD II will still have a recordedfault. Your vehicle may pass or fail,depending on the inspection practices inyour area. •
If you had recent service that requireddisconnecting the battery, OBD II diag-nostic information may be incompleteand "not ready" for inspection. A vehiclethat is not ready may fail inspection.
How can I prepare for my next OBD II
emission inspection?
• If your Check Engine (MIL) light is lit – or was lit but went out without service, haveyour vehicle diagnosed and, if necessary,serviced by a qualified Volvo technician.
• If you recently had service for a lit CheckEngine light, or if you had service thatrequired disconnecting the battery, aperiod of driving is necessary to bring theOBD II system to "ready" for inspection.Two half-hour trips of mixed stop-and-go/highway driving are typically neededto allow OBD II to reach readiness. YourVolvo retailer can provide you with moreinformation on planning a trip.
• Maintain your vehicle in accordance withyour vehicle's maintenance schedule.
Booking service and repairs
Connected Service Booking (CSB) makes set- ting up a time for service, maintenance and/orrepairs directly from the vehicle quick andconvenient.
Prerequisites
• The owner (primary driver) must have a valid Volvo ID. See Volvo ID (p. 21) foradditional information.
• The vehicle must be connected to the Internet using a paired Bluetooth ®
cell
phone. See your Sensus Infotainment supplement for information on pairing acell phone. On models equipped withVolvo On Call (VOC)*, you can connect tothe Internet using your separate VOCdata plan. Refer to your separate VolvoOn Call manual.
• By default, the retailer where you pur-chased your vehicle will be your preferred(primary) retailer/Volvo authorized work-shop who will perform service and repairson your vehicle. To change the preferredretailer, go to Dealer Locator atvolvocars.com and select a retailer, clickon Service Scheduler and book anappointment at the new preferred retailer.
• In order to be guided through the on-screen steps, the menu alternative
Display notifications must be activated.
CSB menu accessOnce the prerequisites have been estab- lished, all CSB-related menus can be
Page 329 of 380

10 Maintenance and servicing
10
}}
327
Lighting functionWat- tageBulb
Vanity mirror2W2x4.6d type T5
Front side marker lights5W5W LL
Glove compart- ment lighting5SV8.5 (length 43mm)
Trunk lighting5SV8.5 (length 38mm)
NOTE
Please consult a Volvo retailer’s Parts department for the most up-to-date bulbspecifications.
Related information
•Bulbs – introduction (p. 319)
Wiper blades – service position
The windshield wiper blades must be in the vertical (service) position for replacement,washing or to lift them away from the wind-shield when e.g., removing ice or snow.
Wiper blades in service position
CAUTION
Be sure the wiper blades are not frozen in position before attempting to move themto the service position.
To put the windshiield wipers in the service position:
1. Insert the remote key into the ignition
slot3
and press the START/STOP
ENGINE button briefly to put the ignition
in mode I (see Ignition modes (p. 73) for
detailed information about the ignition modes).
2. Press the START/STOP ENGINE button
again briefly to switch the ignition off.
3. Within 3 seconds, move the right steering wheel lever up and hold it for at least1 second.
> The wipers will then move to the verti-cal (service) position on the windshield.
The wipers can be returned to the normal position by pressing the START/STOP
ENGINE button briefly to put the ignition in
mode I (or by starting the engine).
CAUTION
If the wiper arms have been folded out from the windshield while in the serviceposition, fold them back against the wind-shield before returning the wipers to thenormal position to help avoid scratchingthe paint on the hood.
3
Not necessary on vehicles with the optional keyless drive.
Page 331 of 380

10 Maintenance and servicing
10
329
With the wipers in the service position, fold out the wiper arm from the wind-shield. Press the button on the wiperblade attachment and pull the wiperblade straight out, parallel with the wiperarm.
Slide in the new wiper blade until it clicks into place.
Check that the blade is securely in place.
4. Press the wipers back against the wind- shield.
To return the wipers from the service position to the normal position, fold the wipers backagainst the windshield and press the START/
STOP ENGINE button briefly to put the igni-
tion in mode I (or start the engine).
CleaningKeeping the windshield and wiper bladesclean helps improve visibility and prolongsthe service life of the wiper blades. Clean thewiper blades with a stiff-bristle brush andlukewarm soap solution or car washing deter-gent.
Related information
• Engine compartment – washer fluid (p. 329)
• Wiper blades – service position (p. 327)
Engine compartment – washer fluid
Washer fluid helps keep the windshield and headlights clean. During cold weather, thereservoir should be filled with windshieldwasher solvent containing antifreeze. UseVolvo Original Washer Fluid or the equivalentwith a recommended pH value between 6 and8.
G021764
Location of the washer fluid reservoir
The windshield and headlight washers share a common reservoir. The washer fluid reservoir is located on the driver's side of the engine compartment. Forcapacities, see the printed Owner's Manual. Specification: Use a washer antifreeze rec-
ommended by Volvo, mixed with water. Volume: •
6.8 US qts (6.5 liters)
• 4.7 US qts (4.5 liters 4
)
Related information
• Wiper blades – service position (p. 327)
4
Models without headlight washers
Page 345 of 380

10 Maintenance and servicing
10
}}
343
Fuses – engine compartment cold zone (Start/Stop only)7
There are fuses in the engine compartment cold zone on models with the Start/Stopfunction.
Location of Start/Stop fuses
Positions
•
Fuses A1, A2 and 1–11 are relays/circuit breakers and should only be removed orreplaced by a trained and qualified Volvoservice technician.
• Fuse 12 may be changed at any timewhen necessary.PosFunctionA
Circuit breaker: central elec- trical module in the enginecompartment175
Circuit breaker: fuseboxes under the glove compart-ment, central electrical mod-ule in the trunk175
PosFunctionA
-
Circuit breaker: fusebox
B
under the glove compartment (see Fuses – glove compart-ment (p. 339))50
7 Option on 4-cyl. engines
Page 351 of 380

10 Maintenance and servicing
10
}}
349
CAUTION
•Do not use cleaning agents with high alcohol content such as washer fluidto clean instrument panel glass.
• Never spray cleaning agents or waterdirectly onto components with electri-cal buttons or controls. Clean compo-nents of this type by applying thecleaning agent/water sparingly to acloth and wiping the components sothat no liquid penetrates into thesecomponents.
Related information
•
Washing the car (p. 345)
Touching up paintwork
Paint damage requires immediate attention to avoid rusting. Make it a habit to check the fin-ish regularly, for instance washing the vehicle.Touch-up if necessary. Paint repairs require special equipment and skill. Contact your Volvo retailer for anyextensive damage. Minor scratches can be repaired by using Volvo touch-up paint.
Color code
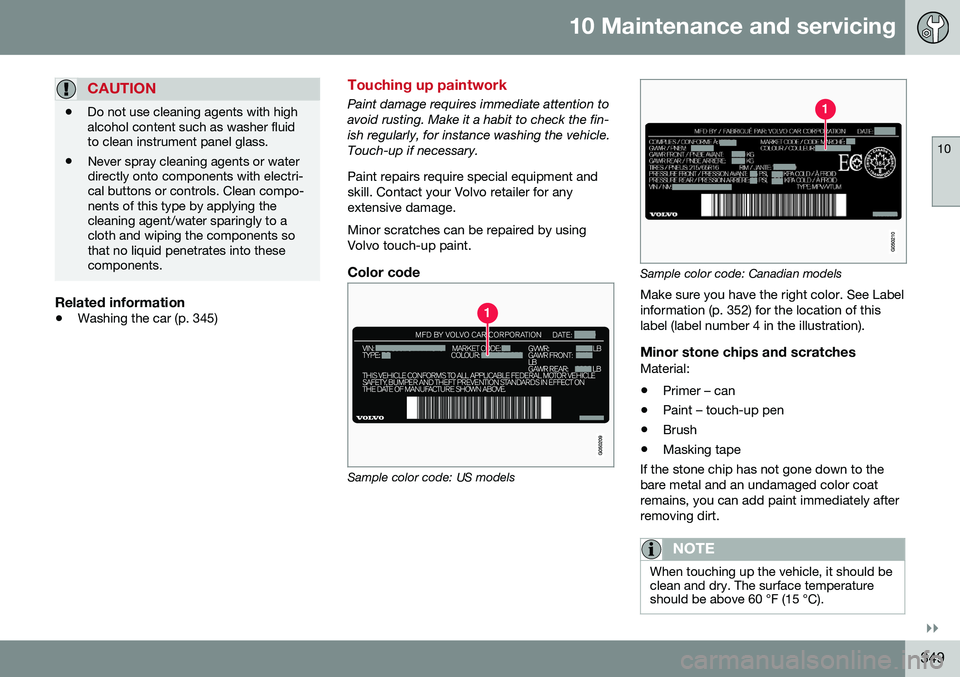
Sample color code: US models
Sample color code: Canadian models
Make sure you have the right color. See Label information (p. 352) for the location of thislabel (label number 4 in the illustration).
Minor stone chips and scratchesMaterial:
• Primer – can
• Paint – touch-up pen
• Brush
• Masking tape
If the stone chip has not gone down to thebare metal and an undamaged color coatremains, you can add paint immediately afterremoving dirt.
NOTE
When touching up the vehicle, it should be clean and dry. The surface temperatureshould be above 60 °F (15 °C).
Page 356 of 380

||
11 Specifications
11
354
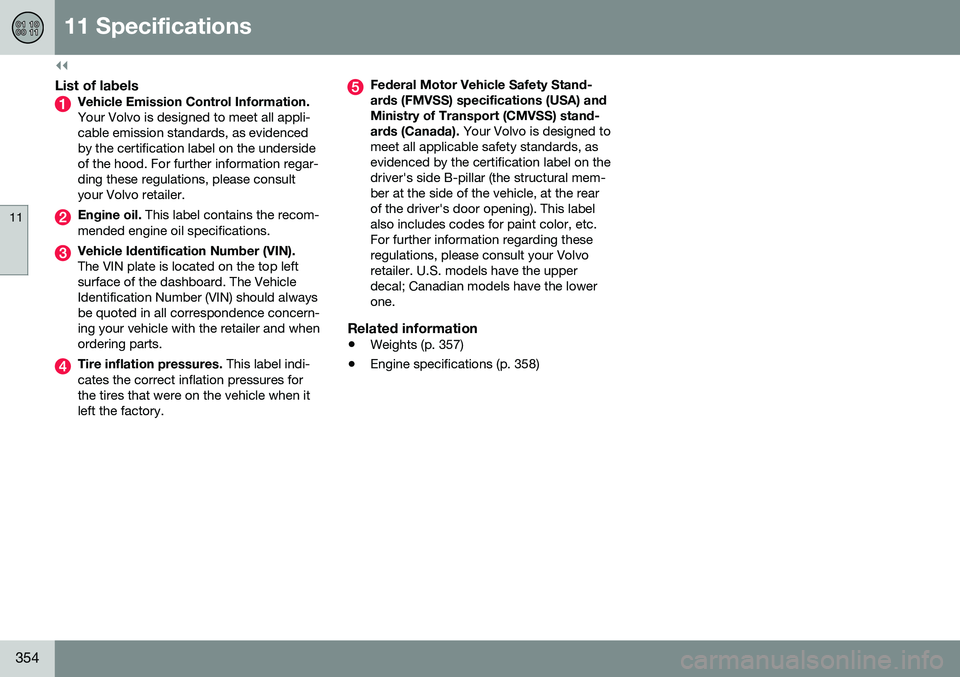
List of labelsVehicle Emission Control Information. Your Volvo is designed to meet all appli- cable emission standards, as evidencedby the certification label on the undersideof the hood. For further information regar-ding these regulations, please consultyour Volvo retailer.
Engine oil. This label contains the recom-
mended engine oil specifications.
Vehicle Identification Number (VIN). The VIN plate is located on the top left surface of the dashboard. The VehicleIdentification Number (VIN) should alwaysbe quoted in all correspondence concern-ing your vehicle with the retailer and whenordering parts.
Tire inflation pressures. This label indi-
cates the correct inflation pressures for the tires that were on the vehicle when itleft the factory.
Federal Motor Vehicle Safety Stand- ards (FMVSS) specifications (USA) andMinistry of Transport (CMVSS) stand- ards (Canada). Your Volvo is designed to
meet all applicable safety standards, as evidenced by the certification label on thedriver's side B-pillar (the structural mem-ber at the side of the vehicle, at the rearof the driver's door opening). This labelalso includes codes for paint color, etc.For further information regarding theseregulations, please consult your Volvoretailer. U.S. models have the upperdecal; Canadian models have the lowerone.
Related information
• Weights (p. 357)
• Engine specifications (p. 358)