2016 VOLVO S80 ESP
[x] Cancel search: ESPPage 276 of 380
09 Wheels and tires
09
274
Tires – storage and age
When storing complete wheels (tires mounted on rims), they should be suspended off thefloor or placed on their sides on the floor.
New Tires
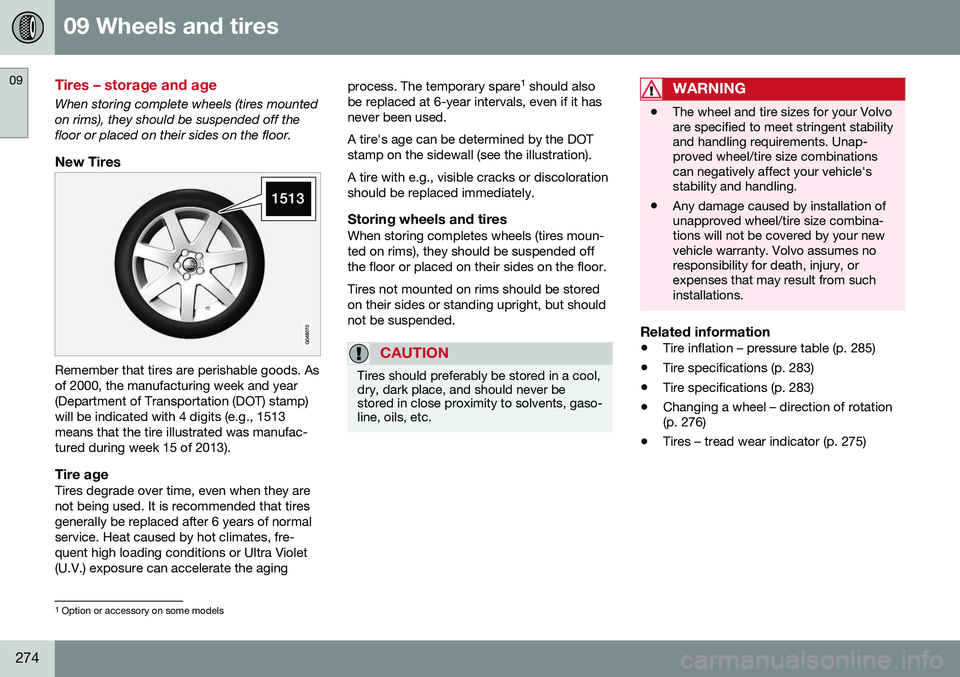
Remember that tires are perishable goods. Asof 2000, the manufacturing week and year(Department of Transportation (DOT) stamp)will be indicated with 4 digits (e.g., 1513means that the tire illustrated was manufac-tured during week 15 of 2013).
Tire ageTires degrade over time, even when they are not being used. It is recommended that tiresgenerally be replaced after 6 years of normalservice. Heat caused by hot climates, fre-quent high loading conditions or Ultra Violet(U.V.) exposure can accelerate the agingprocess. The temporary spare
1
should also
be replaced at 6-year intervals, even if it hasnever been used. A tire's age can be determined by the DOT stamp on the sidewall (see the illustration). A tire with e.g., visible cracks or discoloration should be replaced immediately.
Storing wheels and tiresWhen storing completes wheels (tires moun-ted on rims), they should be suspended offthe floor or placed on their sides on the floor. Tires not mounted on rims should be stored on their sides or standing upright, but shouldnot be suspended.
CAUTION
Tires should preferably be stored in a cool, dry, dark place, and should never bestored in close proximity to solvents, gaso-line, oils, etc.
WARNING
• The wheel and tire sizes for your Volvo are specified to meet stringent stabilityand handling requirements. Unap-proved wheel/tire size combinationscan negatively affect your vehicle'sstability and handling.
• Any damage caused by installation ofunapproved wheel/tire size combina-tions will not be covered by your newvehicle warranty. Volvo assumes noresponsibility for death, injury, orexpenses that may result from suchinstallations.
Related information
•
Tire inflation – pressure table (p. 285)
• Tire specifications (p. 283)
• Tire specifications (p. 283)
• Changing a wheel – direction of rotation (p. 276)
• Tires – tread wear indicator (p. 275)
1
Option or accessory on some models
Page 281 of 380
09 Wheels and tires
09
279
Changing a wheel – spare wheel
Wheel changes should always be carried out correctly.
Spare tire
The spare tire in your vehicle2
is called a
"Temporary Spare". Recommended tire pressure (see the placard on the B-pillar or on the fuel filler door) shouldbe maintained irrespective of which positionon the vehicle the temporary spare tire isused on. In the event of damage to this tire, a new one can be purchased from your Volvo retailer.
WARNING
Current legislation prohibits the use of the "Temporary Spare" tire other than as atemporary replacement for a puncturedtire. It must be replaced as soon as possi-ble by a standard tire. Road holding andhandling may be affected with the "Tem-porary Spare" in use. Do not exceed50 mph (80 km/h).
CAUTION
The vehicle must not be driven with wheels of different dimensions or with a spare tireother than the one that came with the vehi-cle. The use of different size wheels canseriously damage your car's transmission.
Spare wheelThe spare wheel is only intended for tempo- rary use. Replace it with a normal wheel assoon as possible. The car's handling may bealtered by the use of the spare wheel. Thecorrect tire pressure for the spare wheel isstated in the tire pressure table, see Tire infla-tion – pressure table (p. 285) and in the tireinflation placard on the driver's side doorjamb at the rear of the driver's door opening.
WARNING
Current legislation prohibits the use of the “Temporary Spare” tire other than as atemporary replacement for a puncturedtire. It must be replaced as soon as possi-ble by a standard tire. Road holding andhandling may be affected with the “Tem-porary Spare” in use.
CAUTION
The vehicle must never be driven with more than one temporary spare wheel.
The spare wheel is located in the spare wheel well with the rim side down. There are twofoam blocks, one under the spare wheel andone over/inside. The upper one contains alltools. The same bolt runs through to secure the spare wheel and the foam blocks.
Related information
• Changing a wheel – installing a wheel (p. 280)
• Changing a wheel – removing wheel(p. 276)
2
Not on models equipped with the Tire sealing system.
Page 290 of 380
09 Wheels and tires
09
288
side B-pillar and in the tire inflation table in this chapter.
• Cold tires
: The tires are considered to be
cold when they have the same tempera-ture as the surrounding (ambient) air. Thistemperature is normally reached after thevehicle has been parked for at least3 hours.Tire specifications – Uniform Tire Quality Grading
ALL PASSENGER VEHICLE TIRES MUST CONFORM TO FEDERAL SAFETYREQUIREMENTS IN ADDITION TO THESEGRADES .
Quality grades can be found, where appli-cable, on the tire sidewall between thetread shoulder and maximum sectionwidth. For example: Treadwear 200 Traction AA Temperature A
TREADWEARThe treadwear grade is a comparative rating based on the wear rate of the tire when tes-ted under controlled conditions on a specifiedgovernment test course. For example, a tiregraded 150 would wear one and one half(1 ½) times as well on the government courseas a tire graded 100. The relative perform-ance of tires depends upon the actual condi-tions of their use, however, and many departsignificantly from the norm due to variation indriving habits, maintenance practices and dif-ferences in road characteristics and climate.
TRACTIONThe traction grades, from highest to lowest,are AA, A, B, and C, as measured under con-trolled conditions on specified governmenttest surfaces of asphalt and concrete. A tiremarked C may have poor traction perform- ance. The traction grade assigned to this tireis based on braking (straight-ahead) tractiontests and is not a measure of cornering (turn-ing) traction.
WARNING
The traction grade assigned to this tire is based on braking (straight-ahead) tractiontests and is not a measure of cornering(turning) traction.
TEMPERATUREThe temperature grades are A (the highest), B, and C, representing the tire's resistance tothe generation of heat and its ability to dissi-pate heat when tested under controlled con-ditions on a specified indoor laboratory testwheel. Sustained high temperature can causethe material of the tire to degenerate andreduce tire life, and excessive temperaturecan lead to sudden tire failure. The grade Ccorresponds to a minimum level of perform-ance that all passenger vehicle tires mustmeet under the Federal Motor Safety Stand-ard No. 109. Grades B and A represent higherlevels of performance on the laboratory testwheel than the minimum required by law.
Page 292 of 380

09 Wheels and tires
09
290
Snow tires/studded tires4
Owners who live in or regularly commute through areas with sustained periods of snowor icy driving conditions are strongly advisedto fit suitable winter tires to help retain thehighest degree of traction.
Tires for winter use:
•
It is important to install winter tires on all four wheels to help retain traction duringcornering, braking, and accelerating. Fail-ure to do so could reduce traction to anunsafe level or adversely affect handling.
• Do not mix tires of different design as thiscould also negatively affect overall tireroad grip.
• Winter tires wear more quickly on dryroads in warm weather. They should beremoved when the winter driving seasonhas ended.
• Studded tires should be run-in 300 – 600 miles (500 – 1000 km) during whichthe vehicle should be driven as smoothlyas possible to give the studs the opportu-nity to seat properly in the tires. The tiresshould have the same rotational directionthroughout their entire lifetime.
NOTE
Please consult state or provincial regula- tions restricting the use of studded wintertires before installing such tires.
Tire pressure monitoring - introduction
Volvo provides two different systems to moni- tor tire pressure: Tire Pressure MonitoringSystem (TPMS) or Tire Monitor.
Determining which tire monitoring system is in your vehicle
To see which system is installed in your vehi- cle, press the
MY CAR button on the center
console. Go to
SettingsCar settings.
• If your vehicle has a menu called
Tire
monitoring, see Tire Monitor - introduc-
tion (p. 295).
• If your vehicle has a menu called
Tire
pressure, see Tire Pressure Monitoring
System (TPMS) – general information (p. 291).
IntroductionEach tire, including the spare (if provided), should be checked monthly when cold andinflated to the inflation pressure recom-mended by the vehicle manufacturer on thevehicle placard or tire inflation pressure label.(If your vehicle has tires of a different sizethan the size indicated on the vehicle placardor tire inflation pressure label, you shoulddetermine the proper tire inflation pressure forthose tires.) As an added safety feature, your vehicle hasbeen equipped with a tire pressure monitor-ing system that illuminates a low tire pressure telltale (
) when one or more of your tires
is significantly under-inflated. Accordingly, when the low tire pressure telltale illuminates,you should stop and check your tires as soonas possible, and inflate them to the properpressure. Driving on a significantly under-inflated tire causes the tire to overheat and can lead totire failure. Under-inflation also reduces fuelefficiency and tire tread life, and may affectthe vehicle's handling and stopping ability.Please note that a tire pressure monitoringsystem is not a substitute for proper tiremaintenance, and it is the driver's responsi-bility to maintain correct tire pressure, even ifunder-inflation has not reached the level totrigger illumination of the system's low tirepressure telltale. Your vehicle has also been equipped with a TPMS malfunction indicator to indicate whenthe system is not operating properly. Themonitoring system's malfunction indicator iscombined with the low tire pressure telltale. When the system detects a malfunction, the telltale will flash for approximately one minuteand then remain continuously illuminated.This sequence will continue upon subsequentvehicle start-ups as long as the malfunction
4 Where permitted
Page 303 of 380
09 Wheels and tires
09
}}
* Option/accessory, for more information, see Introduction.301
WARNING
Please keep the following points in mind when using the tire sealing system:
• The sealing compound bottle (no. 8 in the illustration) contains 1) rubberlatex, natural and 2) ethanediol. Thesesubstances are harmful if swallowed.
• The contents of this bottle may causeallergic skin reactions or otherwise bepotentially harmful to the respiratorytract, the skin, the central nervous sys-tem, and the eyes.
Precautions: • Keep out of reach of children.
• Do not ingest the contents.
• Avoid prolonged or repeated contact with the skin.
• Wash thoroughly after handling.
First aid:
• Skin: Wash affected areas of skin withsoap and water. Get medical attentionif symptoms occur.
• Eyes: Flush with plenty of water forleast 15 minutes, occasionally liftingthe upper and lower eyelids. Get medi-cal attention if symptoms occur.
• Inhalation: Move the exposed personto fresh air. If irritation persists, getmedical attention.
•Ingestion: Do
NOT induce vomiting
unless directed to do so by medical personnel. Get medical attention.
• Disposal: Dispose of this material andits container to a hazardous or specialwaste collection point.
NOTE
Do not break the seal on the bottle. This occurs automatically when the bottle isscrewed into the holder.
Related information
•
Tire sealing system* – general information (p. 298)
• Tire sealing system* – inflating tires(p. 304)
• Tire sealing system – checking inflationpressure (p. 303)
• Tire sealing system* – sealing hole(p. 301)
• Tire sealing system* – sealing compoundcontainer (p. 305)
Tire sealing system* – sealing hole
The tire sealing system can be used to tem- porarily seal a hole in the tread surface of atire.
Stage 1: Sealing the hole1. Peel off the speed limit sticker and affix it
to the steering wheel hub where it will beclearly visible to the driver.
2. Ensure that the on/off switch is in posi- tion 0 (the 0 side of the switch should be
pressed down).
WARNING
Contact with the sealing compound may cause skin irritation. If contact occurs,wash the affected area immediately withsoap and water.
3. Unscrew the orange cover over the bottle holder and unscrew the cap on the bottle of sealing compound.
NOTE
Do not break the seal on the bottle. This occurs automatically when the bottle isscrewed into the holder.
4. Screw the bottle into the bottle holder.
Page 332 of 380

10 Maintenance and servicing
10
330
Battery – symbols
There are information and warning symbols on the battery.
Symbols on the battery
Wear protective goggles.
Keep away from children.
Avoid smoking, open flames, and/or sparks.
See the owner's manual.
Contains corrosive acid.
Risk of explosion
Recycle properly
NOTE
A used battery should be disposed of in an environmentally responsible manner. Con-sult your Volvo retailer or take the batteryto a recycling station.
Related information
•Battery – changing (p. 332)
• Battery – handling (p. 330)
• Battery – maintenance (p. 331)
Battery – handling
The battery's service life is affected by the number of starts, if it has been discharged,driving style, driving conditions, weather con-ditions ,etc.
Handling
• Check that the battery cables are cor- rectly connected and tightened.
• Never disconnect the battery when theengine is running (for example, whenreplacing the battery).
• If the battery is fully discharged a numberof times, this may shorten its service life.
• The service life of a battery is affected byfactors such as the number of starts, driv-ing conditions and climate. Extreme coldmay also further decrease the battery’sstarting capacity.
• Because the battery’s starting capacitydecreases with time, it may be necessaryto recharge it if the vehicle is not drivenfor an extended period of time or if thevehicle is usually only driven short dis-tances.
• Never use a quick charger to charge thebattery. Only traditional types of batterychargers should be used.
Page 348 of 380

10 Maintenance and servicing
10
346
Automatic car wash
The vehicle should be washed at regular inter- vals since dirt, dust, insects and tar spotsadhere to the paint and may cause damage.To help prevent corrosion, it is particularlyimportant to wash the car frequently in thewintertime.• We do NOT recommend washing your car in an automatic wash during the firstfew months (because the paint will nothave hardened sufficiently).
• An automatic wash is a simple and quickway to clean your car, but it is worthremembering that it may not be as thor-ough as when you yourself go over thecar with sponge and water. Keeping theunderbody clean is most important, espe-cially in the winter. Some automaticwashers do not have facilities for washingthe underbody.
NOTE
Condensation may form temporarily on the inside of the lenses of exterior lights suchas headlights, fog lights, or taillights. Thisis normal and the lights are designed towithstand moisture. Normally, condensa-tion will dissipate after the lights have beenon for a short time.
CAUTION
• Before driving into an automatic car wash, turn off the optional rain sensorto avoid damaging the windshield wip-ers.
• Make sure that side view mirrors, aux-iliary lamps, etc, are secure, and thatany antenna(s) are retracted orremoved. Otherwise there is risk of themachine dislodging them.
• Chromed wheels:
Clean chrome-
plated wheels using the same deter-gents used for the body of the vehicle.Aggressive wheel-cleaning agents canpermanently stain chrome-platedwheels.
WARNING
• When the vehicle is driven immediately after being washed, apply the brakes,including the parking brake, severaltimes in order to remove any moisturefrom the brake linings.
• Engine cleaning agents should not beused when the engine is warm. Thisconstitutes a fire risk.
Related information
•
Polishing and waxing (p. 346)
• Cleaning the interior (p. 347)
• Washing the car (p. 345)
Polishing and waxing
Normally, polishing is not required during the first year after delivery, however, waxing maybe beneficial.
• Before applying polish or wax the vehicle must be washed and dried. Tar spots canbe removed with kerosene or tar remover.Difficult spots may require a fine rubbingcompound.
• After polishing use liquid or paste wax.
• Several commercially available productscontain both polish and wax.
• Waxing alone does not substitute for pol-ishing a dull surface.
• A wide range of polymer-based waxescan be purchased today. These waxesare easy to use and produce a long-last-ing, high-gloss finish that protects thebodywork against oxidation, road dirt andfading.
• Do not polish or wax your vehicle in directsunlight (the surface of the vehicle shouldnot be warmer than 113 °F (45 °C).
Page 350 of 380
||
10 Maintenance and servicing
10
348
Protecting leather upholstery1. Put a small amount of protectant creamon a cloth and apply a thin coating of cream to the upholstery with light circularmovements.
2. Allow the leather to dry for 20 minutes. This will help the leather resist staining and protect against sunlight's harmful UV rays.
CAUTION
• Under no circumstances should gaso- line, naphtha or similar cleaning agentsbe used on the plastic or the leathersince these can cause damage.
• Take extra care when removing stainssuch as ink or lipstick since the color-ing can spread.
• Use solvents sparingly. Too much sol-vent can damage the seat padding.
• Start from the outside of the stain andwork toward the center.
• Sharp objects (e.g. pencils or pens in apocket) or Velcro fasteners on clothingmay damage the textile upholstery.
• Clothing that is not colorfast, such asnew jeans or suede garments, maystain the upholstery.
Cleaning a leather-covered steering wheel
•
Remove soil, dust, etc., with a damp sponge and a neutral soap solution.
• Leather should be allowed to breath.Never cover the steering wheel with aplastic protector.
• Volvo recommends cleaning, protectingand conditioning the steering wheel withVolvo's Leather Care Kit 951 0251 andLeather Softener 943 7429.
If there are stains on the steering wheel: Type 1 (ink, wine, coffee, milk, sweat or
blood)
–Use a soft cloth or sponge. Wipe the wheel with a solution with 5% ammonia.For blood stains, mix approx. 1 cup (2 dl)of water and one ounce (25g) of salt andwipe the stain.
Type 2 (fat, oil, sauces, or chocolate)
1. Same procedure as for type I stains.
2. Finish by rubbing the wheel with absorb- ent paper or a towel.
Type 3 (dry soil or dust)
1. Remove the soil/dust with a soft brush.
2. Same procedure as for type I stains.
CAUTION
Sharp objects, such as rings, could dam- age the leather on the steering wheel.
Cleaning the seat beltsClean only with lukewarm water and a mild soap solution.
Cleaning floor matsThe floor mats should be vacuumed orbrushed clean regularly, especially duringwinter when they should be taken out for dry-ing. Spots on textile mats can be removedwith a mild detergent. For best protection inwinter, Volvo recommends the use of Volvorubber floor mats. Consult your Volvo retailer.
Spots on interior plastic, metal, or wood surfaces
Cleaning interior plastic components should be done with a cleaning agent speciallydesigned for this purpose. Consult your Volvoretailer.