Page 89 of 233

Instruments and controls87If ESP®Plus
has been deactivated with
Ø on the instrument panel, control
indicator Ø illuminates and a
corresponding message appears in
the Driver Information Centre (DIC) 3 89.
ESP® Plus
3 137, Traction Control
system 3 136.
Engine coolant temperature
W illuminates red.
Illuminates briefly when the ignition is
switched on.
Illuminates when the engine is
running
If W illuminates (possibly in
combination with control indicator
C ), stop vehicle and switch off
engine.Caution
Coolant temperature too high.
Check coolant level 3 157.
If there is sufficient coolant, consult a workshop.
Preheating
! illuminates yellow.
Preheating is activated.Only
activates when outside temperature
is low.
AdBlue Õ illuminates yellow.
AdBlue level is low. Refill AdBlue as
soon as possible, to avoid prevention
of engine starts.
Illuminates together with control
indicator A to indicate a system
failure or as a warning that engine starting may not be possible after a
certain distance. Seek the assistance
of a workshop immediately.
A corresponding message appears in the Driver Information Centre (DIC)
3 89.
AdBlue 3 125.
Tyre pressure monitoring system
w illuminates or flashes.Illuminates briefly when the ignition is
switched on.
Illuminates Tyre pressure loss. Stop immediately
and check tyre pressure.
Control indicator w illuminates
together with C 3 85 and a
corresponding message appears in
the Driver Information Centre (DIC)
when a puncture or severely under-
inflated tyre is detected.
Flashes
Fault in system. After a delay the
control indicator illuminates
continuously. Consult a workshop.
Control indicator w illuminates
together with A 3 85 and a
corresponding message appears in
the DIC when a tyre without a
pressure sensor is mounted (e.g.
spare wheel).
Tyre pressure monitoring system
3 177.
Engine oil pressure
I illuminates red.
Page 178 of 233

176Vehicle careWinter tyresWinter tyres improve driving safety at
temperatures below 7 °C and should
therefore be fitted on all wheels.
In accordance with country-specific
regulations, affix the maximum speed sticker in the driver's field of view.
Tyre designations
E.g. 215/65 R 16 C 109 R215:tyre width, mm65:cross-section ratio (tyre height
to tyre width), %R:belt type: RadialRF:type: RunFlat16:wheel diameter, inchesC:cargo or commercial use88:load index e.g. 109 is
equivalent to approx. 1030 kgR:speed code letter
Speed code letter:
Q:up to 100 mphS:up to 112 mphT:up to 118 mphH:up to 130 mphV:up to 150 mphW:up to 168 mphDirectional tyres
Fit directional tyres such that they roll
in the direction of travel. The rolling
direction is indicated by a symbol
(e.g. an arrow) on the sidewall.
Tyre pressure
Check the pressure of cold tyres at
least every 14 days and before any
long journey. Do not forget the spare
wheel. This also applies to vehicles
with tyre pressure monitoring system.
The tyre pressure information label
on the driver's door frame indicates
the original equipment tyres and the
correspondent tyre pressures.
Always inflate tyres to the pressures
shown on the label.
Tyre pressures 3 219.
The tyre pressure data refers to cold
tyres. It applies to summer and winter
tyres.
Always inflate the spare tyre to the
pressure specified for full load.Incorrect tyre pressures will impair
safety, vehicle handling, comfort and
fuel economy and will increase tyre
wear.
Tyre pressures differ depending on
various options. For the correct tyre
pressure value, follow the procedure
below:
1. Identify the engine identifier code.
Engine data 3 201.
2. Identify the respective tyre.
The tyre pressure tables show all possible tyre combinations 3 219.
For the tyres approved for your
vehicle, refer to the EEC Certificate of
Conformity provided with your vehicle or other national registration
documents.
The driver is responsible for correct
adjustment of tyre pressure.9 Warning
If the pressure is too low, this can
result in considerable tyre warm-
up and internal damage, leading to tread separation and even to tyre
blow-out at high speeds.
Page 184 of 233

182Vehicle care9.Connect the red < power supply
lead on the compressor to the
jump start terminal 3 188.
Notice
Depending on model, the jump start
terminal may be located at the left-
hand or right-hand side of the engine compartment.
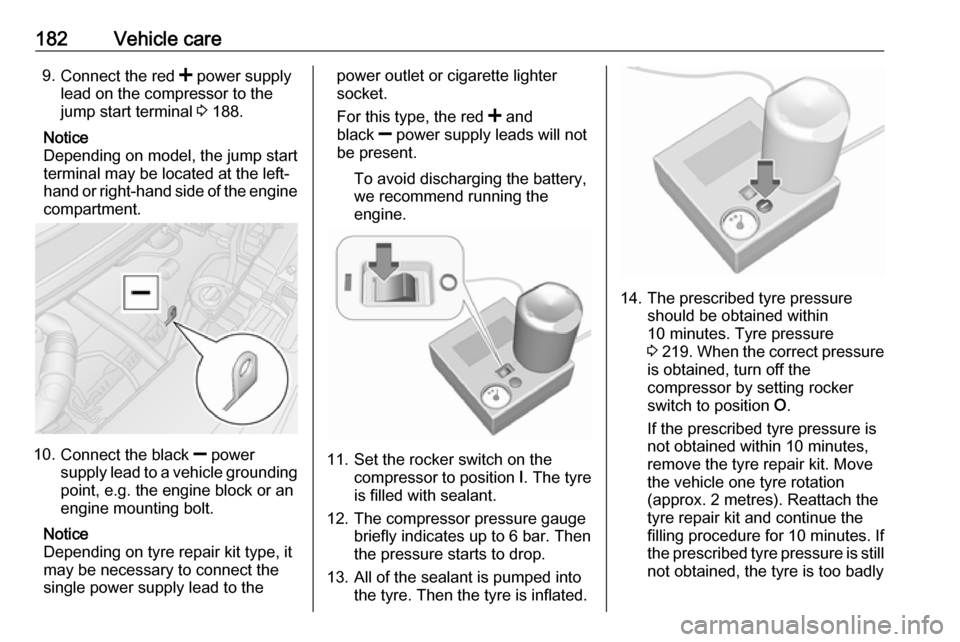
10. Connect the black ] power
supply lead to a vehicle grounding
point, e.g. the engine block or an
engine mounting bolt.
Notice
Depending on tyre repair kit type, it
may be necessary to connect the
single power supply lead to the
power outlet or cigarette lighter
socket.
For this type, the red < and
black ] power supply leads will not
be present.
To avoid discharging the battery,
we recommend running the
engine.
11. Set the rocker switch on the compressor to position I. The tyre
is filled with sealant.
12. The compressor pressure gauge briefly indicates up to 6 bar. Then
the pressure starts to drop.
13. All of the sealant is pumped into the tyre. Then the tyre is inflated.
14. The prescribed tyre pressureshould be obtained within
10 minutes. Tyre pressure
3 219 . When the correct pressure
is obtained, turn off the
compressor by setting rocker
switch to position O.
If the prescribed tyre pressure is
not obtained within 10 minutes,
remove the tyre repair kit. Move
the vehicle one tyre rotation
(approx. 2 metres). Reattach the
tyre repair kit and continue the
filling procedure for 10 minutes. If
the prescribed tyre pressure is still not obtained, the tyre is too badly