2016 VAUXHALL MOVANO_B warning
[x] Cancel search: warningPage 162 of 233
160Vehicle carebattery. Short-distance-driving and
frequent engine starts can discharge
the battery. Avoid the use of
unnecessary electrical consumers.
Batteries do not belong in household
waste. They must be disposed of at
an appropriate recycling collection
point.
Laying up the vehicle for more than
4 weeks can lead to battery
discharge. Disconnect the clamp from the negative terminal of the vehicle
battery.
Ensure the ignition is switched off
before connecting or disconnecting
the vehicle battery.
The anti-theft alarm siren must be
deactivated as follows: Switch the ignition on then off, disconnect the
vehicle's battery within 15 seconds.
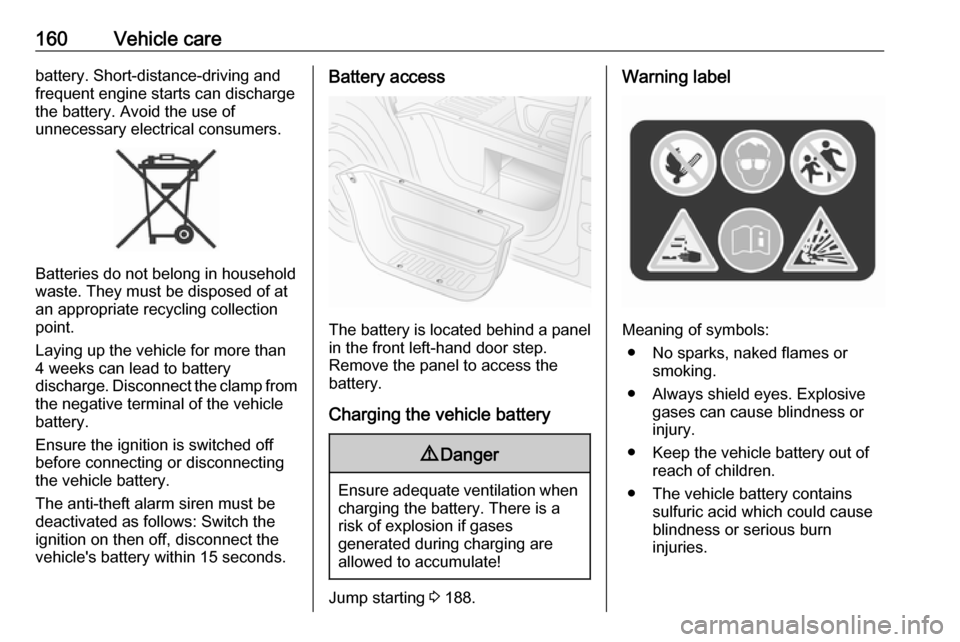
Battery access
The battery is located behind a panel in the front left-hand door step.
Remove the panel to access the
battery.
Charging the vehicle battery
9 Danger
Ensure adequate ventilation when
charging the battery. There is a
risk of explosion if gases
generated during charging are
allowed to accumulate!
Jump starting 3 188.
Warning label
Meaning of symbols:
● No sparks, naked flames or smoking.
● Always shield eyes. Explosive gases can cause blindness or
injury.
● Keep the vehicle battery out of reach of children.
● The vehicle battery contains sulfuric acid which could cause
blindness or serious burn
injuries.
Page 176 of 233
174Vehicle careNo.Circuit1Speed 2: right-hand evaporator
fan2Speed 2: left-hand evaporator
fan3Speed 1: left-hand evaporator
fan4Left-hand heating5Speed 3: left-hand evaporator
fan6Condenser fan7Right-hand heating8Speed 3: right-hand evaporator
fan9Power sliding door10Corridor lighting11Foot panel12Child safety warning buzzer13Speed 1: right-hand evaporator
fanSome circuits may be protected by
several fuses.Vehicle tools
Tools
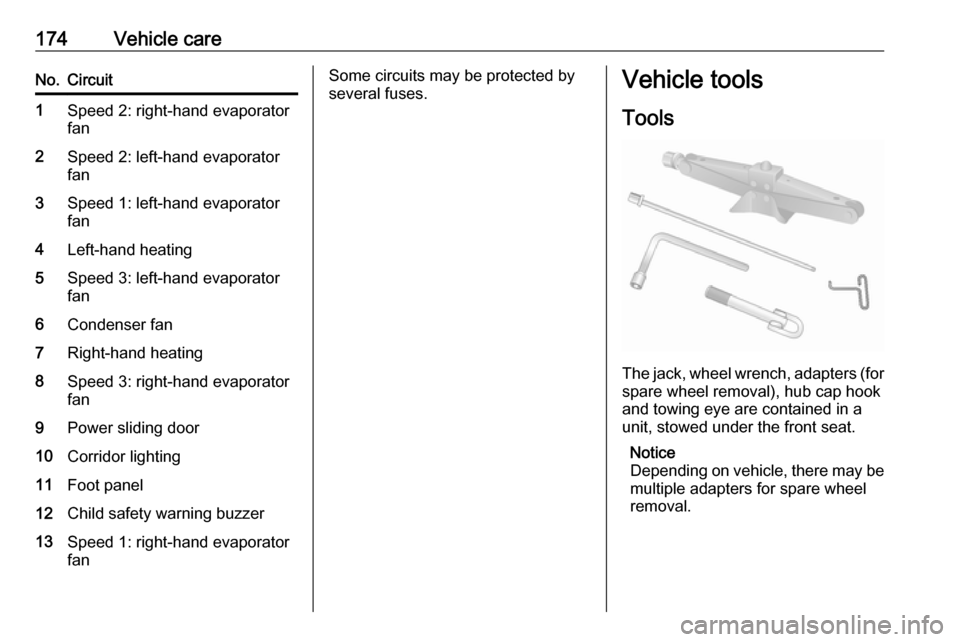
The jack, wheel wrench, adapters (for
spare wheel removal), hub cap hook
and towing eye are contained in a
unit, stowed under the front seat.
Notice
Depending on vehicle, there may be multiple adapters for spare wheel
removal.
Page 178 of 233

176Vehicle careWinter tyresWinter tyres improve driving safety at
temperatures below 7 °C and should
therefore be fitted on all wheels.
In accordance with country-specific
regulations, affix the maximum speed sticker in the driver's field of view.
Tyre designations
E.g. 215/65 R 16 C 109 R215:tyre width, mm65:cross-section ratio (tyre height
to tyre width), %R:belt type: RadialRF:type: RunFlat16:wheel diameter, inchesC:cargo or commercial use88:load index e.g. 109 is
equivalent to approx. 1030 kgR:speed code letter
Speed code letter:
Q:up to 100 mphS:up to 112 mphT:up to 118 mphH:up to 130 mphV:up to 150 mphW:up to 168 mphDirectional tyres
Fit directional tyres such that they roll
in the direction of travel. The rolling
direction is indicated by a symbol
(e.g. an arrow) on the sidewall.
Tyre pressure
Check the pressure of cold tyres at
least every 14 days and before any
long journey. Do not forget the spare
wheel. This also applies to vehicles
with tyre pressure monitoring system.
The tyre pressure information label
on the driver's door frame indicates
the original equipment tyres and the
correspondent tyre pressures.
Always inflate tyres to the pressures
shown on the label.
Tyre pressures 3 219.
The tyre pressure data refers to cold
tyres. It applies to summer and winter
tyres.
Always inflate the spare tyre to the
pressure specified for full load.Incorrect tyre pressures will impair
safety, vehicle handling, comfort and
fuel economy and will increase tyre
wear.
Tyre pressures differ depending on
various options. For the correct tyre
pressure value, follow the procedure
below:
1. Identify the engine identifier code.
Engine data 3 201.
2. Identify the respective tyre.
The tyre pressure tables show all possible tyre combinations 3 219.
For the tyres approved for your
vehicle, refer to the EEC Certificate of
Conformity provided with your vehicle or other national registration
documents.
The driver is responsible for correct
adjustment of tyre pressure.9 Warning
If the pressure is too low, this can
result in considerable tyre warm-
up and internal damage, leading to tread separation and even to tyre
blow-out at high speeds.
Page 181 of 233

Vehicle care1795 seconds to initialise recalculation. A
corresponding message appears in
the DIC.
Several minutes of driving at a speed
above 25 mph may be required to
complete the relearn process. The
system can only provide limited
information during this time.
If problems occur during the relearn
process, control indicator w remains
illuminated and a warning message is displayed in the DIC.
Driver Information Centre (DIC) 3 89.
Vehicle messages 3 90.
General information
The use of tyre chains or
commercially available liquid tyre
repair kits can impair the function of
the system. Factory-approved tyre
repair kits can be used.
Tyre repair kit 3 180, Tyre chains
3 180.
External high-power radio equipment
could disrupt the TPMS.
Each time the tyres are replaced,
TPMS sensors must be dismounted
and serviced by a workshop.Tread depth
Check tread depth at regular
intervals.
Tyres should be replaced for safety
reasons at a tread depth of 2-3 mm (4 mm for winter tyres).
For safety reasons it is recommended
that the tread depth of the tyres on
one axle should not vary by more than 2 mm.
The legally permissible minimum
tread depth (1.6 mm) has been
reached when the tread has worn
down as far as one of the tread wear
indicators (TWI). Their position is
indicated by markings on the
sidewall.
Tyres age, even if they are not used.
We recommend tyre replacement
every 6 years.
Changing tyre and wheel size
If tyres of a different size than those fitted at the factory are used, it may be necessary to reprogramme the
speedometer as well as the nominal
tyre pressure and make other vehicle modifications.
After converting to a different tyre
size, have the label with tyre
pressures replaced.9 Warning
Use of unsuitable tyres or wheels
may lead to accidents and will
invalidate the vehicle type
approval.
Page 182 of 233
180Vehicle careWheel coversWheel covers and tyres that are
factory approved for the respective
vehicle and comply with all of the
relevant wheel and tyre combination
requirements must be used.
If the wheel covers and tyres used are
not factory approved, the tyres must
not have a rim protection ridge.
Wheel covers must not impair brake
cooling.9 Warning
Use of unsuitable tyres or wheel
covers could lead to sudden
pressure loss and thereby
accidents.
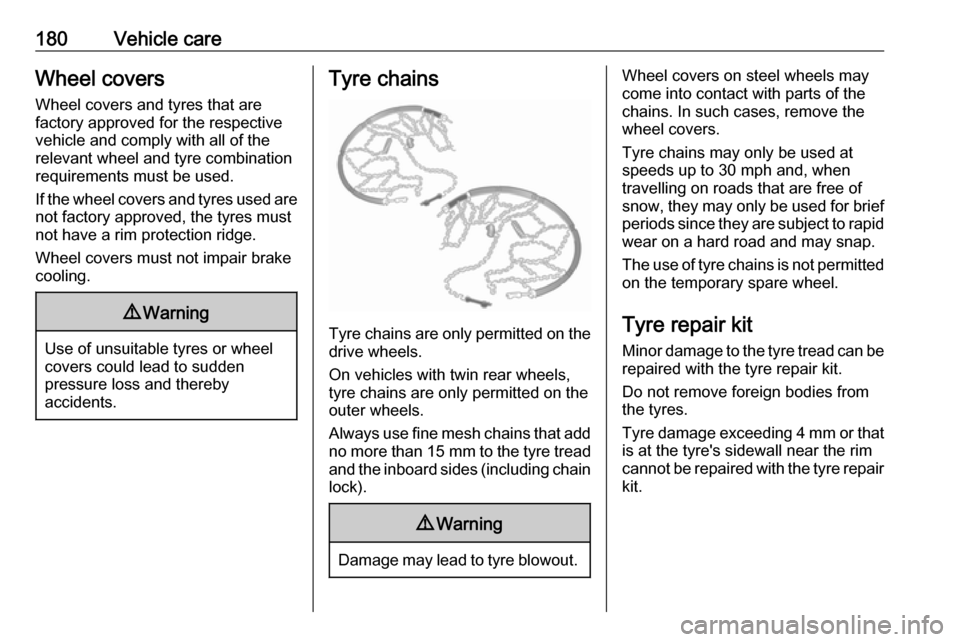
Tyre chains
Tyre chains are only permitted on the
drive wheels.
On vehicles with twin rear wheels,
tyre chains are only permitted on the
outer wheels.
Always use fine mesh chains that add no more than 15 mm to the tyre tread
and the inboard sides (including chain lock).
9 Warning
Damage may lead to tyre blowout.
Wheel covers on steel wheels may
come into contact with parts of the
chains. In such cases, remove the
wheel covers.
Tyre chains may only be used at
speeds up to 30 mph and, when
travelling on roads that are free of
snow, they may only be used for brief
periods since they are subject to rapid wear on a hard road and may snap.
The use of tyre chains is not permitted on the temporary spare wheel.
Tyre repair kit Minor damage to the tyre tread can be
repaired with the tyre repair kit.
Do not remove foreign bodies from
the tyres.
Tyre damage exceeding 4 mm or that is at the tyre's sidewall near the rim
cannot be repaired with the tyre repair kit.
Page 183 of 233
Vehicle care1819Warning
Do not drive faster than 50 mph.
Do not use for a lengthy period.
Steering and handling may be
affected.
If the vehicle has a flat tyre:
Apply the parking brake and engage
neutral (manual transmission) or N
(manual transmission automated).
The tyre repair kit is located under the
front seat. Slide seat forwards fully
and fold backrest down to access kit.
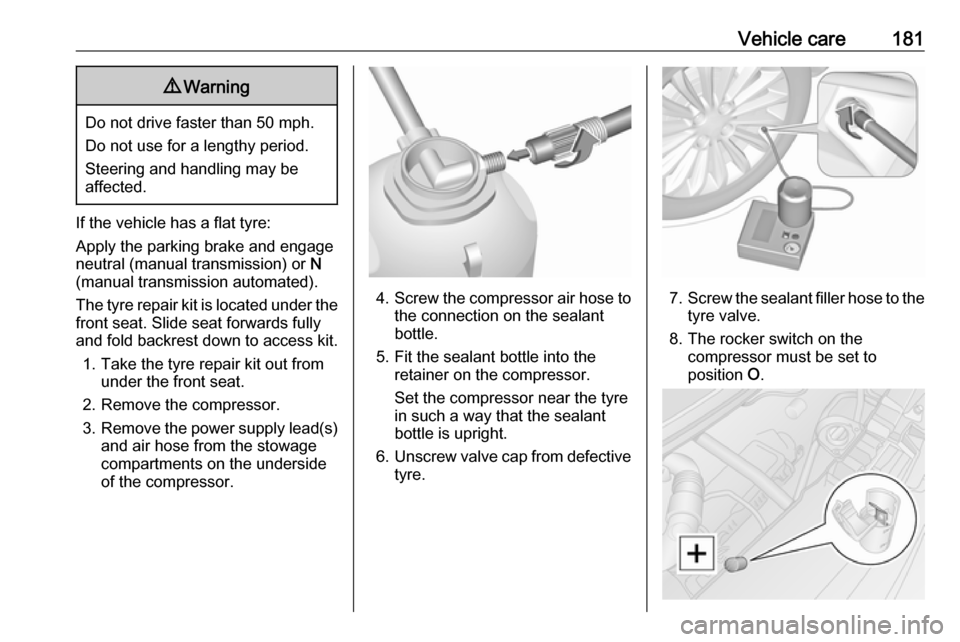
1. Take the tyre repair kit out from under the front seat.
2. Remove the compressor.
3. Remove the power supply lead(s)
and air hose from the stowage
compartments on the underside
of the compressor.
4. Screw the compressor air hose to
the connection on the sealant
bottle.
5. Fit the sealant bottle into the retainer on the compressor.
Set the compressor near the tyre
in such a way that the sealant
bottle is upright.
6. Unscrew valve cap from defective
tyre.7. Screw the sealant filler hose to the
tyre valve.
8. The rocker switch on the compressor must be set to
position O.
Page 186 of 233
184Vehicle careWheel changingSome vehicles are equipped with a
tyre repair kit instead of a spare wheel
3 180.
Make the following preparations and
observe the following information:
● Park the vehicle on a level, firm and non-slippery surface. The
front wheels must be in the
straight-ahead position.
● Apply the parking brake and engage first gear or reverse gear
(manual transmission) or N
(manual transmission
automated).
● Switch off the air suspension system 3 122.
● Remove the spare wheel 3 185.
● Never change more than one wheel at a time.
● Use the jack only to change wheels in case of puncture, not
for seasonal winter or summer
tyre change.
● The jack is maintenance-free.● If the ground on which the vehicle
is standing is soft, a solid board
(max. 1 cm thick) should be
placed under the jack.
● No people or animals may be in the vehicle when it is jacked-up.
● Never crawl under a jacked-up vehicle.
● Do not start the engine when the vehicle is raised on the jack.
● Clean wheel bolts/nuts and their threads before mounting thewheel.9 Warning
Do not grease wheel bolt, wheel
nut and wheel nut cone.
1. Remove the wheel cover using the hook supplied. Vehicle tools
3 174.
2. Install the wheel wrench ensuring that it locates securely and loosen
each wheel bolt/nut by half a turn.
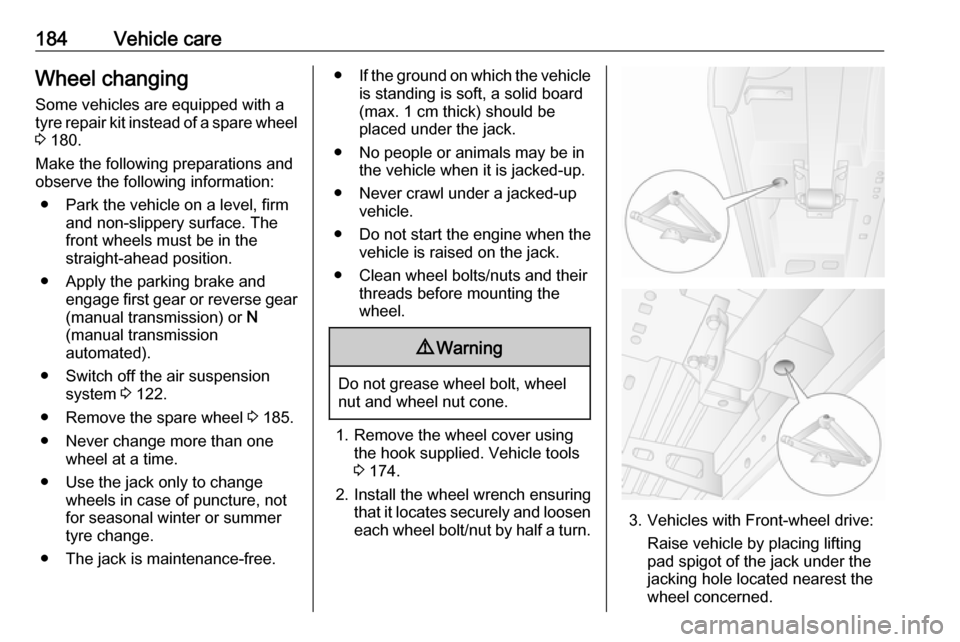
3. Vehicles with Front-wheel drive:
Raise vehicle by placing lifting
pad spigot of the jack under the
jacking hole located nearest the
wheel concerned.
Page 189 of 233
Vehicle care187
When reinstalling a spare wheel, first
attach the mounting plate (twin rear
wheel vehicles) and secure with the
nut.
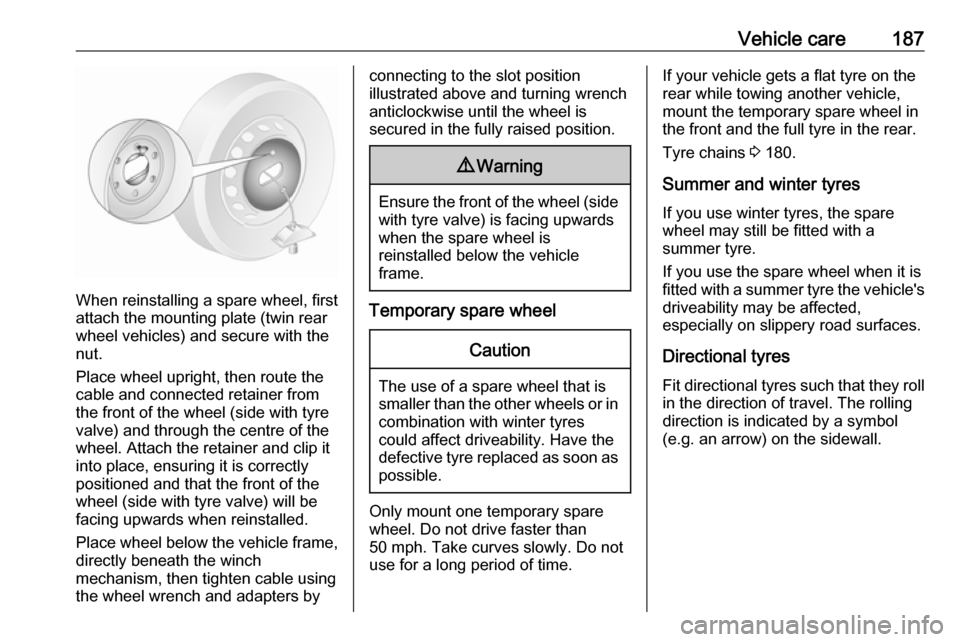
Place wheel upright, then route the
cable and connected retainer from
the front of the wheel (side with tyre
valve) and through the centre of the
wheel. Attach the retainer and clip it
into place, ensuring it is correctly
positioned and that the front of the
wheel (side with tyre valve) will be
facing upwards when reinstalled.
Place wheel below the vehicle frame,
directly beneath the winch
mechanism, then tighten cable using
the wheel wrench and adapters by
connecting to the slot position
illustrated above and turning wrench
anticlockwise until the wheel is
secured in the fully raised position.9 Warning
Ensure the front of the wheel (side
with tyre valve) is facing upwards
when the spare wheel is
reinstalled below the vehicle
frame.
Temporary spare wheel
Caution
The use of a spare wheel that is smaller than the other wheels or in combination with winter tyres
could affect driveability. Have the defective tyre replaced as soon as
possible.
Only mount one temporary spare
wheel. Do not drive faster than
50 mph. Take curves slowly. Do not
use for a long period of time.
If your vehicle gets a flat tyre on the
rear while towing another vehicle,
mount the temporary spare wheel in
the front and the full tyre in the rear.
Tyre chains 3 180.
Summer and winter tyres
If you use winter tyres, the spare
wheel may still be fitted with a
summer tyre.
If you use the spare wheel when it is
fitted with a summer tyre the vehicle's driveability may be affected,
especially on slippery road surfaces.
Directional tyres Fit directional tyres such that they rollin the direction of travel. The rolling
direction is indicated by a symbol
(e.g. an arrow) on the sidewall.