Page 73 of 251
Storage71
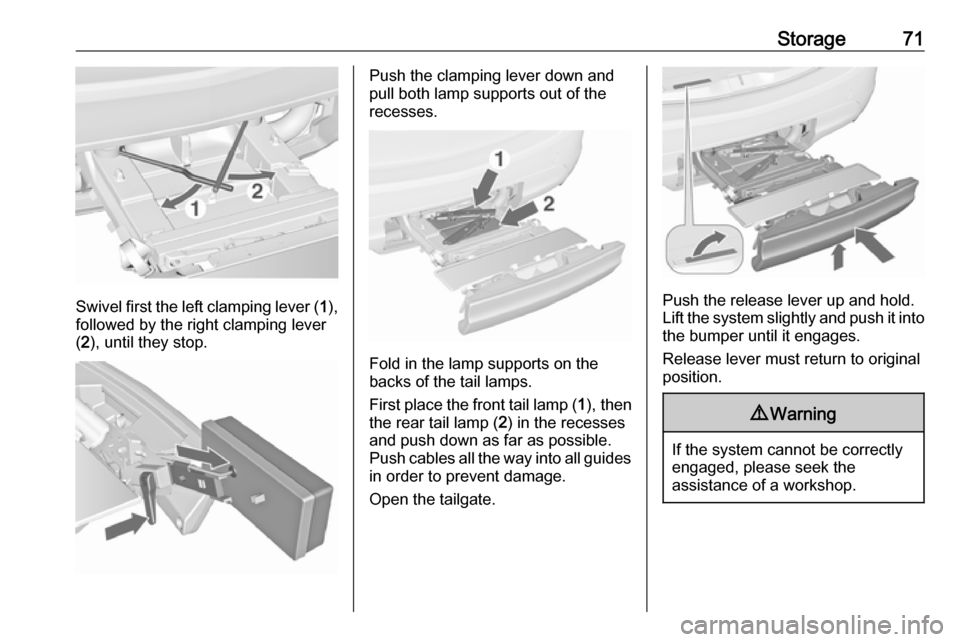
Swivel first the left clamping lever (1),
followed by the right clamping lever
( 2 ), until they stop.
Push the clamping lever down and
pull both lamp supports out of the recesses.
Fold in the lamp supports on the
backs of the tail lamps.
First place the front tail lamp ( 1), then
the rear tail lamp ( 2) in the recesses
and push down as far as possible. Push cables all the way into all guides
in order to prevent damage.
Open the tailgate.
Push the release lever up and hold.
Lift the system slightly and push it into the bumper until it engages.
Release lever must return to original
position.
9 Warning
If the system cannot be correctly
engaged, please seek the
assistance of a workshop.
Page 74 of 251
72StorageLoad compartmentFolding down rear seat backrests
The rear seat backrest is divided into
three parts. All parts can be folded
down individually to increase the size of the load compartment.9 Warning
Do not stow objects under or
behind the seats. The objects
might be damaged and prevent
the guide rails from locking
properly.
A completely flat load bay is created if first the centre seat and then the
outer rear seat backrests are folded
down.
Caution
Do not fold the outer seat
backrests while the seats are in the inner position. The seats could be damaged.
Remove the load compartment coverif necessary 3 73.
Press the catch to release and push
the head restraint downwards 3 34.
Take the seat belt out of the retaining
clip on the backrest.
Pull the handle on the front side of the
backrest and fold down the backrest
onto the seat cushion. The seat is
lowered automatically if the centre
seat is folded down.
The backrests can also be folded
from the load compartment.
Page 75 of 251
Storage73
Pull the handle on the back side of thebackrest and fold down the backrest.
To fold up, pull the handle and raise
the backrests into an upright position
until they engage audibly.
9 Warning
When folding up, ensure that
backrests are securely locked in
position before driving. Failure to
do so may result in personal injury or damage to load or vehicle in the event of heavy braking or collision.
Rear storage
On the left side of the load
compartment there is a stowage
compartment.
Turn the fastener anticlockwise and
fold down the cover.
Load compartment cover Do not place any objects on the cover.
Removing the cover
Unhook retaining straps from tailgate.
Lift cover at the rear and push it
upwards at the front.
Page 76 of 251
74StorageRemove the cover.
Stowing the cover Unhook retaining straps from tailgate. Lift cover at the rear and push it
upwards out of the side guides at the
front.
Stow the cover behind the rear seats.
Fitting the cover Engage cover in side guides and fold
downwards. Attach retaining straps to
tailgate.
Rear floor storage cover
The rear floor cover can be raised.
Fold it up and lift the load
compartment cover slightly.
Pull out the hook at the left sidewall of
the load compartment to hold the rear floor cover upright.
Double load-bay floor
The double load-bay floor can be
inserted in the load compartment in
two positions:
● directly above the cover for the spare wheel well or the rear floorcover,
● in the upper openings in the load
compartment.
To remove, lift the load-bay floor
using the recess and pull backwards.
To insert, push the load-bay floor
forwards into the corresponding
guide, then lower.
Page 77 of 251

Storage75If mounted in the upper position, the
space between the load-bay floor and
the spare wheel well cover can be
used as a stowage compartment.
In this position, if the rear seat
backrests are folded forwards, an
almost completely flat load bay is
created.
In the upper position, the double load-
bay floor is able to withstand a
maximum load of 100 kg. In the lower
position, the double load-bay floor is
able to withstand the maximum
permissible load.
In models with a tyre repair kit, the
spare wheel recess may be used as
an additional stowage compartment.
Tyre repair kit 3 201.Lashing eyes
The lashing eyes are designed to
secure items against slippage, e.g.
using lashing straps or luggage net.
Safety net The safety net can be installed behind
the front seats.
Passengers must not be transported
behind the safety net.
Installation
There are two installation openings in the roof frame: suspend rod of net at
one side, push to the front and
engage. Extend rod, suspend at other
side, push to the front and engage.
Page 78 of 251
76Storage
Suspend hooks of net tensioning
belts in lashing eyes in the floor
behind the front seats. Tension the
net by pulling the loose end of the belt.
Suspend and tighten on both sides.
Removal Tilt length adjuster of the net
tensioning belts upwards and detach
the belts on both sides. Disengage
the upper rod on one side, disengage other side and remove from the
openings.
Stowage
Place tensioning straps as shown in
illustration and align with safety net.
Roll the upper net rod down to
approximately over the middle.
Place the upper net rod over the tensioning straps next to the lower net
rod. The hooks on the upper net rod
must point away from the lower net
rod.
Fasten Velcro tape tightly about the
net next to the length adjusters. The
length adjusters and net rods must lie flat next to each other.
Stow safety net in the space between
the double load-bay floor in the load
compartment. Rear floor storage
cover 3 74.
Page 79 of 251
Storage77Folding trayLocated in the front seat backrests.Open by pulling upwards until it
engages.
Fold away by pressing down past the
resistance point.
Do not place any heavy objects on the folding tray.
Warning triangle
Stow the warning triangle in the space
at the rear side of the load
compartment.
First aid kit
Stow the first aid kit and the high
visibility vest under the driver's seat.
Use the straps.
Depending on the vehicle, a box is
located under the driver's seat. Pull handle and fold down the cover.
Maximum load: 1.5 kg.
Page 80 of 251

78StorageRoof rack systemRoof rackFor safety reasons and to avoid
damage to the roof, the vehicle
approved roof rack system is
recommended. For further
information contact your workshop.
Follow the installation instructions
and remove the roof rack when not in
use.
Detach the cover from each mounting
point.
Loading information
● Heavy objects in the load compartment should be placed
against the seat backrests.
Ensure that the backrests are
securely engaged. If objects can
be stacked, heavier objects
should be placed at the bottom.
● Secure objects with lashing straps attached to the lashing
eyes 3 75.
● Use the hook at the left sidewall
of the load compartment for
hanging up carrier bags. Pull out
the hook. Maximum load: 3 kg.
● Secure loose objects in the load compartment to prevent themfrom sliding.
● When transporting objects in the load compartment, the backrests
of the rear seats must not be
angled forward.
● Do not allow the load to protrude above the upper edge of the
backrests.