Page 282 of 588

2825-6. Using an external device
Listening to a USB memory device
P. 2 5 9
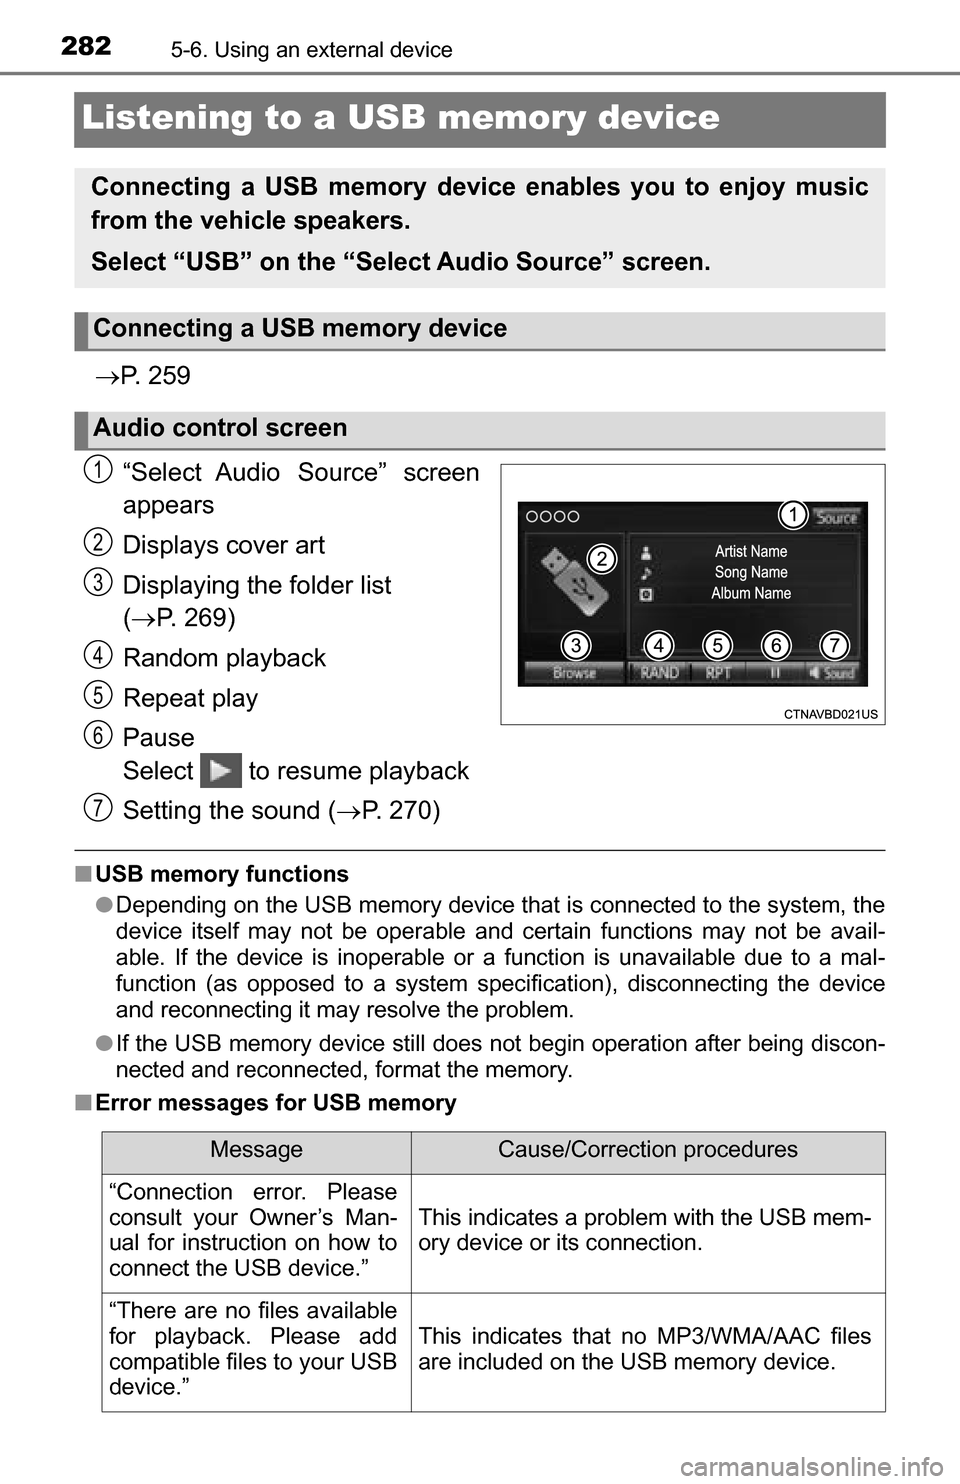
“Select Audio Source” screen
appears
Displays cover art
Displaying the folder list
( P. 269)
Random playback
Repeat play
Pause
Select to resume playback
Setting the sound ( P. 270)
■USB memory functions
●Depending on the USB memory device that is connected to the system, the
device itself may not be operable and certain functions may not be avail-
able. If the device is inoperable or a function is unavailable due to a mal-
function (as opposed to a system specification), disconnecting the device
and reconnecting it may resolve the problem.
● If the USB memory device still does not begin operation after being discon-
nected and reconnected, format the memory.
■ Error messages for USB memory
Connecting a USB memory device enables you to enjoy music
from the vehicle speakers.
Select “USB” on the “Sel ect Audio Source” screen.
Connecting a USB memory device
Audio control screen
1
2
3
4
5
6
7
MessageCause/Correction procedures
“Connection error. Please
consult your Owner’s Man-
ual for instruction on how to
connect the USB device.”
This indicates a problem with the USB mem-
ory device or its connection.
“There are no files available
for playback. Please add
compatible files to your USB
device.”
This indicates that no MP3/WMA/AAC files
are included on the USB memory device.
Page 283 of 588

2835-6. Using an external device
5
Multimedia
■USB memory
●Compatible devices
USB memory device that can be used for MP3, WMA and AAC playback.
● Compatible device formats
The following device format can be used:
• USB communication format: USB2.0 HS (480 Mbps) and FS (12 Mbps)
• File system format: FAT16/32 (Windows)
• Correspondence class: Mass storage class
MP3, WMA and AAC files written to a device with any format other than
those listed above may not play correctly, and their file names and folder
names may not be displayed correctly.
Items related to standards and limitations are as follows:
• Maximum directory hierarchy: 8 levels
• Maximum number of folders in a device: 3000 (including the root)
• Maximum number of files in a device: 9999
• Maximum number of files per folder: 255
● MP3, WMA and AAC files
MP3 (MPEG Audio LAYER 3) is a standard audio compression format.
Files can be compressed to approximately 1/10 of their original size using
MP3 compression.
WMA (Windows Media Audio) is a Microsoft audio compression format.
This format compresses audio data to a size smaller than that of the MP3\
format.
AAC is short for Advanced Audio Coding and refers to an audio compres-
sion technology standard used with MPEG2 and MPEG4.
MP3, WMA and AAC file and media/fo rmats compatibility are limited.
● MP3 file compatibility
• Compatible standards
MP3 (MPEG1 AUDIO LAYER3, MPEG2 AUDIO LAYER3)
• Compatible sampling frequencies MPEG1 AUDIO LAYER3: 32, 44.1, 48 (kHz)
MPEG2 AUDIO LAYER3: 16, 22.05, 24 (kHz)
• Compatible bit rates (compatible with VBR) MPEG1 AUDIO LAYER3: 32-320 (kbps)
MPEG2 AUDIO LAYER3: 8-160 (kbps)
• Compatible channel modes: stereo, joint stereo, dual channel and mon- aural
● WMA file compatibility
• Compatible standards
WMA Ver. 7, 8, 9
• Compatible sampling frequencies HIGH PROFILE 32, 44.1, 48 (kHz)
• Compatible bit rates HIGH PROFILE 48-320 (kbps, VBR)
Page 293 of 588
2935-7. Connecting Bluetooth®
5
Multimedia
To display the screen shown below, press the “SETUP” button and
select “Bluetooth” on the “Setup” screen.
Select to connect the device to
be used with multimedia sys-
tem. ( P. 298)
Select to register a Bluetooth
®
device to be used with multime-
dia system. ( P. 296)
Select to set detailed
Bluetooth
® system settings.
( P. 301)
Select to delete registered devices. ( P. 297)
Registering and connecting from the “Bluetooth Setup” screen
1
2
3
4
Page 296 of 588

2965-7. Connecting Bluetooth®
Registering a Bluetooth® device
Display the “Bluetooth Setup” screen. (P. 293)
Select “Add”.
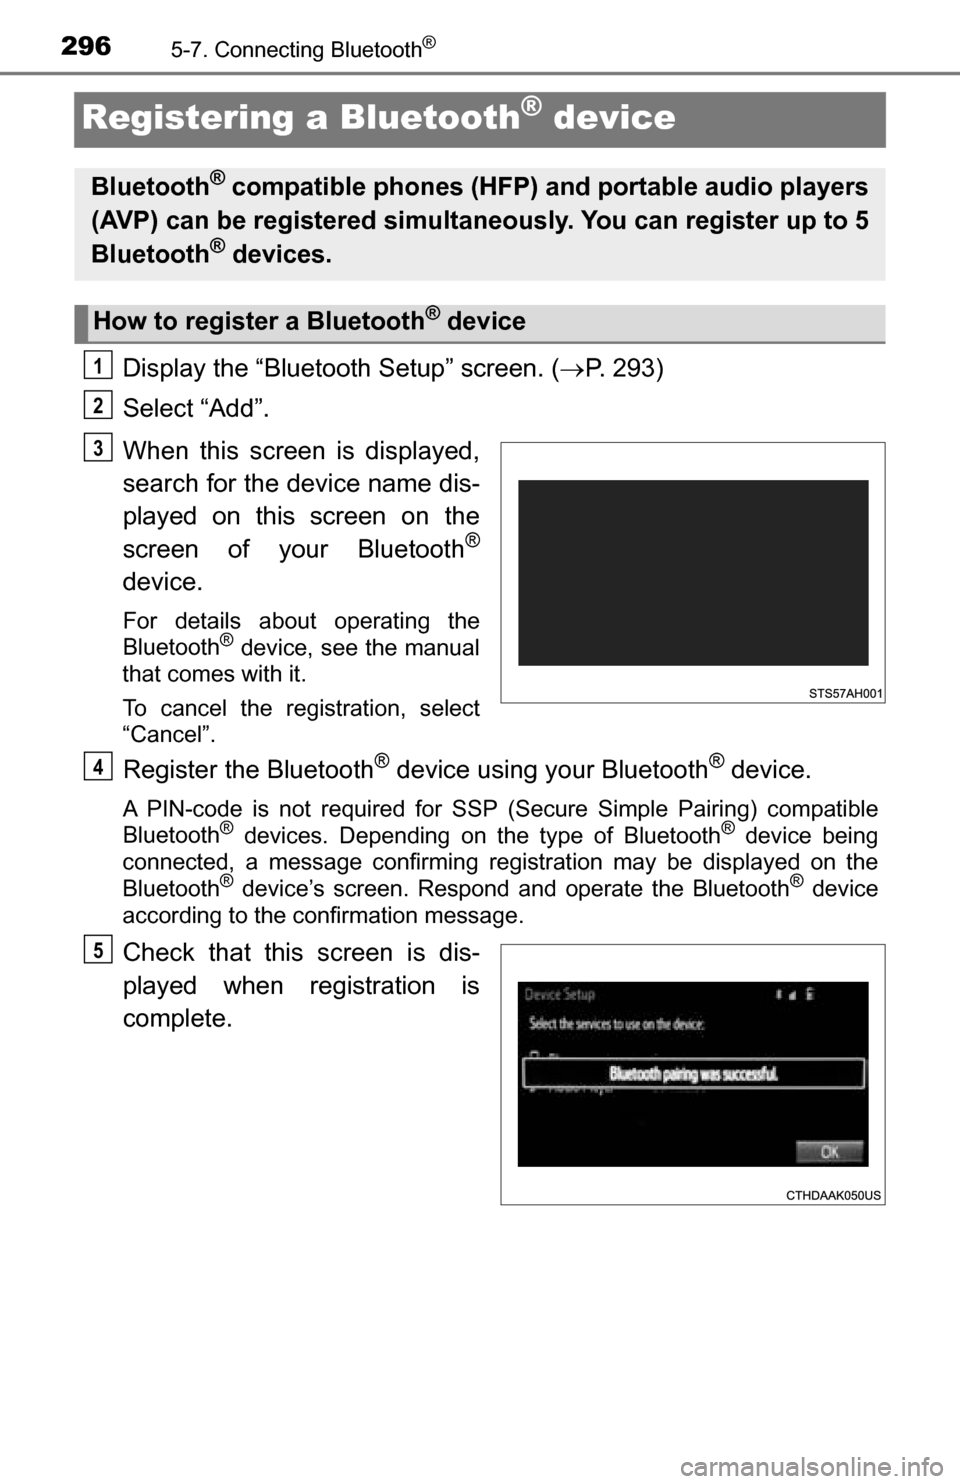
When this screen is displayed,
search for the device name dis-
played on this screen on the
screen of your Bluetooth
®
device.
For details about operating the
Bluetooth® device, see the manual
that comes with it.
To cancel the registration, select
“Cancel”.
Register the Bluetooth® device using your Bluetooth® device.
A PIN-code is not required for SSP (Secure Simple Pairing) compatible
Bluetooth® devices. Depending on the type of Bluetooth® device being
connected, a message confirming registration may be displayed on the
Bluetooth
® device’s screen. Respond and operate the Bluetooth® device
according to the confirmation message.
Check that this screen is dis-
played when registration is
complete.
Bluetooth® compatible phones (HFP) and portable audio players
(AVP) can be registered simultaneously. You can register up to 5
Bluetooth
® devices.
How to register a Bluetooth® device
1
2
3
4
5
Page 297 of 588
2975-7. Connecting Bluetooth®
5
Multimedia
Select “OK” when the connection status changes from “Connect-
ing...” to “Connected”.
If an error message is displayed, follow the guidance on the screen to try
again.
Registration can be performed from screens other than the “Bluetooth
Setup” screen.
■When registering from the “Bluetooth Audio” screen
Display the “Bluetooth Audio” screen. ( P. 302)
Select “Select Device”.
Follow the steps in “How to registering a Bluetooth
® device” from
step . ( P. 296)
Display the “Bluetooth Setup” screen. ( P. 293)
Select “Remove”.
Select the desired device.
A confirmation message will be displa yed, select “Yes” to delete the
device.
Check that a confirmation screen is displayed when the operation is
complete.
Deleting a Bluetooth® device
6
1
2
3
2
1
2
3
4
5
Page 298 of 588

2985-7. Connecting Bluetooth®
Connecting a Bluetooth® device
Press the “SETUP” button.
Select “Bluetooth” on the “Setup” screen.
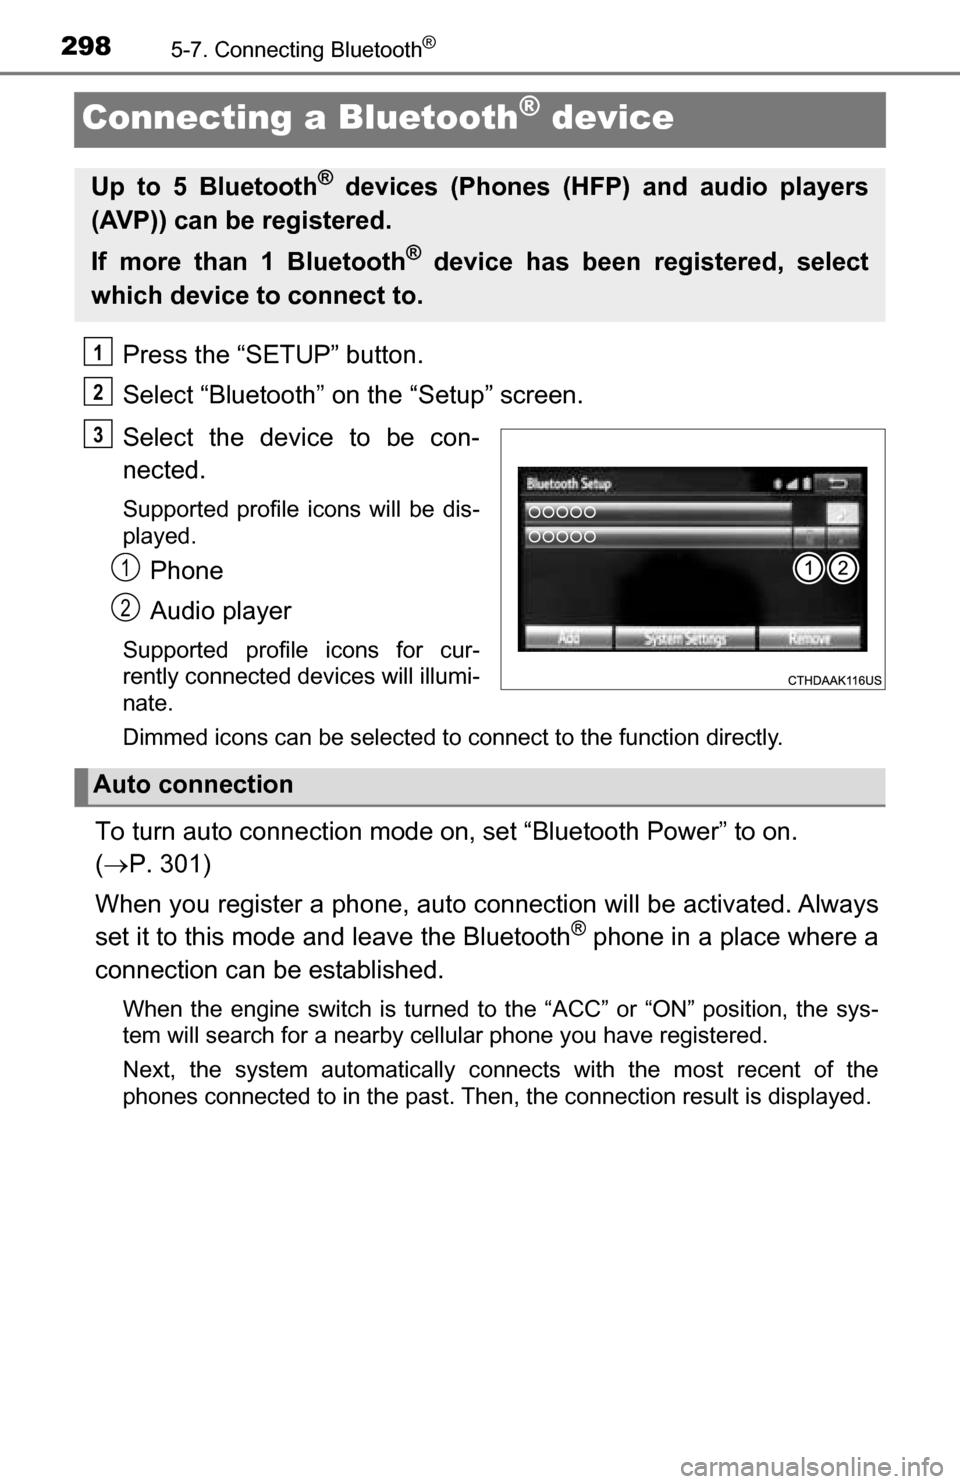
Select the device to be con-
nected.
Supported profile icons will be dis-
played.
Phone
Audio player
Supported profile icons for cur-
rently connected devices will illumi-
nate.
Dimmed icons can be selected to connect to the function directly.
To turn auto connection mode on, set “Bluetooth Power” to on.
( P. 301)
When you register a phone, auto connection will be activated. Always
set it to this mode and leave the Bluetooth
® phone in a place where a
connection can be established.
When the engine switch is turned to the “ACC” or “ON” position, the sys-
tem will search for a nearby cellular phone you have registered.
Next, the system automatically connects with the most recent of the
phones connected to in the past. Then, the connection result is displayed.
Up to 5 Bluetooth® devices (Phones (HFP) and audio players
(AVP)) can be registered.
If more than 1 Bluetooth
® device has been registered, select
which device to connect to.
1
2
3
1
2
Auto connection
Page 300 of 588
3005-7. Connecting Bluetooth®
Displaying a Bluetooth® device details
Display the “Bluetooth Setup” screen. (P. 293)
Select the device.
Select “Device Info”.
Following screen is displayed:
Device name
Change connection method
( P. 300)
Bluetooth
® address
Display your telephone num-
ber
The number may not be dis-
played depending on the model
of phone.
Compatibility profile of the
device
Restore default settings
Select “Connect Audio Player from”.
Select “Vehicle ” or “Device”.
“Vehicle”: Connect the multimedia system to the portable audio player.
“Device”: Connect the portable audio player to the multimedia system.
You can confirm and change the registered device details.
Bluetooth® device registration status
1
2
3
4
1
2
3
4
5
6
Changing connection method
1
2
Page 301 of 588
3015-7. Connecting Bluetooth®
5
Multimedia
Detailed Bluetooth® system settings
Display the “Bluetooth Setup” screen. (P. 293)
Select “System Settings”.
The following screen is displayed:
Bluetooth
® power on/off
You can change Bluetooth®
function on/off
Bluetooth® name
Change PIN-code ( P. 301)
Bluetooth
® address
Display phone status
You can set the system to show
the status confirmation display
when connecting a telephone
Display audio player status
You can set the system to show
the status confirmation display
when connecting an audio
player
Compatibility profile of the system
Restore default settings
You can change the PIN-code that is used to register your Bluetooth
®
devices in the system.
Select “Bluetooth PIN”.
Input a PIN-code, and select “OK”.
You can confirm and change the detailed Bluetooth® settings.
How to check and change detailed Bluetooth® settings
1
2
3
1
2
3
4
5
6
Editing the Bluetooth® PIN
7
8
1
2