Page 170 of 668
170
SIENNA_OM_OM08013U_(U)
3-3. Adjusting the seats
Your preferred driving position (the position of the driver’s seat and
outside rear view mirrors) can be recalled by pressing a button.
Two different driving positions can be recorded into memory.
■Recording procedureCheck that the shift lever is in P.
Turn the engine switch to IGNITION ON mode.
Adjust the driver’s seat and outside rear view mirrors to the
desired positions.
While pressing the “SET”
button, or within 3 seconds
after the “SET” button is
pressed, press button “1” or
“2” until the signal beeps.
If the selected button has
already been preset, the previ-
ously recorded position will be
overwritten.
■
Recall procedure
Check that the shift lever is in P.
Turn the engine switch to IGNITION ON mode.
Press one of the buttons for
the driving position you want
to recall until the signal
beeps.
Driving position memory
1
2
3
4
1
2
3
Page 319 of 668
319
SIENNA_OM_OM08013U_(U)
5-1. Basic Operations
5
Audio system
Audio system
“AUDIO” button
Display the “Select Audio Source” screen or audio top screen.
( P. 332)
“SETUP” button
Press this button to customize the function settings. ( P. 326)
“CAR” button
Press this button to access the vehicle information. ( P. 100)
button
Press this button to access the Bluetooth
® hands-free system.
( P. 367)
: If equipped
Operations such as listening to audio, using the hands-free
phone, confirming vehicle inform ation and changing audio sys-
tem settings are started by using the following buttons.
Audio system operation buttons
1
2
3
4
Page 320 of 668

3205-1. Basic Operations
SIENNA_OM_OM08013U_(U)
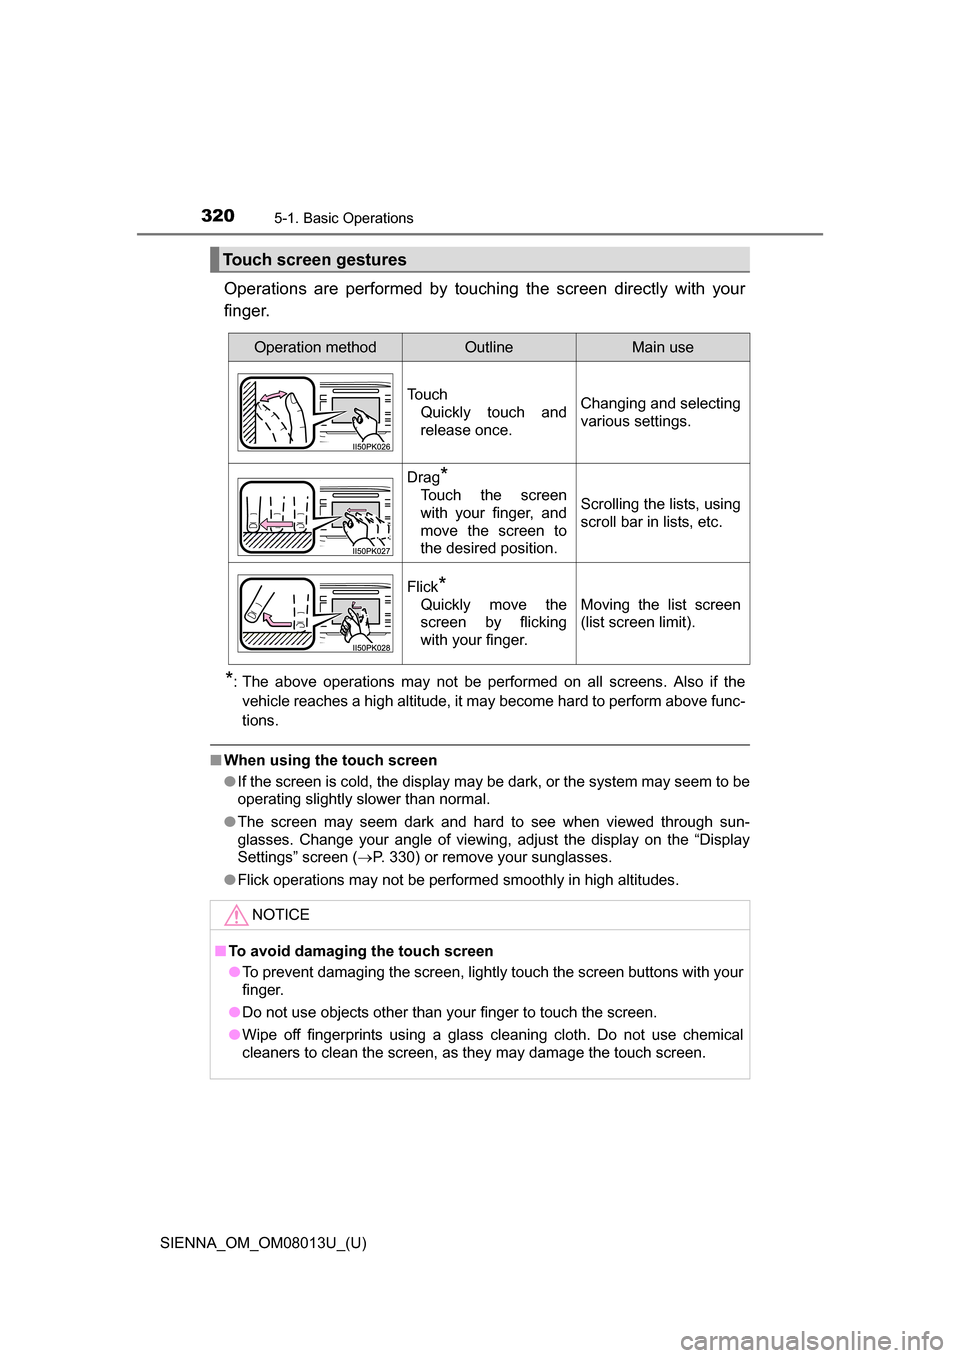
Operations are performed by touching the screen directly with your
finger.
*: The above operations may not be performed on all screens. Also if the vehicle reaches a high altitude, it may become hard to perform above func-
tions.
■ When using the touch screen
●If the screen is cold, the display may be dark, or the system may seem to be
operating slightly slower than normal.
● The screen may seem dark and hard to see when viewed through sun-
glasses. Change your angle of viewing, adjust the display on the “Display
Settings” screen ( P. 330) or remove your sunglasses.
● Flick operations may not be performed smoothly in high altitudes.
Touch screen gestures
Operation methodOutlineMain use
Touch
Quickly touch and
release once.Changing and selecting
various settings.
Drag*
Touch the screen
with your finger, and
move the screen to
the desired position.Scrolling the lists, using
scroll bar in lists, etc.
Flick*
Quickly move the
screen by flicking
with your finger.Moving the list screen
(list screen limit).
NOTICE
■ To avoid damaging the touch screen
●To prevent damaging the screen, lightly touch the screen buttons with your
finger.
● Do not use objects other than your finger to touch the screen.
● Wipe off fingerprints using a glass cleaning cloth. Do not use chemical
cleaners to clean the screen, as they may damage the touch screen.
Page 333 of 668
333
SIENNA_OM_OM08013U_(U)
5-3. Using the Multimedia system
5
Audio system
List screen operation
: Select to scroll to the next
or previous page.
: If appears to the right of titles, the complete titles are
too long for the display. Select
this button to scroll the title.
Turn the “TUNE•SCROLL” knob
to move the cursor box to select a
desired item from the list, and
press the “TUNE•SCROLL” knob
to play it. The track that is being
played is highlighted.
To return to the top screen, select “Now Playing” on the list screen.
When a list screen is displayed, use the appropriate buttons to
scroll through the list.
How to scroll
Page 448 of 668
448
SIENNA_OM_OM08013U_(U)
6-4. Using the other interior features
Garage door opener
The garage door opener (HomeLink® Universal Transceiver) is manu-
factured under license from HomeLink®.
The HomeLink
® compatible transceiver in your vehicle has 3 buttons
which can be programmed to operate 3 different devices. Refer to the
programming method below appropriate for the device.
Indicator light
Buttons
■Programming the HomeLink®
Point the remote control for
the device 1 to 3 in. (25 to 75
mm) from the HomeLink
®
control buttons.
Keep the indicator light on the
HomeLink® in view while pro-
gramming.
: If equipped
The garage door opener can be programmed to operate garage
doors, gates, entry doors, door locks, home lighting systems,
security systems, and other devices.
Programming the HomeLink® (for U.S.A. owners)
1
2
1
Page 449 of 668

SIENNA_OM_OM08013U_(U)
4496-4. Using the other interior features
6
Interior features
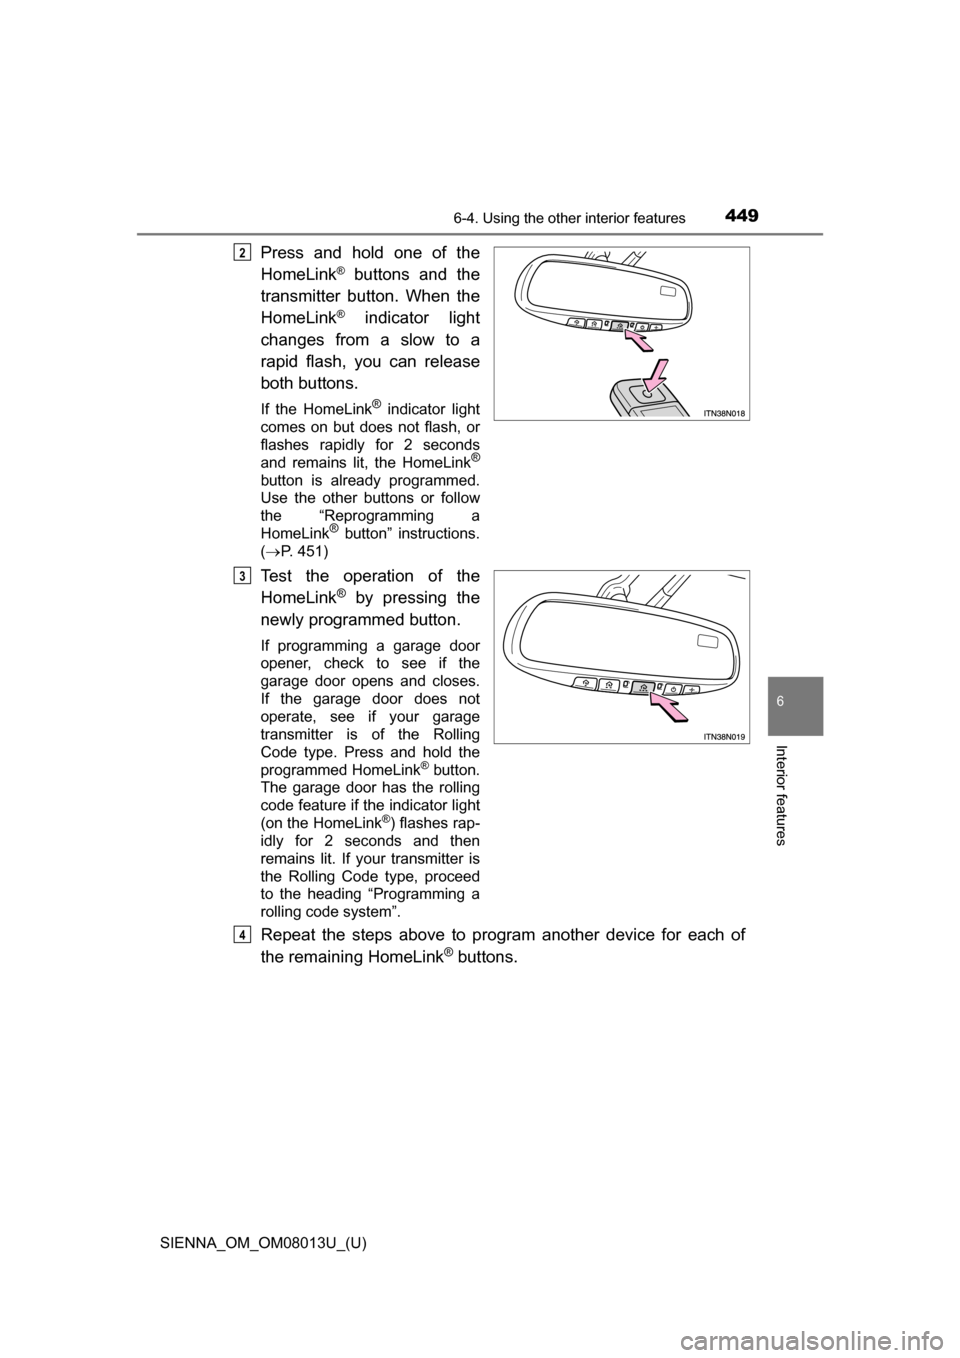
Press and hold one of the
HomeLink
® buttons and the
transmitter button. When the
HomeLink
® indicator light
changes from a slow to a
rapid flash, you can release
both buttons.
If the HomeLink® indicator light
comes on but does not flash, or
flashes rapidly for 2 seconds
and remains lit, the HomeLink
®
button is already programmed.
Use the other buttons or follow
the “Reprogramming a
HomeLink
® button” instructions.
( P. 451)
Test the operation of the
HomeLink® by pressing the
newly programmed button.
If programming a garage door
opener, check to see if the
garage door opens and closes.
If the garage door does not
operate, see if your garage
transmitter is of the Rolling
Code type. Press and hold the
programmed HomeLink
® button.
The garage door has the rolling
code feature if the indicator light
(on the HomeLink
®) flashes rap-
idly for 2 seconds and then
remains lit. If your transmitter is
the Rolling Code type, proceed
to the heading “Programming a
rolling code system”.
Repeat the steps above to program another device for each of
the remaining HomeLink® buttons.
2
3
4
Page 450 of 668

450
SIENNA_OM_OM08013U_(U)
6-4. Using the other interior features
■Programming a Rolling Code system (for U.S.A. owners)
If your device is Rolling Code equipped, follow the steps under the
heading “Programming the HomeLink
®” before proceeding with the
steps listed below.
Locate the training button on the ceiling mounted garage door
opener motor. The exact location and color of the button may
vary by brand of garage door opener.
Refer to the operation manual supplied with the garage door opener for
the location of the training button.
Press the training button.
Following this step, you have 30 seconds in which to initiate step 3
below.
Press and hold the vehicle’s programmed HomeLink® button for
2 seconds and release it. Repeat this step once again. The
garage door may open.
If the garage door opens, the programming process is complete. If the
door does not open, press and release the button a third time. This third
press and release will complete the programming process by opening
the garage door.
The ceiling mounted garage door opener motor should now recognize
the HomeLink
® transceiver and operate the garage door.
Repeat the steps above to program another rolling code system
for any of the remaining HomeLink® buttons.
■Programming an entry gate (for U.S.A. owners)/Programming
all devices in the Canadian market
Place your transmitter 1 to 3 in. (25 to 75 mm) away from the sur-
face of the HomeLink
®.
Keep the indicator light on the HomeLink® in view while programming.
Press and hold the selected HomeLink® button.
Repeatedly press and release (cyc le) the device’s remote control
button for two seconds each until step 4 is complete.
When the indicator light on the HomeLink
® compatible trans-
ceiver starts to flashing rapidly, release the buttons.
Test the operation of the HomeLink
® by pressing the newly pro-
grammed button. Check to see if the gate/device operates cor-
rectly.
Repeat the steps above to program another device for each of
the remaining HomeLink
® buttons.
1
2
3
4
1
2
3
4
5
6
Page 451 of 668

SIENNA_OM_OM08013U_(U)
4516-4. Using the other interior features
6
Interior features
■Programming other devices
To program other devices such as home security systems, home
door locks or lighting, contact your authorized Toyota dealer for
assistance.
■Reprogramming a button
The individual HomeLink
® buttons cannot be erased but can be
reprogrammed. To reprogram a button, follow the programming
instructions.
Press the appropriate HomeLink
® button. The HomeLink® indicator
light on the HomeLink® transceiver should turn on.
The HomeLink® continues to send a signal for up to 20 seconds as long as
the button is pressed.
Press and hold the desired HomeLink® button. After 20 seconds, the
HomeLink® indicator light will start flashing slowly. Keep pressing the
HomeLink® button and press and hold the transmitter button until the
HomeLink® indicator light changes from a slow to a rapid flash.
Release the buttons.
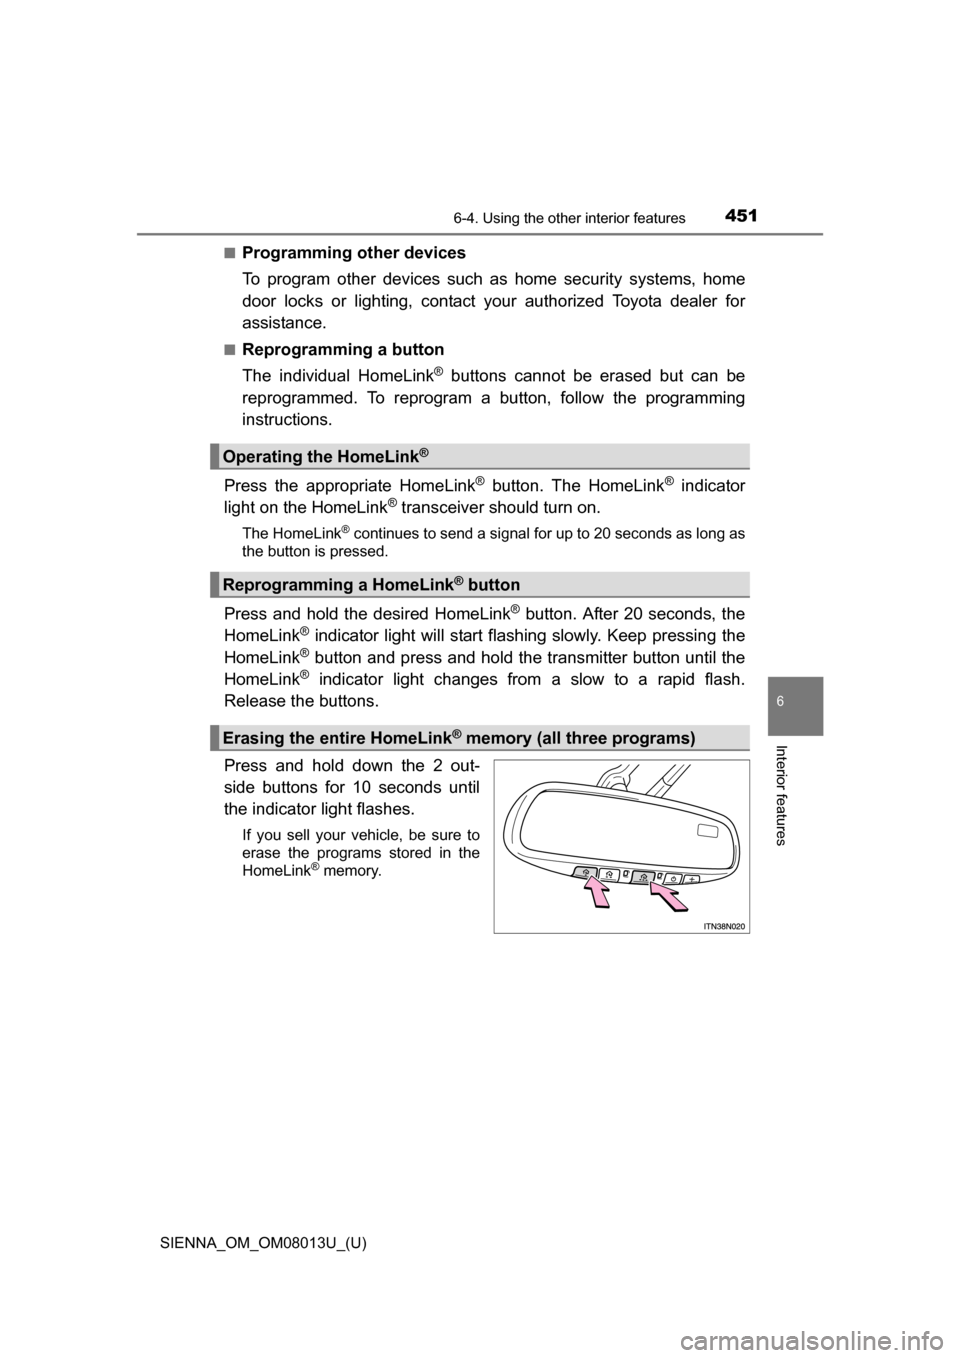
Press and hold down the 2 out-
side buttons for 10 seconds until
the indicator light flashes.
If you sell your vehicle, be sure to
erase the programs stored in the
HomeLink
® memory.
Operating the HomeLink®
Reprogramming a HomeLink® button
Erasing the entire HomeLink® memory (all three programs)