Page 150 of 324
150
7. REAR SEAT ENTERTAINMENT SYSTEM OPERATION
4. PLAYING AN SD CARD*
This system can play still pictures and
AVCHD video that are stored in an SD
card. It does not support music play-
back.
Press the “SD” button if an SD card
has already been inserted in the SD
card slot.
REMOTE CONTROLLER
No.Function
Selecting a control icon
Inputting the selected control icon
Volume up/down
Fast-forward/rewind
Play/pause
Stop
Displaying the option screen
Selecting a chapter
Turning on the SD card mode
MAIN MENU
No.FunctionPage
Playing still pictures151
Playing AVCHD video152
Formatting the SD card153
Deleting the BD history data153
No.Function
*: If equipped
Page 151 of 324
151
7. REAR SEAT ENTERTAINMENT SYSTEM OPERATION
AUDIO SYSTEM
3
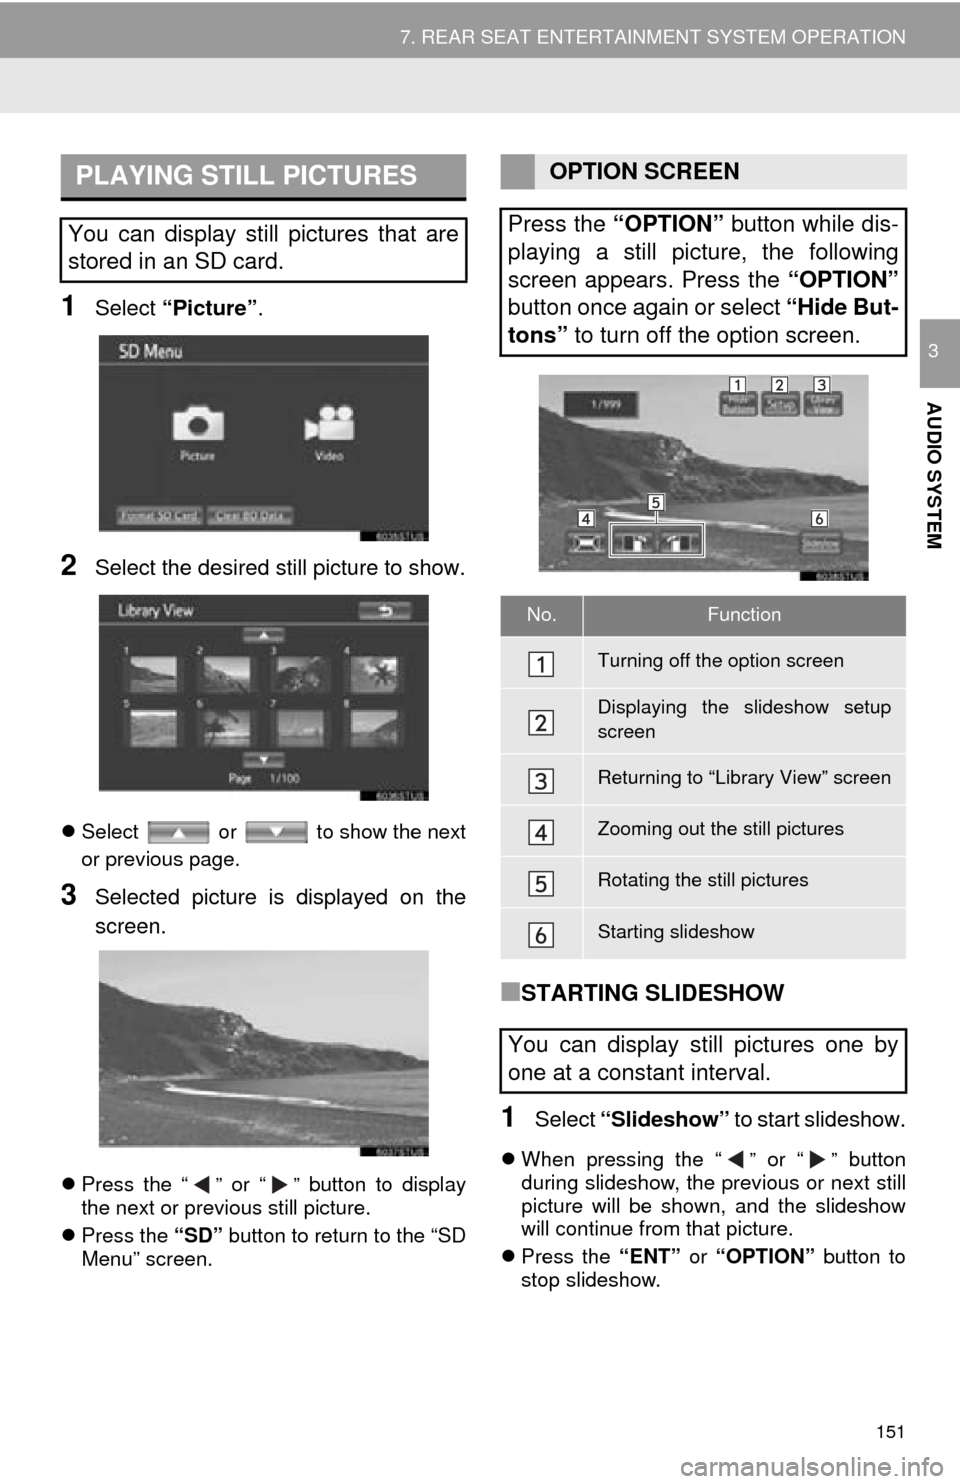
1Select “Picture”.
2Select the desired still picture to show.
Select or to show the next
or previous page.
3Selected picture is displayed on the
screen.
Press the “” or “” button to display
the next or previous still picture.
Press the “SD” button to return to the “SD
Menu” screen.
■STARTING SLIDESHOW
1Select “Slideshow” to start slideshow.
When pressing the “” or “” button
during slideshow, the previous or next still
picture will be shown, and the slideshow
will continue from that picture.
Press the “ENT” or “OPTION” button to
stop slideshow.
PLAYING STILL PICTURES
You can display still pictures that are
stored in an SD card.
OPTION SCREEN
Press the “OPTION” button while dis-
playing a still picture, the following
screen appears. Press the “OPTION”
button once again or select “Hide But-
tons” to turn off the option screen.
No.Function
Turning off the option screen
Displaying the slideshow setup
screen
Returning to “Library View” screen
Zooming out the still pictures
Rotating the still pictures
Starting slideshow
You can display still pictures one by
one at a constant interval.
Page 152 of 324
152
7. REAR SEAT ENTERTAINMENT SYSTEM OPERATION
■ROTATING THE STILL PICTURES
1Select or to rotate a still
picture.
The rotate information will be maintained
until the system is turned off or the SD
card is removed.
■ZOOM OUT THE STILL PICTURES
1Select to zoom out the still pic-
tures.
Select again to cancel zoom out.
This function is only available for small-
sized still pictures.
■SLIDESHOW SETUP
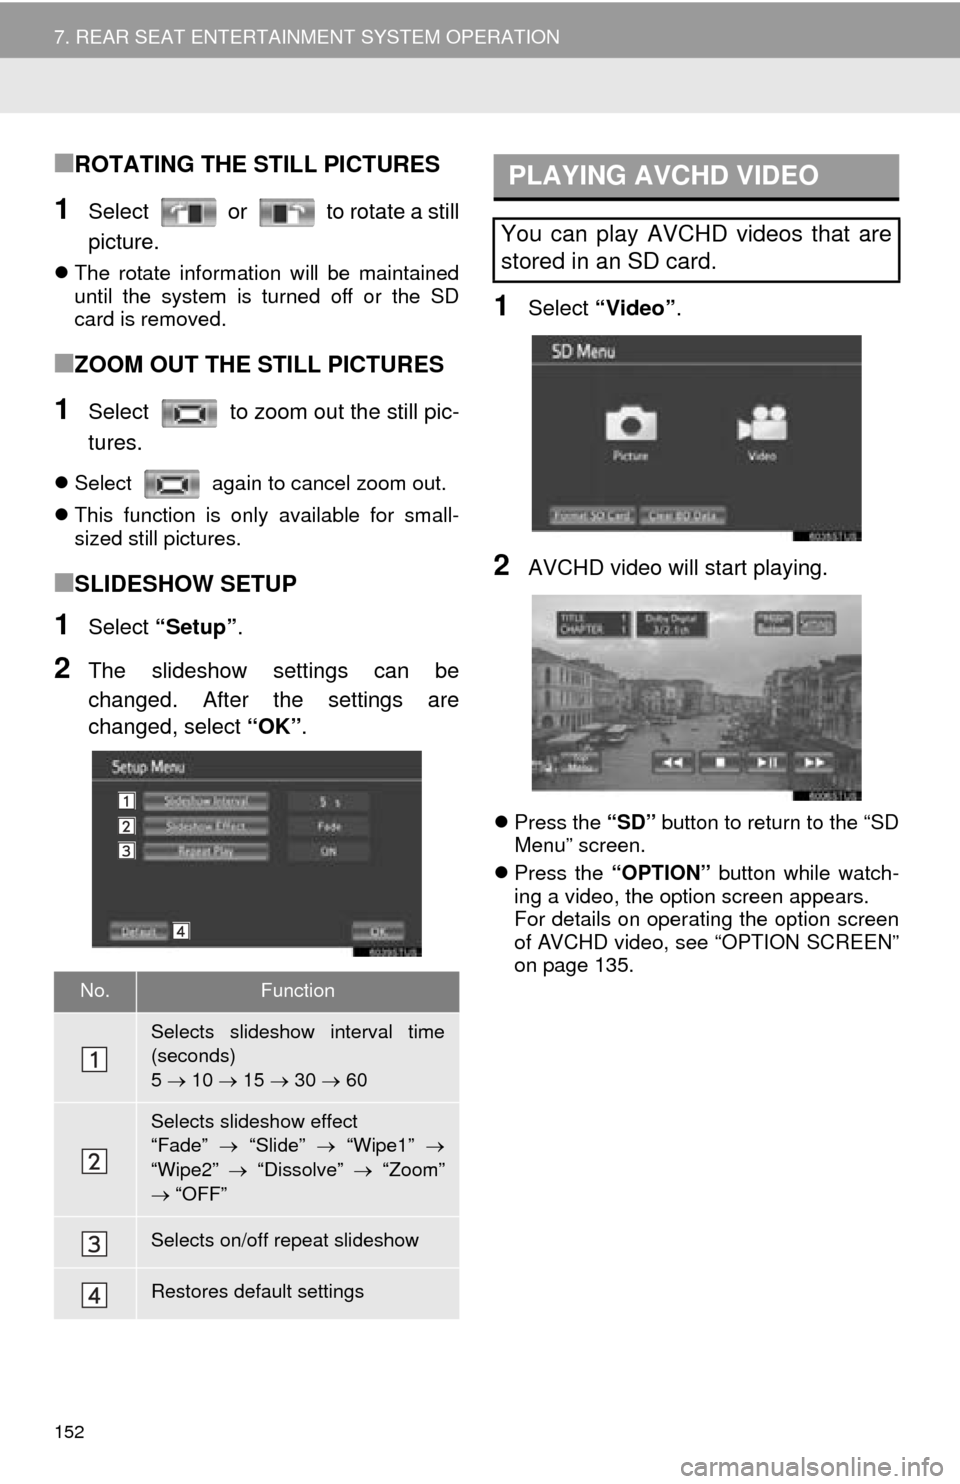
1Select “Setup” .
2The slideshow settings can be
changed. After the settings are
changed, select “OK”.
1Select “Video”.
2AVCHD video will start playing.
Press the “SD” button to return to the “SD
Menu” screen.
Press the “OPTION” button while watch-
ing a video, the option screen appears.
For details on operating the option screen
of AVCHD video, see “OPTION SCREEN”
on page 135.
No.Function
Selects slideshow interval time
(seconds)
5 10 15 30 60
Selects slideshow effect
“Fade” “Slide” “Wipe1”
“Wipe2” “Dissolve” “Zoom”
“OFF”
Selects on/off repeat slideshow
Restores default settings
PLAYING AVCHD VIDEO
You can play AVCHD videos that are
stored in an SD card.
Page 153 of 324
153
7. REAR SEAT ENTERTAINMENT SYSTEM OPERATION
AUDIO SYSTEM
3
1Select “Format SD Card” .
2Select “Yes” to format the SD card.
If the SD card is formatted, all data on the
card will be erased.
1Select “Clear BD Data” .
2Select “Yes” to delete the BD history
data.
Compatible files
The following files can be displayed.
Picture file format: JPEG
• Picture resolution: between 34 34
and 8192 8192 pixels
• Gray scale JPEG is not supported
Video file format: AVCHD
• For AVCHD playback, use a disc with
data that was saved using a video
recording device. .mts and .m2ts files
cannot be played by themselves.
Compatible formats
This system is compatible with SD memory
cards that meet SD card specifications
FAT16 formats, SDHC memory cards in
FAT32 format, and SDXC memory cards in
exFAT format.
An SD card is not provided with the rear
seat entertainment system and needs to
be purchased separately.
The Panasonic SD memory card format
software version 4.0 or higher is recom-
mended.
Data stored in an SD card may be lost.
Before playing back pictures and videos
stored in an SD card, make certain to back
up the data.
Before an SD card that contains any kind
of data is played, slide the lock switch on
the SD card to “LOCK” in order to prevent
any data from being accidentally deleted
or overwritten.
FORMATTING THE SD CARD
DELETING THE BD HISTORY
DATA
The BD history data such as book-
marks and resume information can be
deleted.
SD CARD INFORMATION
Page 154 of 324
154
7. REAR SEAT ENTERTAINMENT SYSTEM OPERATION
CAUTION
●SD cards
• Keep away from children. These are
small and if swallowed by a child they
can cause choking.
NOTICE
● Failure to follow the precautions below
may result in damage to the SD cards or
the SD card slot.
• Do not insert anything other than an
SD card into the SD card slot.
• Do not stick levels or stickers on SD card. There is a possibility that it may
become impossible to eject the SD
card from inside the slot.
• Do not handle an SD card with wet hands. Doing so may cause electric
shock or a malfunction.
• Do not allow hands or metal objects to contact the interface pins of SD cards.
• Do not place SD cards on the instru- ment panel, on any place with direct
sunlight or in areas with a lot of mois-
ture.
• Do not use SD cards in any place where static electricity or electric noise
adversely affects SD cards. This may
cause data corruption or data loss.
• Always place the SD card in its storage case when not in use.
Page 155 of 324
155
7. REAR SEAT ENTERTAINMENT SYSTEM OPERATION
AUDIO SYSTEM
3
5. USING THE VIDEO MODE*
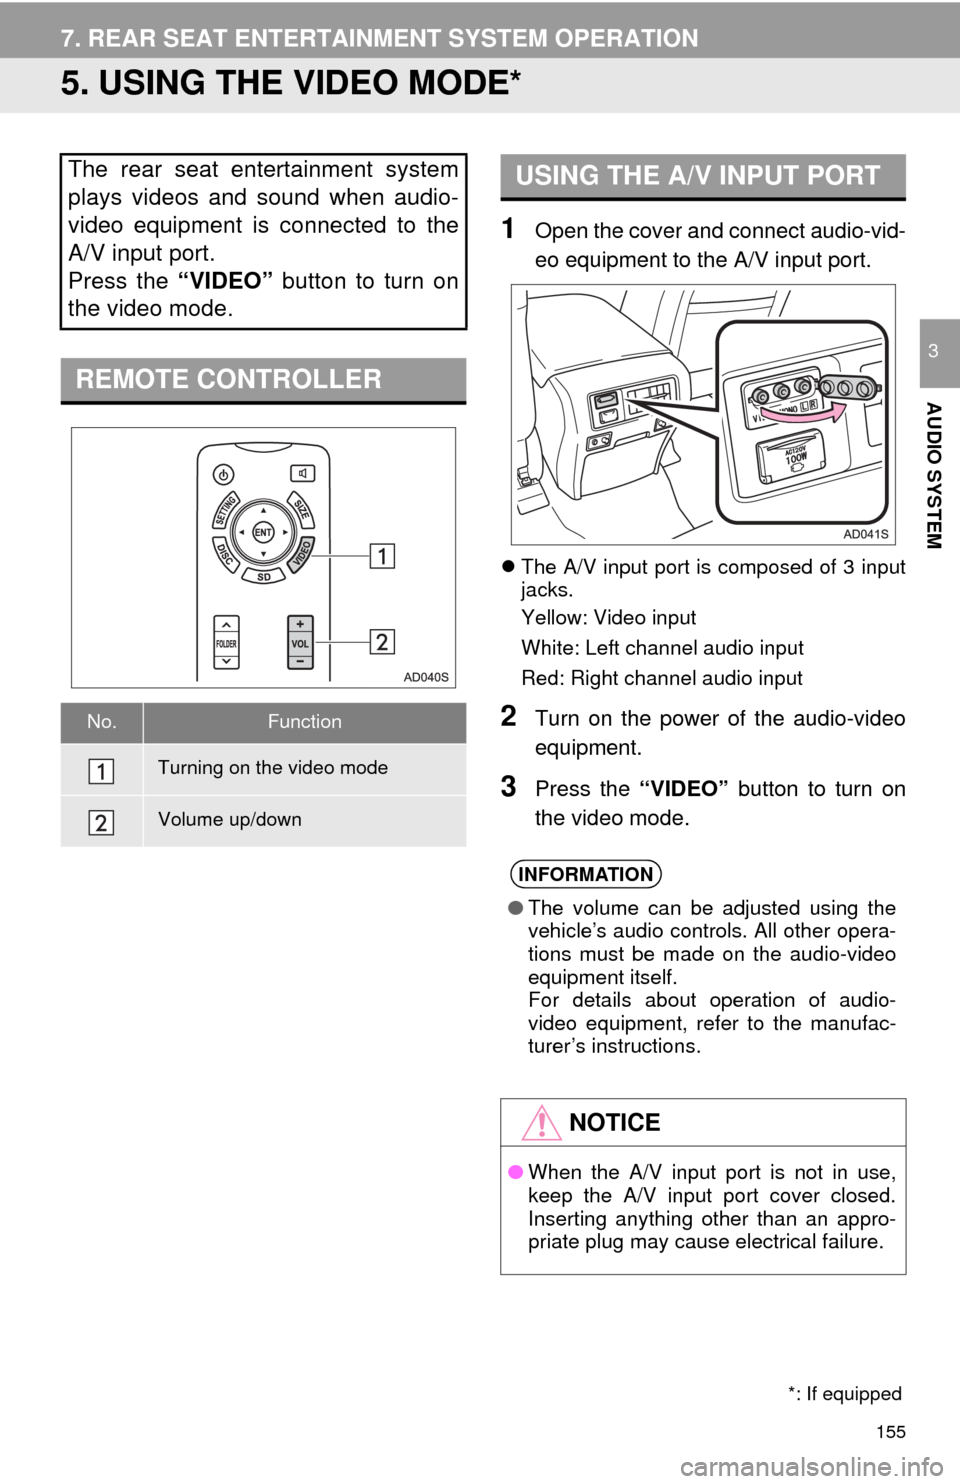
1Open the cover and connect audio-vid-
eo equipment to the A/V input port.
The A/V input port is composed of 3 input
jacks.
Yellow: Video input
White: Left channel audio input
Red: Right channel audio input
2Turn on the power of the audio-video
equipment.
3Press the “VIDEO” button to turn on
the video mode.
The rear seat entertainment system
plays videos and sound when audio-
video equipment is connected to the
A/V input port.
Press the “VIDEO” button to turn on
the video mode.
REMOTE CONTROLLER
No.Function
Turning on the video mode
Volume up/down
*: If equipped
USING THE A/V INPUT PORT
INFORMATION
● The volume can be adjusted using the
vehicle’s audio controls. All other opera-
tions must be made on the audio-video
equipment itself.
For details about operation of audio-
video equipment, refer to the manufac-
turer’s instructions.
NOTICE
●When the A/V input port is not in use,
keep the A/V input port cover closed.
Inserting anything other than an appro-
priate plug may cause electrical failure.
Page 156 of 324
156
7. REAR SEAT ENTERTAINMENT SYSTEM OPERATION
Page 311 of 324

311
R
Radio ............................................ 75, 85, 91
Rear seat entertainment system ............. 121
Rear view monitor system ..................... 174
Registering home..................................... 22
Registering preset destinations ............... 24
Registering/connecting Bluetooth
®
device ................................................... 41
Certification .......................................... 45
Profiles ................................................. 43
Registering a Bluetooth
® audio player
for the first time ................................. 42
Registering a Bluetooth
® phone
for the first time ................................. 41
Route guidance screen .......................... 259
During freeway driving ....................... 261
Route overview .................................. 260
Screen for route guidance .................. 259
Turn list screen................................... 263
Turn-by-turn arrow screen.................. 263
When approaching intersection.......... 262
Route trace ............................................ 237
S
Satellite Radio .......................................... 85
Screen adjustment ................................... 39
SD card ................................................... 291
Search operation.................................... 244
Searching by address......................... 246
Searching by address book ................ 251
Searching by coordinates ................... 254
Searching by emergency.................... 252
Searching by intersection and freeway ........................................... 252
Searching by map .............................. 254
Searching by point of interest ............. 247
Searching from previous destinations..................................... 251
Selecting search area......................... 245
Setting home as destination ............... 245
Setting preset destinations as destination.................................. 245