Page 9 of 276
9
1
2
3
4
5
6
7
8
9
1. BASIC OPERATION ........................ 66
QUICK REFERENCE ............................ 66
SOME BASICS ...................................... 67
2. RADIO OPERATION ....................... 72
AM/FM RADIO....................................... 72
XM Satellite Radio ................................. 81
INTERNET RADIO ................................ 87
3. MEDIA OPERATION ....................... 88
CD ......................................................... 88
USB MEMORY ...................................... 91
iPod ....................................................... 94
Bluetooth
® AUDIO ................................. 98
AUX ......................................................... 102
4. AUDIO REMOTE CONTROLS ...... 104
STEERING SWITCHES ...................... 104
5. SETUP ........................................... 106
AUDIO SETTINGS .............................. 106
6. TIPS FOR OPERATING
THE AUDIO SYSTEM .................. 108
OPERATING INFORMATION ............. 108
1. VOICE COMMAND SYSTEM
OPERATION ................................ 118
VOICE COMMAND SYSTEM .............. 118
CASUAL SPEECH
RECOGNIZATION ............................ 123
COMMAND LIST ................................. 124
1. INFORMATION ............................. 128
RECEIVING WEATHER
INFORMATION ................................. 128
DATA SERVICES SETTINGS ............. 129
1. REAR VIEW MONITOR
SYSTEM ....... ............................ ...
132
REAR VIEW MONITOR SYSTEM ....... 132
REAR VIEW MONITOR SYSTEM
PRECAUTIONS ................................ 134
THINGS YOU SHOULD KNOW .......... 139
1. PHONE OPERATION
(HANDS-FREE SYSTEM
FOR CELLULAR PHONES)........ 142
QUICK REFERENCE .......................... 142
SOME BASICS .................................... 143
CALLING ON THE Bluetooth
®
PHONE .............................................. 146
RECEIVING ON THE Bluetooth
®
PHONE .............................................. 151
TALKING ON THE Bluetooth
®
PHONE .............................................. 152
Bluetooth
® PHONE MESSAGE
FUNCTION ........................................ 155
2. SETUP........................................... 160
PHONE/MESSAGE SETTINGS .......... 160
3. WHAT TO DO IF... ....................... 172
TROUBLESHOOTING ......................... 172
3AUDIO SYSTEM
4VOICE COMMAND SYSTEM
5INFORMATION
6PERIPHERAL MONITORING
SYSTEM
7PHONE
Page 56 of 276
56
3. OTHER SETTINGS
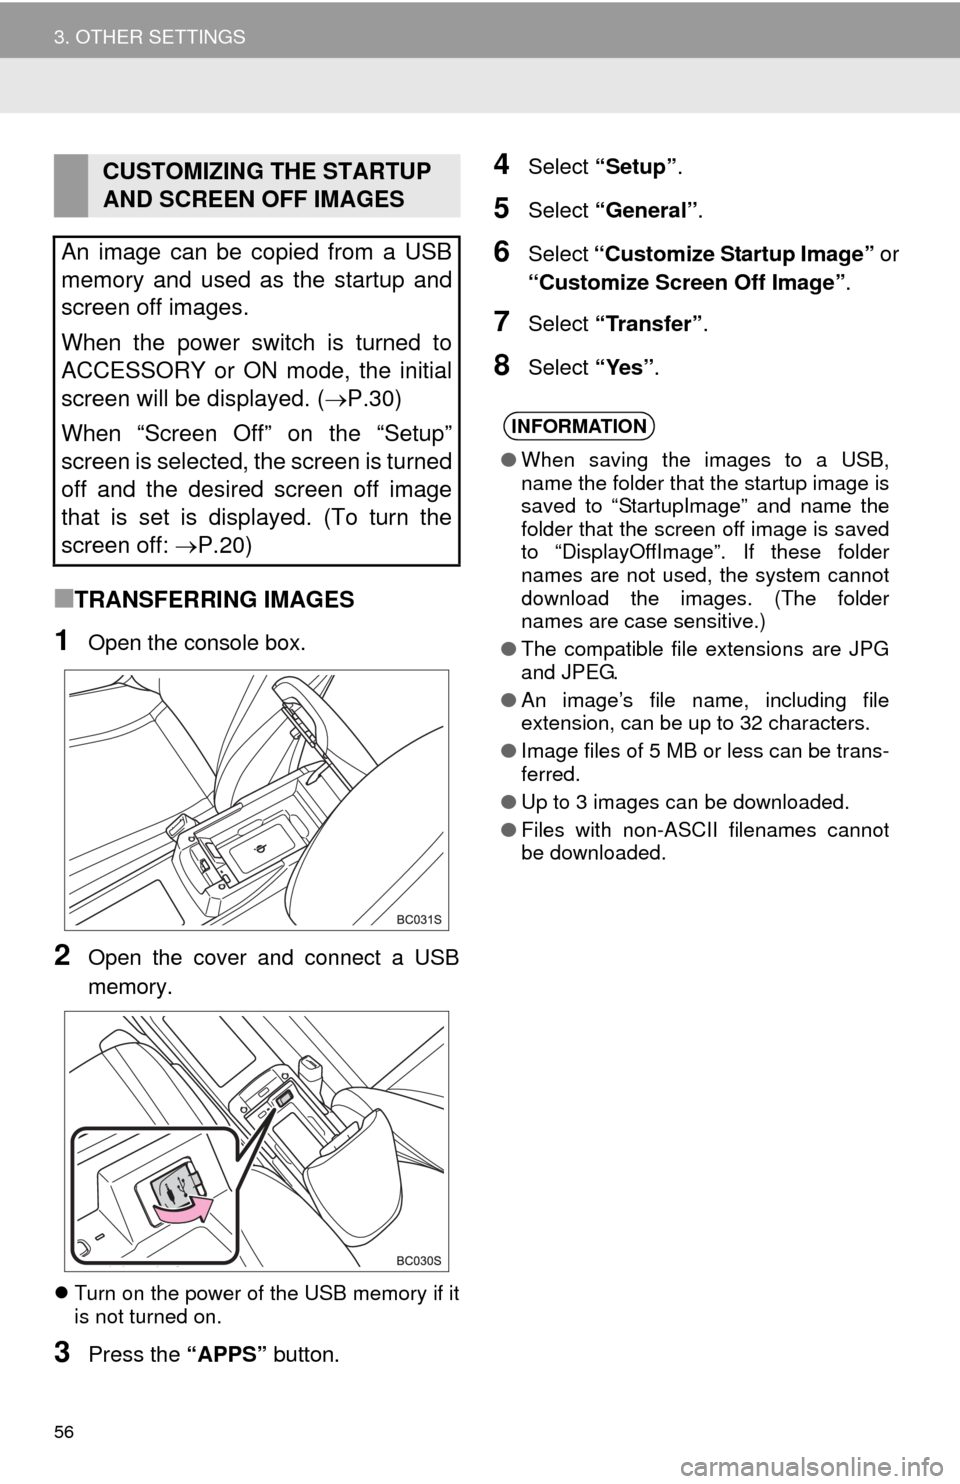
■TRANSFERRING IMAGES
1Open the console box.
2Open the cover and connect a USB
memory.
Turn on the power of the USB memory if it
is not turned on.
3Press the “APPS” button.
4Select “Setup”.
5Select “General” .
6Select “Customize Startup Image” or
“Customize Screen Off Image” .
7Select “Transfer” .
8Select “Yes”.
CUSTOMIZING THE STARTUP
AND SCREEN OFF IMAGES
An image can be copied from a USB
memory and used as the startup and
screen off images.
When the power switch is turned to
ACCESSORY or ON mode, the initial
screen will be displayed. ( P.30)
When “Screen Off” on the “Setup”
screen is selected, the screen is turned
off and the desired screen off image
that is set is displayed. (To turn the
screen off: P.20)
INFORMATION
● When saving the images to a USB,
name the folder that the startup image is
saved to “StartupImage” and name the
folder that the screen off image is saved
to “DisplayOffImage”. If these folder
names are not used, the system cannot
download the images. (The folder
names are case sensitive.)
● The compatible file extensions are JPG
and JPEG.
● An image’s file name, including file
extension, can be up to 32 characters.
● Image files of 5 MB or less can be trans-
ferred.
● Up to 3 images can be downloaded.
● Files with non-ASCII filenames cannot
be downloaded.
Page 64 of 276
64
1. QUICK REFERENCE ..................... 66
2. SOME BASICS............................... 67
TURNING THE SYSTEM ON AND OFF ...................................... 67
SELECTING AN AUDIO SOURCE ........ 68
DISC SLOT ............................................ 69
USB/AUX PORT .................................... 69
SOUND SETTINGS ............................... 70
VOICE COMMAND SYSTEM ................ 71
1. AM/FM RADIO...................................... 72
OVERVIEW ............................................ 72
PRESETTING A STATION .................... 74
SELECTING A STATION
FROM THE LIST ................................. 74
CACHING A RADIO PROGRAM ........... 75
RADIO BROADCAST DATA
SYSTEM .............................................. 76
TRAFFIC ANNOUNCEMENT
(FM RADIO) ......................................... 77
USING HD Radio™ TECHNOLOGY...... 77
AVAILABLE HD Radio™
TECHNOLOGY.................................... 78
TROUBLESHOOTING GUIDE ............... 80
2. XM Satellite Radio ........................ 81
OVERVIEW ............................................ 81
HOW TO SUBSCRIBE TO XM Satellite Radio ............................... 83
DISPLAYING THE RADIO ID................. 85
PRESETTING A CHANNEL ................... 85
SELECTING A CHANNEL
FROM THE LIST ................................. 85
IF THE SATELLITE RADIO TUNER MALFUNCTIONS ................................ 86
3. INTERNET RADIO......................... 87
LISTENING TO INTERNET RADIO ....... 87
1BASIC OPERATION2RADIO OPERATION
3
AUDIO SYSTEM
Page 65 of 276
3
65
1
2
3
4
5
6
7
8
9
1. CD .................................................. 88
OVERVIEW ........................................... 88
PLAYING AN AUDIO CD ...................... 90
PLAYING AN MP3/WMA/AAC DISC ..... 90
2. USB MEMORY ............................... 91
OVERVIEW ........................................... 91
PLAYING A USB AUDIO ....................... 93
3. iPod ................................................ 94
OVERVIEW ........................................... 94
PLAYING AN iPod ................................. 97
4. Bluetooth® AUDIO ........................ 98
OVERVIEW ........................................... 98
CONNECTING A Bluetooth®
DEVICE ............................................. 101
LISTENING TO Bluetooth
® AUDIO ..... 101
5.AUX ................................................. 102
OVERVIEW ......................................... 102
1. STEERING SWITCHES............... 104
1. AUDIO SETTINGS ...................... 106
“Audio Settings” SCREEN ................... 106
1. OPERATING INFORMATION ..... 108
RADIO.................................................. 108
CD PLAYER AND DISC ...................... 109
iPod ...................................................... 111
FILE INFORMATION ........................... 112
TERMS ................................................ 115
ERROR MESSAGES ........................... 116
3MEDIA OPERATION4AUDIO REMOTE CONTROLS
5SETUP
6TIPS FOR OPERATING
THE AUDIO SYSTEM
AUDIO SYSTEM
Page 66 of 276
66
1. BASIC OPERATION
1. QUICK REFERENCE
Press the “AUDIO” button to display the audio screen.
FunctionPage
Using the radio72
Playing an audio CD or MP3/WMA/AAC disc88
Playing a USB memory91
Playing an iPod®94
Playing a Bluetooth® device98
Using the AUX port102
Using the steering wheel audio switches104
Audio system settings106
Page 69 of 276
69
1. BASIC OPERATION
AUDIO SYSTEM
3
1Insert a disc into the disc slot.
After insertion, the disc is automatically
loaded.
1Press the button and remove the
disc.
1Open the console box.
2Open the cover and connect a device.
Turn on the power of the device if it is not
turned on.
DISC SLOT
INSERTING A DISC
EJECTING A DISC
NOTICE
● Never try to disassemble or oil any part
of the CD player. Do not insert anything
other than a disc into the slot.
INFORMATION
●The player is intended for use with 4.7
in. (12 cm) discs only.
● When inserting a disc, gently insert the
disc with the label facing up.
USB/AUX PORT
Page 87 of 276
87
2. RADIO OPERATION
AUDIO SYSTEM
3
3. INTERNET RADIO
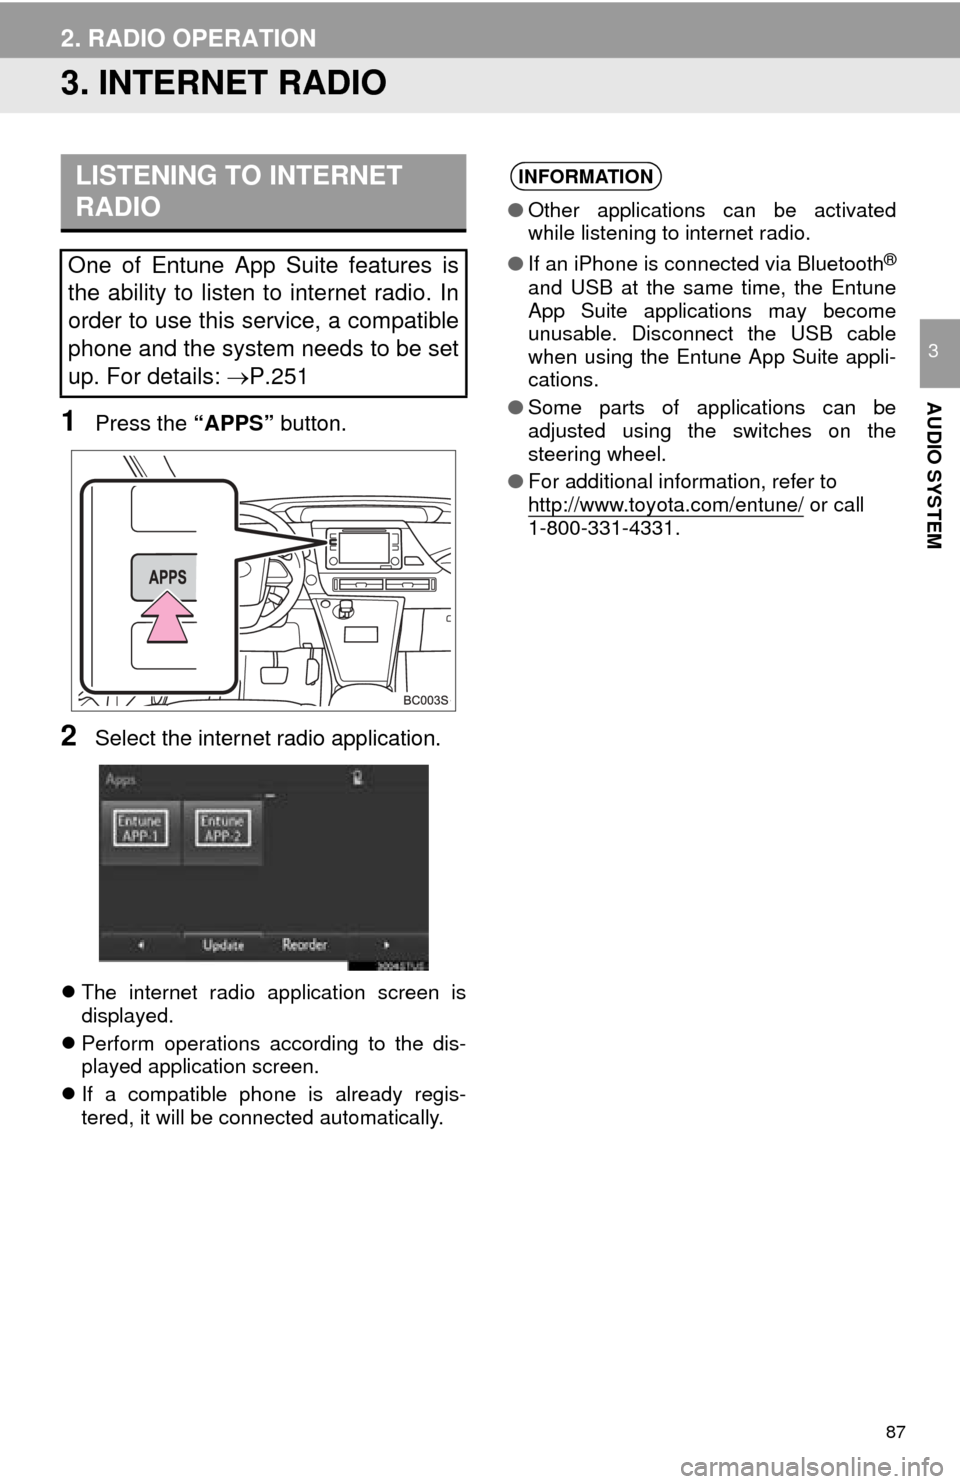
1Press the “APPS” button.
2Select the internet radio application.
The internet radio application screen is
displayed.
Perfo
rm operations according to the dis -
played application screen.
I
f a compatible phone is already regis -
tered, it will be connected automatically.
LISTENING TO INTERNET
RADIO
One of Entune App Suite features is
the ability to listen to internet radio. In
order to use this service, a compatible
phone and the system needs to be set
up. For details: P.251
INFORMATION
●Other applications can be activated
while listening to internet radio.
● If an iPhone is connected via Bluetooth
®
and USB at the same time, the Entune
App Suite applications may become
unusable. Disconnect the USB cable
when using the Entune App Suite appli-
cations.
● Some parts of applications can be
adjusted using the switches on the
steering wheel.
● For additional information, refer to
http://www.toyota.com/entune/
or call
1-800-331-4331.
Page 91 of 276
91
3. MEDIA OPERATION
AUDIO SYSTEM
3
2. USB MEMORY
■CONTROL SCREEN
■CONTROL PANEL
OVERVIEW
The USB memory operation screen can be reached by the following methods:
Connect a USB memory ( P.69)
Select “USB”
on the “Select Audio Source” screen. ( P.68)