Page 522 of 620

5228-2. Steps to take in an emergency
COROLLA_TMMMS_TMMC_U (OM12J84U)
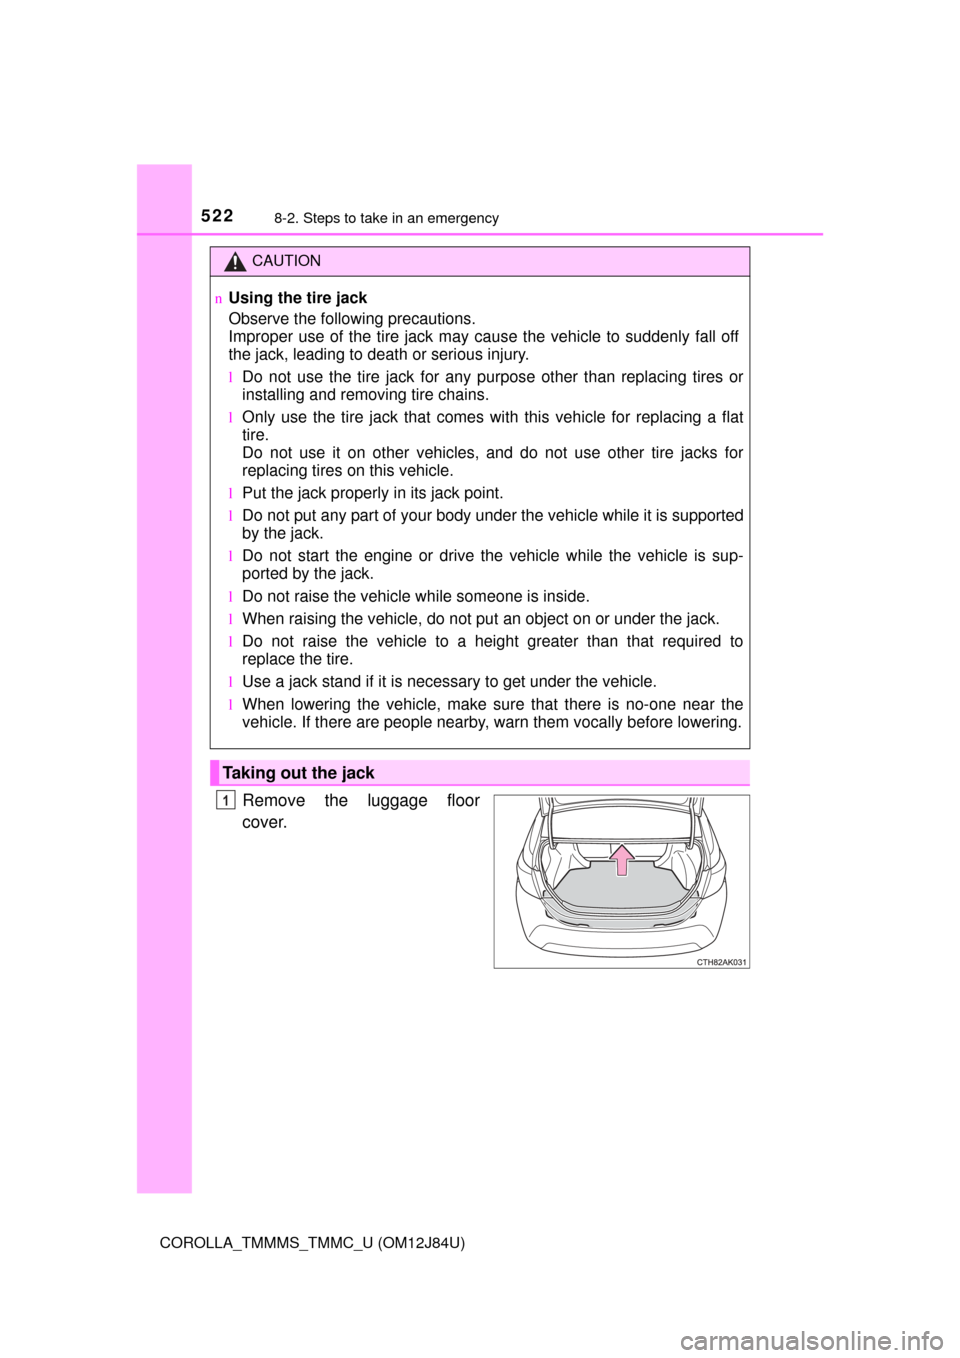
Remove the luggage floor
cover.
CAUTION
nUsing the tire jack
Observe the following precautions.
Improper use of the tire jack may cause the vehicle to suddenly fall off
the jack, leading to death or serious injury.
lDo not use the tire jack for any purpose other than replacing tires or
installing and removing tire chains.
lOnly use the tire jack that comes with this vehicle for replacing a flat
tire.
Do not use it on other vehicles, and do not use other tire jacks for
replacing tires on this vehicle.
lPut the jack properly in its jack point.
lDo not put any part of your body und er the vehicle while it is supported
by the jack.
lDo not start the engine or drive the vehicle while the vehicle is sup-
ported by the jack.
lDo not raise the vehicle while someone is inside.
lWhen raising the vehicle, do not put an object on or under the jack.
lDo not raise the vehicle to a height greater than that required to
replace the tire.
lUse a jack stand if it is necessary to get under the vehicle.
lWhen lowering the vehicle, make su re that there is no-one near the
vehicle. If there are people nearby, warn them vocally before lowering.
Taking out the jack
1
Page 523 of 620
5238-2. Steps to take in an emergency
8
When trouble arises
COROLLA_TMMMS_TMMC_U (OM12J84U)
Take out the jack.For tightening
For loosening
Remove the luggage floor cover. ( P. 522)
Remove the tool tray.
Loosen the center fastener that
secures the spare tire.2
1
2
Taking out the spare tire
1
2
3
CAUTION
nWhen storing the spare tire
Be careful not to catch fingers or other body parts between the spare
tire and the body of the vehicle.
Page 529 of 620

5298-2. Steps to take in an emergency
8
When trouble arises
COROLLA_TMMMS_TMMC_U (OM12J84U)
nThe compact spare tire
lThe compact spare tire is identified by the label “TEMPORARY USE
ONLY” on the tire sidewall.
Use the compact spare tire temporarily, and only in an emergency.
lMake sure to check the tire inflation pressure of the compact spare tire.
( P. 558)
nWhen the compact spare tire is equipped
The vehicle becomes lower when driving with the compact spare tire
compared to when driving with standard tires.
nAfter completing the tire change (vehicles with a tire pressure warn-
ing system)
The tire pressure warning system must be reset. ( P. 456)
nWhen using the compact spare tire (vehicles with a tire pressure
warning system)
As the compact spare tire is not equipped with a tire pressure warning
valve and transmitter, lo w inflation pressure of the spare tire will not be
indicated by the tire pressure warning system. Also, if you replace the
compact spare tire after the tire pressure warning light comes on, the light
remains on.
nIf you have a flat front tire on a road covered with snow or ice
Install the compact spare tire on one of the rear wheels of the vehicle.
Perform the following steps and fit tire chains to the front tires:
Replace a rear tire with the compact spare tire.
Replace the flat front tire with the tire removed from the rear of the vehi-
cle.
Fit tire chains to the front tires.
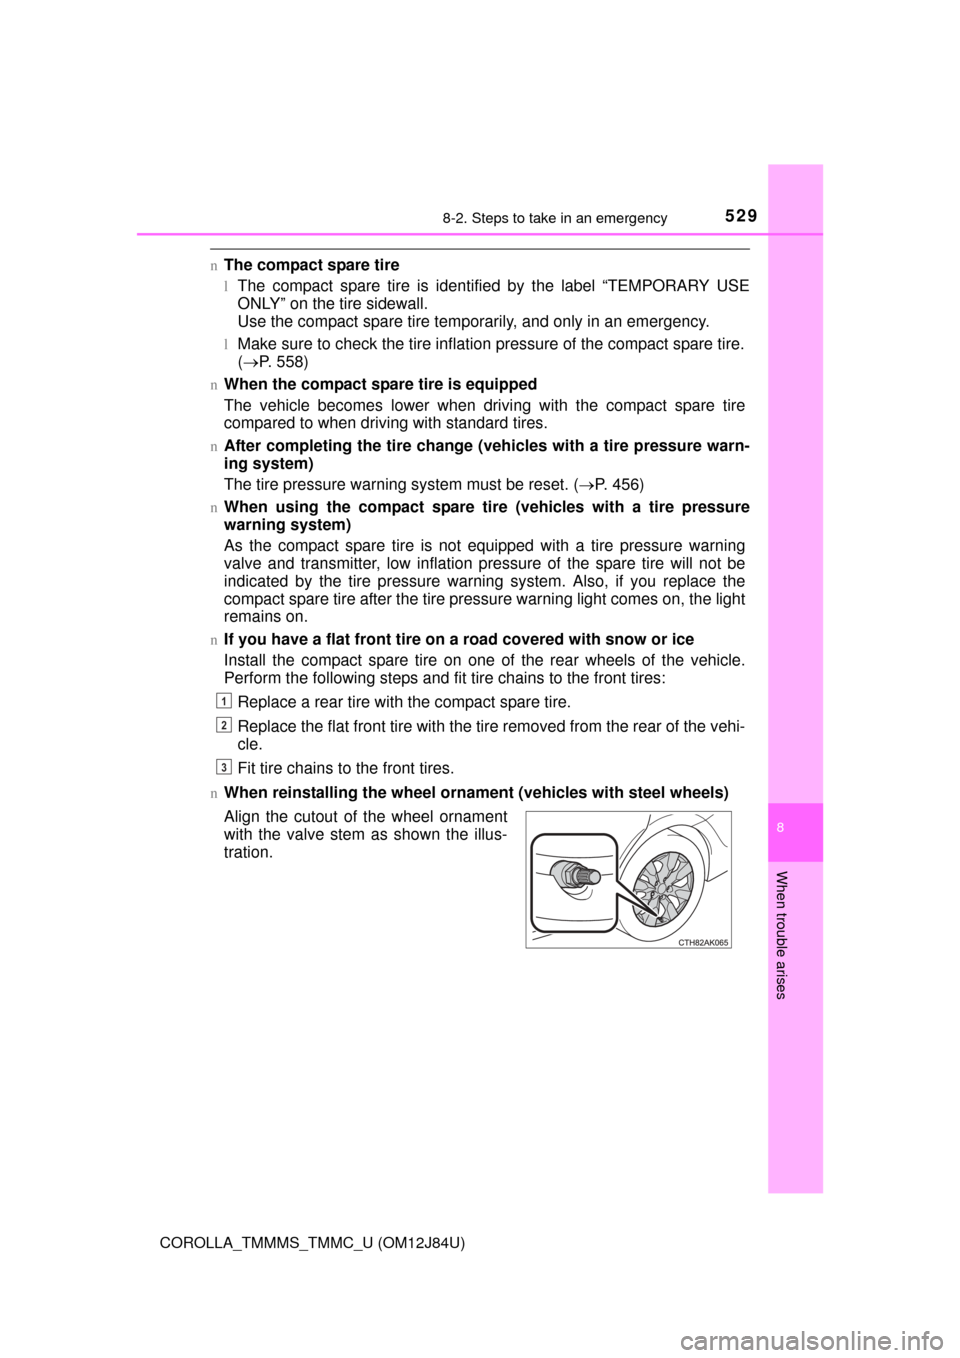
nWhen reinstalling the wheel ornament (vehicles with steel wheels)
Align the cutout of the wheel ornament
with the valve stem as shown the illus-
tration.
1
2
3
Page 534 of 620
5348-2. Steps to take in an emergency
COROLLA_TMMMS_TMMC_U (OM12J84U)
Set the parking brake.
Vehicles without a smart key system: Turn the engine switch to the
“ACC” position.
Vehicles with a smart key system: Turn the engine switch to
ACCESSORY mode.
Depress the brake pedal.
Pry the cover up with a flathead
screwdriver or equivalent tool.
To prevent damage to the cover,
cover the tip of the screwdriver with
a rag.
Press the shift lock override
button.
The shift lever can be shifted while
the button is pressed.
If the shift lever cannot be shifted from P
(except vehicles with a manual transmission)
If the shift lever cannot be sh ifted with your foot on the brake
pedal, there may be a problem with the shift lock system (a sys-
tem to prevent accidental operation of the shift lever). Have the
vehicle inspected by your Toyota dealer immediately.
The following steps may be used as an emergency measure to
ensure that the shift lever can be shifted:
1
2
3
4
5
Page 538 of 620
5388-2. Steps to take in an emergency
COROLLA_TMMMS_TMMC_U (OM12J84U)
If you have a set of jumper (or booster) cables and a second vehicle
with a 12-volt battery, you can jump start your vehicle by following the
steps below.
Open the hood. ( P. 437)
Remove the engine cover.
Raise the rear of the engine
cover to remove the two rear
clips, and then raise the front of
the engine cover to remove the
two front clips.
If the vehicle batter y is discharged
The following procedures may be used to start the engine if the
vehicle’s battery is discharged.
You can also call your Toyota de aler or a qualified repair shop.
1
2
Page 571 of 620

5719-1. Specifications
9
Vehicle specifications
COROLLA_TMMMS_TMMC_U (OM12J84U)
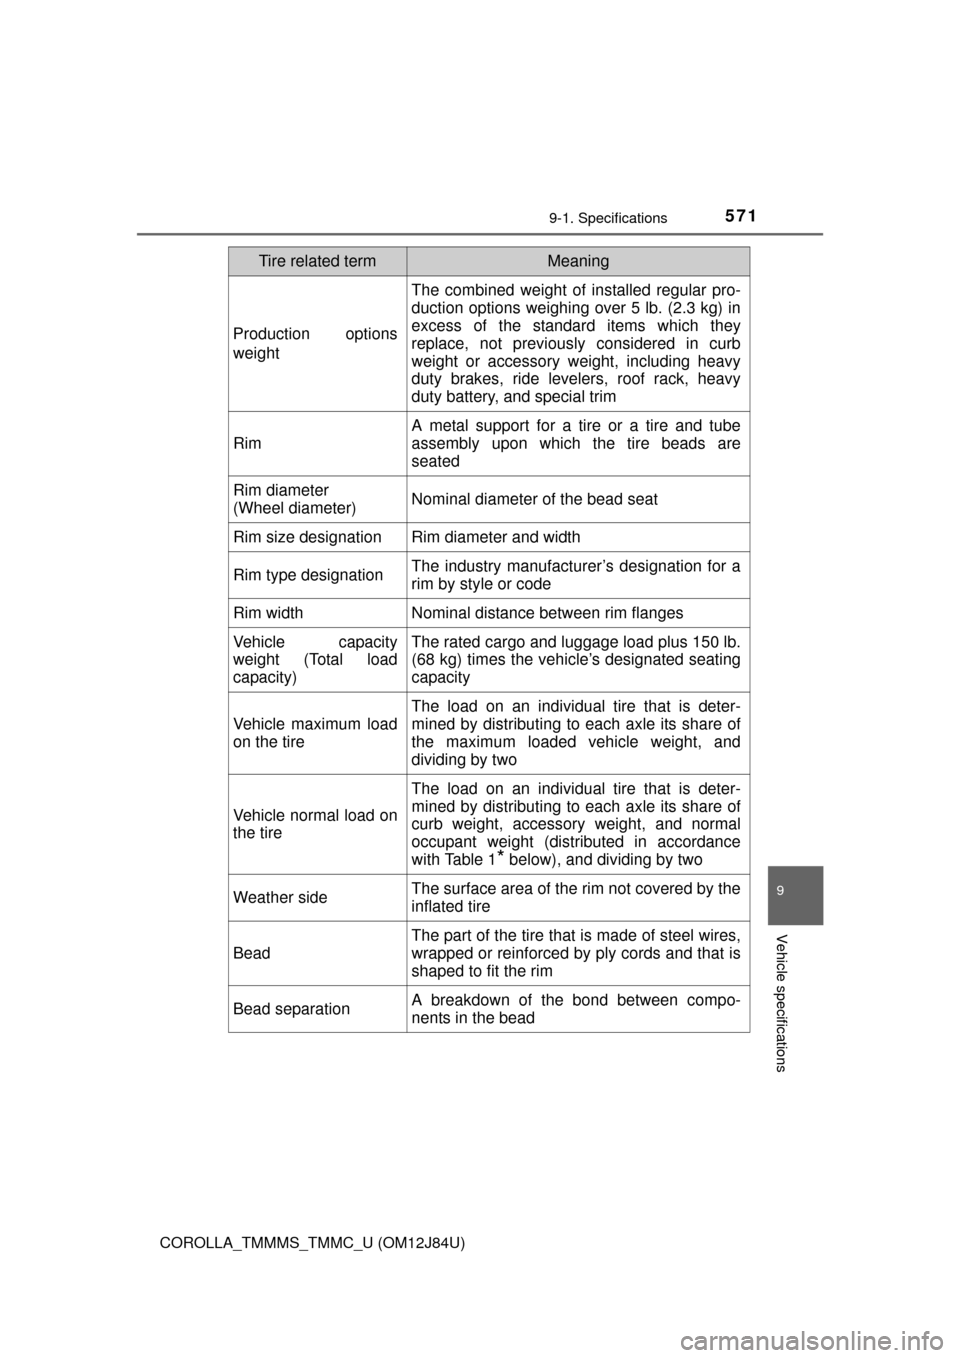
Production options
weight
The combined weight of installed regular pro-
duction options weighing over 5 lb. (2.3 kg) in
excess of the standard items which they
replace, not previously considered in curb
weight or accessory weight, including heavy
duty brakes, ride levelers, roof rack, heavy
duty battery, and special trim
Rim
A metal support for a tire or a tire and tube
assembly upon which the tire beads are
seated
Rim diameter
(Wheel diameter)Nominal diameter of the bead seat
Rim size designationRim diameter and width
Rim type designationThe industry manufacturer’s designation for a
rim by style or code
Rim widthNominal distance between rim flanges
Vehicle capacity
weight (Total load
capacity)The rated cargo and luggage load plus 150 lb.
(68 kg) times the vehicle’s designated seating
capacity
Vehicle maximum load
on the tire
The load on an individual tire that is deter-
mined by distributing to each axle its share of
the maximum loaded vehicle weight, and
dividing by two
Vehicle normal load on
the tire
The load on an individual tire that is deter-
mined by distributing to each axle its share of
curb weight, accessory weight, and normal
occupant weight (distributed in accordance
with Table 1
* below), and dividing by two
Weather sideThe surface area of the rim not covered by the
inflated tire
Bead
The part of the tire that is made of steel wires,
wrapped or reinforced by ply cords and that is
shaped to fit the rim
Bead separationA breakdown of the bond between compo-
nents in the bead
Tire related termMeaning
Page 574 of 620

5749-1. Specifications
COROLLA_TMMMS_TMMC_U (OM12J84U)
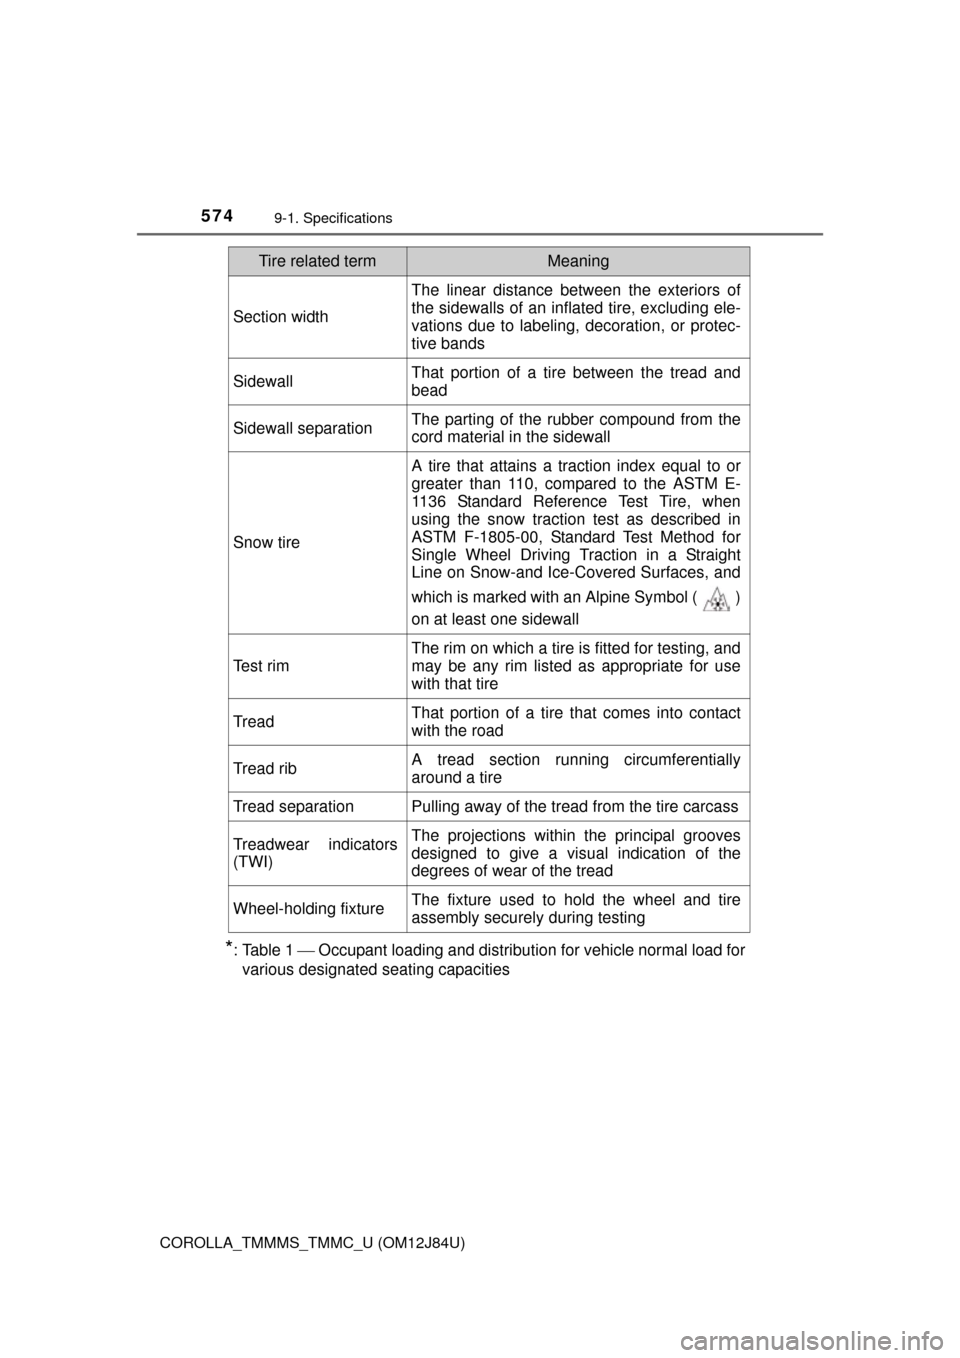
*: Table 1 Occupant loading and distribution for vehicle normal load for
various designated seating capacities
Section width
The linear distance between the exteriors of
the sidewalls of an inflated tire, excluding ele-
vations due to labeling, decoration, or protec-
tive bands
SidewallThat portion of a tire between the tread and
bead
Sidewall separationThe parting of the rubber compound from the
cord material in the sidewall
Snow tire
A tire that attains a traction index equal to or
greater than 110, compared to the ASTM E-
1136 Standard Reference Test Tire, when
using the snow traction test as described in
ASTM F-1805-00, Standard Test Method for
Single Wheel Driving Traction in a Straight
Line on Snow-and Ice-Covered Surfaces, and
which is marked with an Alpine Symbol ( )
on at least one sidewall
Test rim
The rim on which a tire is fitted for testing, and
may be any rim listed as appropriate for use
with that tire
TreadThat portion of a tire that comes into contact
with the road
Tread ribA tread section running circumferentially
around a tire
Tread separationPulling away of the tread from the tire carcass
Treadwear indicators
(TWI)The projections within the principal grooves
designed to give a visual indication of the
degrees of wear of the tread
Wheel-holding fixtureThe fixture used to hold the wheel and tire
assembly securely during testing
Tire related termMeaning