Page 437 of 620
4377-3. Do-it-yourself maintenance
7
Maintenance and care
COROLLA_TMMMS_TMMC_U (OM12J84U)
Pull the hood lock release lever.
The hood will pop up slightly.
Pull up the auxiliary catch lever
and lift the hood.
Hold the hood open by inserting
the support rod into the slot.
Hood
Release the lock from the inside of the vehicle to open the hood.
1
2
3
Page 438 of 620
4387-3. Do-it-yourself maintenance
COROLLA_TMMMS_TMMC_U (OM12J84U)
CAUTION
nPre-driving check
Check that the hood is fully closed and locked.
If the hood is not locked properly, it may open while the vehicle is in motion
and cause an accident, which may result in death or serious injury.
n After installing the support rod into the slot
Make sure the rod supports the hood securely preventing it from falling
down onto your head or body.
NOTICE
nWhen closing the hood
Be sure to return the support rod to its clip before closing the hood. Closing
the hood with the support rod not clipped could cause the hood to bend.
Page 444 of 620
4447-3. Do-it-yourself maintenance
COROLLA_TMMMS_TMMC_U (OM12J84U)n
Adding engine oil
If the oil level is below or near
the low level mark, add engine
oil of the same type as that
already in the engine.
Make sure to check the oil type and prepare the items needed
before adding oil.
Remove the oil filler cap by turning it counterclockwise.
Add engine oil slowly, checking the dipstick.
Install the oil filler cap by turning it clockwise.
Engine oil selection P. 553
Oil quantity
(Low Full) 1.6 qt. (1.5 L, 1.3 Imp. qt.)
Items
Clean funnel
1
2
3
Page 450 of 620

4507-3. Do-it-yourself maintenance
COROLLA_TMMMS_TMMC_U (OM12J84U)
Check the battery as follows.
nBattery exterior
Make sure that the battery terminals are not corroded and that
there are no loose connections, cracks, or loose clamps.
Terminals
Hold-down clamp
n Before recharging
When recharging, the battery produces hydrogen gas which is flammable and
explosive. Therefore, observe the following before recharging:
lIf recharging with the battery installed on the vehicle, be sure to disconnect
the ground cable.
l Make sure the power switch on the charger is off when connecting and dis-
connecting the charger cables to the battery.
n After recharging/reconnecting the ba ttery (vehicles with a smart key sys-
tem)
l Unlocking the doors using the smart key system may not be possible imme-
diately after reconnecting the battery. If this happens, use the wireless
remote control or the mechanical key to lock/unlock the doors.
l Start the engine with the engine switch in ACCESSORY mode. The engine
may not start with the engine switch turned off. However, the engine will
operate normally from the second attempt.
l The engine switch mode is recorded by the vehicle. If the battery is recon-
nected, the vehicle will return the engine switch mode to the status it was in
before the battery was disconnected. Make sure to turn off the engine
before disconnect the battery. Take extra care when connecting the battery
if the engine switch mode prior to discharge is unknown.
If the system will not start even after multiple attempts, contact your Toyota
dealer.
Battery
1
2
Page 456 of 620

4567-3. Do-it-yourself maintenance
COROLLA_TMMMS_TMMC_U (OM12J84U)n
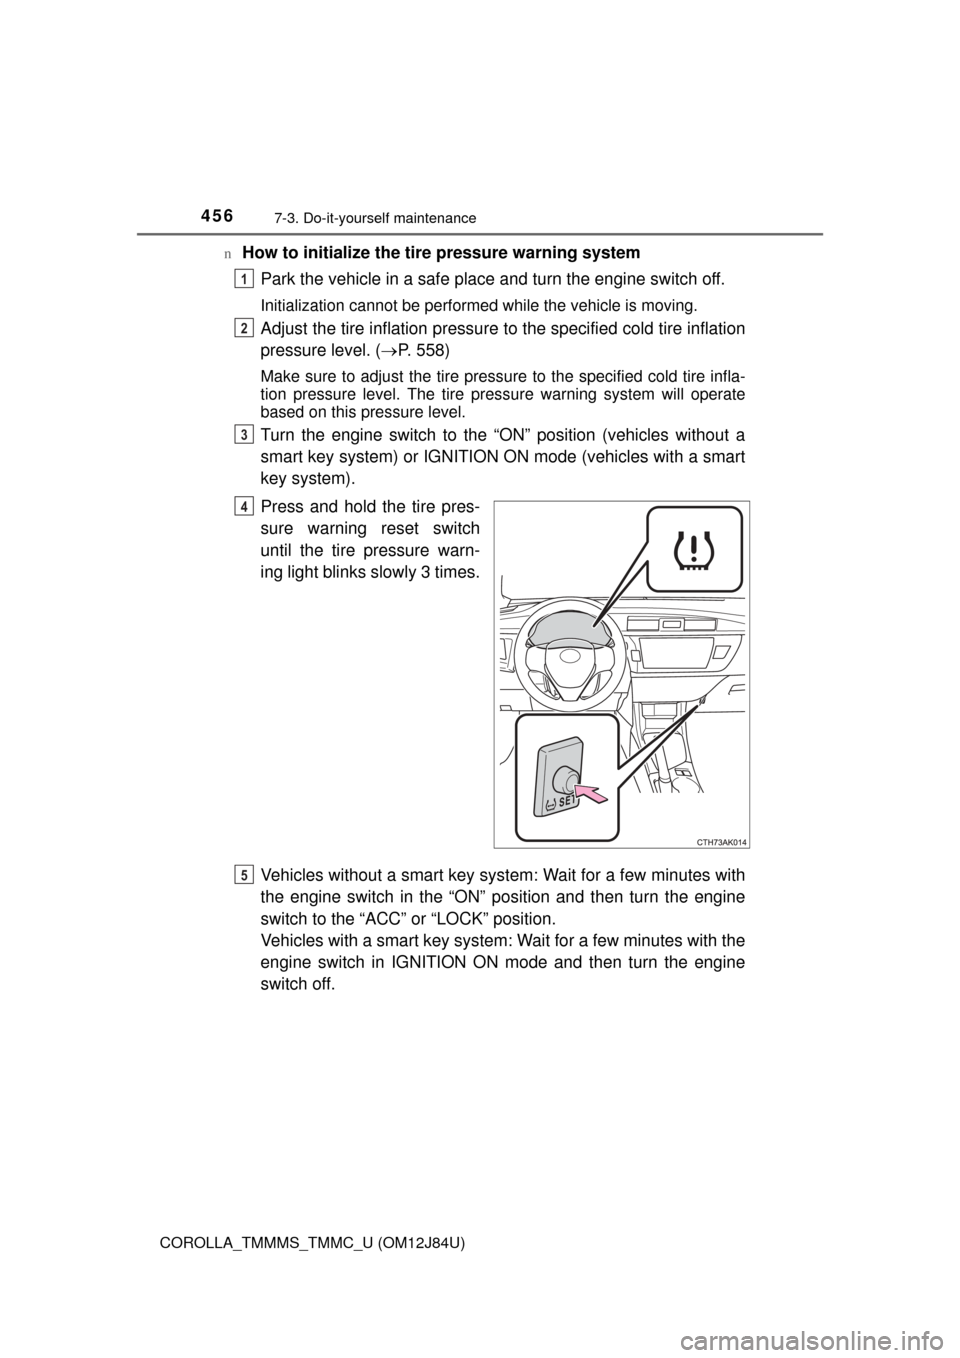
How to initialize the tire pressure warning system
Park the vehicle in a safe place and turn the engine switch off.
Initialization cannot be performed while the vehicle is moving.
Adjust the tire inflation pressure to the specified cold tire inflation
pressure level. ( P. 558)
Make sure to adjust the tire pressu re to the specified cold tire infla-
tion pressure level. The tire pressure warning system will operate
based on this pressure level.
Turn the engine switch to the “ON” position (vehicles without a
smart key system) or IGNITION ON mode (vehicles with a smart
key system).
Press and hold the tire pres-
sure warning reset switch
until the tire pressure warn-
ing light blinks slowly 3 times.
Vehicles without a smart key syst em: Wait for a few minutes with
the engine switch in the “ON” position and then turn the engine
switch to the “ACC” or “LOCK” position.
Vehicles with a smart key system: Wait for a few minutes with the
engine switch in IGNITION ON mode and then turn the engine
switch off.
1
2
3
4
5
Page 476 of 620
4767-3. Do-it-yourself maintenance
COROLLA_TMMMS_TMMC_U (OM12J84U)n
Rear
nHeadlight high beams
Turn the bulb base counter-
clockwise.
Pull the bulb out while press-
ing the lock release of the
connector.
Back-up lights
Rear turn signal lights
Stop/tail/rear side marker lights
License plate lights
Replacing light bulbs
1
2
3
4
1
2
Page 478 of 620
4787-3. Do-it-yourself maintenance
COROLLA_TMMMS_TMMC_U (OM12J84U)n
Front fog lights (if equipped)
Remove the fender liner bolts
and clip.
Partly remove the fender
liner.
Unplug the connector while
depressing the lock release.
1
2
3
Page 479 of 620
4797-3. Do-it-yourself maintenance
7
Maintenance and care
COROLLA_TMMMS_TMMC_U (OM12J84U)
Turn the bulb base counter-
clockwise.
Install a new light bulb.
Align the 3 tabs on the light bulb
with the mounting and insert.
Turn clockwise and secure the
bulb base.
Install the connector.
Shake the connector gently to
check that it is not loose, turn
the front fog lights on once and
visually confirm that no light is
leaking through the mounting.
When installing the fender liner, install by conducting and
with the directions reversed.
Make sure that the fender liner is attached to the inside of the bumper.
4
5
6
721