Page 244 of 568

2445-1. Basic Operations
CAMRY_U (OM33D37U)
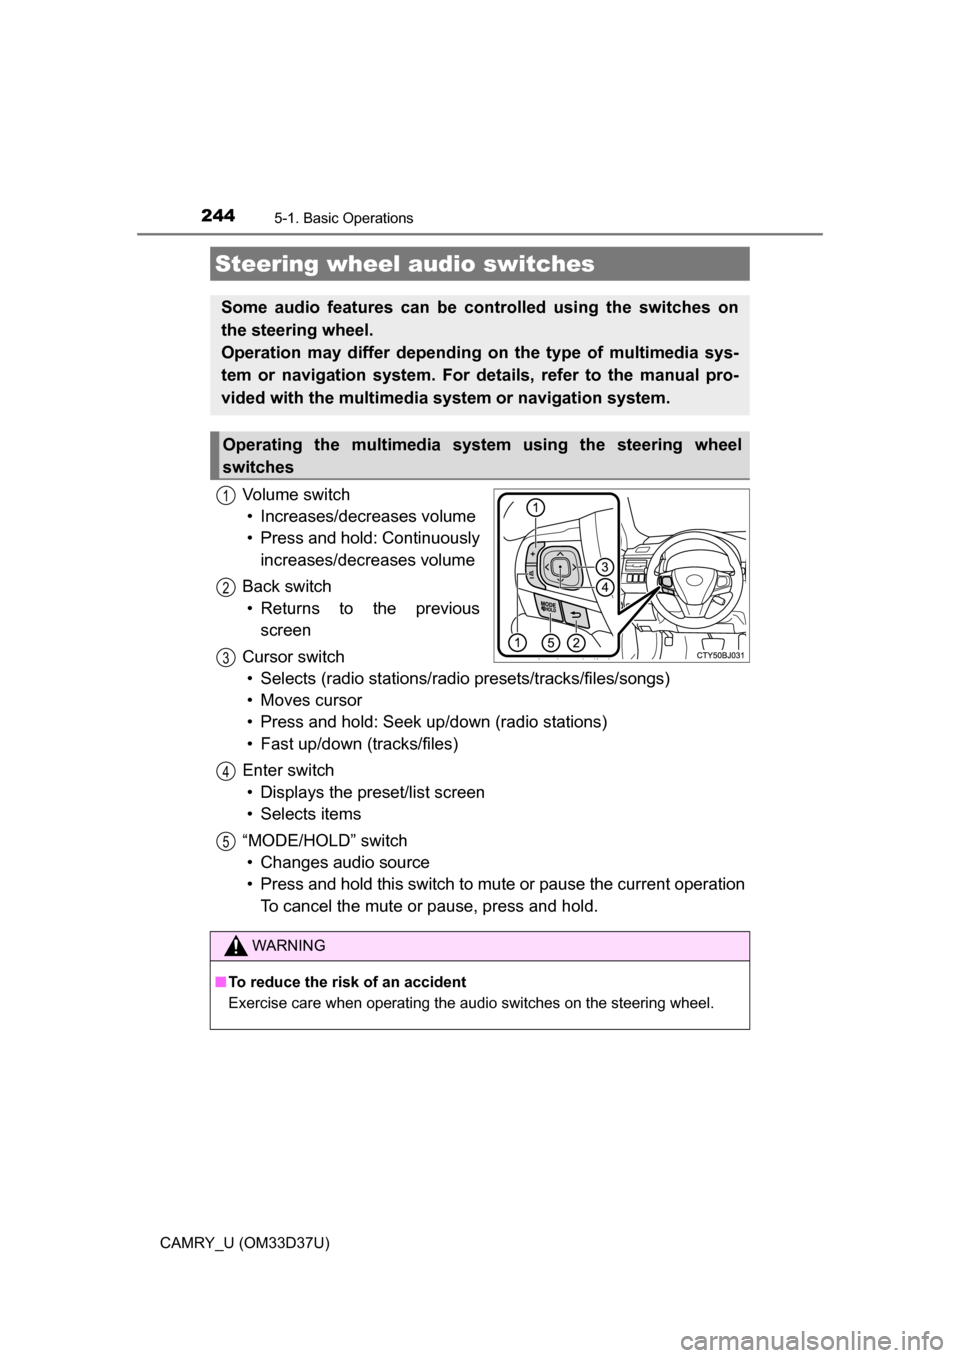
Volume switch• Increases/decreases volume
• Press and hold: Continuously increases/decreases volume
Back switch • Returns to the previous screen
Cursor switch • Selects (radio stations/radio presets/tracks/files/songs)
• Moves cursor
• Press and hold: Seek up/down (radio stations)
• Fast up/down (tracks/files)
Enter switch • Displays the preset/list screen
• Selects items
“MODE/HOLD” switch • Changes audio source
• Press and hold this switch to mute or pause the current operation To cancel the mute or pause, press and hold.
Steering wheel audio switches
Some audio features can be controlled using the switches on
the steering wheel.
Operation may differ depending on the type of multimedia sys-
tem or navigation system. For details, refer to the manual pro-
vided with the multimedia system or navigation system.
Operating the multimedia system using the steering wheel
switches
1
12
3
4
5
WARNING
■ To reduce the risk of an accident
Exercise care when operating the audio switches on the steering wheel.
Page 247 of 568
2475-1. Basic Operations
5
Audio system
CAMRY_U (OM33D37U)
Press: Turns the multimedia system on and off.
Turn: Adjusts the volume.
Ejects a disc.
Disc slot
Pauses or resumes playing music.
Turn: Selects radio station bands, tracks and files. Selects items in the list display.
Seeks up or down fo r a radio station.
Accesses a desired track or file.
Select to change on/off.
Select to change on/off.
■ Using cellular phones
Interference may be heard through the multimedia system's speakers if a cel-
lular phone is being used inside or close to the vehicle while the multimedia
system is operating.
Basic audio operations
Basic audio operations and functi ons common to each mode are
explained in this section.
Operating the multimedia system
Random playback
Repeat play
1
2
3
4
5
6
Page 248 of 568

2485-1. Basic Operations
CAMRY_U (OM33D37U)
WARNING
■Laser product
This product is a class 1 laser product.
Do not open the cover of the player or attempt to repair the unit yourself.
Refer servicing to qualified personnel.
● Laser products
• Do not take this unit apart or attempt to make any changes yourself.
This is an intricate unit that uses a laser pickup to retrieve information
from the surface of compact discs. The laser is carefully shielded so
that its rays remain inside the cabinet. Therefore, never try to disassem-
ble the player or alter any of its parts since you may be exposed to laser
rays and dangerous voltages.
• This product utilizes a laser.
Use of controls or adjustments or performance of procedures other than
those specified herein may result in hazardous radiation exposure.
THE USE OF OPTICAL INSTRUMENTS WITH THIS PRODUCT WILL
INCREASE EYE HAZARD.
NOTICE
■To prevent battery discharge
Do not leave the multimedia system on longer than necessary when the
engine is off.
■ To avoid damaging the multimedia system
Take care not to spill drinks or other fluids on the multimedia system.
Page 255 of 568
255
5
Audio system
CAMRY_U (OM33D37U)
5-3.Using the Multimedia system
Press the “AUDIO” button to display the audio source selection
screen.
If the audio source selection screen is not displayed, press the “AUDIO”
button again.
Select the desired audio
source.
Select the desired audio
source then or to
reorder.
The audio source changes as follows each time the “MODE/HOLD”
switch is pressed.
Selecting the audio source
Switching between audio sources such as radio and CD are
explained in this section.
Changing audio source
1
2
1
Using the steering wheel switches to change audio source
Page 260 of 568
2605-4. Using the radio
CAMRY_U (OM33D37U)
Search for desired stations by turning the “TUNE/SCROLL” knob or
pressing the “ ” or “ ” button on “SEEK/TRACK”.
Select “(add new)”.
To change the preset station to a different one, select and hold the preset
station.
Select “Yes”.
Select “OK” after setting the new preset station.
■Refreshing the station list Select “Refresh” on the “Station List” screen.
To cancel the refresh, select “Cancel Refresh”.
■Reception sensitivity
●Maintaining perfect radio reception at all times is difficult due to the continu-
ally changing position of the antenna, differences in signal strength and sur-
rounding objects, such as trains, transmitters, etc.
● The radio antenna is mounted inside the rear window. To maintain clear
radio reception, do not attach metallic window tinting or other metallic
objects to the antenna wire mounted inside the rear window.
Setting station presets
1
2
3
4
1
Page 268 of 568

2685-6. Using an external device
CAMRY_U (OM33D37U)
■About iPod
●“Made for iPod”, “Made for iPhone” and “Made for iPad”\
mean that an elec-
tronic accessory has been designed to connect specifically to iPod or
iPhone, or iPad, respectively, and has been certified by the developer to
meet Apple performance standards.
● Apple is not responsible for the operation of this device or its compliance
with safety and regulatory standards. Please note that the use of this acces-
sory with iPod, iPhone or iPad may affect wireless performance.
● iPad, iPhone, iPod, iPod classic, iPod nano, and iPod touch are trademarks
of Apple Inc., registered in the U.S. and other countries. Lightning is a trade-
mark of Apple Inc.
■ iPod cover art
●Depending on the iPod and songs in the iPod, iPod cover art may be dis-
played.
● This function can be changed to on/off. ( P. 252)
● It may take time to display iPod cover art, and the iPod may not be operated
while the cover art display is in process.
● Only iPod cover art that is saved in JPEG format can be displayed.
■ iPod functions
●When an iPod is connected and the audio source is changed to iPod mode,
the iPod will resume play from the same point in which it was last used.
● Depending on the iPod that is connected to the system, certain functions
may not be available. If a function is unavailable due to a malfunction (as
opposed to a system specification), disconnecting the device and recon-
necting it may resolve the problem.
● While connected to the system, the iPod cannot be operated with its own
controls. It is necessary to use the controls of the vehicle's multimedia sys-
tem instead.
● When the battery level of an iPod is very low, the iPod may not operate. If
so, charge the iPod before use.
● Compatible models ( P. 270)
■ iPod problems
To resolve most problems encountered when using your iPod, disconnect
your iPod from the vehicle iPod connection and reset it. For instructions on
how to reset your iPod, refer to your iPod Owner's Manual.
Page 286 of 568
2865-7. Connecting Bluetooth®
CAMRY_U (OM33D37U)
Display the “Bluetooth* Setup” screen. (P. 279)
Select the device.
Select “Device Info”.
The following screen is dis-
played: Device Name
Change connection method
( P. 286)
Bluetooth
® Address
Display your telephone num-
ber
The number may not be dis-
played depending on the
model of phone.
Compatibility profile of the
device
Restore default settings
*: Bluetooth is a registered trademark of Bluetooth SIG, Inc.
Select “Connect Audio Player from”.
Select “Vehicle ” or “Device”.
“Vehicle”: Connect the multimedia system to the portable audio player.
“Device”: Connect the portable audio player to the multimedia system.
Displaying a Bluetooth® device details
You can confirm and change the registered device details.
Bluetooth® device registration status
1
2
3
4
1
2
3
4
5
6
Changing connection method
1
2
Page 332 of 568

3326-1. Using the air conditioning system and defogger
CAMRY_U (OM33D37U)■
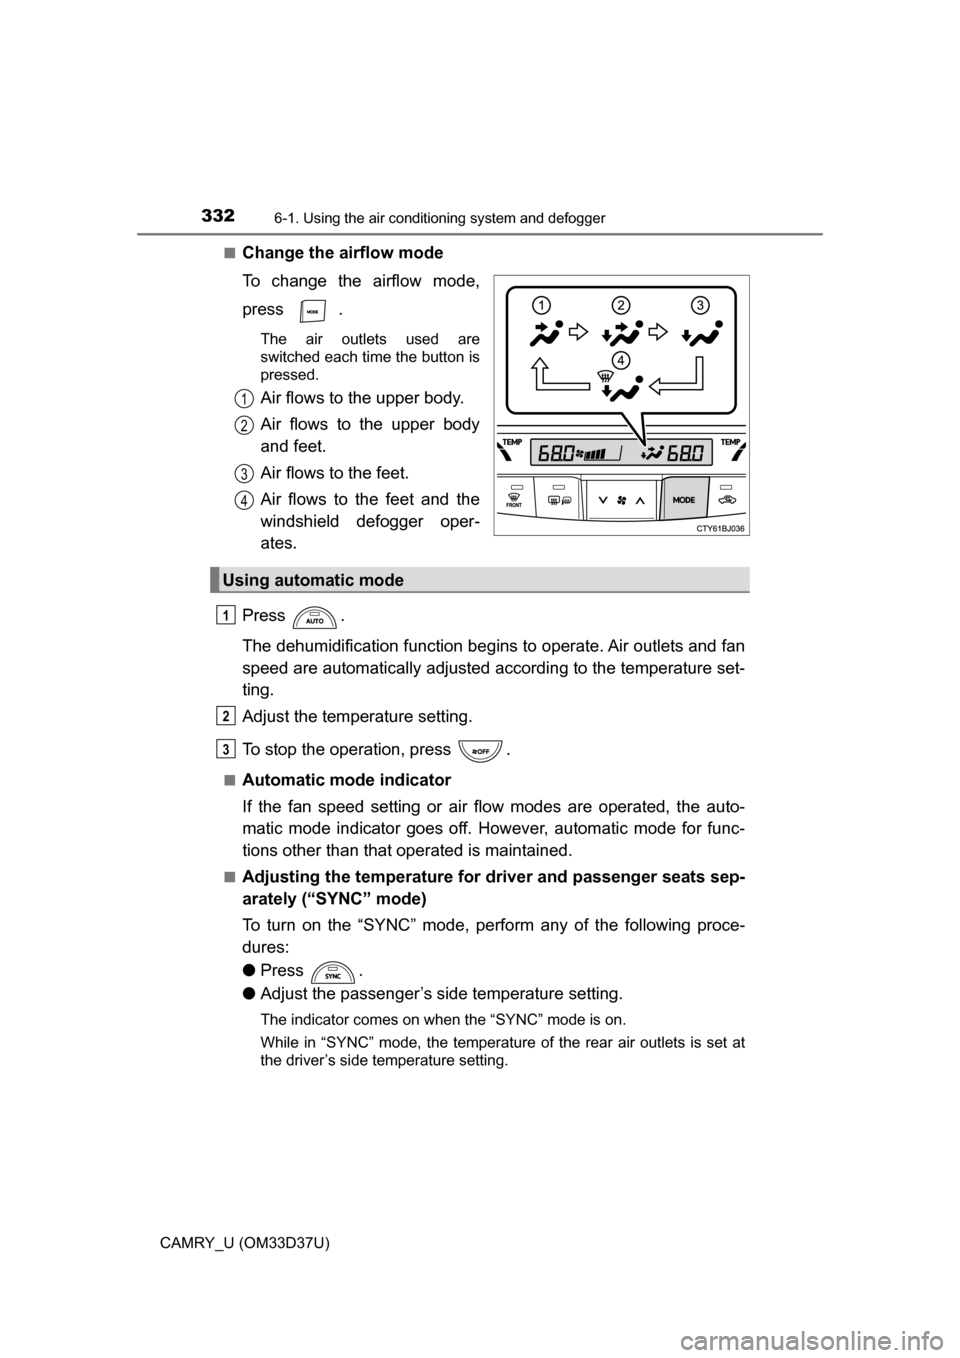
Change the airflow mode
To change the airflow mode,
press .
The air outlets used are
switched each time the button is
pressed.
Air flows to the upper body.
Air flows to the upper body
and feet.
Air flows to the feet.
Air flows to the feet and the
windshield defogger oper-
ates.
Press .
The dehumidification function begins to operate. Air outlets and fan
speed are automatically adjusted according to the temperature set-
ting.
Adjust the temperature setting.
To stop the operation, press .
■Automatic mode indicator
If the fan speed setting or air fl ow modes are operated, the auto-
matic mode indicator goes off. However, automatic mode for func-
tions other than that operated is maintained.
■Adjusting the temperature for driver and passenger seats sep-
arately (“SYNC” mode)
To turn on the “SYNC” mode, perform any of the following proce-
dures:
● Press .
● Adjust the passenger’s side temperature setting.
The indicator comes on when the “SYNC” mode is on.
While in “SYNC” mode, the temperature of the rear air outlets is set at
the driver’s side temperature setting.
1
2
3
4
Using automatic mode
1
2
3