Page 112 of 304
112
3. MEDIA OPERATION
AVA L O N _ N a v i _ U
Registering an additional device
1Select “Select Device” on the
Bluetooth
® audio control screen.
2For more in formation: P.50
Selecting a registered device
1Select “Select Device” on the
Bluetooth
® audio control screen.
2For more in formation: P.52
1Select the repeat button to change on/
off.
1Select the random button to change
on/off.
CONNECTING A Bluetooth®
DEVICE
To use the Bluetooth® audio system, it
is necessary to register a Bluetooth
®
device with the system.
LISTENING TO Bluetooth®
AUDIO
REPEATING
The track currently being listened to
can be repeated.
RANDOM ORDER
Tracks can be automatically and ran-
domly selected.
Page 116 of 304
116
4. AUDIO REMOTE CONTROLS
AVA L O N _ N a v i _ U
“ ” switch
“ ” switch
Back switch
ModeOperationFunction
AM, FM
PressPreset station/channel up/down
Station/channel list up/down
Press and holdFast preset station/channel up/down
Fast station/channel list up/down
XM*
PressPreset channel up/down
Channel list up/down
Press and holdFast preset channel up/down
Fast channel list up/down
Audio CD, MP3/
WMA/AAC disc,
USB, iPod,
Bluetooth
® audio
PressTrack/file up/down
Track/file list up/down
Press and holdFast track/file up/down
Fast track/file list up/down
*: If equipped
ModeOperationFunction
AM, FM
PressSeek up/down
Press and holdSeek up/down continuously while the switch is being
pressed
XM*1PressType seek up/down
Press and holdFast channel up/down
Audio CD, MP3/ WMA/AAC disc, USB, iPod,
Bluetooth
® audio
PressTab selection*2
Press and holdFast forward/rewind
*
1: If equipped
*2: USB, iPod only
ModeOperationFunction
AllPressReturn to the previous screen
Page 117 of 304
117
4. AUDIO REMOTE CONTROLS
AVA L O N _ N a v i _ U
AUDIO SYSTEM
3
“MODE/HOLD” switch
ModeOperationFunction
AM, FM,
XM*1, AUX
PressChange audio modes
Press and holdMute*2 (Press and hold again to resume the sound.)
Audio CD/
MP3/WMA/
AAC disc,
USB, iPod,
Bluetooth
®
audio,
APPS
PressChange audio modes
Press and holdPause (Press and hold again to resume the playmode.)
*
1: If equipped
*2: For AM/FM radio, if cache radio is enabl ed, pressing and holding the “MODE/HOLD” switch
pauses the broadcast. (Press and hold again to play back the cashed radio program.)
INFORMATION
●In the APPS mode, some operation may be done on the screen depend on the selected
APPS.
Page 139 of 304

139
Camry_Navi_U
VOICE COMMAND SYSTEM
4
2. MOBILE ASSISTANT OPERATION
1. MOBILE ASSISTANT
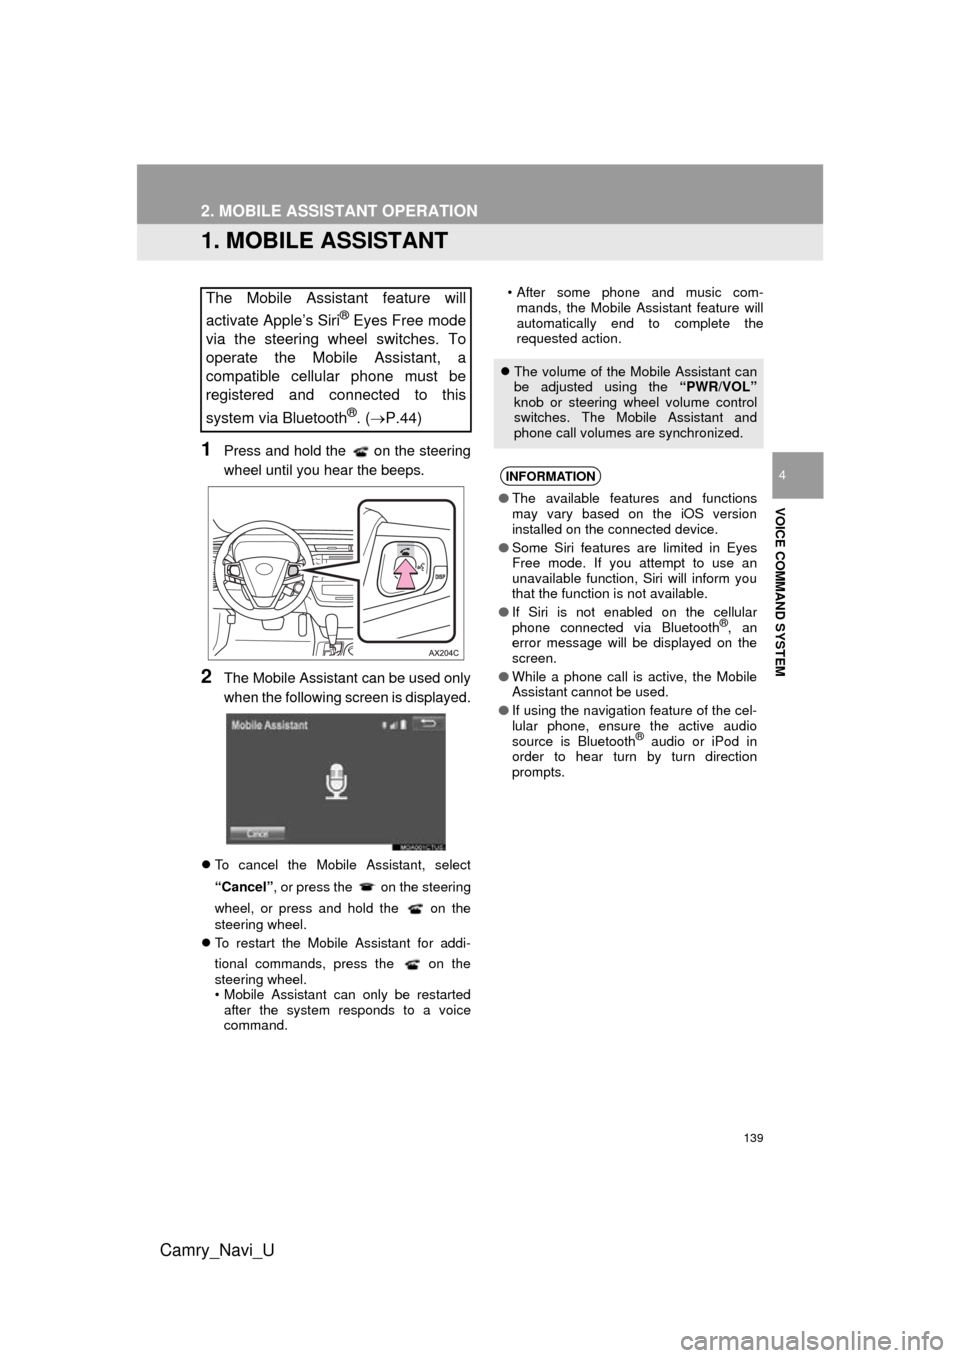
1Press and hold the on the steering
wheel until you hear the beeps.
2The Mobile Assistant can be used only
when the following screen is displayed.
To cancel the Mobile Assistant, select
“Cancel”, or press the on the steering
wheel, or press and hold the on the
steering wheel.
To restart the Mobile Assistant for addi-
tional commands, press the on the
steering wheel.
• Mobile Assistant can only be restarted
after the system responds to a voice
command. • After some phone and music com-
mands, the Mobile Assistant feature will
automatically end to complete the
requested action.
The Mobile Assistant feature will
activate Apple’s Siri
® Eyes Free mode
via the steering wheel switches. To
operate the Mobile Assistant, a
compatible cellular phone must be
registered and connected to this
system via Bluetooth
®. ( P.44)
The volume of the Mobile Assistant can
be adjusted using the “PWR/VOL”
knob or steering wheel volume control
switches. The Mobile Assistant and
phone call volumes are synchronized.
INFORMATION
● The available features and functions
may vary based on the iOS version
installed on the connected device.
● Some Siri features are limited in Eyes
Free mode. If you attempt to use an
unavailable function, Siri will inform you
that the function is not available.
● If Siri is not enabled on the cellular
phone connected via Bluetooth
®, an
error message will be displayed on the
screen.
● While a phone call is active, the Mobile
Assistant cannot be used.
● If using the navigation feature of the cel-
lular phone, ensure the active audio
source is Bluetooth
® audio or iPod in
order to hear turn by turn direction
prompts.
Page 142 of 304

142
AVA L O N _ N a v i _ U
1. USEFUL INFORMATION
1. RECEIVING WEATHER INFORMATION
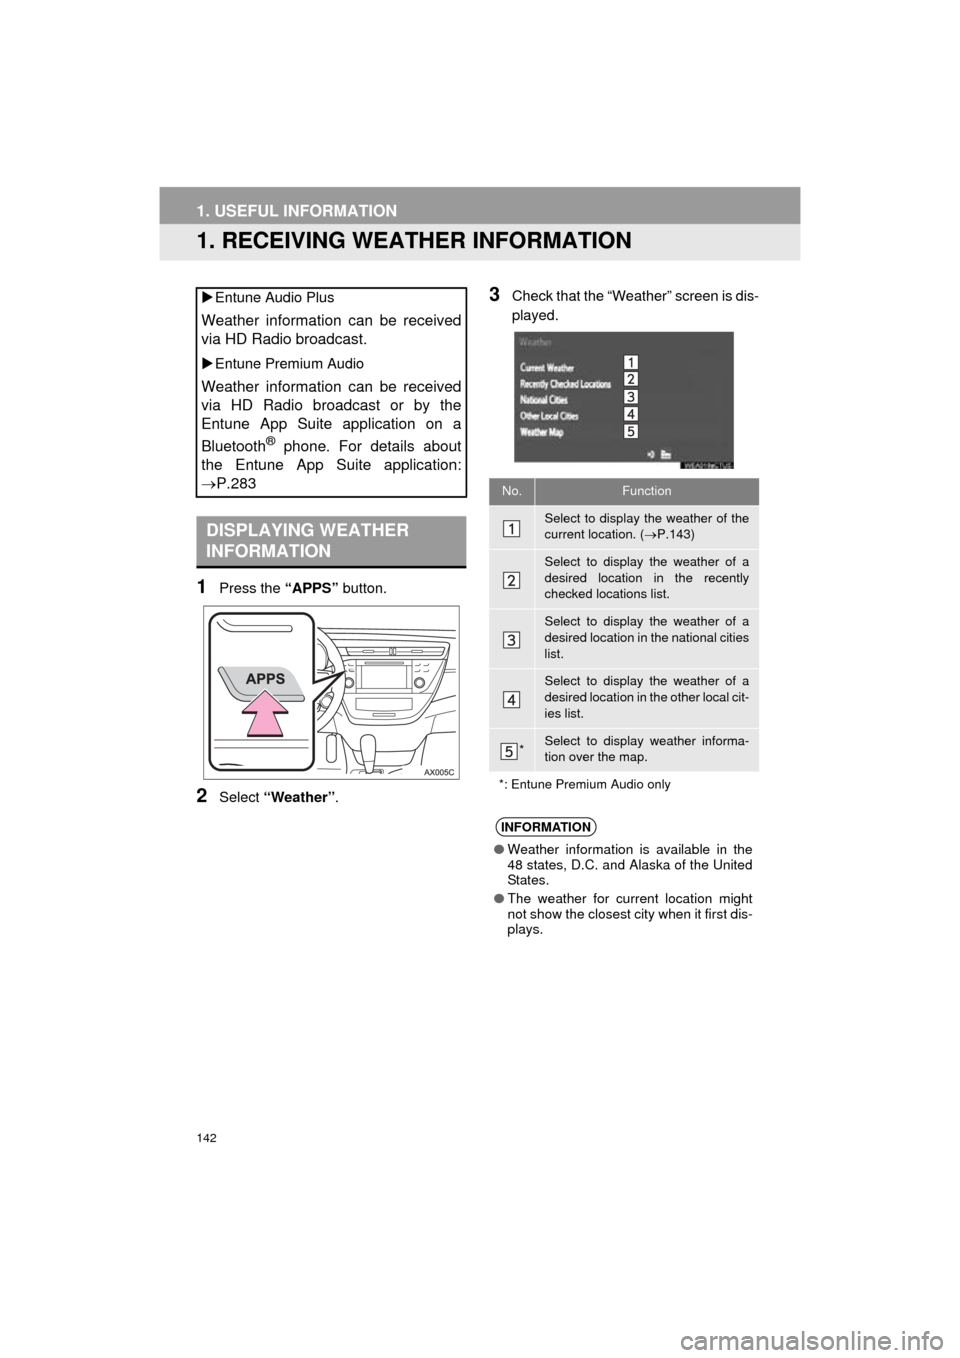
1Press the “APPS” button.
2Select “Weather” .
3Check that the “Weather” screen is dis-
played.
Entune Audio Plus
Weather information can be received
via HD Radio broadcast.
Entune Premium Audio
Weather information can be received
via HD Radio broadcast or by the
Entune App Suite application on a
Bluetooth
® phone. For details about
the Entune App Suite application:
P.283
DISPLAYING WEATHER
INFORMATION
No.Function
Select to display the weather of the
current location. ( P.143)
Select to display the weather of a
desired location in the recently
checked locations list.
Select to display the weather of a
desired location in the national cities
list.
Select to display the weather of a
desired location in the other local cit-
ies list.
*Select to display weather informa-
tion over the map.
*: Entune Premium Audio only
INFORMATION
● Weather information is available in the
48 states, D.C. and Alaska of the United
States.
● The weather for current location might
not show the closest city when it first dis-
plays.
Page 145 of 304

145
1. USEFUL INFORMATION
AVA L O N _ N a v i _ U
INFORMATION
5
3. DATA SERVICES SETTINGS*
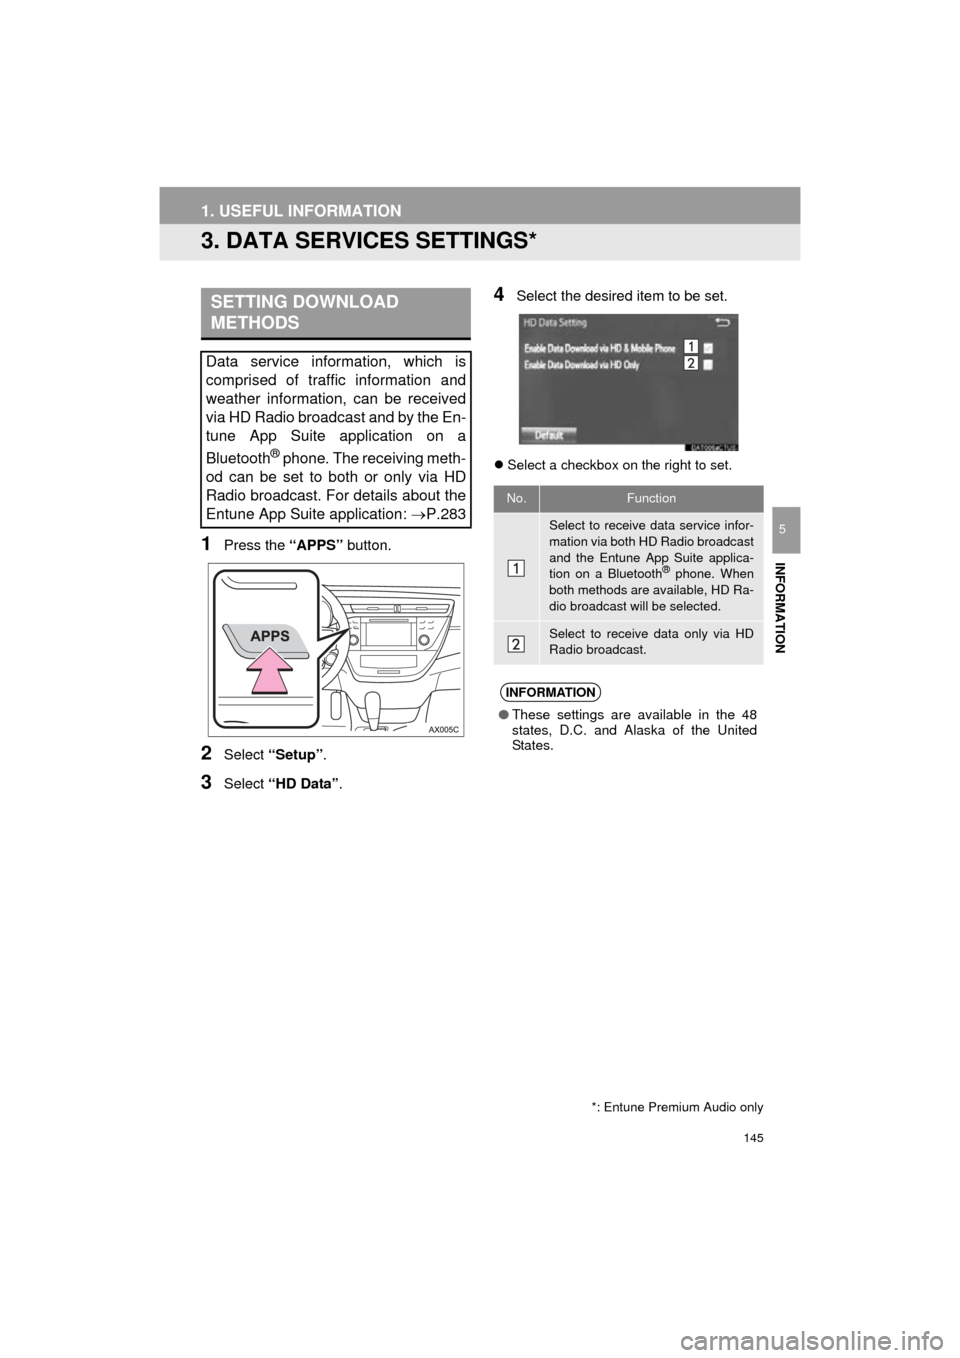
1Press the “APPS” button.
2Select “Setup” .
3Select “HD Data” .
4Select the desired item to be set.
Select a checkbox on the right to set.
SETTING DOWNLOAD
METHODS
Data service information, which is
comprised of traffic information and
weather information, can be received
via HD Radio broadcast and by the En-
tune App Suite application on a
Bluetooth
® phone. The receiving meth-
od can be set to both or only via HD
Radio broadcast. For details about the
Entune App Suite application: P.283
*: Entune Premium Audio only
No.Function
Select to receive data service infor-
mation via both HD Radio broadcast
and the Entune App Suite applica-
tion on a Bluetooth
® phone. When
both methods are available, HD Ra-
dio broadcast will be selected.
Select to receive data only via HD
Radio broadcast.
INFORMATION
● These settings are available in the 48
states, D.C. and Alaska of the United
States.
Page 149 of 304
149
1. REAR VIEW MONITOR SYSTEM
PERIPHERAL MONITORING SYSTEM
AVA L O N _ N a v i _ U
6
SCREEN DESCRIPTION
The rear view monitor system screen will be displayed if the shift lever is shifted to
the “R” position while the engine switch is in IGNITION ON mode.
No.DisplayFunction
Vehicle width guide line
Displays a guide path when the vehicle is being backed
straight up.
The displayed width is wider than the actual vehicle
width.
Vehicle center guide lineThis line indicates the estimated vehicle center on the
ground.
Distance guide lineShows distance behind the vehicle.
Displays a point approximately 1.5 ft. (0.5 m) (red) from
the edge of the bumper.
Distance guide lineShows distance behind the vehicle.
Displays a point approximately 3 ft. (1 m) (blue) from
the edge of the bumper.
CANCELING REAR VIEW MONITOR SYSTEM
The rear view monitor system is canceled when the shift lever is shifted into any
position other than the “R” position.
Page 161 of 304

161
2. TOYOTA PARKING ASSIST MONITOR
AVA L O N _ N a v i _ U
PERIPHERAL MONITORING SYSTEM
6
2. ESTIMATED COURSE LINE DISPLAY MODE
SCREEN DESCRIPTION
No.DisplayFunction
Vehicle width guide line
Displays a guide path when the vehicle is being backed
straight up.
The displayed width is wider than the actual vehicle
width.
These guide lines align with the estimated course lines
when the vehicle is going straight ahead.
Estimated course linesShow an estimated course when the steering wheel is
turned.
Distance guide lines
Show distance behind the vehicle when the steering
wheel is turned.
The guide lines move in conjunction with the estimated
course lines.
The guide lines display points approximately 1.5 ft.
(0.5m) (red) and approximately 3ft. (1m) (yellow) from
the center of the edge of the bumper.
Distance guide lineShows distance behind the vehicle.
Displays a point approximately 1.5 ft. (0.5m) (blue)
from the edge of the bumper.
Vehicle center guide lineThe line indicates the estimated vehicle center on the
ground.
WA R N I N G
● If the steering wheel is straight and the vehicle width guide lines and the estimated
course lines are not in alignment, have the vehicle inspected by your Toyota dealer.