Page 358 of 492

3586-3. Do-it-yourself maintenance
AVALON_HV_U (01999-07002)■
Tire types
●Summer tires
Summer tires are high-speed performance tires best suited to highway
driving under dry conditions. Since
summer tires do not have the same
traction performance as snow tires, summer tires are inadequate for
driving on snow-covered or icy ro ads. For driving on snow-covered
roads or icy roads, the use of snow tires is recommended. When install-
ing snow tires, be sure to replace all four tires.
●All season tires
All season tires are designed to provide better traction in snow and to
be adequate for driving in most winter conditions as well as for use
year-round. All season tires, however, do not have adequate traction
performance compared with snow tires in heavy or loose snow. Also, all
season tires fall short in acceleration and handling performance com-
pared with summer tires in highway driving.
●Snow tires
For driving on snow-covered roads or icy roads, we recommend using
snow tires. If you need snow tires, select tires of the same size, con-
struction and load capacity as the or iginally installed tires. Since your
vehicle has radial tires as original equipment, make sure your snow
tires also have radial construction. Do not install studded tires without
first checking local regulations fo r possible restrictions. Snow tires
should be installed on all wheels. ( P. 268)
■Initializing the tire pressure warning system
Initialize the system with the tire infl ation pressure adjusted to the speci-
fied level.
■If the tread on snow tires wears down below 0.16 in. (4 mm)
The effectiveness of the tire s as snow tires is lost.
■If you press the tire pressure warning reset switch accidentally
If initialization is performed, adjust the tire inflation pressure to the speci-
fied level and initialize the tire pressure warning system again.
Page 359 of 492

3596-3. Do-it-yourself maintenance
6
Maintenance and care
AVALON_HV_U (01999-07002)■
Situations in which the tire pressure warning system may not oper-
ate properly (vehicles with a tire pressure warning system)
●In the following cases, the tire pr
essure warning system may not operate
properly.
• If non-genuine Toyota wheels are used.
• A tire has been replaced with a tire that is not an OE (Original Equip- ment) tire.
• A tire has been replaced with a tire that is not of the specified size.
• Tire chains etc. are equipped.
• If a window tint that affects the radio wave signals is installed.
• If there is a lot of snow or ice on the vehicle, particularly around the
wheels or wheel housings.
• If the tire inflation pressure is extremely higher than the specified
level.
• If tires not equipped with tire pressure warning valves and transmit- ters are used.
• If the ID code on the tire pressure warning valves and transmitters is not registered in the tire pressure warning computer.
●Performance may be affected in the following situations.
• Near a TV tower, electric power plant, gas station, radio station, large
display, airport or other facility that generates strong radio waves or
electrical noise
• When carrying a portable radio, cellular phone, cordless phone or
other wireless communication device
Vehicles with a tire inflation pressure display function: If tire position
information is not correctly displayed due to the radio wave conditions,
the display may be corrected by driving and changing the radio wave
conditions.
●When the vehicle is parked, the time taken for the warning to start or go
off could be extended.
●When tire inflation pressure declines rapidly for example when a tire has
burst, the warning may not function.
Page 363 of 492

3636-3. Do-it-yourself maintenance
6
Maintenance and care
AVALON_HV_U (01999-07002)
NOTICE
■Repairing or replacing tires, wheels, tire pressure warning valves,
transmitters and tire valve caps
●When removing or fitting the wheels, tires or the tire pressure warning
valves and transmitters, contact your Toyota dealer as the tire pres-
sure warning valves and transmitters may be damaged if not handled
correctly.
●When replacing tire valve caps, do not use tire valve caps other than
those specified. The cap may become stuck.
■To avoid damage to the tire pressure warning valves and transmit-
ters
When a tire is repaired with liquid sealants, the tire pressure warning
valve and transmitter may not operate properly. If a liquid sealant is
used, contact your Toyota dealer or other qualified service shop as soon
as possible. Make sure to replace the tire pressure warning valve and
transmitter when replacing the tire. ( P. 355)
■Driving on rough roads
Take particular care when driving on roads with loose surfaces or pot-
holes.These conditions may cause losses in tire inflation pressure,
reducing the cushioning ability of the tires. In addition, driving on rough
roads may cause damage to the tires themselves, as well as the vehi-
cle’s wheels and body.
■If tire inflation pressure of e ach tire becomes low while driving
Do not continue driving, or your tires and/or wheels may be ruined.
Page 366 of 492

3666-3. Do-it-yourself maintenance
AVALON_HV_U (01999-07002)■
Instructions for checking tire inflation pressure
When checking tire inflation pressure, observe the following:
●Check only when the tires are cold.
If your vehicle has been parked for at least 3 hours or has not been
driven for more than 1 mile or 1.5 km, you will get an accurate cold tire
inflation pressure reading.
●Always use a tire pressure gauge.
It is difficult to judge if a tire is properly inflated based only on its appear-
ance.
●It is normal for the tire inflation pressure to be higher after driving as
heat is generated in the tire. Do not
reduce tire inflation pressure after
driving.
●Never exceed the vehicle capacity weight.
Passengers and luggage weight should be placed so that the vehicle is
balanced.
WARNING
■Proper inflation is critical to save tire performance
Keep your tires properly inflated.
If the tires are not properly inflated, the following conditions may occur
which could lead to an accident resulting in death or serious injury:
●Excessive wear
●Uneven wear
●Poor handling
●Possibility of blowouts result ing from overheated tires
●Air leaking from between tire and wheel
●Wheel deformation and/or tire damage
●Greater possibility of tire damage while driving (due to road hazards,
expansion joints, sharp edges in the road, etc.)
NOTICE
■When inspecting and adjusting tire inflation pressure
Be sure to put the tire valve caps back on.
If a valve cap is not installed, dirt or moisture may get into the valve and
cause an air leak, resulting in decreased tire inflation pressure.
Page 367 of 492

3676-3. Do-it-yourself maintenance
6
Maintenance and care
AVALON_HV_U (01999-07002)
When replacing wheels, care should be taken to ensure that they are
equivalent to those removed in load capacity, diameter, rim width and
inset
*.
Replacement wheels are available at your Toyota dealer.
*: Conventionally referred to as “offset”.
Toyota does not recommend using the following:
● Wheels of different sizes or types
● Used wheels
● Bent wheels that have been straightened
● Use only Toyota wheel nuts and wrenches designed for use with
your aluminum wheels.
● When rotating, repairing or changi ng your tires, check that the
wheel nuts are still tight after driving 1000 miles (1600 km).
● Be careful not to damage the aluminum wheels when using tire
chains.
● Use only Toyota genuine balance weights or equivalent and a plas-
tic or rubber hammer when balancing your wheels.
Wheels
If a wheel is bent, cracked or heavily corroded, it should be
replaced. Otherwise, the tire may separate from the wheel or
cause a loss of handling control.
Wheel selection
Aluminum wheel precautions
Page 368 of 492

3686-3. Do-it-yourself maintenance
AVALON_HV_U (01999-07002)
■When replacing wheels
The wheels of your vehicle are equipped with tire pressure warning
valves and transmitters that allow the tire pressure warning system to
provide advance warning in the event of a loss in tire inflation pressure.
Whenever wheels are replaced, tire pressure warning valves and trans-
mitters must be installed. ( P. 355)
WARNING
■When replacing wheels
●Do not use wheels that are a different size from those recommended in
the Owner’s Manual, as this may result in a loss of handling control.
●Never use an inner tube in a leak ing wheel which is designed for a
tubeless tire. Doing so may result in an accident, causing death or seri-
ous injury.
■When installing the wheel nuts
●Never use oil or grease on the wheel bolts or wheel nuts.
Oil and grease may cause the wheel nuts to be excessively tightened,
leading to bolt or disc wheel damage. In addition, the oil or grease can
cause the wheel nuts to loosen and the wheel may fall off, causing an
accident and resulting in death or serious injury. Remove any oil or
grease from the wheel bolts or wheel nuts.
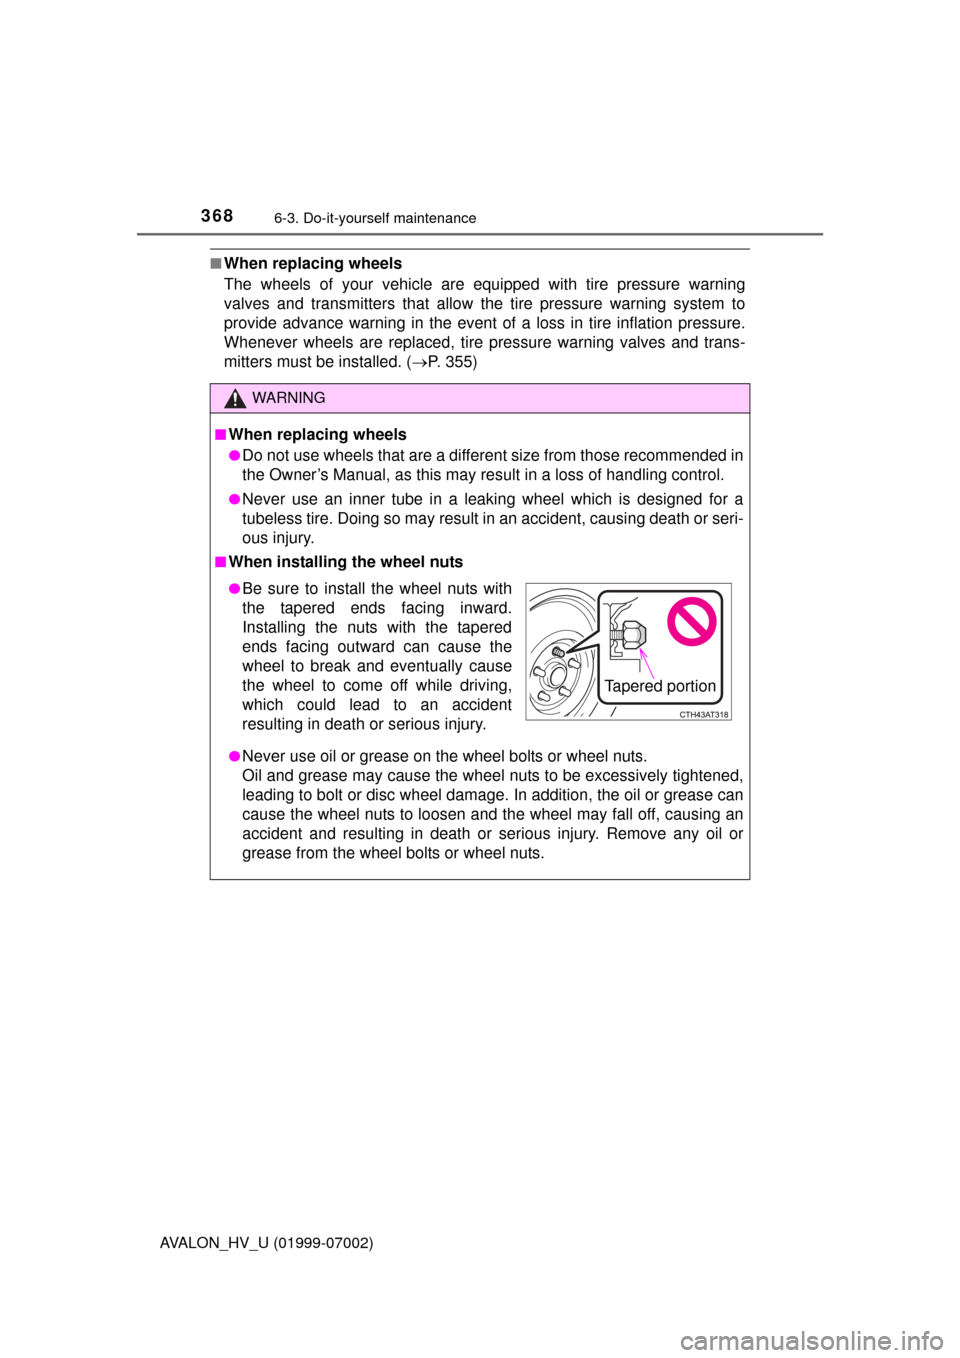
●Be sure to install the wheel nuts with
the tapered ends facing inward.
Installing the nuts with the tapered
ends facing outward can cause the
wheel to break and eventually cause
the wheel to come off while driving,
which could lead to an accident
resulting in death or serious injury.
Tapered portion
Page 369 of 492
3696-3. Do-it-yourself maintenance
6
Maintenance and care
AVALON_HV_U (01999-07002)
NOTICE
■Replacing tire pressure warning valves and transmitters
●Because tire repair or replacement may affect the tire pressure warn-
ing valves and transmitters, make sure to have tires serviced by your
Toyota dealer or other qualified service shop. In addition, make sure to
purchase your tire pressure warning valves and transmitters at your
Toyota dealer.
●Ensure that only genuine Toyota wheels are used on your vehicle.
Tire pressure warning valves and transmitters may not work properly
with non-genuine wheels.
Page 381 of 492
3816-3. Do-it-yourself maintenance
6
Maintenance and care
AVALON_HV_U (01999-07002)■
Front turn signal/parking light
To allow enough working
space, turn the steering
wheel to the opposite side of
the bulb to be replaced.
Remove the 3 fender liner
clips.
Turn the steering wheel to the
left when replacing the right side
light bulb, and turn the steering
wheel to the right when replac-
ing the left side light bulb.
Remove the fender liner bolt
and partly remove the fender
liner.
1
2