Page 3 of 179
1. Exterior lights (Lights on page 48)
2. Front doors ( Opening and Closing Front Doors from Outside Model X on page 7)
3. Falcon wing doors ( Doors on page 4)
4. Charge port ( Charging Instructions on page 128)
5. Active spoiler ( Active Spoiler on page 66)
6. Forward looking camera ( About Driver Assistance on page 72)
7. Exterior mirrors ( Mirrors on page 40)
8. Radar sensor (hidden from view in the above image)( About Driver Assistance on page 72)
9. Hood/Front trunk ( Front Trunk on page 14)
10. Wheels and tires ( Wheels and Tires on page 160)
11. Rear view camera ( Rear View Camera on page 65)
12. Rear trunk/liftgate ( Rear Trunk on page 12)
13. Ultrasonic sensors ( Park Assist on page 57 and About Driver Assistance on page 72)
Exterior Overview
Overview3
Page 47 of 179

8. Use the right steering wheel buttons to change what displays on the right side of theinstrument panel whenever a phone call is not active (see Using Left Steering Wheel Buttons
on page 37).
9. Total estimated driving distance (or energy) available. Instead of driving distance, you can display the percentage of battery energy remaining. To do so, touch Controls > Settings >
Units & Format > Energy & Charging (see Settings on page 101).
Note: When anticipating when you need to charge, use range estimates as a general guideline only.
Note: In cold weather, some of the stored energy in the Battery may not be available on your drive because the Battery is too cold. When this happens, a portion of the Battery meter isblue and the driving distance value has a
snowflake image next to it. If Model X is plugged in,
you can heat your Battery using wall power by turning on climate control using the mobile app. When the Battery warms up, the blue portion on the meter and the
snowflake image are
no longer displayed.
10. The speed limit (if available) that is currently being detected by Speed Assist (see Speed
Assist on page 91).
11. The car in front of you (if applicable).
12. Pay attention to important driving-related messages that appear at the bottom center of the instrument panel.
13. Your Model X.
14. When Autosteer is active, the driving lane is highlighted in blue (see Autosteer on page 80).
The lane may highlight in red If a front wheel passes over a lane marking and the associated
turn signal is
off (see Lane Assist on page 86).
15. Currently selected gear: Park, Reverse, Neutral, or Drive.
Instrument Panel
Driving47
Page 64 of 179
Touch to display a search list of
charging locations that are
estimated to be within your driving
range. Then touch a location in the
search list to navigate to it.Based on the amount of energy
remaining in your Model X, there
are no known charging locations
within your driving range.
Getting Maximum Range
64Model X Owner
Page 117 of 179
Overview
Touch the Maps (or Nav) icon to view and
search for a location on Google Maps TM
. If
Model X is equipped with the Navigation option, the app is labeled Nav, and onboard
maps are available. To search for a location,
you must have a data connection. When you
specify a location, the touchscreen displays
the route and provides turn-by-turn
instructions.
Using Maps Touch the search
field, or speak a voice
command to specify a location (for details on
how to use voice commands, see Using Voice
Commands on page 39). You can enter or
speak an address, landmark, business, etc. You can also touch PLACES and choose from a list
of recent locations and searches, Favorite
destinations, Supercharger locations,
CHAdeMO station locations, and charging
stations you
Page 125 of 179
High Voltage Components
1. Front Motor
2. AC Compressor
3. Forward Junction Box
4. High Voltage Cabling
5. Battery Coolant Heater
6. DC-DC Converter
7. Cabin Heater
8. Battery
9. On-board Charger
10. Charge Port
11. Rear Motor
12. HV cable to Rear HVAC Assembly
Electric Vehicle Components
Charging125
Page 126 of 179

Warning: The high voltage system has no user serviceable parts. Do not disassemble, removeor replace high voltage components, cables or connectors. High voltage cables are coloredorange for easy
identification.
Warning: Read and follow all instructions provided on the labels that are attached to Model X.
These labels are there for your safety.Warning: In the unlikely event that a fire occurs, immediately contact your local fireemergency responders.Charging Equipment
Charging equipment designed
specifically to
charge your Model X is available from Tesla. A
Tesla Wall Connector, which installs in your
garage, is the fastest way to charge Model X at home.
In several market regions, Model X is equipped
with a Mobile Connector and the adapter(s)
you need to plug into commonly used power outlets. When using the Mobile Connector,
first plug the Mobile Connector into the power
outlet, then plug in Model X. For more
information about your Mobile Connector, see
the Mobile Connector Owner
Page 129 of 179
During ChargingDuring charging, the charge port pulses green
and charging status displays on the instrument
panel. The frequency at which the charge
port
Page 130 of 179

Changing Charge SettingsThe charge settings screen displays on the
touchscreen whenever the charge port door is
open.
To display charge settings at any time, touch the Battery icon on the top of the
touchscreen, or touch Controls > Charging
(located in the upper right portion of the
Controls screen).
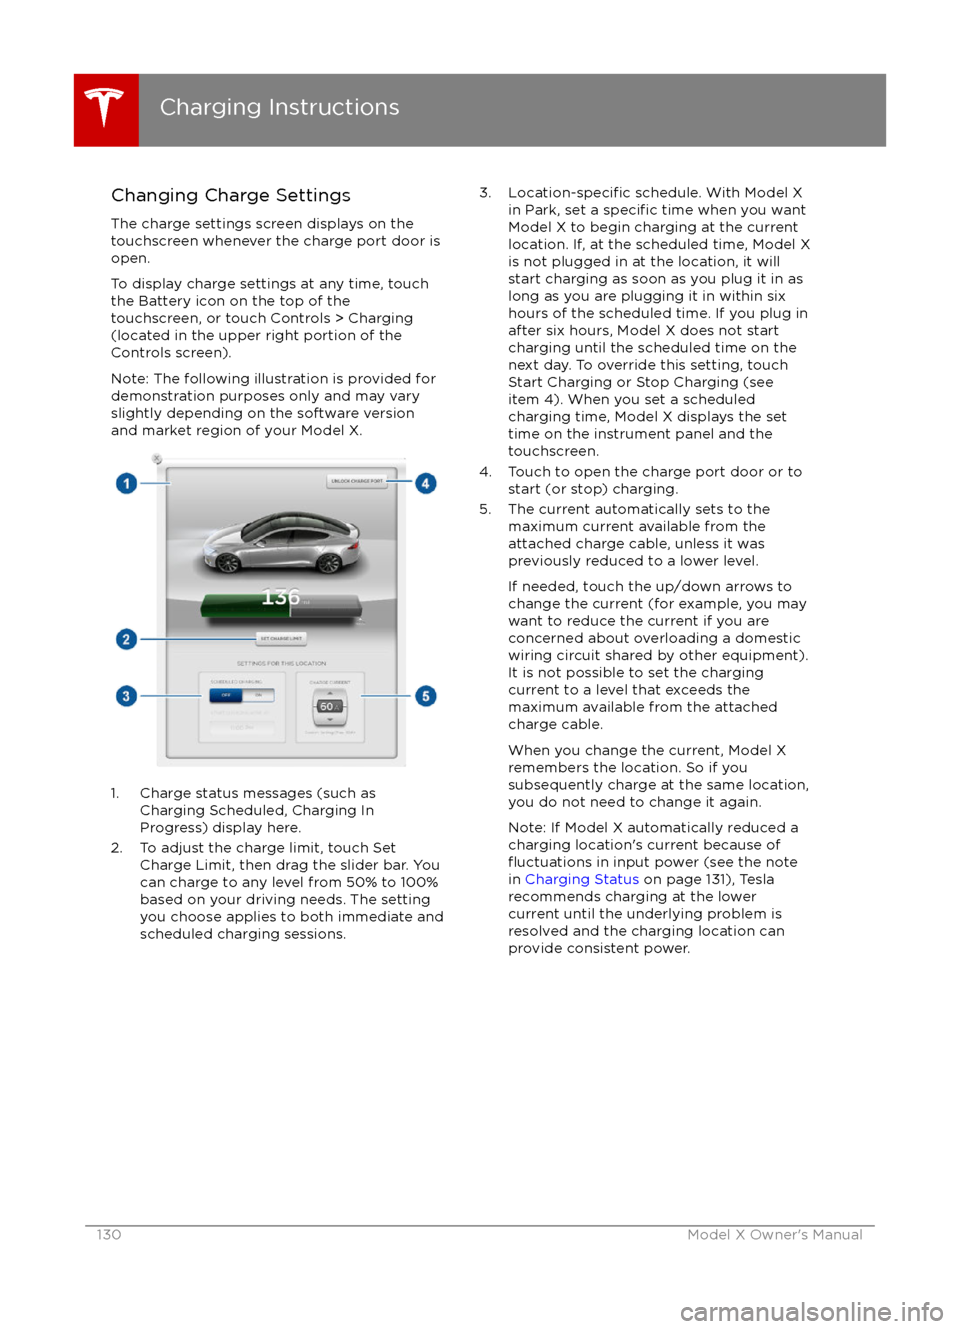
Note: The following illustration is provided for
demonstration purposes only and may vary
slightly depending on the software version
and market region of your Model X.
1. Charge status messages (such as
Charging Scheduled, Charging In
Progress) display here.
2. To adjust the charge limit, touch Set Charge Limit, then drag the slider bar. You
can charge to any level from 50% to 100%
based on your driving needs. The setting
you choose applies to both immediate and scheduled charging sessions.
3.Location-specific schedule. With Model X
in Park, set a specific time when you want
Model X to begin charging at the current
location. If, at the scheduled time, Model X
is not plugged in at the location, it will
start charging as soon as you plug it in as
long as you are plugging it in within six
hours of the scheduled time. If you plug in
after six hours, Model X does not start
charging until the scheduled time on the
next day. To override this setting, touch Start Charging or Stop Charging (see
item 4). When you set a scheduled
charging time, Model X displays the set
time on the instrument panel and the
touchscreen.
4. Touch to open the charge port door or to start (or stop) charging.
5. The current automatically sets to the maximum current available from the
attached charge cable, unless it was
previously reduced to a lower level.
If needed, touch the up/down arrows to change the current (for example, you may
want to reduce the current if you are
concerned about overloading a domestic wiring circuit shared by other equipment).
It is not possible to set the charging
current to a level that exceeds the
maximum available from the attached
charge cable.
When you change the current, Model X
remembers the location. So if you
subsequently charge at the same location,
you do not need to change it again.
Note: If Model X automatically reduced a charging location