Page 5 of 190
If Model S is unable to detect the key, the
touchscreen displays a message indicating that a key is not inside. Place the key where
Model S can best detect it, which is below the
12V power socket (see Key Not Inside on page
41).
Radio equipment on a similar frequency can
affect the key. If this happens, move the key at
least one foot (30 cm) away from other electronic devices (phone, laptop, etc). If the
key does not work, you may need to change
its battery. If the key
Page 47 of 190

8. Use the right steering wheel buttons to change what displays on the right side of theinstrument panel whenever a phone call is not active (see Using Left Steering Wheel Buttons
on page 37).
9. Total estimated driving distance (or energy) available. Instead of driving distance, you can display the percentage of battery energy remaining. To do so, touch Controls > Settings >
Units & Format > Energy & Charging (see Settings on page 99).
Note: When anticipating when you need to charge, use range estimates as a general guideline only.
Note: In cold weather, some of the stored energy in the Battery may not be available on your drive because the Battery is too cold. When this happens, a portion of the Battery meter isblue and the driving distance value has a
snowflake image next to it. If Model S is plugged in,
you can heat your Battery using wall power by turning on climate control using the mobile app. When the Battery warms up, the blue portion on the meter and the
snowflake image are
no longer displayed.
10. The speed limit (if available) that is currently being detected by Speed Assist (see Speed
Assist on page 88).
11. The car in front of you (if applicable).
12. Pay attention to important driving-related messages that appear at the bottom center of the instrument panel.
13. Your Model S.
14. When Autosteer is active, the driving lane is highlighted in blue (see Autosteer on page 74).
The lane may highlight in red If a front wheel passes over a lane marking and the associated
turn signal is
off (see Lane Assist on page 83).
15. The following distance that Traffic-Aware Cruise Control will maintain from the car in front of
you. You can adjust the following distance as appropriate for driving conditions (see Traffic-
Aware Cruise Control on page 68).
16. Currently selected gear: Park, Reverse, Neutral, or Drive.
Instrument Panel
Driving47
Page 55 of 190

Regenerative Braking
Whenever Model S is moving and your foot is
off the accelerator, regenerative braking slows
down Model S and feeds any surplus energy
back to the Battery.
By anticipating your stops and simply
removing pressure from the accelerator to slow down, you can take advantage ofregenerative braking to increase driving range.
Of course, this is no substitute for regular
braking when needed for safety.
Note: If regenerative braking is aggressively
slowing Model S, such as on a steep descent,
brake lights turn on to alert other road users
that you are slowing down.
The Energy app displays real-time feedback
on the amount of energy being gained by
regenerative braking. You can also display the
power meter on either side of the instrument
panel by choosing Energy using the scroll
button on the steering wheel (see Steering
Wheel on page 37).
The amount of energy fed back to the Battery using regenerative braking can depend on the
current state of the Battery and the charge
level setting that you are using. If regenerative
braking is limited, a dashed yellow line
displays on the power meter. For example,
regenerative braking may be limited if the Battery is already fully charged or if the
ambient temperature is low.
To Set the Regenerative Braking Level
You can use the touchscreen to change the
level of regenerative braking:
1. Touch Controls > Driving > Regenerative Braking.
2. Choose from two levels:
Page 104 of 190

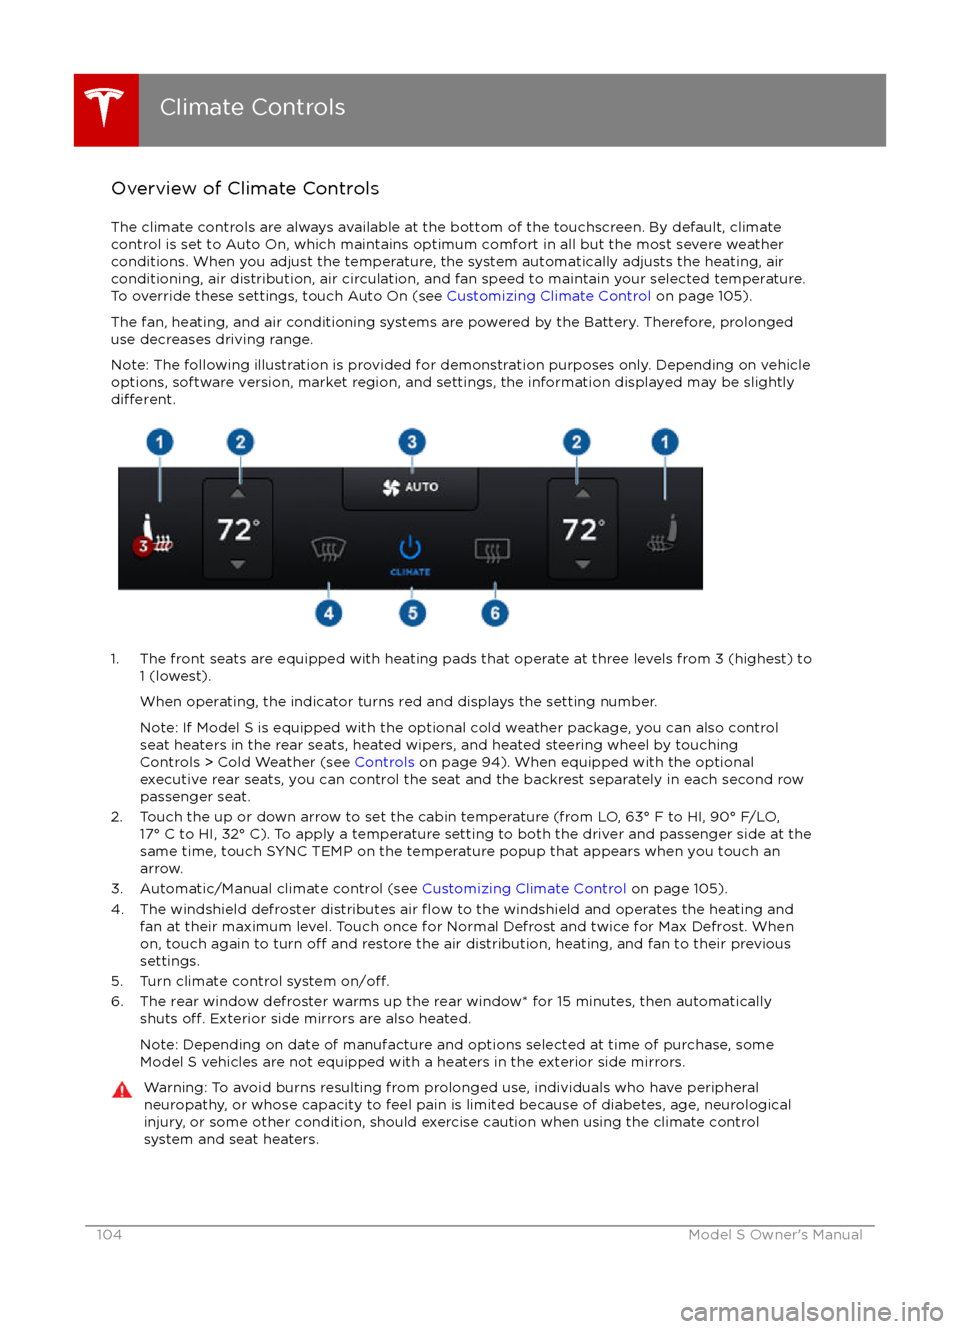
Overview of Climate Controls
The climate controls are always available at the bottom of the touchscreen. By default, climate control is set to Auto On, which maintains optimum comfort in all but the most severe weather conditions. When you adjust the temperature, the system automatically adjusts the heating, air
conditioning, air distribution, air circulation, and fan speed to maintain your selected temperature. To override these settings, touch Auto On (see Customizing Climate Control on page 105).
The fan, heating, and air conditioning systems are powered by the Battery. Therefore, prolonged use decreases driving range.
Note: The following illustration is provided for demonstration purposes only. Depending on vehicle
options, software version, market region, and settings, the information displayed may be slightly
different.
1. The front seats are equipped with heating pads that operate at three levels from 3 (highest) to 1 (lowest).
When operating, the indicator turns red and displays the setting number.
Note: If Model S is equipped with the optional cold weather package, you can also control seat heaters in the rear seats, heated wipers, and heated steering wheel by touchingControls > Cold Weather (see Controls on page 94). When equipped with the optional
executive rear seats, you can control the seat and the backrest separately in each second row
passenger seat.
2. Touch the up or down arrow to set the cabin temperature (from LO, 63
Page 113 of 190

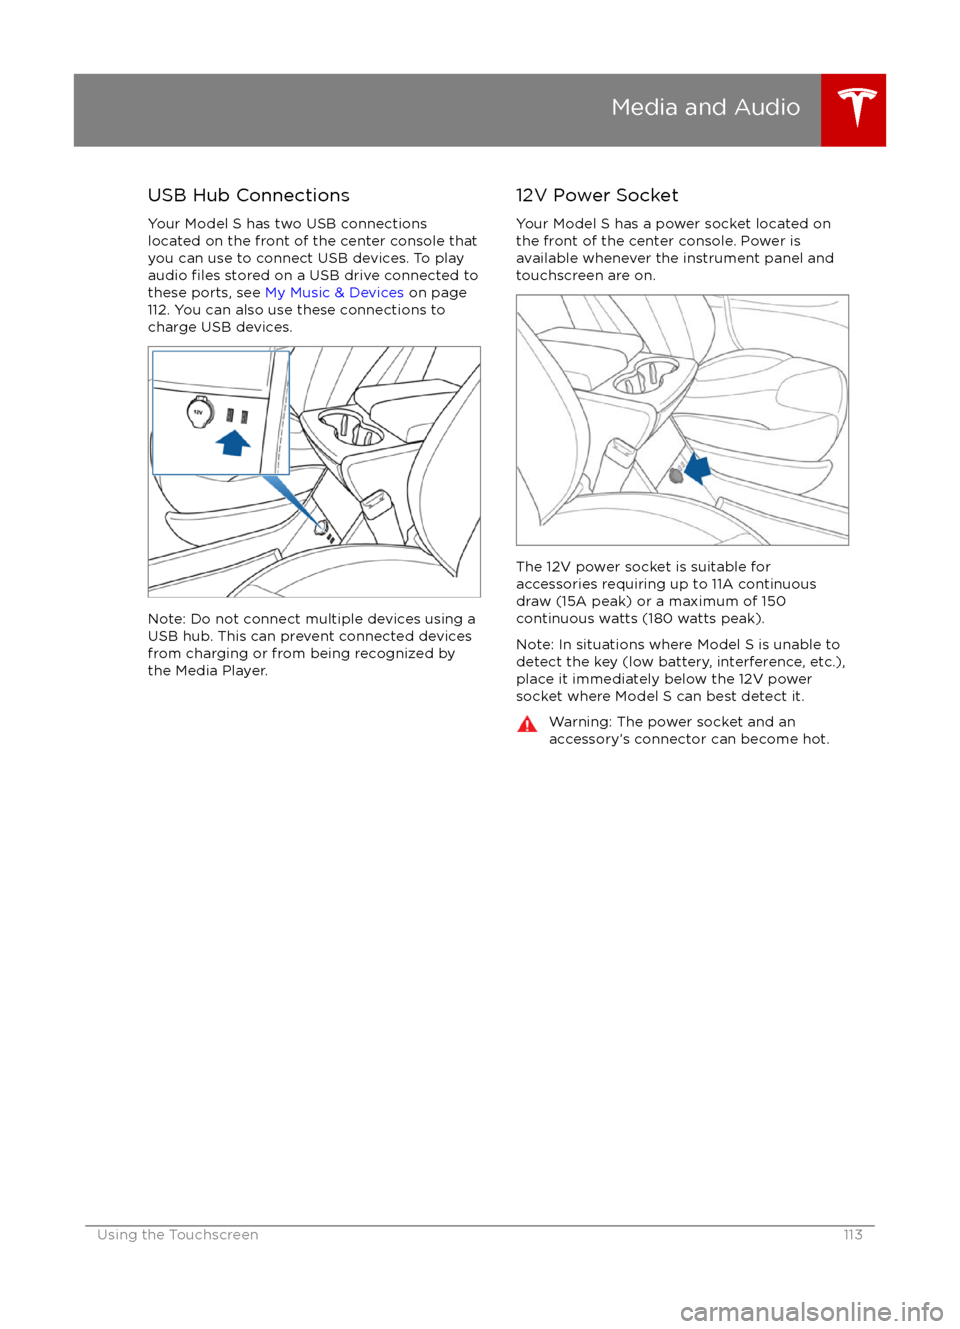
USB Hub Connections
Your Model S has two USB connections
located on the front of the center console that
you can use to connect USB devices. To play
audio
files stored on a USB drive connected to
these ports, see My Music & Devices on page
112. You can also use these connections to charge USB devices.
Note: Do not connect multiple devices using a
USB hub. This can prevent connected devices
from charging or from being recognized by
the Media Player.
12V Power Socket
Your Model S has a power socket located on
the front of the center console. Power is
available whenever the instrument panel and
touchscreen are on.
The 12V power socket is suitable for
accessories requiring up to 11A continuous
draw (15A peak) or a maximum of 150
continuous watts (180 watts peak).
Note: In situations where Model S is unable to detect the key (low battery, interference, etc.),
place it immediately below the 12V power
socket where Model S can best detect it.
Warning: The power socket and an
accessory
Page 127 of 190
High Voltage Components
1. Battery
2. DC-DC converter and junction box 3. High voltage cabling (colored orange)
4. 10 kW on-board master charger
5. OPTIONAL: 10 kW on-board charger
6. Charge port
7. Motor
Electric Vehicle Components
Charging127
Page 129 of 190
About the Battery
Model S has one of the most sophisticated
battery systems in the world. The most
important way to preserve the Battery is to LEAVE YOUR Model S PLUGGED IN when you
are not using it. This is particularly important if you are not planning to drive Model S for
several weeks. When plugged in, Model S wakes up when needed to automatically
maintain a charge level that maximizes the
lifetime of the Battery.
There is no advantage to waiting until the
Battery
Page 132 of 190

Changing Charge SettingsThe charge settings screen displays on the
touchscreen whenever the charge port door is
open.
To display charge settings at any time, touch the Battery icon on the top of the
touchscreen, or touch Controls > Charging
(located in the upper right portion of the
Controls screen).
Note: The following illustration is provided for
demonstration purposes only and may vary
slightly depending on the software version
and market region of your Model S.
1. Charge status messages (such as
Charging Scheduled, Charging In
Progress) display here.
2. To adjust the charge limit, touch Set Charge Limit, then drag the slider bar. You
can charge to any level from 50% to 100%
based on your driving needs. The setting
you choose applies to both immediate and scheduled charging sessions.
3.Location-specific schedule. With Model S
in Park, set a specific time when you want
Model S to begin charging at the current
location. If, at the scheduled time, Model S
is not plugged in at the location, it will
start charging as soon as you plug it in as
long as you are plugging it in within six
hours of the scheduled time. If you plug in
after six hours, Model S does not start charging until the scheduled time on the
next day. To override this setting, touch Start Charging or Stop Charging (see
item 4). When you set a scheduled
charging time, Model S displays the set
time on the instrument panel and the
touchscreen.
4. Touch to open the charge port door or to start (or stop) charging.
5. The current automatically sets to the maximum current available from the
attached charge cable, unless it was
previously reduced to a lower level.
If needed, touch the up/down arrows to change the current (for example, you may
want to reduce the current if you are
concerned about overloading a domestic
wiring circuit shared by other equipment).
It is not possible to set the charging
current to a level that exceeds the
maximum available from the attached
charge cable.
When you change the current, Model S
remembers the location. So if you
subsequently charge at the same location,
you do not need to change it again.
Note: If Model S automatically reduced a charging location