Page 172 of 594
! Items of display message (for operation and vehicle condition) Item Icon “ ” information reminder Refer to page
Deactivation of the selection of the SI-DRIVE Sport Sharp (S#)
mode when the engine is cold —— 7-29, 7-31
Pedal operation for starting engine
— 7-12
Select lever into “ P ” operation ——
Access key warning* (The vehicle was driven while the access key
is not inside the vehicle.) — 3-28
Push-button ignition switch without “ OFF ” warning* —— 3-28
Access key lock-in warning* — 3-28
Emergency operation of push-button ignition switch* — 9-16
Release operation for steering lock* — 3-28
Power save function operation* —— 2-15
Key in the ignition switch reminder (if equipped) —— 3-5
Headlights ON warning —— 3-94
*: Models with keyless access with push-button start system Instruments and controls/Multi information display
– CONTINUED –3-43
Page 223 of 594

Instruments and controls/Light control switch
5. Reconfirmation will be displayed. If
you are sure you want to proceed, select
“ Ye s ” by operating the “
” switch.
6. Confirm the setting again by pushing
the
button. 7. The system will notify you that the
setting is complete. Light control switch CAUTION. Use of any lights for a long period
of time while the engine is not
running can cause the battery to
discharge.
. Before leaving the vehicle, make
sure that the lights are turned off.
If the vehicle is left unattended
for a long time with the lights
illuminated, the battery may be
discharged.
Models with “ keyless access with
push-button start system ” :
The light control switch operates when the
push-button ignition switch is in the “ ACC ”
or “ ON ” position.
Regardless of the position of the light
control switch, the illuminated lights are
turned off when the push-button ignition
switch is turned off.
Models without “ keyless access with
push-button start system ” :
The light control switch operates when the
key is inserted in the ignition switch.
Regardless of the position of the light
control switch, the illuminated lights are3-94
Page 224 of 594

turned off when the key is removed from
the ignition switch.
NOTE The light control switch can be oper-
ated (except auto on/off headlights),
even under the following conditions.
. when the key is not inserted into the
ignition switch (models without “ key-
less access with push-button start
system ” )
. when the push-button ignition
switch is turned off (models with “ key-
less access with push-button start
system ” )
If the driver ’ s door is opened while the
headlights are illuminated under such
conditions, the chirp sound will inform
the driver that the lights are illumi-
nated. & Headlights
To turn on the headlights, turn the knob on
the end of the turn signal lever.
“ ” position
Headlights, parking lights, front side mar-
ker lights, rear side marker lights, tail lights
and license plate lights are on.
“
” position
Parking lights, front side marker lights,
rear side marker lights, tail lights and
license plate lights are on. “
” position: auto on/off headlights (if
equipped)
When the ignition switch is in the “ ON ”
position, headlights, parking lights, front
side marker lights, rear side marker lights,
tail lights and license plate lights are
automatically on or off depending on the
level of the ambient light.
“
” position
The headlights are all off.
NOTE The sensitivity of the auto on/off head-
lights can be changed by a SUBARU
dealer. Consult your SUBARU dealer
for details. Also, for models with a multi
function display, the setting can be
changed using the display. For details,
refer to “ Auto light sensor sensitivity
setting ” F 3-88.Instruments and controls/Light control switch
– CONTINUED –3-95
Page 225 of 594

Instruments and controls/Light control switch
! Sensor for the auto on/off head-
lights (if equipped)
The sensor is on the instrument panel as
shown in the illustration.
CAUTION
If any object is placed on or near the
sensor, the sensor may not detect
the level of the ambient light cor-
rectly and the auto on/off headlights
may not operate properly. & High/low beam change
(dimmer)
To change from low beam to high beam,
push the turn signal lever forward. When
the headlights are on high beam, the high
beam indicator light “
” on the combina-
tion meter is also on.
To switch back to low beam, pull the lever
back to the center position. & Headlight flasher
CAUTIONDo not hold the lever in the flashing
position for more than just a few
seconds.
To flash the headlights, pull the lever
toward you and then release it. The high
beam will stay on for as long as you hold
the lever. The headlight flasher works
even though the lighting switch is in the
“
” (off) position.
When the headlights are on high beam,
the high beam indicator light “
” on the
combination meter is also on.3-96
Page 226 of 594

& Daytime running light system WARNINGThe brightness of the illumination of
the high beam headlights is reduced
by the daytime running light system.
The light switch must always be
turned to the “
” position when it
is dark outside.
The high beam headlights will automati-
cally illuminate at reduced brightness
when the following conditions are fulfilled.
. The engine is running.
. The parking brake is fully released.
. The light control switch is in the
“ AUTO ” (if equipped), “
” or off position.
. For CVT models, the select lever is in a
position other than the “ P ” position.
NOTE . When the light switch is in the “ ”
position, the instrument panel illumina-
tion, front side marker lights, tail lights
and license plate lights are also illumi-
nated.
. For models with the auto on/off
headlights, while the light control
switch is in the “ AUTO ” position and
the system is activated to the auto-on
mode depending on the ambient light level, the high beam headlights that
have illuminated at reduced brightness
turn off, and the low beam headlights
turn on alternatively. At this time, the
instrument panel illumination, front
side marker lights, tail lights and
license plate lights are also illuminated.
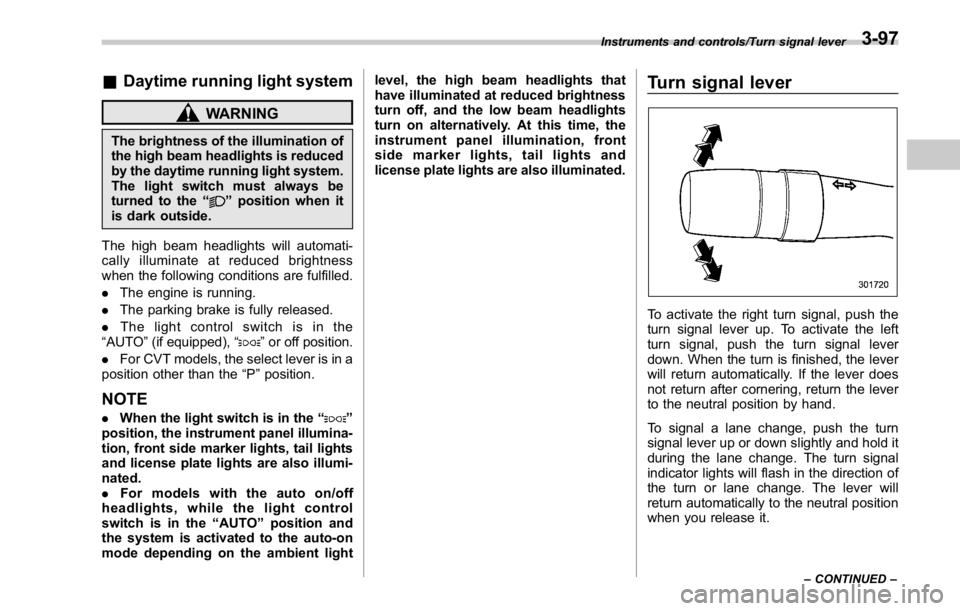
Turn signal lever
To activate the right turn signal, push the
turn signal lever up. To activate the left
turn signal, push the turn signal lever
down. When the turn is finished, the lever
will return automatically. If the lever does
not return after cornering, return the lever
to the neutral position by hand.
To signal a lane change, push the turn
signal lever up or down slightly and hold it
during the lane change. The turn signal
indicator lights will flash in the direction of
the turn or lane change. The lever will
return automatically to the neutral position
when you release it. Instruments and controls/Turn signal lever
– CONTINUED –3-97
Page 228 of 594

Headlight beam leveler (if
equipped) & Automatic headlight beam
leveler (models with LED
headlights) The LED headlights generate more light
than conventional halogen headlights.
Therefore a driver of an oncoming vehicle
may experience too much glare if your
headlight beam height adjustment is high
when the vehicle is carrying a heavy load.
The automatic headlight beam leveler
adjusts the headlight beam height auto-
matically and optimally according to the
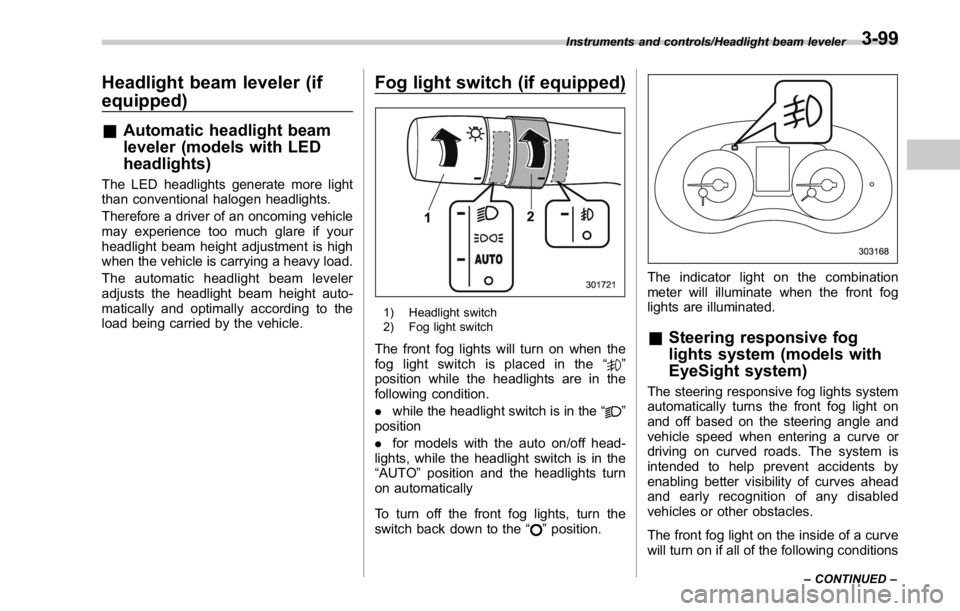
load being carried by the vehicle. Fog light switch (if equipped)
1) Headlight switch
2) Fog light switch
The front fog lights will turn on when the
fog light switch is placed in the “
”
position while the headlights are in the
following condition.
. while the headlight switch is in the “
”
position
. for models with the auto on/off head-
lights, while the headlight switch is in the
“ AUTO ” position and the headlights turn
on automatically
To turn off the front fog lights, turn the
switch back down to the “
” position. The indicator light on the combination
meter will illuminate when the front fog
lights are illuminated.
& Steering responsive fog
lights system (models with
EyeSight system) The steering responsive fog lights system
automatically turns the front fog light on
and off based on the steering angle and
vehicle speed when entering a curve or
driving on curved roads. The system is
intended to help prevent accidents by
enabling better visibility of curves ahead
and early recognition of any disabled
vehicles or other obstacles.
The front fog light on the inside of a curve
will turn on if all of the following conditionsInstruments and controls/Headlight beam leveler
– CONTINUED –3-99
Page 229 of 594

Instruments and controls/Fog light switch
are met.
. The light control switch is in the “
”
position
. The light control switch is in the
“ AUTO ” position and the low beam head-
lights turn on automatically
. The fog light switch is in the “
”
position
. The low beam mode is selected (the
turn signal lever is in the center position)
. The select lever is in a position other
than the “ R ” position
. The steering responsive fog lights
system has not been deactivated
. The operating conditions such as the
steering angle and vehicle speed are met
The front fog lights on both sides will turn
on as usual if all of the following conditions
are met.
. The light control switch is in the “
”
position
. The light control switch is in the
“ AUTO ” position and the low beam head-
lights turn on automatically
. The fog light switch is in the “
”
position
. The low beam mode is selected (the
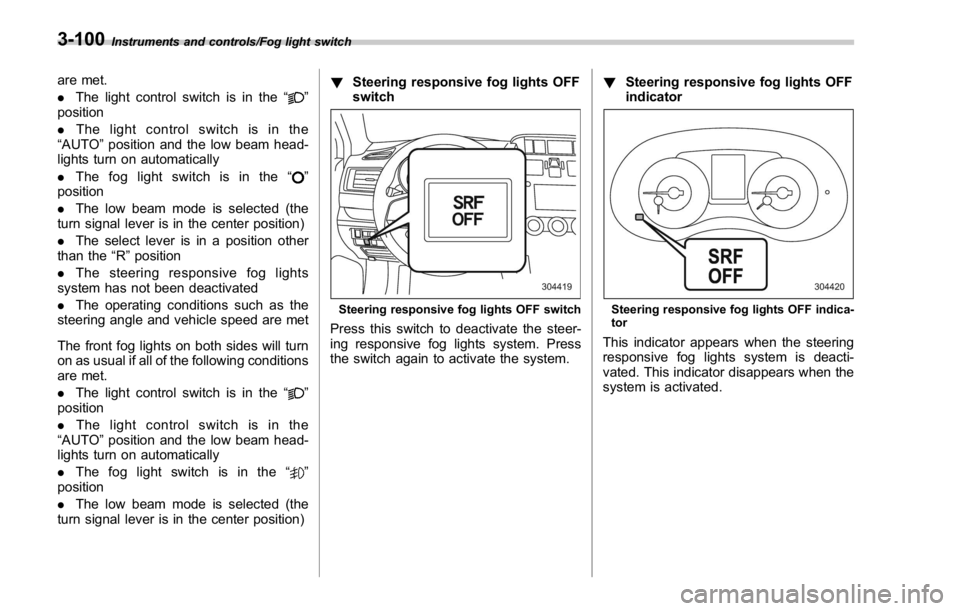
turn signal lever is in the center position) ! Steering responsive fog lights OFF
switch
Steering responsive fog lights OFF switch
Press this switch to deactivate the steer-
ing responsive fog lights system. Press
the switch again to activate the system. ! Steering responsive fog lights OFF
indicator
Steering responsive fog lights OFF indica-
tor
This indicator appears when the steering
responsive fog lights system is deacti-
vated. This indicator disappears when the
system is activated.3-100
Page 232 of 594
! Windshield washer
To wash the windshield, pull the wiper
control lever toward you. The washer fluid
sprays until you release the lever. The
wipers operate while you pull the lever. NOTE
The windshield washer fluid warning
indicator appears when the washer
fluid level in the tank has dropped to
the lower limit. If the warning indicator
appears, refill the tank with fluid. For
the refilling procedure, refer to “ Wind-
shield washer fluid ” F 11-38.Mirrors Always check that the inside and outside
mirrors are properly adjusted before you
start driving.
& Inside mirror
The inside mirror has a day and night
position. Pull the tab at the bottom of the
mirror toward you for the night position.
Push it away for the day position. The
night position reduces glare from head-
lights. Instruments and controls/Mirrors
– CONTINUED –3-103